A Guide to Vehicle Night Vision Systems
Your headlights are great, but they have their limits. Vehicle night vision is about seeing what’s lurking in the shadows far beyond your high beams. By using either thermal imaging or image intensification, this tech reveals hidden hazards in total darkness, turning a dangerous drive into a controlled, tactical advantage.
This isn't just a gadget for sci-fi movies. It’s a critical tool for anyone operating after dark, whether you're law enforcement on patrol, a hunter tracking game, or an overlander exploring remote trails.
Seeing Clearly In Complete Darkness
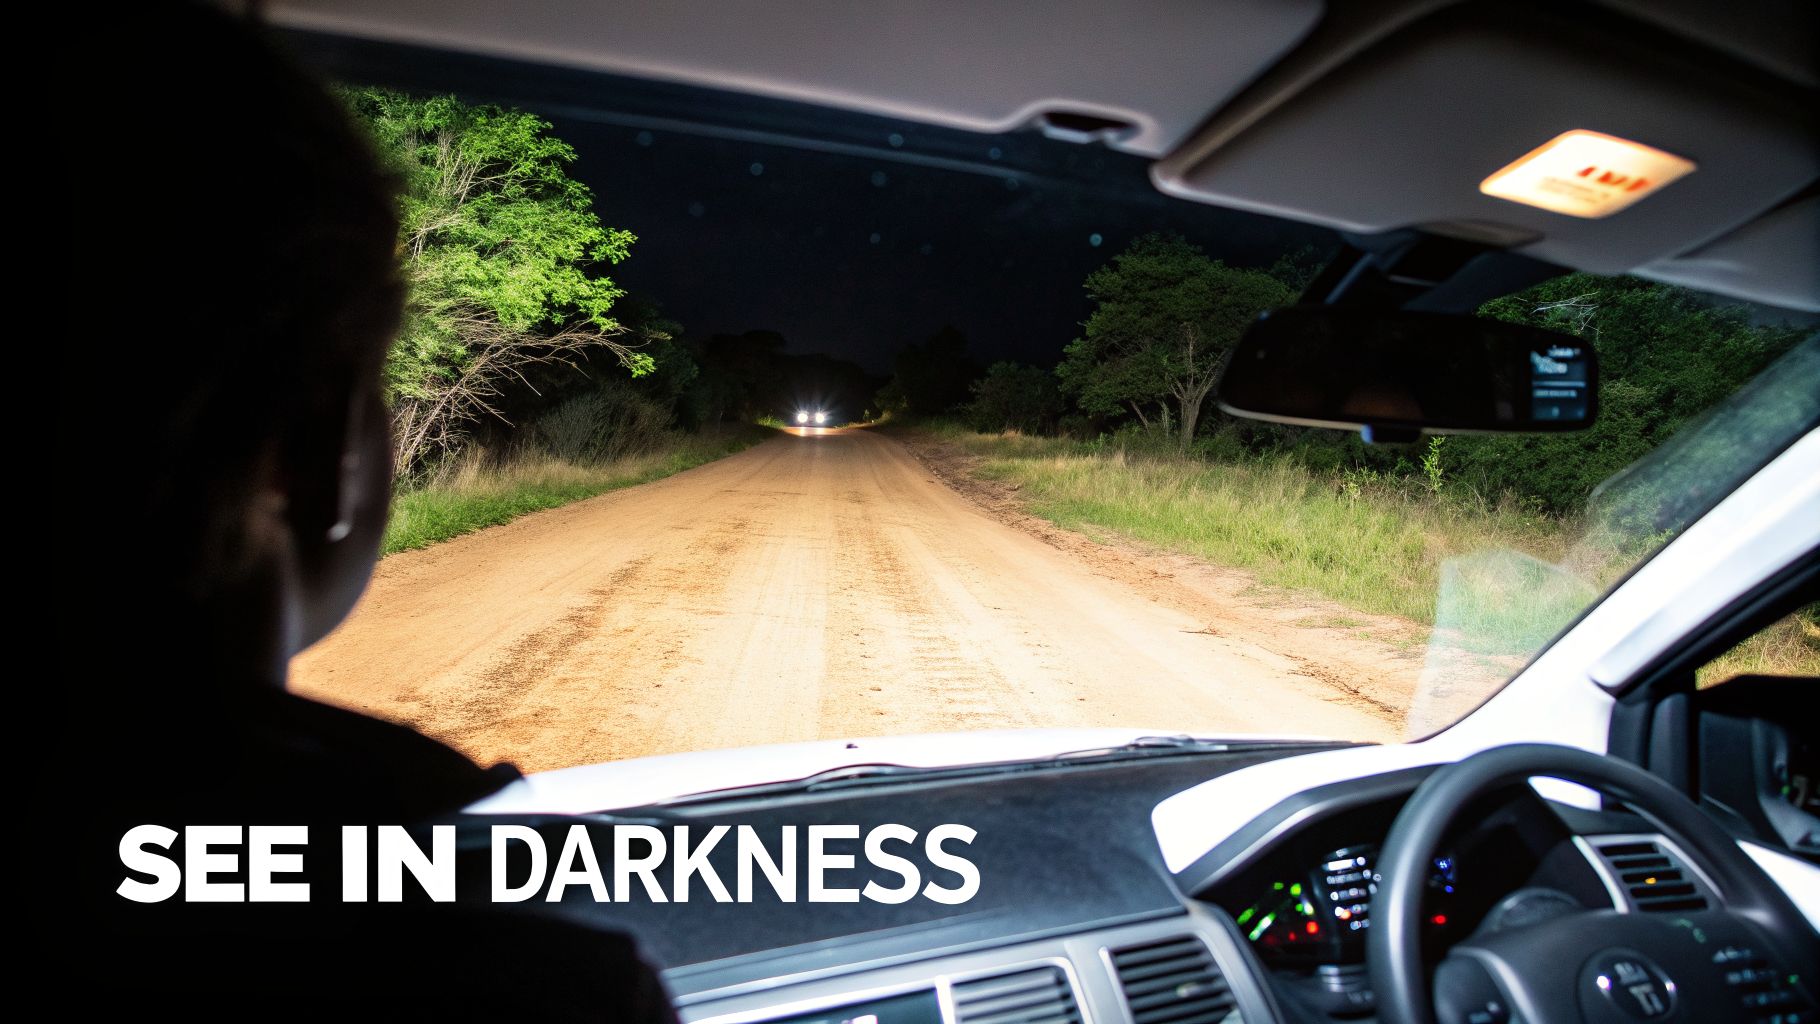
Let's be honest, driving after sundown is inherently risky. Your visibility is drastically reduced, and your reaction time shrinks with it. On a remote trail or a high-stakes patrol, what you can't see is your biggest enemy. Vehicle night vision isn't just an accessory; it’s a fundamental upgrade for safety and mission success.
Instead of getting bogged down in overly technical jargon, we're going to break down the two main technologies in a way that makes sense for real-world use. By looking at this equipment through the lens of tactical, hunting, and security applications, you'll see exactly how it gives you an edge. The goal is simple: to help you see everything your headlights miss.
The Two Core Technologies
The world of vehicle night vision is split down two different paths. Each technology has its own distinct strengths, and understanding the difference is the first step to choosing the right system for your needs.
- Thermal Imaging: Think of this as seeing heat. These systems don’t need any light at all. They detect the infrared energy—the heat signature—that every object gives off. This creates a picture based on temperature differences, making a warm-bodied animal or person glow brightly against a cooler background, even in pitch-black conditions.
- Image Intensification: This is the classic "green screen" night vision you’ve probably seen in movies. It works by collecting tiny amounts of ambient light from the moon, stars, or even distant city glow and amplifying it thousands of times to create a visible, detailed image.
Even with high beams, you're limited to seeing about 500 feet ahead, which gives you precious little time to react at speed. In contrast, a good thermal system can detect the heat signature of a deer or person up to 300 meters away, spotting threats long before your headlights pick them up. The safety impact is huge; some studies have even shown nighttime insurance claims drop by as much as 20% for vehicles equipped with this technology.
Vehicle Night Vision At a Glance
To make the choice a bit clearer, here’s a quick comparison of how these two systems stack up for use in a vehicle.
| Technology Type | How It Works | Best For | Key Advantage |
|---|---|---|---|
| Thermal Imaging | Detects heat signatures (infrared energy) to create a black-and-white or color-palette image. | Detecting living targets (people, animals) in complete darkness, fog, or smoke. | Unmatched detection capability. It sees through obscurants and requires zero ambient light. |
| Image Intensification | Amplifies existing ambient light from sources like the moon and stars to create a visible, green-hued image. | Navigating terrain and identifying specific details on objects when some ambient light is present. | Provides a more detailed, recognizable image of the environment itself, not just heat sources. |
Getting this foundation right is critical. If you want to go deeper into the science behind it all, you might be interested in our guide on how night vision works. Now, let's look at how this technology evolved from its military roots into the incredible systems we have available today.
The Evolution of Night Vision Technology
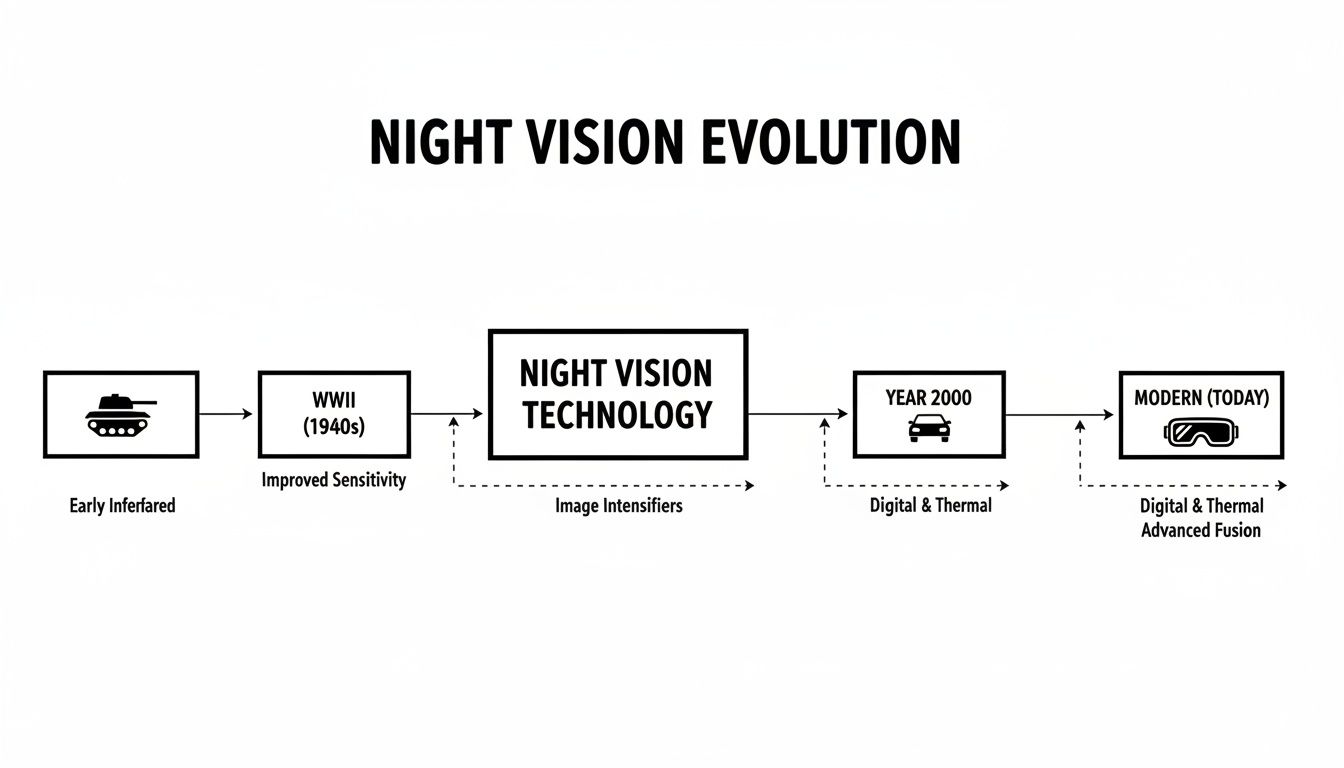
The night vision system in your truck wasn't born in a car factory. Its story begins on the battlefield, where the ability to own the night meant the difference between life and death. Long before it was helping drivers spot deer on a dark road, this technology gave soldiers a decisive edge after sundown.
The basic idea of seeing in the dark isn't new. The first crude experiments date back to the early 20th century, but things got serious during World War II. Those early devices were a far cry from the sleek cameras we use now—they were bulky, power-hungry, and clumsy. But they worked.
From Battlefield to Bumper
The most infamous early setup was the German "Vampir" system, mounted on Panther tanks towards the end of the war. These were massive, active infrared units. Think of a huge spotlight, but one that projected light invisible to the naked eye, which a special viewer could then see. Primitive, yes, but it was a revolutionary leap that allowed tank crews to fight effectively long after the sun went down.
After the war, the technology improved in stages. If you’ve ever looked into buying a PVS-14, you'll be familiar with the concept of "Generations."
Generation 0 & 1: These were the direct descendants of the Vampir. They were "active" systems, meaning they had to blast the area with an infrared (IR) illuminator to see. The problem? Anyone else with night vision could see that bright IR signature from miles away.
Generation 2: This is where things got interesting. The introduction of the micro-channel plate (MCP) was a game-changer. Gen 2 devices became incredibly efficient at amplifying faint ambient light from the moon and stars. This drastically reduced the need for that giant, giveaway IR spotlight, creating the first truly "passive" systems perfect for staying hidden.
This relentless, military-funded progress eventually paved the way for civilian use. Suddenly, the idea of giving an ordinary driver superhuman night sight wasn't just a fantasy.
The transition from specialized military gear to a consumer safety feature demonstrates a technology's maturity. Once an advantage reserved for elite units, seeing in the dark is now an accessible tool for improving situational awareness for everyone.
The real breakthrough for drivers came right at the turn of the millennium. In 2000, Cadillac put a thermal night vision system in its DeVille sedan. It was a landmark moment. The system used a passive infrared camera built by Raytheon, a top defense contractor, to spot the heat signatures of people and animals far beyond the glow of the headlights. This crossover from military to automotive tech was the starting gun, and other manufacturers quickly jumped into the race. You can read early reports on the subject to see just how big of a deal this was at the time.
Today, the same principles that kept soldiers safe now help pros and enthusiasts navigate with confidence. The hardware has gotten smaller, more powerful, and much more affordable, making a high-quality vehicle night vision system a non-negotiable piece of kit for anyone serious about operating in low light.
Thermal Imaging vs. Image Intensification
When you're looking at adding night vision to a vehicle, your choice really comes down to two core technologies. One sees heat, the other amplifies light. While both will absolutely let you own the night, they get there in completely different ways, which makes each one the right tool for specific jobs and environments.
Think of thermal imaging as a completely different way of seeing. It doesn't use light; it sees the world through infrared energy—or heat. Every single thing, from an engine block that was just running to a deer standing in a field, puts out a heat signature. A thermal camera grabs that energy and turns it into a picture, giving you that classic black-and-white or color-palette view where hot things glow brightly against a cooler background.
This is thermal's superpower. It needs zero light to work. You could be in the darkest, most remote forest on a moonless, overcast night, and it won't matter. It will also slice right through smoke, fog, or dust that would blind the naked eye or other types of night vision.
The Power of Seeing Heat
This makes thermal an absolute monster when it comes to detection. If your main goal is simply to find something alive out there—a person, a coyote, a lost cow—thermal is your go-to. The heat radiating off a living body creates a stark contrast against the cold ground and trees, making targets pop right out on the screen.
A law enforcement officer, for example, can scan a dense treeline and immediately spot a suspect trying to hide where regular night vision would just see a wall of leaves. For a hunter, it means scanning a pitch-black field and seeing the glowing shape of a predator long before it ever crosses into the beam of a spotlight.
Key Takeaway: Thermal imaging is all about detection. It definitively answers the question, "Is something out there?" It sees heat signatures that are totally invisible to our eyes, no matter how dark it is or what’s in the air.
The technology behind this has come a long way. What started as bulky, specialized military gear has evolved into the sophisticated systems we can mount on our vehicles today.
This progression shows a clear path of constant refinement, making these systems smaller, more powerful, and more accessible than ever before.
Amplifying a Whisper of Light
On the other side of the coin, you have image intensification (I²). This is the "classic" green-tinted night vision most people think of. Instead of seeing heat, it acts like a massive light amplifier for your eyes. It gathers the faintest traces of ambient light—from the moon, the stars, or even distant city glow—and multiplies it thousands of times to create a visible image.
Unlike thermal, I² gives you a much more detailed and recognizable picture of the world. You can see the texture of the ground, identify specific obstacles, and even read signs. This level of detail is critical for actually navigating and making sense of your surroundings. It's built for identification.
An off-roader trying to pick a line through a rocky trail at night needs that detail to see the ruts, rocks, and drop-offs. The big catch, however, is that it's completely dependent on having some light to work with. In a place with no light at all, like a sealed building or a deep cave, an image intensifier is blind without an external IR illuminator to provide a light source.
If you want to go deeper on these differences, you can learn more about thermal imaging vs. night vision in our detailed article. Really understanding what each one does best is the first step to choosing the right gear.
A Quick Comparison
So, which one is for you? It all comes down to your primary mission. One isn't flat-out "better" than the other; they're just different tools for different tasks.
| Feature Comparison | Thermal Imaging | Image Intensification |
|---|---|---|
| Primary Function | Detection of heat sources | Identification of objects and terrain |
| Light Requirement | None; works in total darkness | Requires some ambient light (moon, stars) |
| Performance in Fog/Smoke | Excellent; sees through obscurants | Poor; cannot see through obscurants |
| Image Detail | Lower; shows heat shapes | Higher; shows detailed, recognizable images |
| Best Use Case | Spotting people or animals quickly | Navigating terrain and identifying details |
Think of it this way: a security team protecting a large, dark property would almost certainly choose thermal to instantly spot an intruder. But a driver who needs to identify specific hazards on a dark road might prefer the crisp, detailed view from an I² system. The mission always dictates the gear.
Alright, you've got the basics down on thermal versus image intensification. Now it's time to dig into the specs that really separate the serious gear from the cheap toys. Forget the marketing hype—we're talking about the numbers that dictate what you can actually see and how well you can react when things go dark.
These metrics aren't just for nerds to argue about on forums. They have a direct, real-world impact on performance. A system with poor specs can be worse than useless; it can be a dangerous distraction. Let's break down what truly matters.
Range: Detection, Recognition, and Identification
When someone talks about a system's "range," don't just take a single number at face value. In the night vision world, we break range down into three distinct levels, a concept known as DRI. Understanding this is crucial for managing your expectations of what a unit can do at different distances.
- Detection: This is the furthest distance you can tell something is out there. It might just be a single hot pixel on a thermal screen or a faint flicker in an I² tube. You don't know what it is, but you know it’s not just empty space.
- Recognition: As you get closer, you can start to classify the object. You can tell the difference between a person, a vehicle, or an animal. The general shape becomes clear.
- Identification: This is where you can make a positive ID. You can see specific, identifying details—is that person holding a rifle or a shovel? Is that a coyote or a neighbor's dog?
Picture this: you're on a dark ranch road. Your thermal unit detects a heat signature at 800 meters. As you drive closer, at 400 meters, you can recognize it's a large, four-legged animal. Finally, at 150 meters, you can clearly identify it as a buck with a full rack of antlers, not a lost cow from the next pasture over. That's DRI in action.
Resolution and Field of View
Image clarity and situational awareness are defined by two specs that are always in a balancing act: Resolution and Field of View (FoV).
Resolution, measured in pixels (like 640×480), is all about image detail. More pixels mean a sharper, cleaner image, which is what allows you to identify targets at greater distances. It’s the difference between seeing a blurry blob and being able to count the points on that buck's antlers.
Field of View (FoV), on the other hand, is measured in degrees and tells you how wide your viewing window is. A wide FoV is fantastic for situational awareness, like navigating a tight trail or scanning an open field. The trade-off? A wider view spreads the sensor's pixels out, which can reduce how far away you can identify a specific target.
A high-resolution sensor (e.g., 640×480) with a narrow FoV is a marksman's dream, perfect for spotting game from a hide. But for an off-roader trying not to drive into a ditch, a wider FoV is far more valuable.
This is exactly why high-end automotive systems are becoming so common. The automotive night vision market is on track to hit USD 10.56 billion by 2032, with luxury and commercial fleets leading the charge. These systems often boast 90% detection accuracy for pedestrians out to 300 meters—well beyond the 120-meter reach of even the best headlights. That massive R&D investment trickles down, making incredibly capable systems available for the rest of us. You can find more details in this automotive market research.
Refresh Rate and Thermal Sensitivity
Finally, let's talk about two specs that dramatically affect how the image feels and performs in real-time: refresh rate and thermal sensitivity.
Refresh Rate, measured in Hertz (Hz), dictates how smoothly motion appears on screen. Think of it like frames-per-second in a video. A higher rate (30Hz or 60Hz) gives you a fluid, seamless image that’s essential when you or your target are moving. A low, choppy rate (like 9Hz) is disorienting in a moving vehicle and can make tracking anything a real nightmare.
Thermal Sensitivity, often listed in milliKelvins (mK), is a measure of how well a thermal camera can see tiny temperature differences. The lower the mK number (e.g., <50mK), the more sensitive the unit is. This sensitivity creates a high-contrast image packed with detail, allowing you to pull a target out from a background that's a similar temperature. It’s what lets you see the texture on an animal's fur or the tread on a vehicle's tires.
To make sense of all these numbers, it helps to see them side-by-side. These are the core specs you'll encounter when comparing different night vision and thermal systems for your vehicle.
Night Vision Performance Spec Breakdown
This table breaks down the most important performance metrics, what they measure, and why they should matter to you when outfitting a vehicle.
| Metric | What It Measures | Why It Matters for Vehicle Use |
|---|---|---|
| DRI Range (m) | Distances for Detection, Recognition, and Identification. | Tells you the practical, effective distance for spotting hazards vs. positively identifying threats. |
| Resolution (pixels) | The amount of detail the sensor can capture (e.g., 640×480). | Higher resolution means a clearer image, making it easier to identify objects at a distance without squinting. |
| Field of View (degrees) | The width of the observable scene at any given moment. | A wider FoV is better for navigation and peripheral awareness, while a narrow FoV is for long-range observation. |
| Refresh Rate (Hz) | How many times per second the image updates. | A high refresh rate (30Hz+) is critical for smooth viewing from a moving vehicle and tracking moving targets. |
| Thermal Sensitivity (mK) | The smallest temperature difference the sensor can detect. | A lower mK number (<50mK) provides a higher-contrast, more detailed image, especially in low-contrast conditions. |
Ultimately, choosing the right system is about matching these specifications to your specific needs. A security professional scanning a perimeter has different priorities than an overlander navigating a dark trail, and understanding these specs is the first step toward making an informed decision.
Integrating a System with Your Vehicle
So, you've got your hands on a powerful vehicle night vision system. That's the easy part. The real work begins with installation, because a top-tier unit is only as good as its setup. A sloppy install will give you nothing but headaches and unreliable performance.
Getting it right means thinking through the entire process—where to mount the gear, how to power it cleanly, and how to keep it running cool. Thankfully, whether you're aiming for a clean factory look or a rugged, no-nonsense rig, there’s an integration path that fits your vehicle and your mission.
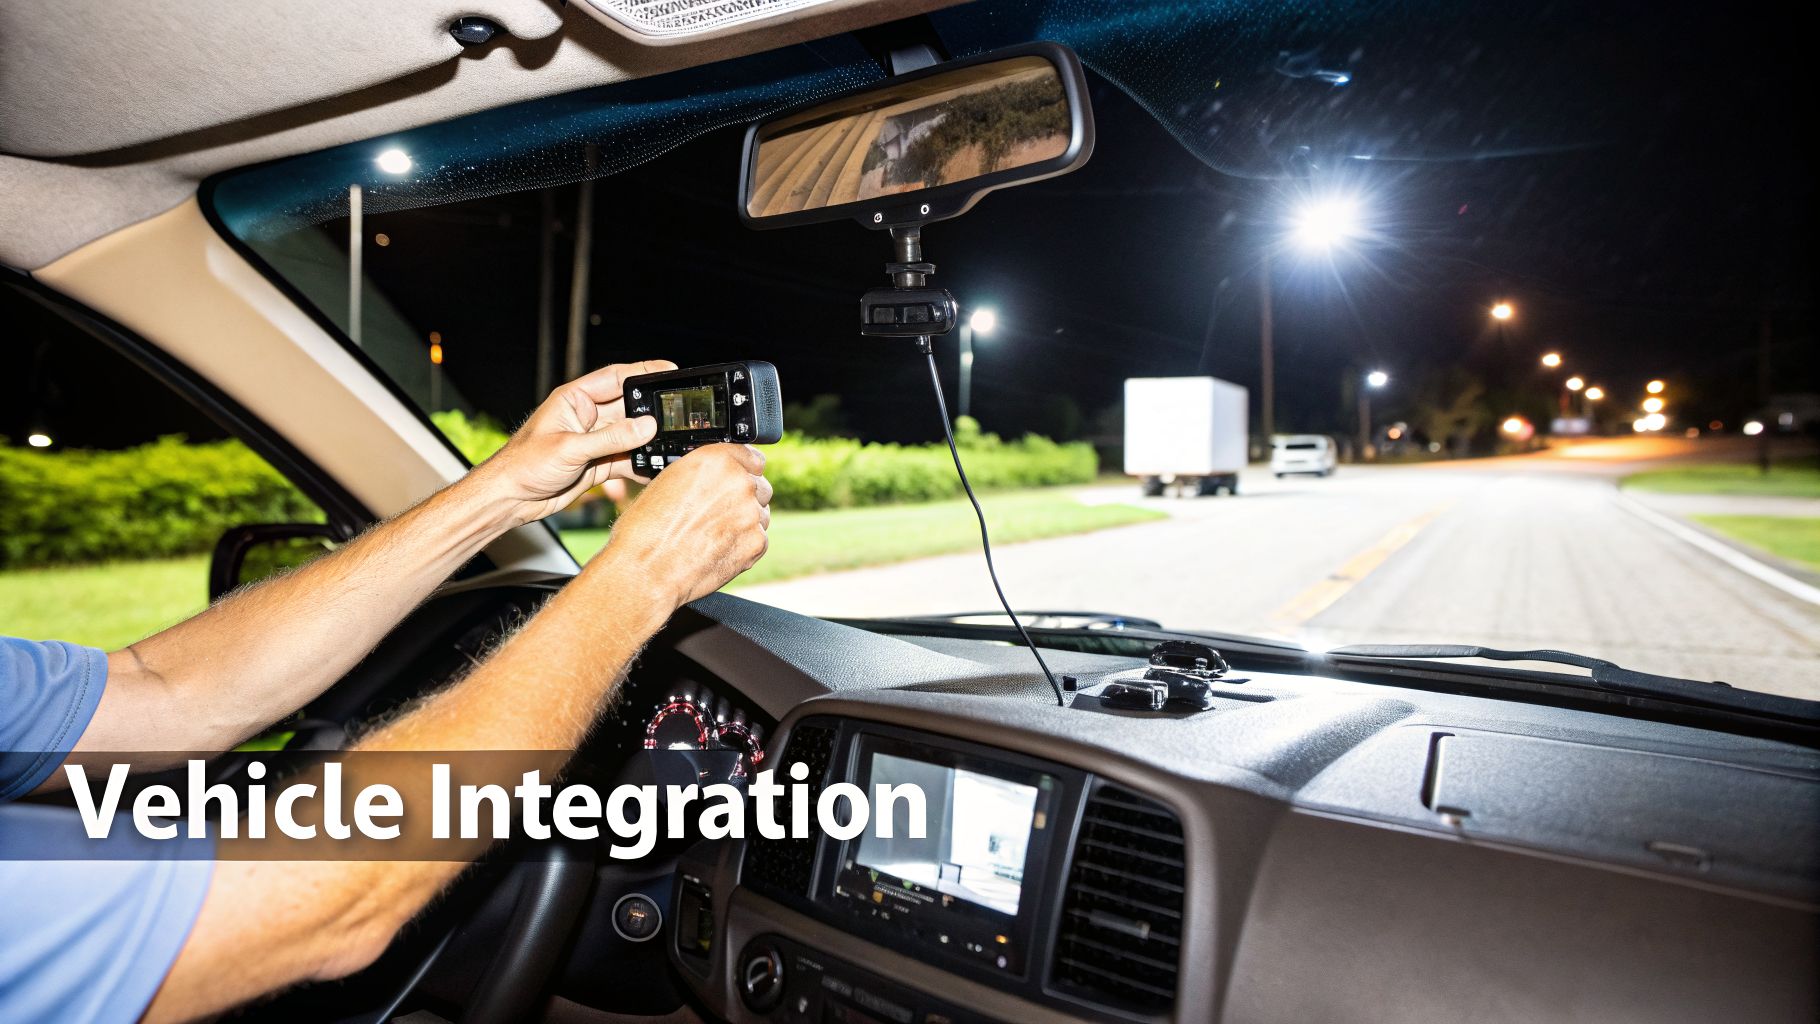
Mounting Your Camera and Display
Think of this like setting up a rifle scope. The placement of your camera and display is everything. Get it wrong, and it’s either useless or a dangerous distraction. The goal is a crystal-clear view that you can reference with just a flick of your eyes.
- Camera Placement: The camera itself belongs at the front of the vehicle. Most guys go for the grille, the front bumper, or tucked away behind the windshield. A grille mount is a popular choice; it’s protected, centered, and gives you a perspective similar to the OEM systems found in high-end trucks and SUVs.
- Display Integration: You need that video feed somewhere you can see it without taking your eyes completely off the road. This can be a dedicated screen on the dash, an integration with your truck’s existing infotainment system, or even a replacement rearview mirror with its own built-in monitor.
For a dedicated patrol vehicle or off-road build, a tough, adjustable dash mount for a separate monitor offers the best flexibility. If you're outfitting your daily driver, tying the feed into the factory screen gives you that clean, from-the-factory appearance.
Pro Tip: Pay close attention to the camera's field of view during mounting. A centered position gives you a balanced, intuitive picture of the road ahead. Off-center mounts can work, but they often skew your depth perception and take some getting used to.
Powering Your System Safely
Your night vision system will need a stable 12V power source. Wiring it correctly is non-negotiable if you want to avoid a dead battery or, worse, electrical gremlins. The trick is to tap into a circuit that powers on and off exactly when you want it to.
Tying into an ignition-switched circuit is the go-to method for most installs. This means the system is only active when the vehicle is running, completely eliminating any risk of draining your battery overnight. The cleanest way to do this is with a fuse tap in your vehicle's fuse box, pulling power from a circuit like the radio or a 12V accessory port.
For those who want total manual control, wiring the system directly to the battery through its own dedicated switch and relay is another solid option.
Heatsinking and Illumination
Here are two details that are easy to forget but have a massive impact on performance: heatsinking and illuminator placement.
Thermal cameras generate a surprising amount of heat. Without a way to get rid of it, the image can get noisy and degrade, or the unit might even shut itself down to prevent damage. Any quality system will have heatsinks built in, but you have to do your part by mounting the camera where it can get plenty of airflow.
For active I² systems using an infrared illuminator, placement is just as critical. You’re essentially aiming a spotlight only your camera can see. Mount the illuminator as high and as far forward as you can to throw a clean beam down the road and, just as importantly, to avoid reflecting off your vehicle's hood. If you want to dive deeper into this, check out our guide on infrared lighting for cameras to see how different setups compare.
Putting in the effort on the install ensures your gear will be ready to perform flawlessly every time you hit the switch, giving you a decisive edge when the sun goes down.
Finding the Right Night Vision System for Your Mission
There's no single "best" night vision system for a vehicle. The real question isn't "what's best?" but "what's best for what I do?" The ideal setup for a law enforcement cruiser is worlds apart from what an overlander needs to crawl a trail at 2 AM.
Instead of getting lost in spec sheets, let's focus on the mission. Think about what you'll be doing with your vehicle in the dark. We've built out a few common profiles below. See which one fits you best and use it as a guide to building out your perfect system.
The Dedicated Hunter
For the hunter, the game is all about detection. Your goal is to spot that buck from a quarter-mile away, often in total darkness and sometimes through morning fog or light brush. Your truck becomes a mobile blind, letting you scan huge tracts of land without leaving a scent trail.
Your Go-To Tech: This is thermal imaging territory, hands down. Nothing else comes close to its ability to spot a warm body against a cool background. A deer will literally glow on your screen, making it pop from the landscape in a way image intensification simply can't match, especially against natural camouflage.
What Specs Matter: Pay close attention to resolution and thermal sensitivity. You want at least a 384×288 sensor, but a 640×480 is a serious upgrade. This, combined with a low mK number (your sensitivity rating), gives you a sharp enough picture to not just see a heat blob, but to identify it—is that a buck or a doe? A coyote or the neighbor's dog?
Setup and Rigging: Keep it simple and rugged. A thermal camera on the grille or a roof rack, wired to a monitor on your dash, is all you really need. This isn't about looking slick; it's about having a tough, reliable workhorse that helps you fill your tag.
The Law Enforcement Officer
An officer on patrol faces a constantly shifting set of threats. One minute, you're trying to spot a suspect hiding in a pitch-black alleyway; the next, you're trying to read a license plate without giving away your position. This job demands a powerful mix of both detection and identification capabilities.
Your Go-To Tech: Thermal imaging is the priority. Being able to see a person's heat signature through bushes, behind a car, or ditched in a dark field is a tactical game-changer. For agencies with the budget, a high-end fusion system that overlays thermal and image intensification is the ultimate tool, giving you both heat detection and crucial environmental detail.
What Specs Matter: You need detection range and a high refresh rate (30Hz or 60Hz). Period. Seeing a threat from as far away as possible is critical, and a high refresh rate ensures the image is smooth and clear when tracking a person or vehicle from a moving patrol car. A choppy, low-hertz feed is a major liability in a high-stakes situation.
Setup and Rigging: This requires professional integration. The video feed should be cleanly routed to an existing MFD (Multi-Function Display) or a dedicated, securely mounted monitor. The system must be wired into the vehicle's ignition for "always-on" readiness. When a call comes in, you don't have time to be fumbling with power buttons.
A vehicle NVD isn't just for driving. For law enforcement, it's a powerful surveillance platform. It allows officers to safely clear a perimeter, observe a developing situation from a standoff distance, and gather intel without putting themselves in harm's way.
The Off-Road Adventurer
For the overlander or weekend trail warrior, the mission is all about seeing the terrain. The biggest threats out there aren't people hiding in the dark—they're the ruts, rocks, and unexpected drop-offs that can bring your adventure to a grinding, expensive halt.
Your Go-To Tech: This is one of the few places where Image Intensification (I²) often makes more sense. An I² camera gives you a familiar, detailed view of the path ahead, letting you judge depth, texture, and shadows. While thermal is great for spotting a wandering moose, it tends to flatten the terrain, making it dangerously hard to see that deep hole or patch of water right in front of you.
What Specs Matter: A wide Field of View (FoV) is your best friend. You need that peripheral vision to see where your tires are about to go and what's coming up on the sides of the trail. It's less about seeing a mile down the road and more about seeing everything within 50 yards, perfectly.
Setup and Rigging: A grille-mounted I² camera paired with a powerful, externally-mounted IR illuminator is a killer combination. The IR illuminator acts like a stealthy spotlight, painting the trail with invisible light that your camera can see, giving you a crystal-clear picture of every obstacle without the blinding glare of traditional light bars. For the display, a simple, dedicated dash screen is the most practical choice for most off-road rigs.
Frequently Asked Questions About Vehicle Night Vision
We get a lot of questions from customers who are ready to take the next step with vehicle-mounted night vision. This section is designed to give you direct answers to the most common ones we hear, covering everything from legal gray areas to practical installation concerns.
Are Aftermarket Vehicle Night Vision Systems Legal?
Generally, yes. Most states consider vehicle night vision systems to be a driving aid, just like a backup camera or GPS. Since they display information on a screen and don't project light in a way that blinds other drivers, they're typically legal for on-road use.
Where it can get tricky is with state-specific laws. Some places have rules about where you can mount a display screen in the driver's view. The use of powerful, external IR illuminators might also fall under vehicle lighting regulations. For off-road use, you're almost always in the clear. Still, it's always a good idea to check your local and state vehicle codes before you finalize your setup.
Can I Use My Helmet-Mounted PVS-14 For Driving?
While you technically can, we strongly advise against it. Driving with a helmet-mounted monocular like a PVS-14 is incredibly dangerous. The very narrow field of view creates a tunnel-vision effect, and the lack of depth perception makes it nearly impossible to judge distances or spot hazards on your periphery.
A dedicated, vehicle-mounted system gives you a stable, wide-angle image that's safely integrated into your vehicle's dash. You get far better situational awareness, which is critical when you're moving at speed. A head-mounted unit is an excellent tool, but it's built for being on foot.
How Difficult Is It to Install a System?
The difficulty really depends on the system you choose. Many modern thermal kits are designed for a straightforward DIY installation. It often just involves mounting the camera, running a cable to a display, and connecting to a 12V power source—something you can easily do with a fuse tap.
If you're looking for a more seamless setup, like routing the video feed into your vehicle’s factory infotainment screen, things get more complex. That kind of integration might require professional help to get everything talking to each other correctly. Here at Superior Tactical, we stock components and complete kits for both the die-hard DIYer and the professional installer.
What Is the Lifespan of a Night Vision Camera?
High-quality systems are built to last. A well-made thermal camera core can easily provide reliable service for over a decade with proper care. The image intensifier tubes in I² systems are just as durable, with many rated for over 10,000 hours of runtime.
The single most important factor is buying from a reputable brand that stands behind their product with a solid warranty and repair service. That's how you know your investment is protected and your gear will be ready when you need it for years to come.
At Superior Tactical LLC, we're here to provide the dependable gear and straight-shooting advice you need to own the night. Whether you need a full system or just a few key components, find the right equipment to keep you mission-ready by visiting us at https://superiortac.com.