Phone Attachment for Binoculars: Tactical Guide
You’re behind glass, on a ridgeline, in a stand, or parked on a perimeter. You’ve got the subject in your binoculars, clear enough to identify behavior, movement, and direction. What you don’t have is a fast way to preserve that view and send it to somebody else without dragging out a separate camera body and lens.
That gap is where a phone attachment for binoculars earns its keep.
A lot of people still treat digiscoping as a birdwatching trick. In the field, it’s more than that. It’s a compact documentation method for hunters who need to confirm what they saw, officers who need a visual record, and security teams who need to share what one observer is seeing before the moment is gone. The difference between a frustrating setup and a reliable one comes down to fit, alignment, and field discipline.
From Observation to Intelligence The Role of Digiscoping
A distant sighting doesn’t help much if it stays in one person’s memory.
That is the core value of a binocular phone adapter. It converts a live observation into something you can review, send, and archive while the event is still unfolding. In practical use, that means a scout can document sign from a ridge, a hunter can record antler detail before a stalk, and an officer can preserve what was visible through the optic at the time of contact.
The technology has been around long enough that it’s no longer a novelty. The smartphone digiscoping adapter emerged in the early 2010s, and a major turning point came in 2013 when Carson Optical released a $17.99 iPhone adapter that could turn standard 10x binoculars into the equivalent of a 330mm telephoto lens on a phone, making long-range imaging far more accessible than dedicated telephoto setups (New Atlas coverage of the 2013 Carson adapter).
This is relevant because many individuals already own the two expensive parts of the system. They have a smartphone. They have binoculars. The adapter is the bridge.
For operators working around low light or distance, that bridge fills a real gap between direct observation and formal imaging tools. It won’t replace a purpose-built evidence camera or a dedicated thermal recorder. It will give you a lightweight way to capture what your optic is already showing you.
A setup like this also helps close the loop between observer and team. One person sees it. The phone records it. The team gets a reference point instead of a verbal description.
For readers working in low-light observation, digital binoculars and night vision options sit in the same decision space. The common thread is simple. If your optics show you something important, you need a practical way to preserve it.
Good field documentation doesn’t start with the camera. It starts with getting the same view your eyes already trust into a format other people can verify.
Selecting an Adapter for Tactical and Professional Optics
Most adapter reviews stop at convenience. That’s not enough if your gear gets used in cold, rain, dust, darkness, or under time pressure.
The first hard truth is that the consumer market doesn’t fully cover professional optics. A documented gap exists because most consumer adapters are built around 19-53mm eyepiece diameters, while many professional night vision systems and ruggedized tactical optics use non-standard dimensions and need reinforced mounting solutions (Bresser product context on consumer adapter sizing limits).
What matters in the field
A tactical user should care about five things before brand names:
- Eyepiece fit: If the clamp doesn’t match the optic, nothing else matters.
- Retention under movement: Walking, glassing from a vehicle, or changing position exposes weak clamps fast.
- Noise discipline: Plastic creak, spring snap, and metal-on-metal contact matter more than most buyers think.
- Phone clearance: Multi-lens phones, thick cases, and off-center camera modules can make a “universal” adapter not universal at all.
- Repeatability: The best setup is the one you can remount close to perfect without starting over every time.
Clamp, magnetic, and case-based systems
Each adapter style has a role. None is perfect.
| Tactical Adapter Selection Matrix | Eyepiece Range (mm) | Deployment Speed | Durability | Best Use Case |
|---|---|---|---|---|
| Universal clamp-style adapter | 23-50mm | Moderate | Varies by plastic or metal construction | General binocular use where flexibility matters |
| Metal frame clamp adapter | 25-48mm | Moderate | Strong | Repeated field use where rigidity matters more than speed |
| Magnetic ring system | 38-45mm | Fast | Strong when properly matched | Night vision or fast transitions where thin profile matters |
| Device-specific phone case system | Model-dependent | Fast once set up | Good if supported by the case ecosystem | Users who run one phone full-time with one optic platform |
Clamp-style units are the broadest fit option. They make sense for patrol kits, mixed-use hunting packs, and teams sharing optics. The weakness is setup time. Universal usually means more adjustment.
Metal clamp systems tend to hold alignment better than lighter plastic designs. They’re less forgiving of bad fit, but when they lock in correctly, they usually stay there through panning and repositioning better than flimsy spring-only units.
Magnetic systems shine when speed matters and when the user can’t afford a bulky mount sticking out into the other eye box. That becomes much more important with night vision.
Case-based systems can be excellent if the phone model stays constant. They’re less attractive for agency gear, loaner kits, or users who upgrade phones often.
Material matters more than marketing
Plastic isn’t automatically junk. Some ABS adapters are serviceable and quiet. But heavy field use exposes where cheap polymer flexes, where springs weaken, and where knobs lose tension.
Metal-framed adapters usually give better confidence during long observation periods. They also tolerate repeated mounting cycles better. The downside is weight, edge noise, and in some designs, more potential to mar an eyepiece if the contact surfaces aren’t padded.
Look closely at these details:
- Padding at contact points: Foam or rubber matters. It protects the optic and improves grip.
- Adjustment knob size: Tiny knobs are miserable with gloves.
- Clamp geometry: Wide contact surfaces spread load better than narrow pressure points.
- Phone tray rigidity: If the phone shifts independently of the eyepiece mount, alignment drifts no matter how strong the optic clamp is.
The tactical compatibility problem
Many buyers waste money in this area.
A universal binocular adapter may fit standard daytime glass and still fail on a PVS-14, a dual-tube housing, or a thermal optic because the eyepiece is shaped differently, recessed differently, or heavier and less tolerant of side load. Consumer listings rarely address that with useful precision.
Selection rule: Buy for the optic first, then confirm the phone. Many users do the opposite and end up with an adapter that fits the handset but never fits the eyepiece.
If you’re trying to integrate mounting hardware across a broader observation kit, platforms such as the Argus A4 mount ecosystem are worth understanding because they show how accessory compatibility becomes a system problem, not a one-part problem.
What works and what usually doesn’t
What works:
- A rigid adapter matched closely to the eyepiece diameter
- Padded contact points
- A phone mount that accommodates your case, not your phone without it.
- A setup you can pre-stage and mark for repeat use
What usually doesn’t:
- One-size-fits-all adapters on non-standard tactical eyepieces
- Cheap spring clamps on slick rubber armor in wet conditions
- Bulky adapters on optics that still need normal binocular use
- Any mount chosen purely because it’s cheap
The right adapter is the one that stays boring. It goes on cleanly, aligns predictably, and doesn’t ask for attention once the glass is up.
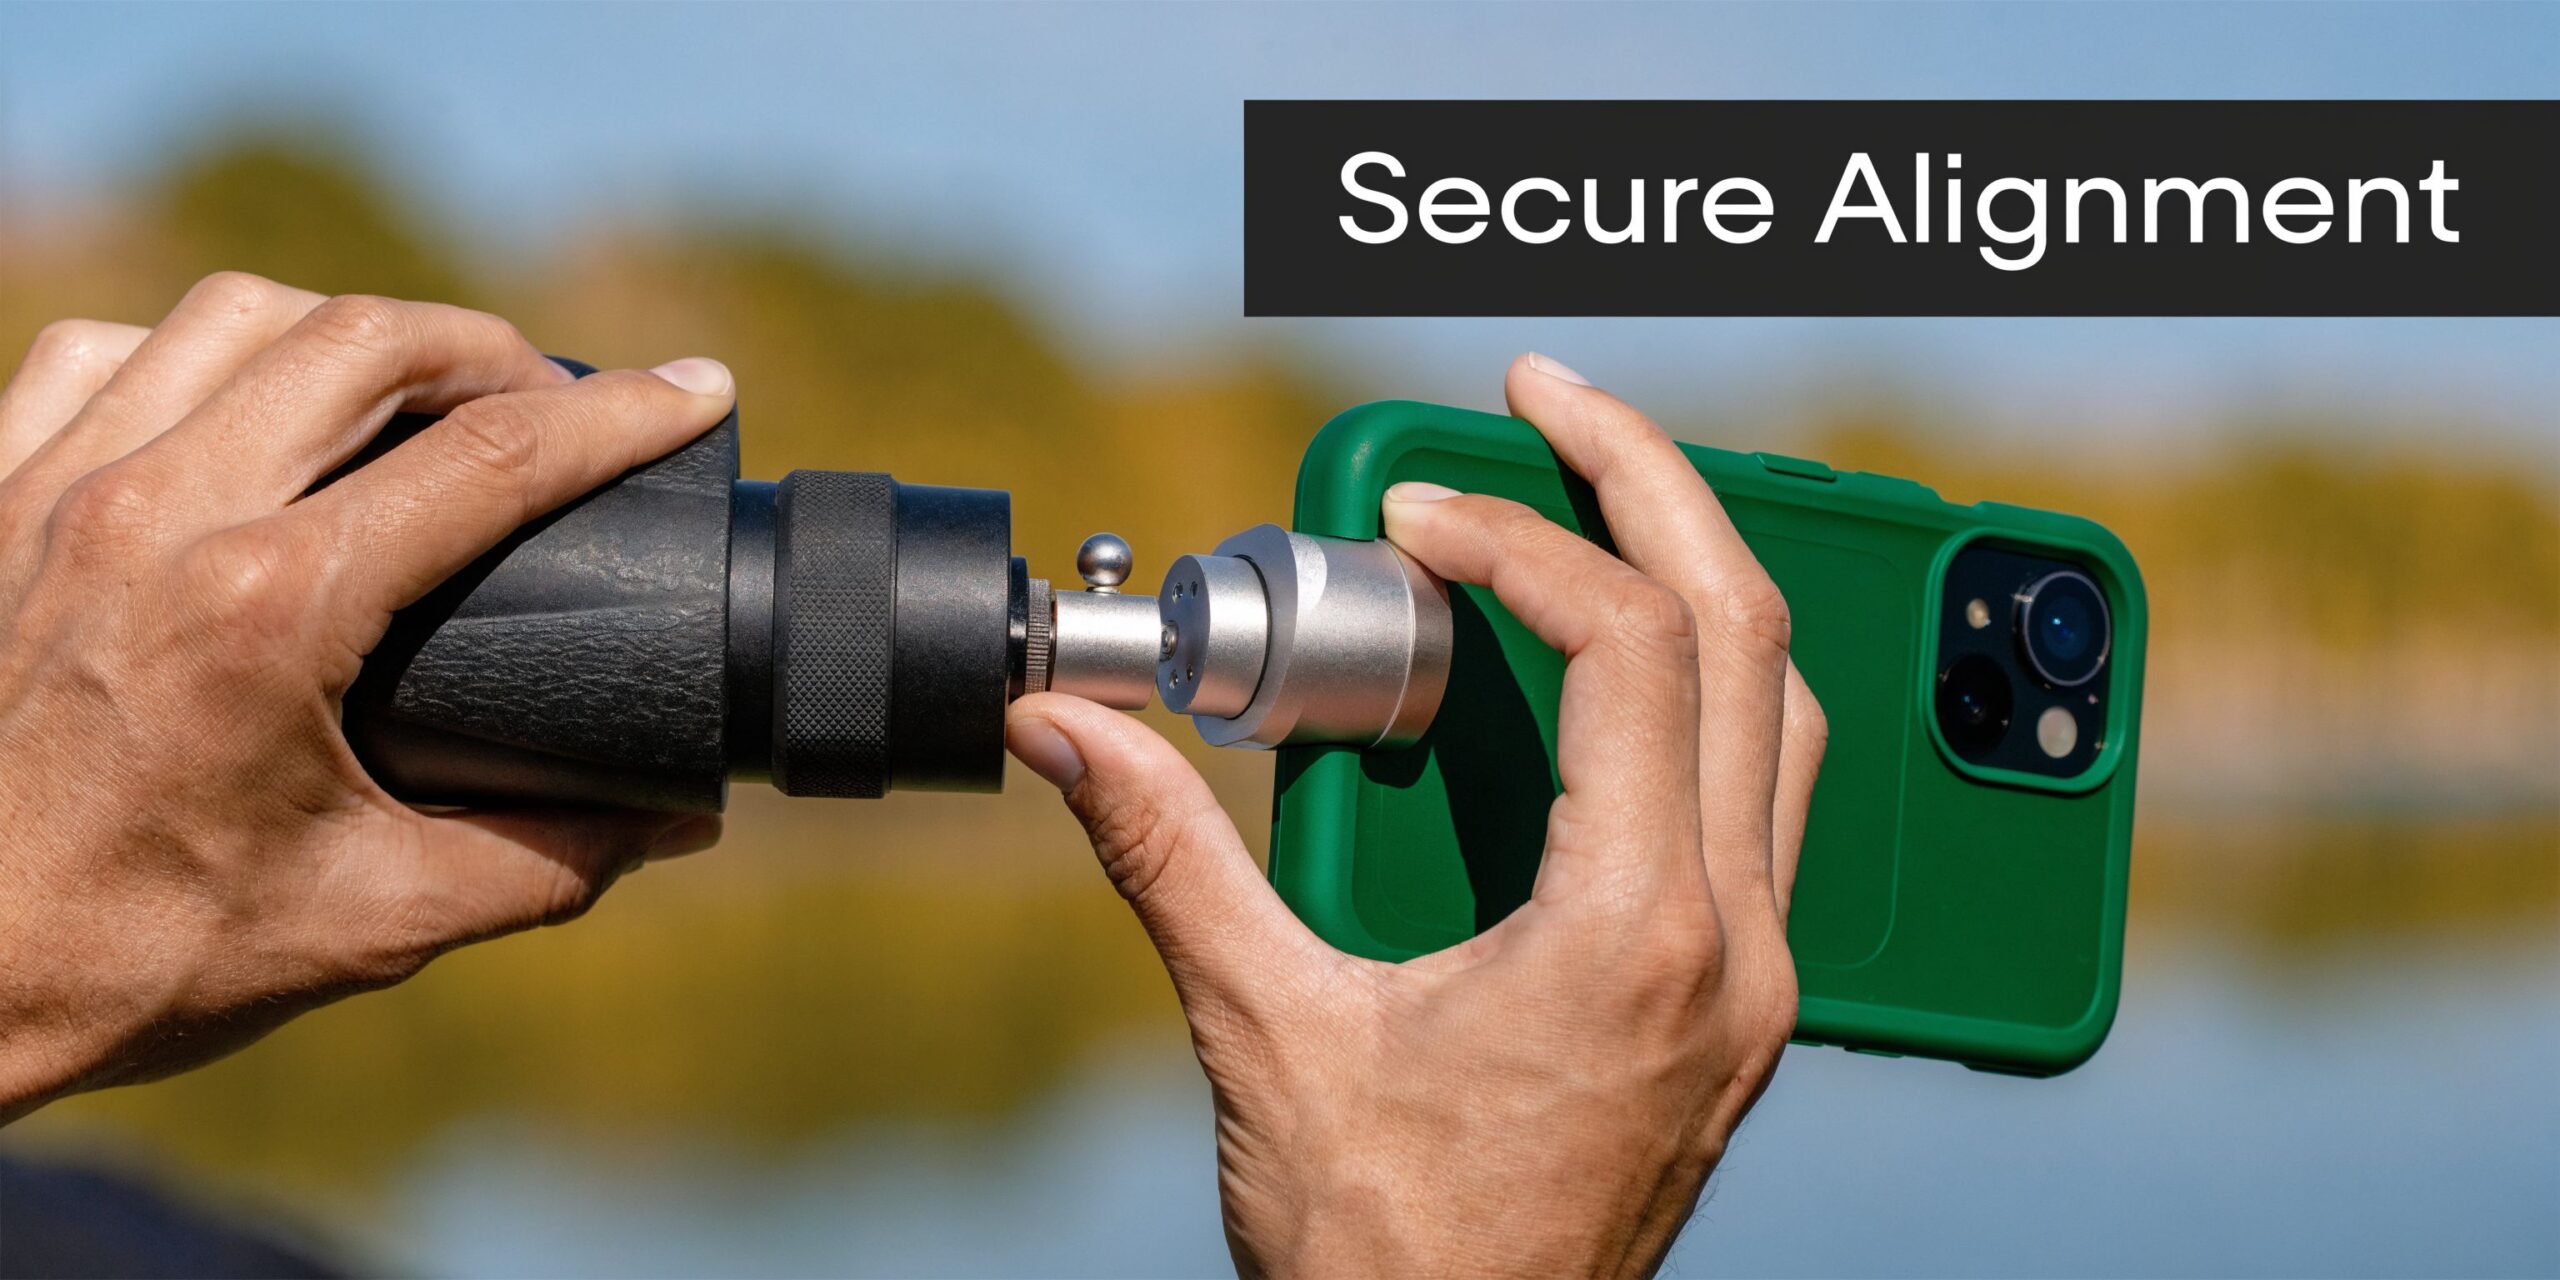
The Core Process for Secure Mounting and Alignment
A phone adapter fails in two ways. It either moves, or it never aligns correctly in the first place.
Both problems come from rushing the setup. Field tests on smartphone optic adapters found a 95% success rate in achieving rigid, unchanged positioning after alignment, but also noted that finding the sweet spot can take 2-5 minutes of trial-and-error, and 60% of first attempts show initial vignetting from misalignment (Celestron smartphone adapter guidance).
That tracks with real use. Most bad images aren’t caused by the phone camera. They’re caused by poor mechanical alignment over the eyepiece.
Start with fit before you ever mount the phone
Measure or confirm the outer diameter of the eyepiece. Don’t eyeball it and hope. An adapter that barely fits will either slip or force you to over-tighten.
If you’re using a clamp system, inspect the contact surfaces before installation. Dirt, grit, or dried mud between the clamp and eyepiece can create a tiny angle error that becomes a major optical problem once the phone is in place.
A close, stable setup looks like this in practice:
The fastest repeatable mounting sequence
Use the same order every time. That’s how you build consistency.
- Mount the adapter to the eyepiece first. Get it snug, not crushed.
- Insert the phone second. Make sure the phone is fully seated in its tray or clamp.
- Wake the camera app before fine adjustment. A live image gives immediate feedback.
- Shift the phone slowly across the exit pupil. You’re looking for the full bright circle.
- Tighten in small increments. Over-correcting one knob often throws off the whole stack.
The key is to chase symmetry, not just visibility. A partial bright image with a black crescent on one side means you’re close, but not centered.
Finding the sweet spot without wasting time
The sweet spot is the exact point where the phone camera sits over the optic’s exit pupil. You know you’ve found it when the black ring shrinks evenly and the image fills the frame as much as the adapter and optic will allow.
Three habits speed this up:
- Use the widest phone camera that aligns correctly with the eyepiece. Multi-lens phones can fool you if the app defaults to the wrong module.
- Lower screen brightness during alignment in dark conditions. It helps you see edge shading without blinding yourself.
- Watch the edges, not the center. The center often looks acceptable even when the outer field is badly clipped.
Practical rule: If you fixate on the middle of the image, you’ll accept bad alignment. Judge the setup by the outer ring.
Tighten for retention, not brute force
Most users damage performance by treating the adapter like a scope ring.
You need enough pressure to prevent rotation and drift during panning. You do not need enough pressure to deform the rubber armor or bind adjustment parts. Over-tightening can create gradual slippage because the adapter shifts as material compresses.
Use this pressure logic:
- Initial clamp pressure: Just enough to hold position while you align.
- Final pressure: One controlled increment after alignment confirms the mount.
- Recheck after movement: Pan left, right, and tilt. If the image remains unchanged, stop tightening.
If the adapter rotates after this, the issue is usually poor fit or poor contact material, not a lack of force.
Build your own indexing system
Professionals don’t reinvent alignment every outing.
Mark the adapter’s ideal orientation with a non-permanent paint marker, witness tape, or another removable reference. One mark on the adapter and one on the optic can cut setup friction dramatically. Do the same for the phone tray if your handset stays in the same case.
That small step turns a fiddly process into a known drill.
Silent setup in low light
Noise matters. A metallic click, a spring snap, or a dropped clamp in a blind or on a perimeter is avoidable.
To keep setup quiet:
- Pre-loosen adjustment knobs before you move into position.
- Mount while the optic is braced against your chest, pack, or a support.
- Use both hands deliberately instead of trying to rush one-handed unless your system was built for that.
- Seat the phone gently rather than forcing corners under tension.
A quiet setup is usually a smoother setup. Sudden motion causes more alignment errors than people realize.
The quick check before you record
Before you hit record or snap a still, verify four things:
- Edge check: No fresh vignetting after movement
- Horizon check: Phone isn’t canted unless you want it that way
- Focus check: The optic is focused first, then the phone is allowed to settle
- Retention check: A small pan doesn’t change framing
When a phone attachment for binoculars is mounted correctly, the system stops feeling improvised. It feels like part of the optic.
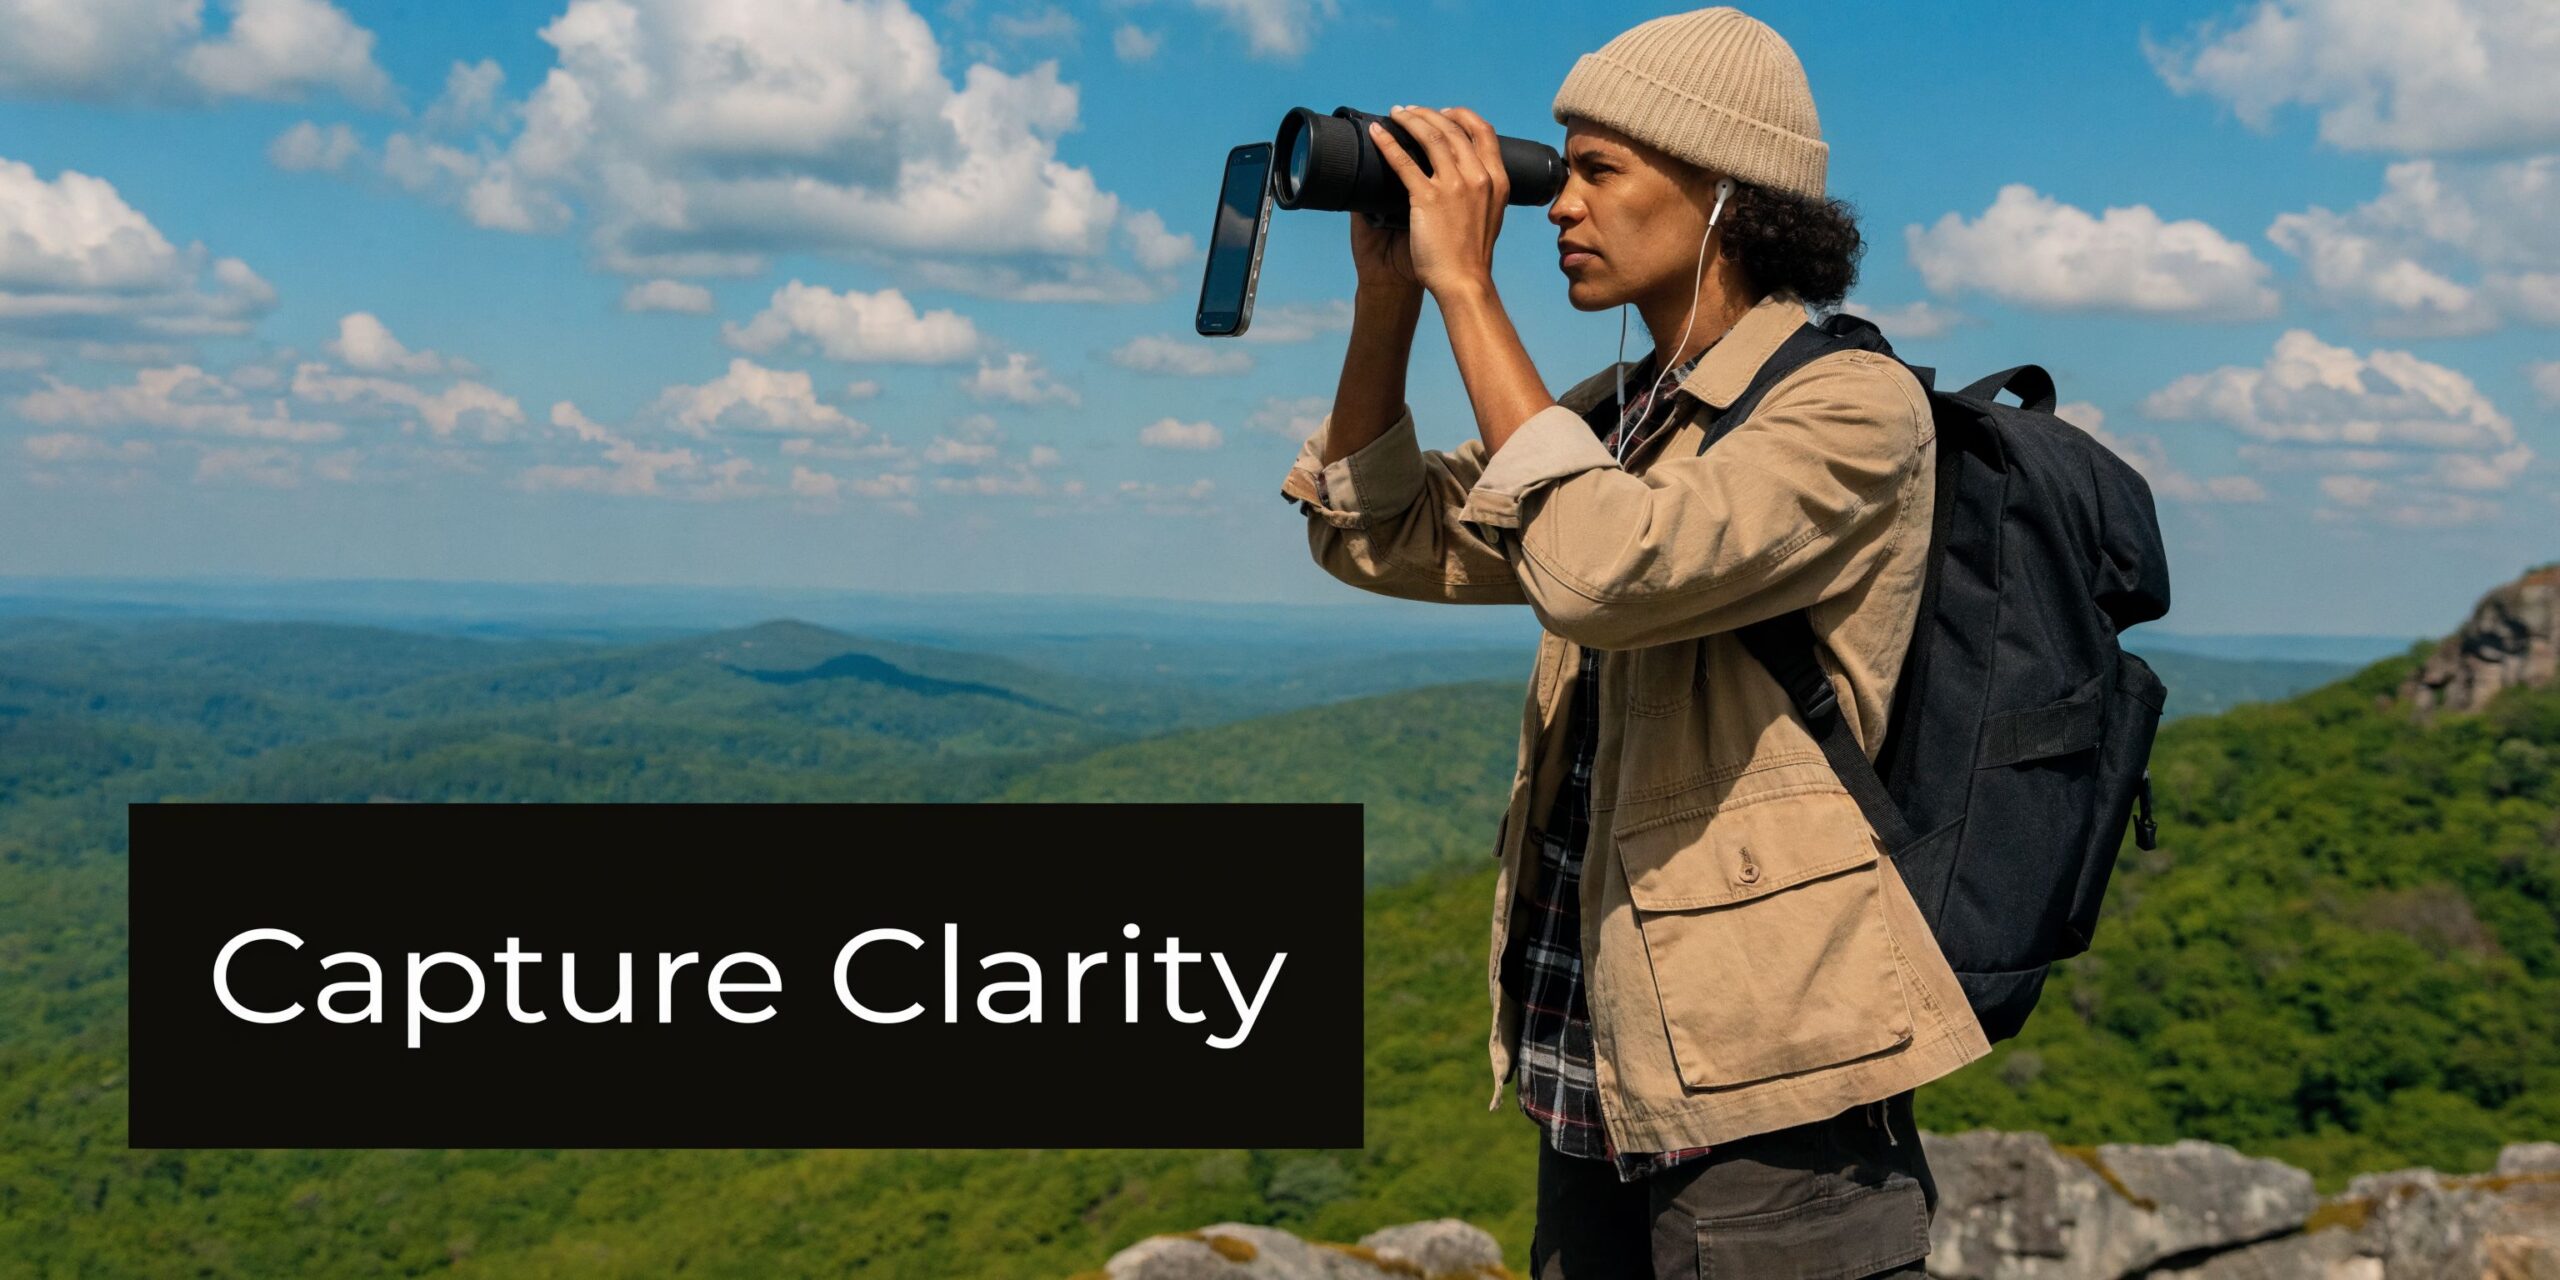
Mastering Image Capture in the Field
A stable mount can still produce useless footage if the operator handles it like a normal phone camera.
Through binoculars, every small movement gets amplified. So does every bad camera habit. The market has plenty of advice on recreational use, but there’s a documented gap around professional concerns such as vibration dampening for stabilized surveillance footage, frame rate optimization in low light, and evidentiary data handling (overview of the missing professional guidance).
Stability beats magnification
Most poor digiscoped clips fail because the user tries to force more reach instead of building more support.
Body position matters more than app settings here. If you can’t deploy a tripod, build a rest from what’s already there. A vehicle door frame, a pack, a fence post, a tree, or the edge of a blind can cut enough movement to make the footage usable.
This kind of improvised support often matters more than the adapter brand:
A few practical methods work well:
- Against a tree: Lean your support-side shoulder and forearm into the trunk, then bring the optic in.
- Off a vehicle: Rest elbows, not the optic itself, if vibration is still present.
- Using a pack: Compress the pack into a soft cradle so the binoculars settle without rocking.
- Prone or seated: Lower positions usually win. They reduce sway and fatigue.
Control the phone before it starts hunting
Phone cameras want to help. Through an eyepiece, that help often makes things worse.
Autofocus can pulse. Auto-exposure can brighten and darken unpredictably. If your camera app allows it, lock focus and exposure once the optic image is clean. That prevents the phone from reacting to every change in contrast or movement across the frame.
Use these habits:
- Focus the binoculars first: Get the optic sharp to your eye before worrying about the phone.
- Then settle the phone image: Let the camera app lock onto the already-focused optical view.
- Avoid digital zoom: Magnification comes primarily from the binoculars. Digital zoom usually just enlarges noise and shake.
- Record a little wider than you think you need: Cropping later is often cleaner than trying to frame too tightly in the field.
If the footage feels soft, check whether the phone is digitally zoomed before blaming the binoculars.
Capture media that remains useful later
A clean image without context can still be hard to use in a report or debrief.
For field documentation, think in sequences instead of one heroic clip. Start with a wider establishing view if possible. Then capture the tighter detail. If the subject moves, hold a little longer than feels natural. Short, abrupt clips create more ambiguity than people expect.
A useful workflow often looks like this:
- Open with orientation: Landmarks, terrain breaks, roads, structures
- Transition to the subject: Let the viewer understand where the subject sits in the scene
- Hold steady: Don’t chase every movement with fast pans
- Speak observations only if appropriate for the situation: If you need silence, note details immediately afterward
Low-light trade-offs
As available light drops, phone cameras get more fragile. Motion blur becomes a bigger problem. So does noise.
The answer usually isn’t more movement, more zoom, or frantic refocusing. It’s less. Slow your panning. Hold longer. Accept that a steady lower-light clip often has more operational value than a shaky brighter-looking one.
When the image starts to break apart, prioritize recognition and sequence over aesthetics. Professional documentation doesn’t need to be pretty. It needs to be understandable.
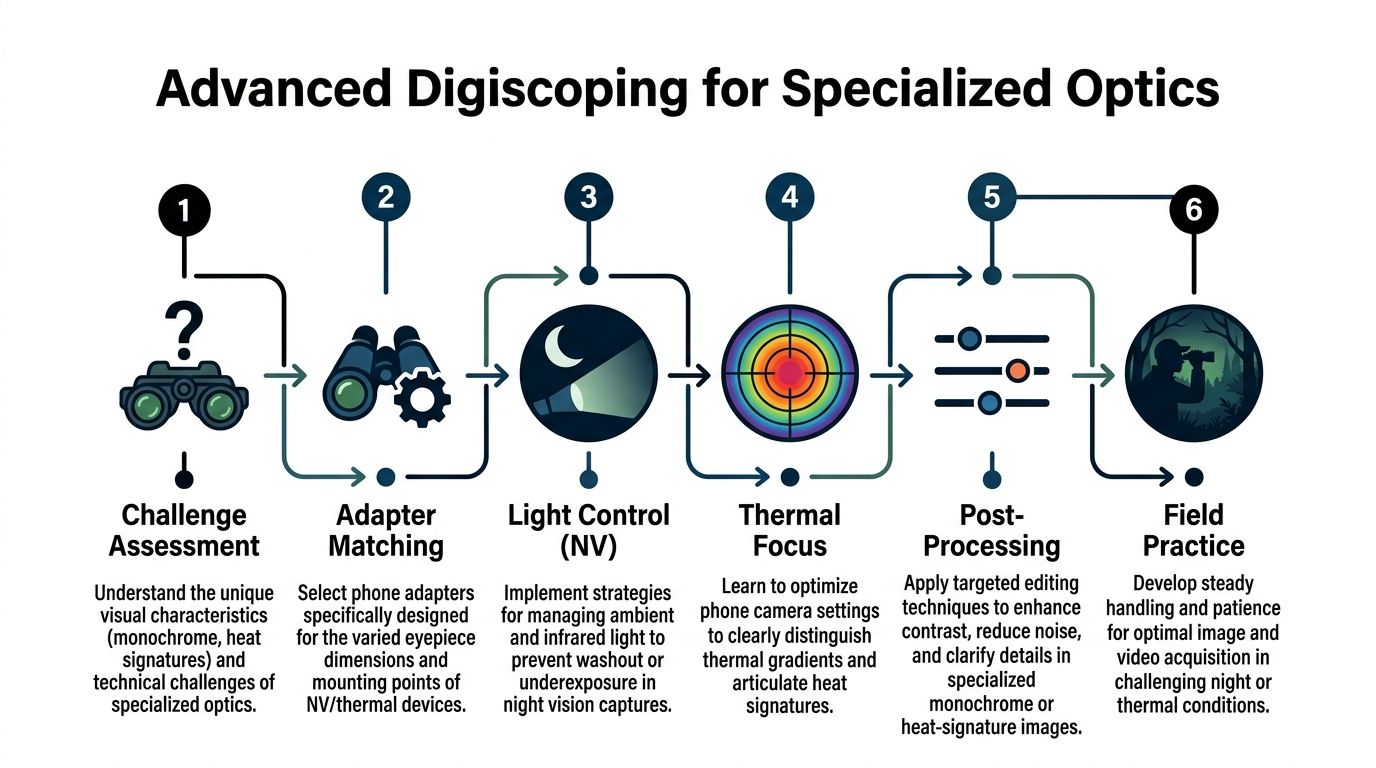
Advanced Digiscoping for Night Vision and Thermal Optics
Night vision and thermal change the whole equation.
A daytime binocular adapter that feels merely inconvenient in sunlight can become a serious liability after dark. Bulk blocks the other eye. Bright screens wreck dark adaptation. Misfit mounts become much harder to diagnose when you cannot glance down and reset everything under full light.
For night vision use, magnetic adapters with ultra-thin profiles as slim as 16mm matter because they don’t obstruct the unaided eye as much, and these systems can reach 98% stable fixation while cutting setup time by 50% compared with traditional screw-clamps (MagView binocular adapter details).
Why profile matters on night vision
With a monocular such as a PVS-14 style setup, the second eye still has a job. It helps with ambient awareness, movement, and reduced tunnel effect. A bulky adapter body that intrudes into the other eye box makes the whole system slower and more fatiguing.
That’s why thin magnetic systems have a real advantage here. The issue isn’t only speed. It’s space.
A slim setup also reduces interference when the optic is already mounted in a helmet, handheld, or observation position where extra side bulk catches on gear.
The process is easier to understand visually:
Night vision discipline with a phone attached
The biggest user error with night vision digiscoping isn’t mechanical. It’s light discipline.
A bright phone screen can degrade your natural night vision, splash light onto nearby surfaces, and announce your position in ways people forget until they see it happen. If the camera app enables flash by default, that’s another risk. Keep flash disabled before the phone ever gets near the optic.
For practical use:
- Dim the screen manually before deployment
- Disable flash and torch features in advance
- Use dark-mode camera interfaces if available
- Avoid face-up screen checks when others are nearby
Field note: Set your phone for night work before the optic comes out. Small prep errors become large visibility errors after dark.
Magnetic versus clamp systems on specialized optics
Traditional screw-clamp systems still have a place on some daytime optics and on setups where maximum mechanical lockup matters more than speed. But for night vision and thermal, they often add too much width and too much setup friction.
Magnetic systems work best when the ring is properly matched to the eyepiece and the phone interface is already staged. They allow the operator to dock and undock quickly without disturbing the optic itself. That’s useful when you need to alternate between direct viewing and capture.
Clamp systems still make sense when:
- The optic doesn’t support a clean magnetic ring fit
- You’re documenting from a more static observation post
- You need a more universal solution across multiple users or devices
Magnetic systems make more sense when:
- The optic is used in low light and one-eye clearance matters
- You expect repeated attachment and removal during the same session
- You need less obstruction around the eyepiece
Capturing usable night vision images
Phone cameras don’t see phosphor images exactly the way your eye does. They also react differently to thermal palettes and contrast-heavy scenes.
The cleanest approach is to simplify the task. Don’t chase a perfect cinematic image. Chase a readable one.
For night vision:
- Keep the phone centered and still
- Let the image settle before recording
- Avoid overexposing the phosphor field
- Record enough surrounding context that the viewer understands what the bright points or silhouettes represent
For thermal:
- Use the palette you can interpret fastest
- Prioritize subject separation from background
- Keep motion smooth because thermal detail can smear visually when the phone and optic are both moving
Thermal especially punishes aggressive panning. Move the optic slowly and deliberately. Let hotspots declare themselves instead of trying to whip the frame into position.
Integrating with a broader low-light kit
A phone adapter on specialized optics is still just one link in the chain. It works best when the rest of the low-light setup is already coherent, including the optic, helmet or handheld workflow, and the way thermal and night vision complement each other in identification and confirmation tasks. If you’re running both technologies, night vision with thermal overlay is the kind of system-level concept worth understanding before you try to document through either one.
The strongest night digiscoping setups are the ones that respect three realities. Keep the profile thin. Keep the screen dim. Keep the handling deliberate.
Field Maintenance and Troubleshooting Common Issues
Most failures with a phone attachment for binoculars aren’t dramatic. They’re small shifts, dirty lenses, moisture, or mounting habits that slowly degrade the image.
Vignetting that appears after movement
If the image was clean and now shows a black crescent or ring, the adapter usually rotated or the phone slipped slightly in its tray.
Fix it in this order:
- Check phone seating first: The handset may have shifted before the optic clamp did.
- Then check clamp rotation: Even a minor twist on the eyepiece can reintroduce edge shadow.
- Realign by the edges of the image: Don’t trust a bright center alone.
If vignetting keeps returning, the adapter likely isn’t a true fit for that eyepiece, or the clamp surfaces need better friction.
Slippage in humidity or rough movement
Rubber armor, condensation, and field grime can make a secure mount act unpredictable.
Wipe the eyepiece body and the adapter contact points with a clean dry cloth before remounting. If the clamp has padding, inspect it for compression, contamination, or wear. A pad that has gone slick stops doing its job.
If you’re working in wet conditions, recheck retention any time the setup comes on and off a sling, out of a pouch, or off a vehicle rest.
Soft image and inconsistent clarity
Operators often blame the phone when the optical path is dirty.
Clean both the phone camera lens and the binocular eyepiece with proper lens-safe materials. Dust on either surface becomes more obvious when you’re stacking optics. Fingerprints are even worse.
A few habits prevent most image degradation:
- Cap or cover the adapter when it’s in a pack
- Store it so adjustment knobs aren’t under pressure
- Keep the phone lens area clear of pocket lint and skin oil
- Avoid tossing the adapter loose with metal gear
Dirt between the phone lens and the eyepiece doesn’t just reduce sharpness. It creates misleading glare and haze that can look like a camera problem.
Condensation and temperature shifts
Move from a cold truck to warm air, or from a warm body-worn pouch into freezing conditions, and moisture can show up fast.
Let the optic and adapter acclimate when possible. If fogging appears, don’t grind it around with a dirty cloth. Blot moisture carefully, then clean once the surfaces stabilize. Repeated rough wiping in the field causes more long-term damage than the fog itself.
A maintained adapter isn’t glamorous. It’s just ready when the optic comes up.
Frequently Asked Questions for Tactical Operators
Can a universal adapter be trusted on duty or on a serious hunt
Sometimes, yes. Not automatically.
A universal unit can work well on standard binoculars if it fits the eyepiece, locks firmly, and has already been tested on your exact phone and case combination. It becomes less trustworthy when you move into non-standard night vision housings, thermal eyepieces, or heavier professional optics.
Should you leave the adapter mounted full time
Usually not.
On some systems, especially thin magnetic ones, staged or semi-permanent components make sense. But most clamp adapters add bulk, snag points, and one more thing to get knocked out of alignment. It’s better to have a repeatable mounting method than a permanently awkward optic.
What matters most for evidence integrity
Consistency and context.
Record what you saw as steadily as possible, preserve the original file, and note where you were, what optic you used, and what conditions affected the image. A technically imperfect clip with clear context is often more useful than a sharp clip with no supporting details.
Is a tripod mandatory
No, but support is.
If a tripod isn’t practical, build a stable rest from terrain, a pack, a blind window, a vehicle frame, or your own body position. The operator who knows how to brace well usually gets better results than the operator with more gear and worse technique.
What’s the biggest mistake with night vision digiscoping
Screen mismanagement.
People spend time choosing the adapter and then forget that an over-bright screen can compromise dark adaptation and visibility discipline. The phone must be treated as part of the low-light system, not as a separate consumer device.
Is digital zoom ever worth using
Rarely.
Your optic is already providing the meaningful magnification. Digital zoom usually magnifies shake, noise, and softness. It’s usually better to keep the image cleaner and crop later if needed.
If you’re building a reliable low-light observation setup and want gear suited to field use, Superior Tactical LLC is a strong place to start. They focus on night vision, thermal optics, and tactical accessories for professionals and serious end users, with in-house repairs, free diagnostics, and Gen 3 night vision systems backed by a 10-year warranty.