Your Ultimate Guide to Choosing a Light Laser Combo
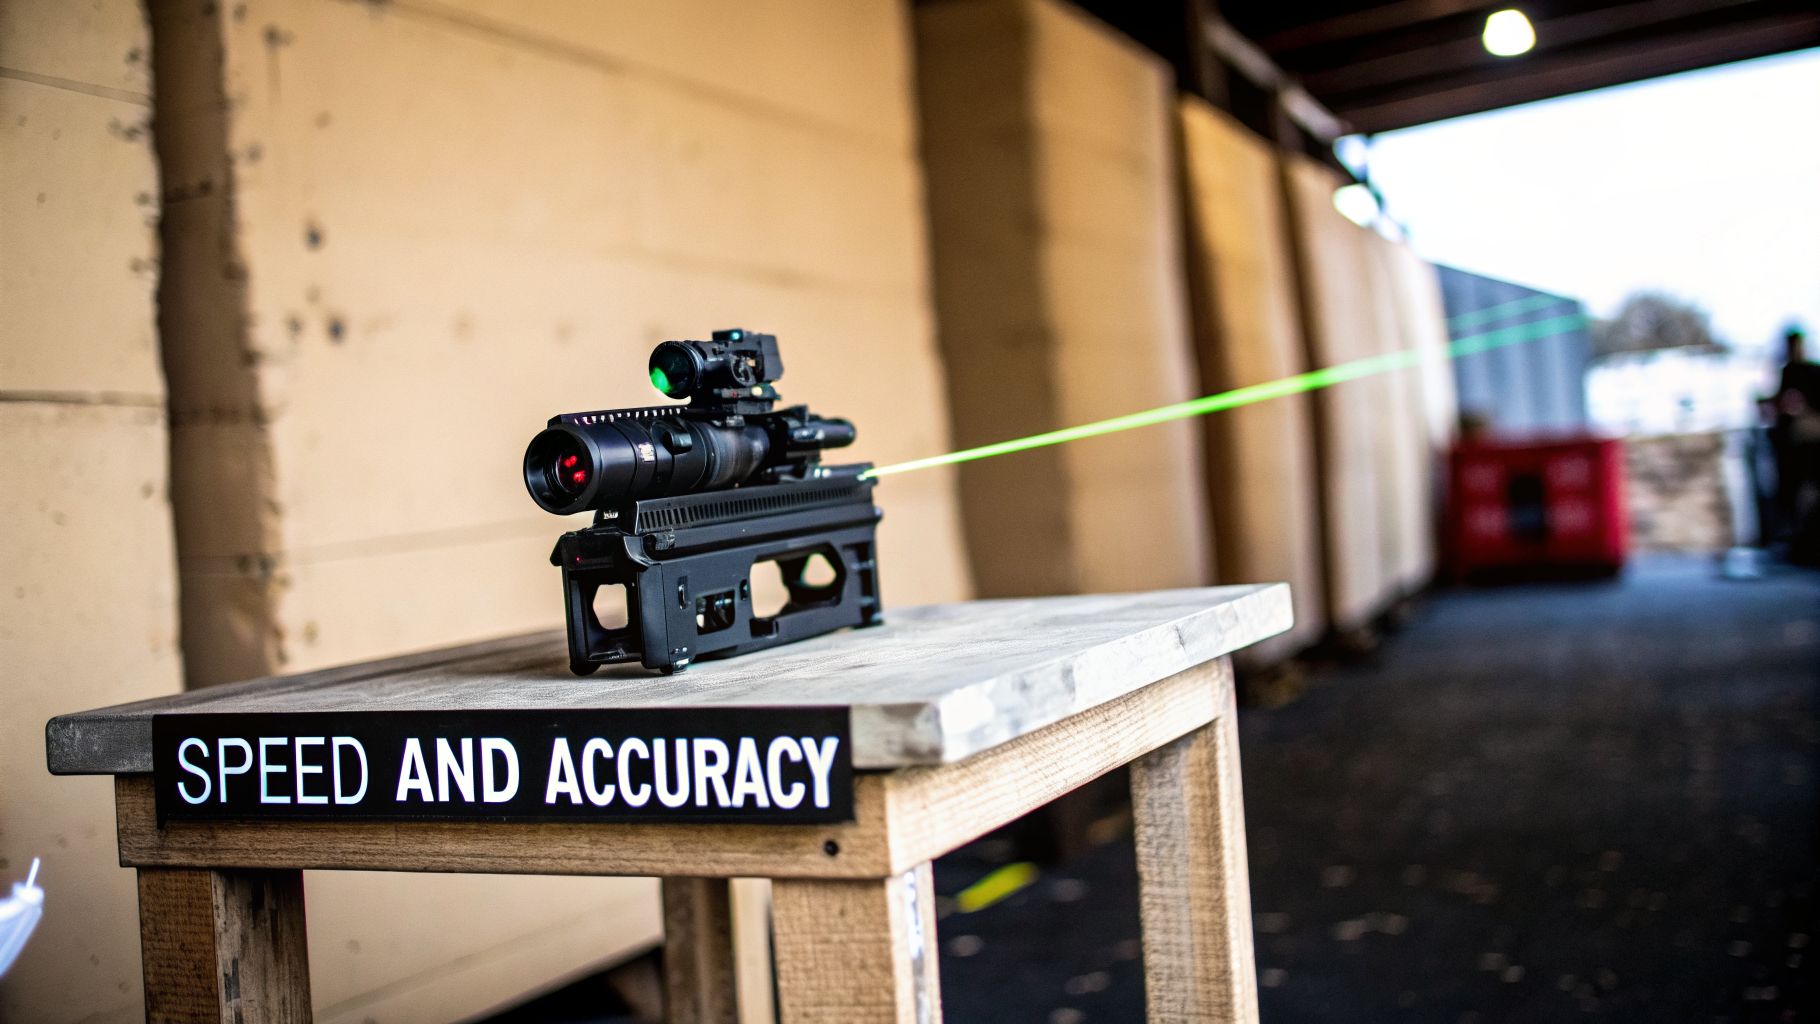
At its core, a light laser combo is exactly what it sounds like: a single accessory for your firearm that houses both a high-intensity flashlight and a targeting laser. It’s an elegant solution that merges two critical tools into one compact, rail-mounted unit.
Think of it as giving your firearm the ability to both see and point in the dark. This integration provides a powerful one-two punch of target illumination and a clear aiming reference, dramatically improving your effectiveness when the lights go out.
Unlocking Tactical Advantage with a Light Laser Combo
Picture yourself clearing a dark hallway or tracking game in the pre-dawn gloom. In these high-stakes, low-light situations, a light laser combo isn't just a convenience—it's a genuine game-changer. It solves two fundamental problems at once.
The powerful flashlight beam cuts through the darkness, allowing for positive target identification. At the same time, the laser gives you a fast, intuitive aiming point that doesn't rely on perfectly aligning your iron sights. For law enforcement making split-second threat assessments or a hunter needing a clean shot at dusk, this dual capability is invaluable.
The Power of Integration
Bolting two separate devices onto your firearm works, but combining them into a single unit is where the real magic happens. You’re not just saving rail space; you’re creating a more efficient and intuitive system.
Instead of fumbling with two different sets of controls under stress, you operate a single, cohesive unit. This simplified workflow lets you stay focused on your surroundings and the task at hand. The practical benefits are immediate and substantial:
Enhanced Situational Awareness: A powerful flashlight beam does more than just light up your target. It fills the room, revealing potential secondary threats, obstacles, or escape routes you might have otherwise missed.
Faster, More Accurate Aiming: The laser dot gets you on target incredibly quickly, especially in close quarters or from awkward shooting positions where getting a traditional sight picture is slow or impossible.
Greater Confidence in the Dark: Knowing you have the tools to both see and aim effectively in any lighting condition is a massive psychological boost. It builds the confidence you need to act decisively.
With an integrated system, you never have to choose between identifying a threat and aiming at it. You can do both simultaneously. That simple fact fundamentally changes the equation for any defensive or tactical scenario.
To really spell it out, let's look at what choosing an integrated system gives you over separate components.
Core Advantages of an Integrated Light Laser System
The table below breaks down the key benefits of having your light and laser in one package.
| Advantage | What This Means for Tactical and Recreational Users |
|---|---|
| Efficient Use of Rail Space | Frees up valuable space on your firearm for other accessories like grips, optics, or backup sights. |
| Simplified Ergonomics | One set of controls (buttons or pressure pads) to manage, making operation faster and more intuitive under stress. |
| Weight and Balance | A single, purpose-built unit is often lighter and more balanced than two separate devices, improving weapon handling. |
| Cost-Effectiveness | Purchasing one integrated device is frequently more affordable than buying a separate high-quality light and laser. |
Ultimately, choosing a quality combo means you're not just adding gadgets to your firearm; you're building a more capable and reliable system. It’s about optimizing your setup for the real world, ensuring your weapon is balanced, fast, and ready for whatever comes next.
Visible vs. IR Lasers for Night Vision Use
When you're in the market for a light/laser combo, one of the first decisions you'll face is a big one: do you need a visible laser or an infrared (IR) one? The best way to think about it is like this: a visible laser speaks a language your eyes understand perfectly. An IR laser, on the other hand, speaks a covert language that requires a special translator—your night vision device (NVD).
Visible lasers, which come in either red or green, are what most people picture. They’re designed for aiming with the naked eye, projecting a bright dot that shows you exactly where your muzzle is pointed. They’re incredibly helpful in low-light situations where getting a good sight picture can be slow or awkward. For anyone not running night vision, a visible laser is the default choice.
The Role of Visible Lasers
A visible laser is a very direct aiming tool. You press a button, a dot appears on your target, and you know precisely where your round will impact. It's a huge advantage in fast-moving situations or when you're forced to shoot from an odd position where you can't get behind your sights.
The classic debate is red vs. green. Green lasers are much easier for the human eye to see, especially during daylight or at dusk, which is why they've become so popular. That said, red lasers tend to be more reliable in extreme cold and are usually easier on batteries. The right one for you really boils down to where you'll be using it most and what your budget looks like.
A visible laser gives you an immediate point of aim, removing the guesswork and time it takes to align sights. It's a direct line of communication between your firearm and your target, visible to anyone.
Of course, that visibility is a double-edged sword. While it makes aiming dead simple for you, that bright beam can also be a beacon that gives your position away. And that's exactly why the world of IR lasers exists.
Unlocking Covert Capability with IR Lasers
Infrared (IR) lasers are the key that unlocks the full offensive potential of your night vision gear. An IR laser operates on a wavelength your eyes can't see, making it completely invisible to anyone without an NVD. From their perspective, nothing is happening at all.
But once you look through your PVS-14 or dual-tube goggles, that invisible beam lights up as a crisp, brilliant aiming point on your target. This gives you a massive tactical advantage, letting you aim with pinpoint precision in total darkness without ever tipping off your target.
- Covert Aiming: You can paint and engage targets without giving off any visible light. This is an absolute game-changer for law enforcement, military ops, and serious night hunters.
- Active Illumination: Most quality light/laser combos also feature an IR illuminator. Think of it as an invisible flashlight. It floods the area with IR light that your NVDs can see, turning a pitch-black field into a clearly lit environment.
- NVD Synergy: The IR laser and illuminator are designed to work as a team. You use the illuminator to scan, find, and identify what's out there, then use the laser to place your shot.
The technology is only getting better and more widespread. The global laser projection market, which was valued at USD 21.40 billion in 2025, is expected to explode to USD 113.6 billion by 2035. As Market.us reports, this growth shows just how integral laser systems are becoming in both professional and civilian applications.
An IR-capable light/laser combo turns your night vision from a simple observation tool into a true aiming system. If you're serious about operating after dark, an IR laser isn't just a cool accessory—it’s a core piece of equipment. For those outfitting a rifle, we’ve put together a guide on the best AR laser systems to help you choose the right one.
Decoding the Key Technical Specifications
When you start shopping for a light laser combo, the spec sheet can feel like a foreign language. Lumens, candela, nanometers—it’s a lot to take in. But understanding these terms is the key to choosing a device that actually works for you, not just one that looks good in a product photo. Let's translate that technical jargon into real-world performance.
Think of your weapon light's output like water coming from a garden hose. The two specs that matter most are lumens and candela.
- Lumens represent the total volume of water. This is the raw amount of light pouring out of the device, which dictates how big of an area you can light up.
- Candela is the water pressure. It measures the beam's focused intensity, telling you how far that light will "throw" to identify a threat downrange.
A light with a ton of lumens but low candela will give you a wide, floody beam—great for clearing a room but useless at a distance. On the flip side, a high-candela "thrower" will cut a tight beam through the darkness hundreds of yards away, but you might lose some of that crucial peripheral vision up close. A truly versatile light laser combo finds the sweet spot between both.
Laser Wavelength and Power Output
Of course, the light is only half the equation. The laser’s specs are just as critical, and it really boils down to wavelength and power output. These two factors determine how visible your laser is and how far it can reach.
Wavelength, which we measure in nanometers (nm), is what gives the laser its color. For visible lasers, you’re almost always looking at red (around 635-650 nm) or green (around 510-530 nm). The human eye is much more sensitive to the green light spectrum, which is why a green laser dot looks dramatically brighter and is easier to pick up, especially in daylight.
Power output, measured in milliwatts (mW), is what determines the laser’s raw brightness and effective range. For civilian use, most visible lasers are capped at <5mW. That might not sound like a lot, but it’s more than enough power for effective aiming inside most realistic engagement distances.
To help you choose between the two main visible laser types, here's a quick comparison.
Visible Laser Wavelength Comparison
| Laser Type | Wavelength Range | Daylight Visibility | Perceived Brightness | Best Use Case |
|---|---|---|---|---|
| Red Laser | 635-650 nm | Low to moderate | Lower | Low-light and indoor scenarios where battery life is a priority. |
| Green Laser | 510-530 nm | Good to excellent | Significantly higher | All-around use, especially outdoors or in environments with bright ambient light. |
As you can see, a green laser offers a clear advantage in visibility across more conditions, while a red laser can be a good, budget-friendly option for dedicated low-light use.
This chart below gives a great overview of where different aiming tools fit, from visible lasers in low light to infrared systems for complete darkness.
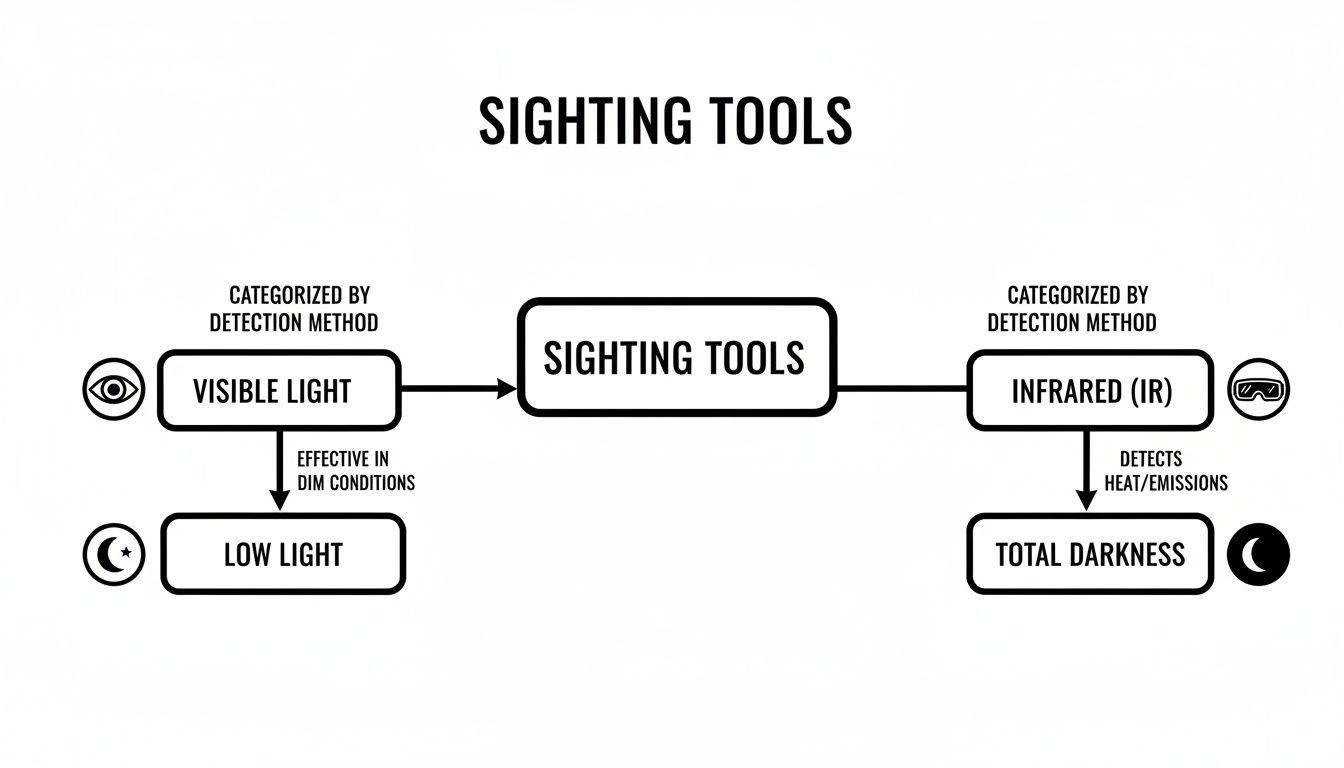
The big takeaway here is that visible lasers own the low-light space, but once you go to pitch-black conditions and need to use night vision, an IR laser is non-negotiable. If you're running NVGs, you'll want to dig deeper into our guide on dedicated laser aiming modules.
The demand for this technology is surging. The solid-state lasers used in these tactical devices are part of a market projected to grow at a 9.18% CAGR through 2031. This isn't just about weapon lights; it’s driven by the expansion of laser-based sensors and aiming equipment across multiple industries. You can learn more about these market forces in this full laser technology market analysis.
Mounting Systems and Battery Life
Finally, let’s get down to brass tacks: how the unit attaches to your gun and what keeps it running. These practical details are just as important as beam intensity.
The gold standard for mounting any optic or accessory is a Picatinny rail (MIL-STD-1913). This system provides a rock-solid, repeatable lockup that is absolutely essential for holding your laser's zero, shot after shot. A cheap or poorly designed mount will shift under recoil, making your laser completely unreliable.
Your choice of battery also has a huge impact on performance, readiness, and long-term cost. Here are the main players:
- CR123A: For years, these have been the workhorse of the tactical world. They pack a punch, hold a charge on the shelf for a long time, and work well in the cold. The downside is they're disposable, and the cost adds up.
- Rechargeable (18650, etc.): Moving to a rechargeable system is much cheaper in the long run and better for the environment. The trade-off is that you need a charging setup and a good system for rotating batteries to ensure you always have a fresh one ready to go.
Getting a handle on these specs is what separates a smart buyer from someone just guessing. It allows you to cut through the marketing fluff and choose a light laser combo based on the performance criteria that matter for how you’ll actually be using it.
How to Properly Install and Zero Your Combo
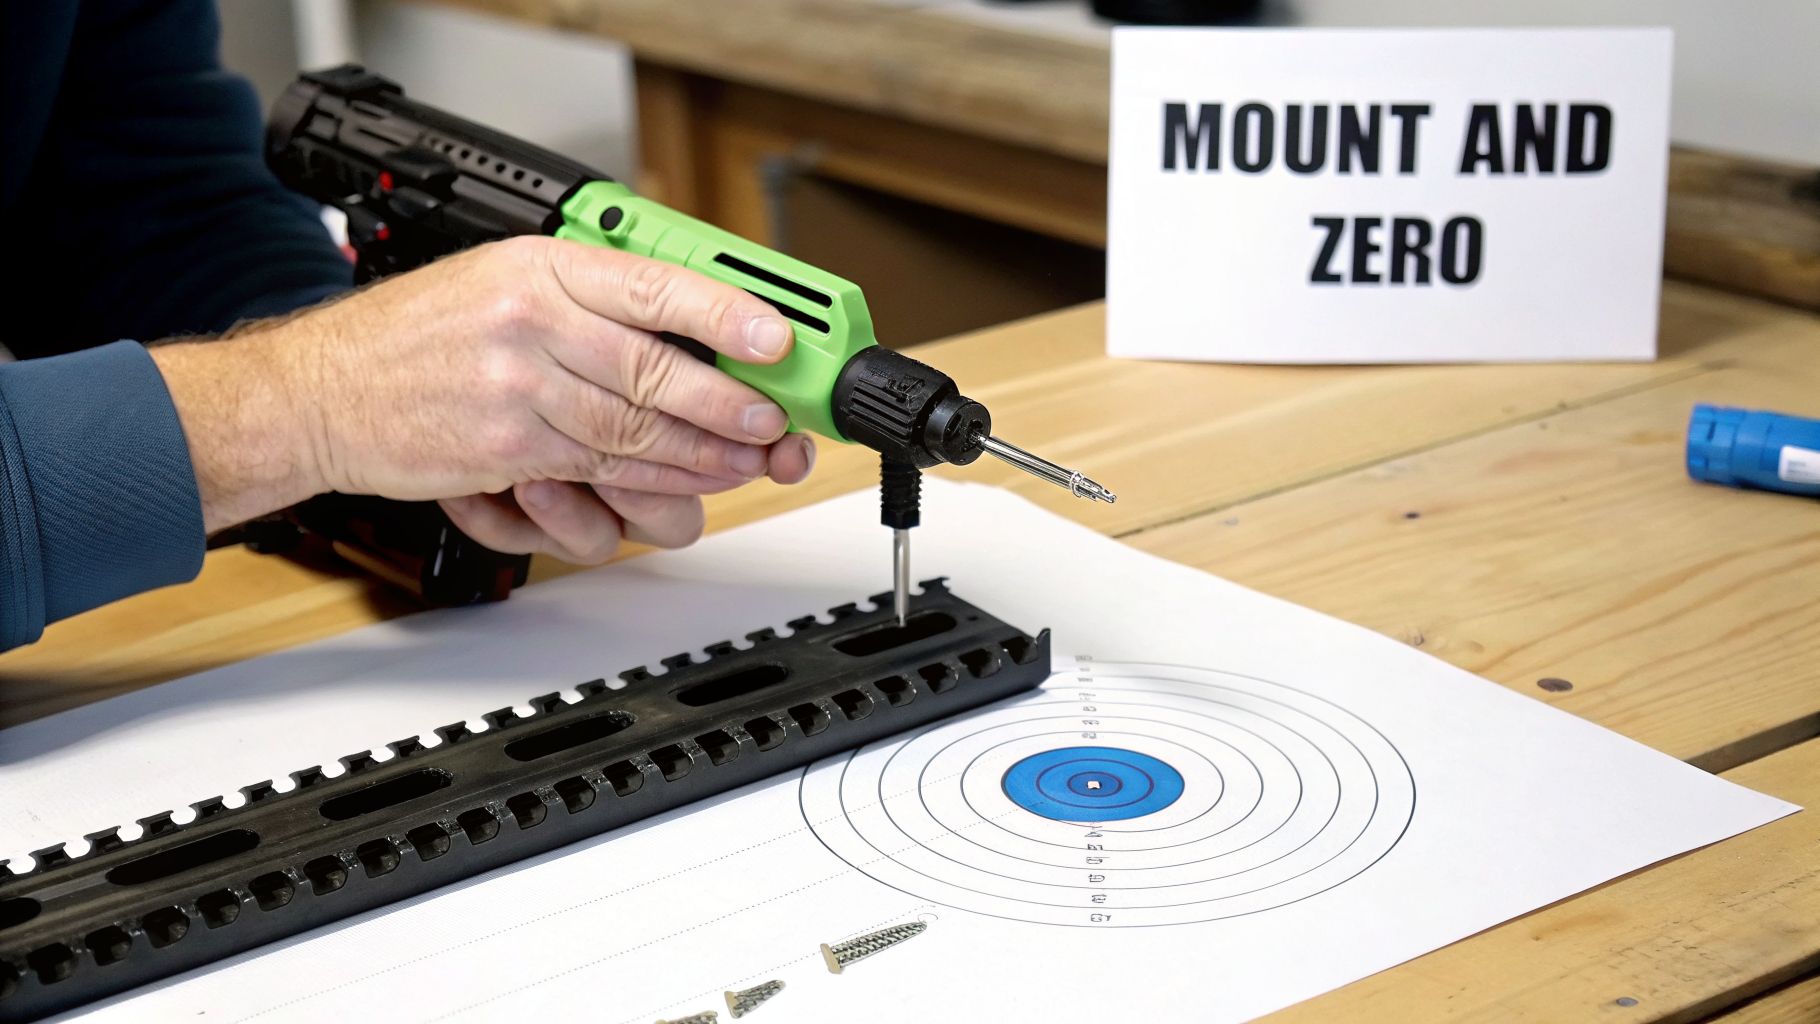
Getting that new light laser combo out of the box is a great feeling. But let's be honest, it's just a fancy flashlight until you mount it correctly and zero it perfectly. This whole process is what turns it from a simple pointer into a reliable aiming tool, ensuring your laser dot is right where your round is going to land.
First things first: a rock-solid mount. Your device will clamp onto a Picatinny rail, and getting a secure fit here is absolutely non-negotiable. Think of it as the foundation of a house—if it's wobbly, everything else is compromised. Grab a quality torque driver and tighten the mounting screws to the manufacturer’s exact spec. Too loose, and the unit will shift under recoil; too tight, and you can strip the screws or damage the rail.
The Zeroing Process Explained
With the combo locked down, it's time to zero the laser. "Zeroing" is just a term for aligning the laser beam with your firearm's point of impact at a specific distance. The two most common ways to get this done are co-witnessing with another optic and the traditional live-fire zero.
If you already have a zeroed red dot or scope on your firearm, co-witnessing is a fantastic way to get your laser incredibly close without firing a single shot.
- Stabilize Your Firearm: Place your unloaded firearm in a stable shooting rest, vise, or even on sandbags. The key is making sure it doesn't move a millimeter.
- Aim Your Primary Optic: Look through your already-zeroed optic and center the reticle on a distant target. A 25- or 50-yard zero is a practical starting point for most setups.
- Adjust the Laser: Now, without moving the firearm, turn on your laser. You'll see adjustment screws for windage (left/right) and elevation (up/down). Tweak these until the laser dot sits directly on top of your primary optic's reticle.
At this point, your laser is "slaved" to your primary optic. This means that at your chosen zeroing distance, both your optic and your laser are pointing at the exact same spot.
A great trick to save time and ammo at the range is to use a bore sight. This little device shines its own laser straight down the barrel, giving you an initial reference point. You can align your combo's laser to the bore sight's dot before you even leave the house.
Verifying and Fine-Tuning Your Zero
Even if you've co-witnessed your laser, you're not done yet. You must confirm your zero with live fire. Things like the specific ballistics of your ammo and even environmental factors can create small discrepancies that need to be ironed out.
Head to the range and fire a three-to-five-shot group at your chosen zeroing distance. See where your group lands in relation to where your laser was pointing.
If you're off, make small, deliberate clicks on the windage and elevation turrets to move the point of impact. Fire another group to confirm the adjustment. This final step is what gives you true confidence that your light laser combo is an accurate, mission-ready aiming device.
Training Drills and Real-World Applications
Bolting a high-end light laser combo onto your firearm is the easy part. The real work begins now: training until its use becomes second nature. Under pressure, you don't have time to think—you only have time to act. The goal is to weld the device to your will, making its activation as instinctive as raising your rifle to your shoulder.
Consistent, dedicated practice is what builds that critical muscle memory. You need to be able to hit the right button for the right function without ever taking your eyes off the threat. Fumbling for a switch in a high-stress situation just isn't an option.
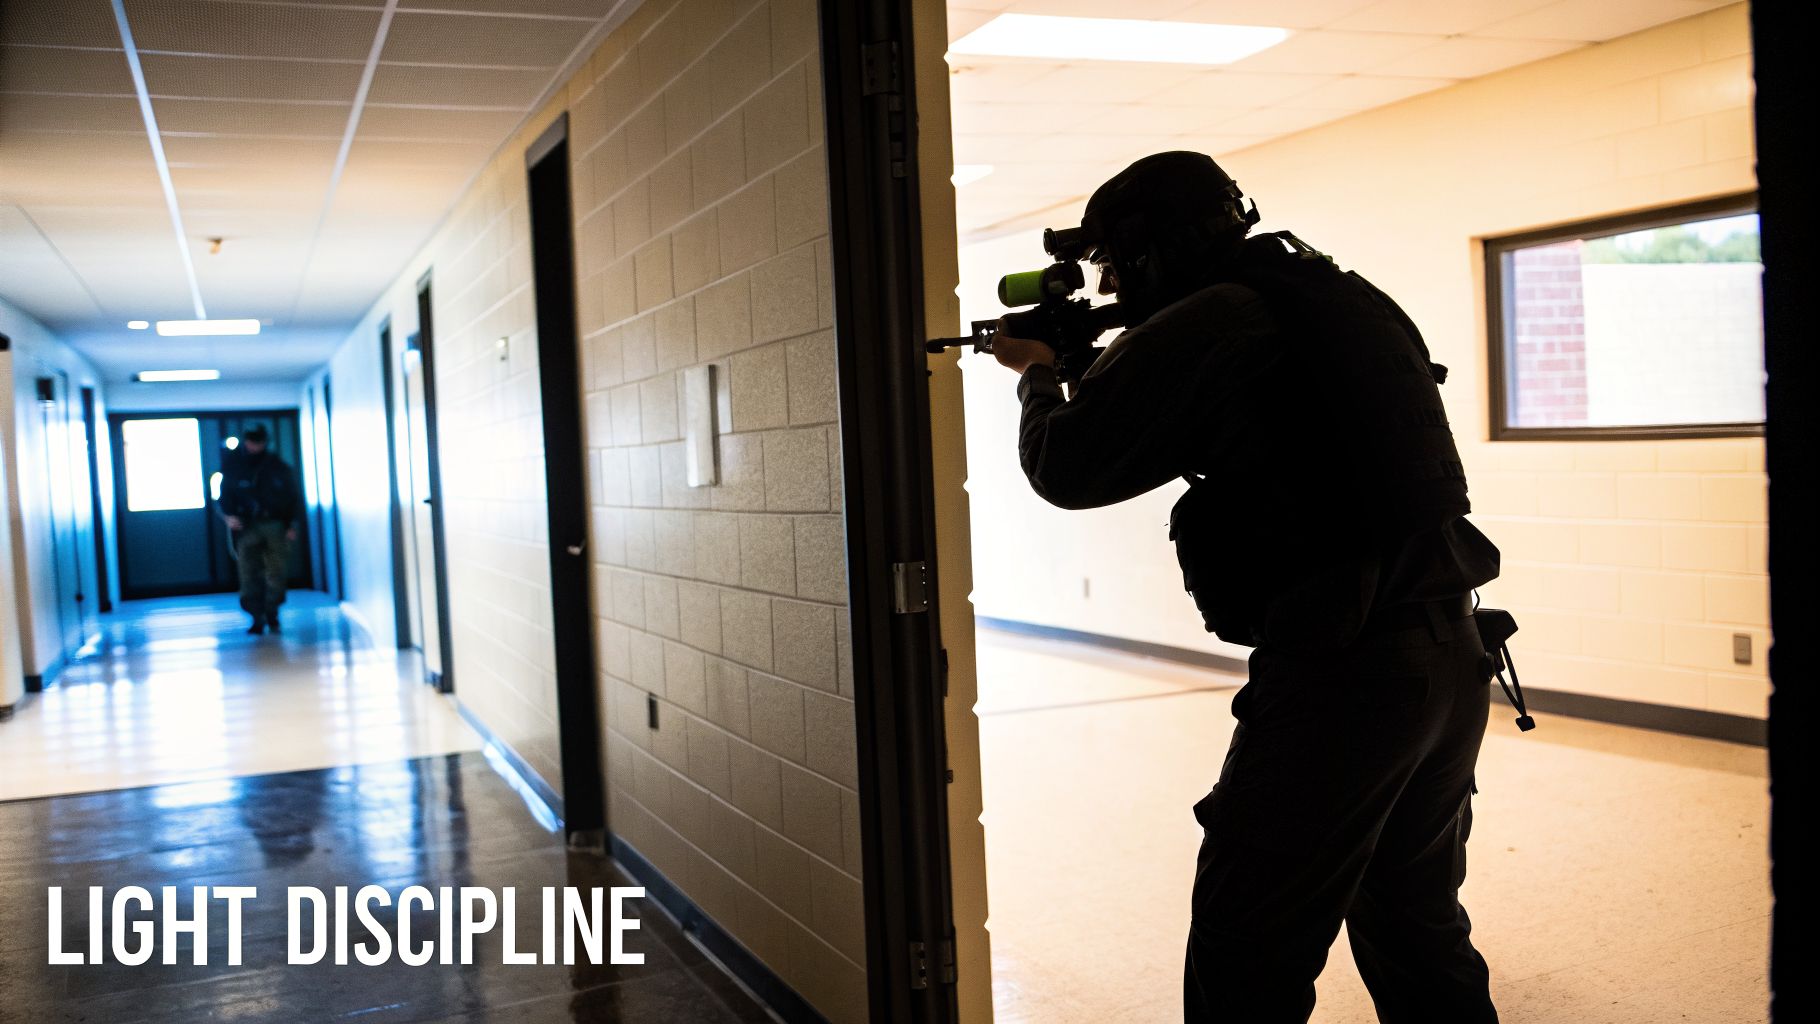
The Art of Light Discipline
One of the single most important skills you'll learn is light discipline. It’s a simple concept with life-or-death implications: use your light sparingly and with purpose. Leaving your light on constantly is like holding up a giant neon sign that says, "I'm right here!" You're just giving your opponent a perfect target.
This is exactly why your combo's momentary-on feature is so valuable. Whether it's a pressure pad or a half-press on a button, this function lets you "paint" an area with a quick splash of light. It's just enough to see what's in that dark corner or identify a potential threat before you melt back into the darkness.
Think of it like this: you're gathering intelligence in short, controlled bursts. You see what you need to see, then you vanish. You control the information, and you deny the enemy a target.
From the Range to the Real World
Knowing the theory is one thing, but putting it to the test is where competence is forged. These drills are designed to help both law enforcement and hunters turn their light laser combo's features into tangible, real-world skills.
For the Tactical Operator: Dynamic Room Entry
- Objective: Clear a room with speed and certainty, using the light for disorientation and the laser for rapid aiming.
- Execution: From outside a doorway, use a quick momentary flash to get a "snapshot" of the room's interior. As you move in, use the wide spill of your beam to illuminate the entire space and overwhelm anyone inside. The laser comes into its own here, letting you get fast, accurate shots on target from awkward angles without needing a perfect cheek weld.
For the Hunter: Ethical Nocturnal Hunting
- Objective: To make a clean, ethical shot on nocturnal game using an IR device and night vision.
- Execution: With your NVDs active, use the IR illuminator on a low setting to scan for targets without giving away your position with visible light. Once you've spotted your game, switch over to your IR laser to place a precise, invisible aiming point. This method ensures you're not spooking the animal (or anything else nearby) and leads to a more humane hunt.
Taking Your Training to the Next Level
Once the basics feel smooth, it's time to introduce more complexity. These advanced drills force you to combine movement, quick decision-making, and the precise use of your light and laser.
"Slicing the Pie" Drill: This is a fundamental skill for clearing corners. From behind cover, take small, methodical steps to expose the room one "slice" at a time. Use your momentary-on function to flash each new sliver of visible space, keeping most of your body protected.
Target Discrimination Drill: This is non-negotiable for anyone who might operate in a complex environment. Set up multiple targets—some threats, some non-threats (e.g., pictures of armed vs. unarmed individuals). In low light, force yourself to use quick flashes to positively identify a target before engaging it with the laser. This builds the judgment needed to prevent a tragedy.
Transition Drills: What happens when you can't get a good sight picture through your primary optic? You need a backup plan. Practice transitioning from your scope or red dot to using only the laser for aiming. This skill is your lifeline when you're forced to shoot from an unconventional position.
Remember, realistic training is the only thing that separates a professional from someone who just owns expensive gear. Invest the time in these drills, and your light laser combo will become a trusted extension of your skillset, ready for when it matters most.
Understanding Laser Safety and Legal Considerations
Getting a light/laser combo isn't just about mounting it and hitting the range. There's a serious side to it that’s just as crucial as your zero: understanding the safety protocols and the laws that govern their use. This isn't about navigating red tape; it's about being a responsible operator and protecting yourself and everyone around you.
The golden rule is dead simple, and it’s one you already live by: treat the laser just like you treat your muzzle. All the fundamental firearms safety rules apply. If you wouldn't point your gun at it, you absolutely do not point your laser at it. Period.
Laser Classifications and Eye Safety
Most aiming lasers available to the public are designated as Class 3R (which used to be called Class IIIa). This means their output is legally capped at less than 5 milliwatts (mW). While that power level is considered safe for a brief, accidental glance, you must never intentionally shine it into anyone's eyes.
Even a quick, direct exposure from a Class 3R laser can cause temporary flash blindness, serious disorientation, and lingering afterimages. While the risk of permanent eye damage is low, it’s not zero. Safe handling is completely non-negotiable.
The bottom line is to treat the laser beam with the exact same respect you give a loaded firearm. Never point your light/laser combo at people, vehicles, or aircraft for any reason.
This need for caution is becoming more relevant every day, even outside the firearms world. Powerful laser technology is showing up everywhere. For example, the automotive laser headlight market is projected to skyrocket to USD 121.65 billion by 2034. This just goes to show how common these devices are becoming, which reinforces why universal safety awareness is so important. You can see the data for yourself in this automotive laser market report.
Local Laws and Hunting Regulations
On top of the universal safety rules, you have to know what your local and state laws say. Regulations can change drastically from one place to another, particularly when it comes to using laser aimers for specific activities.
A few key areas to check:
- Hunting: Many states put tight restrictions on using any electronic aiming device, lasers included. Before you head out for a hunt, you absolutely must check your state's current fish and game regulations.
- Concealed Carry: Owning a laser is usually fine, but some cities or counties might have specific rules about having one on a concealed carry firearm. It's on you to know the laws where you carry.
- IR Lasers: The regulations around infrared (IR) lasers are often a completely different animal and can be much stricter. If you're thinking about moving into the world of night vision, our guide on IR laser pointers is a must-read.
Being a responsible owner means doing your homework. When you make safety and legal compliance your top priorities, you ensure your light/laser combo serves you well as the valuable tool it's meant to be.
A Few Common Questions About Light/Laser Combos
When you're trying to choose the right light and laser, a few key questions always seem to pop up. We get them all the time. Let's tackle the big ones so you can feel confident in your choice.
Is a Red or Green Laser Better?
This is probably the number one question we hear, and the honest answer is: it depends entirely on where and when you'll be shooting.
A green laser is just flat-out easier for the human eye to see, especially during the day. If you need a laser that's going to be visible in bright sunlight, green is your only real choice. The trade-off? Green lasers typically cost more and can sometimes get sluggish in extreme cold.
On the other hand, the classic red laser is king in low-light or indoor situations. They are workhorses—generally more durable across a wide range of temperatures, easier on batteries, and lighter on your wallet. For most people, a red laser is a perfectly reliable and practical tool.
Do I Really Need an IR Laser if I Don't Have Night Vision?
Nope. Not at all. An IR (infrared) laser is completely invisible to your naked eye. It puts out a beam of light that only a night vision device (NVD) can pick up. Without the NVD, an IR laser is just an expensive switch that does nothing you can see.
Think of it this way: An IR laser is a secret handshake, but you need night vision goggles to see it. If you don't own NVDs or plan on getting them, stick with a combo that has a visible red or green laser.
How Often Should I Check My Laser's Zero?
Good habits keep you on target. You should get into the practice of confirming your laser's zero regularly. It's an absolute must before a duty shift, a competition, or a hunt.
You should always re-check your zero if your firearm gets dropped, after traveling with it, or any time you take the light laser combo off and put it back on. Treat it just like your primary optic.
Can I Put a Pistol Light/Laser on My Rifle?
Technically, you might be able to mount it if it uses a standard Picatinny rail, but you really shouldn't. It's a bad idea.
Pistol units are built for the size, weight, and recoil of a handgun. They don't have the ruggedness, the light output (candela), or the laser power needed for the distances you'd engage with a rifle. You'll be left with a dim light and a laser that's hard to see past 25 yards. Always use gear designed for the specific firearm platform.
Ready to find the right tool for the job? The guys at Superior Tactical LLC live and breathe this stuff. We can help you match the perfect light laser combo to your firearm, whether it's for patrol, home defense, or chasing hogs in the dark. Check out our hand-picked selection from the best brands in the business.