A Complete Guide to IR Laser Night Vision
If you've ever tried using night vision in a truly dark space—think a windowless building or a cloudy, moonless night—you know the hard limit of the technology. Without any ambient light to amplify, even the best gear sees nothing but black. This is where IR laser night vision comes in, giving you the ability to light up a scene with a beam that's completely invisible to the naked eye.
It's like carrying a stealth flashlight. The beam cuts through the darkness, but only someone looking through a night vision device (NVD) can see it.
How IR Laser Night Vision Unlocks the Dark
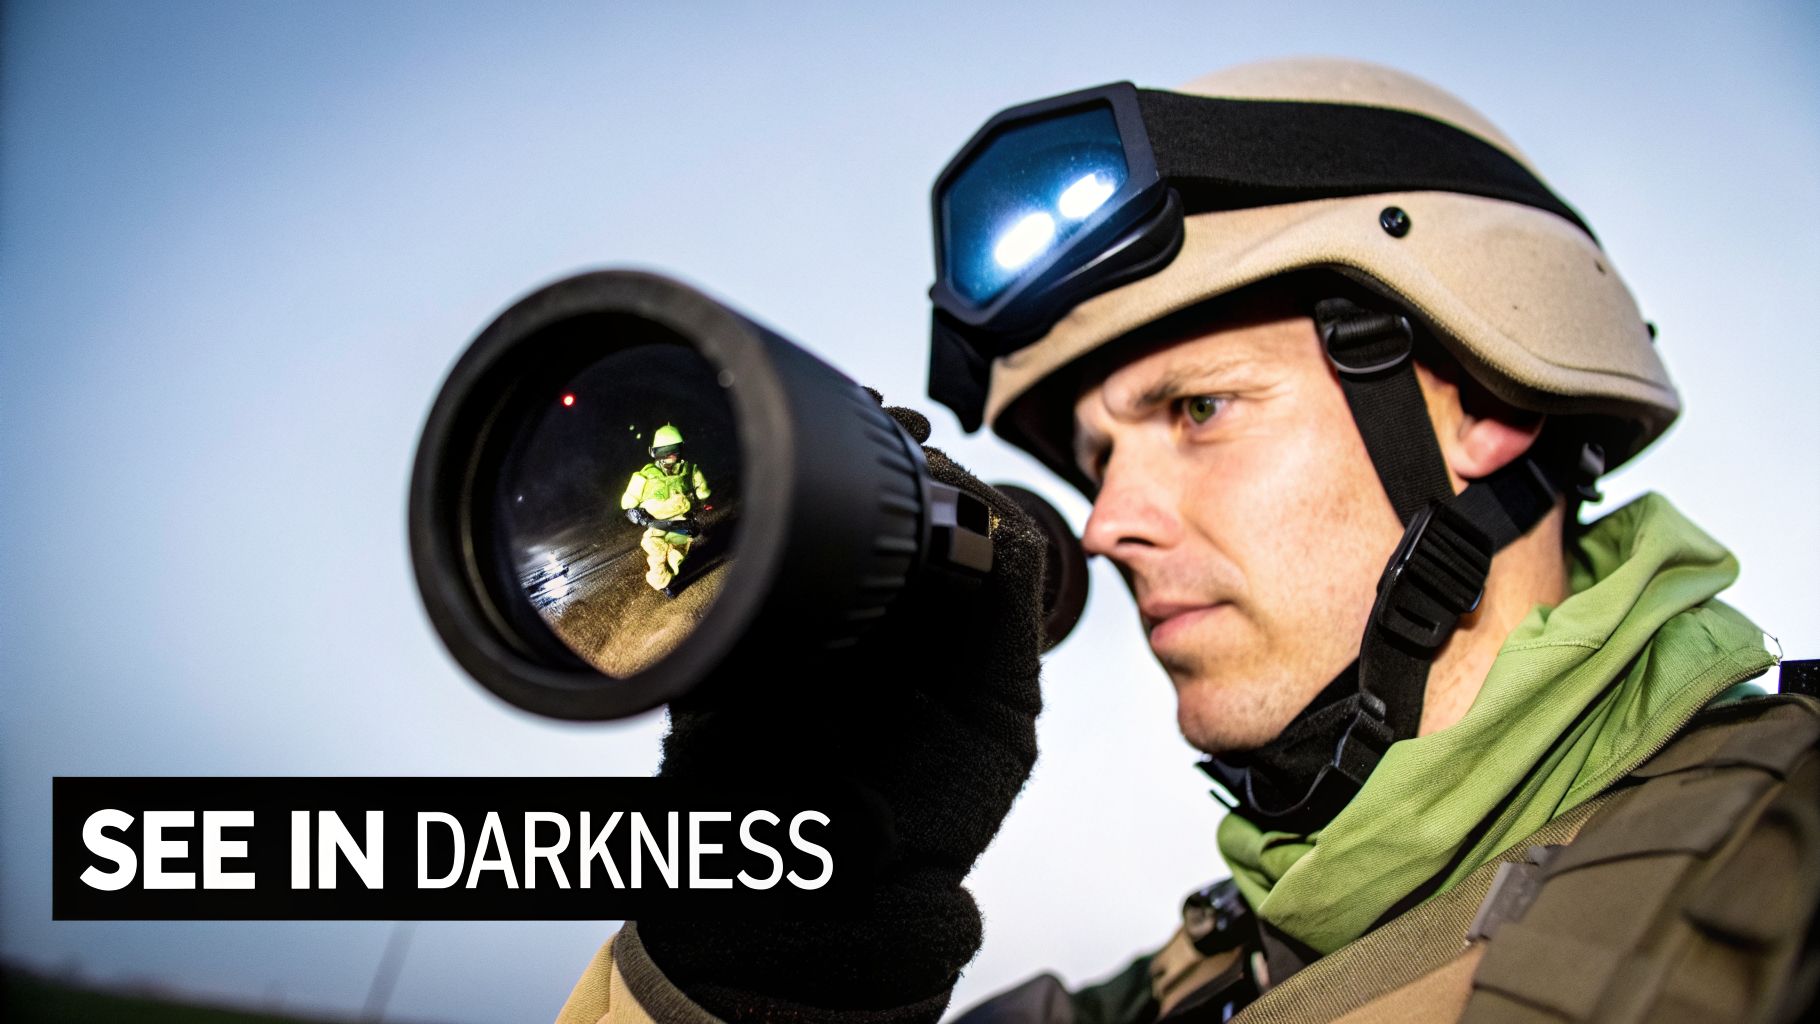
The whole system is a partnership between two critical pieces of gear: an infrared (IR) laser unit and a night vision device, like a PVS-14 monocular or a set of dual-tube goggles. In total darkness, neither one can do the job alone.
Your IR laser projects a concentrated beam of light that exists outside the visible spectrum. This invisible light travels downrange, hits whatever you're looking at, and bounces back. Your NVD then scoops up all that reflected infrared energy and translates it into the crisp, visible image you see—usually in that classic green or a more modern white phosphor glow.
This setup is what we call active illumination. It’s a game-changer because you're creating your own light source, rather than just passively amplifying whatever little starlight or moonlight is available.
The Two Core Functions of IR Lasers
When you mount an IR laser on your rifle, it’s really there to do two distinct jobs. Getting a handle on these two functions is the key to using this equipment effectively.
- Illumination: The IR illuminator acts like a wide-angle floodlight. It casts a broad cone of invisible light to brighten up an entire area, which is perfect for navigating, scanning your surroundings, or getting positive identification on something you've detected. You're essentially painting the landscape with light that only you can see.
- Aiming: The IR aiming laser projects a sharp, precise dot onto your target. This dot functions as your aiming point, letting you engage targets quickly and accurately without having to look through your primary optic. It’s your own personal, invisible targeting dot.
The core principle is simple: An IR laser provides the light, and the night vision device provides the sight. This symbiotic relationship turns pitch-black environments into a clear, navigable, and decisive operational space.
Ultimately, the IR laser gives your NVD something to look at when there’s no natural light to work with. For a law enforcement officer clearing a dark warehouse, a hunter tracking hogs after sundown, or a soldier on a no-moon mission, this capability isn't just a nice-to-have—it's essential. This guide is built to give you the foundation you need to master this powerful tool.
The Science of Seeing in the Dark
Before we get into the gear, we need to talk about the "IR" in IR laser night vision. Think of the light your eyes can see as a small slice of a much bigger pie—the visible light spectrum. Just past the red edge of that slice is a huge region of light our eyes can’t perceive: infrared (IR). This is the invisible world where night vision comes alive.
An IR laser works by shooting out a beam of this invisible light. To your naked eye, nothing is happening. But your night vision device is built specifically to see this energy. It gathers the IR light that bounces off objects and translates it into the green-hued image you see, turning an invisible beam into a powerful tool.
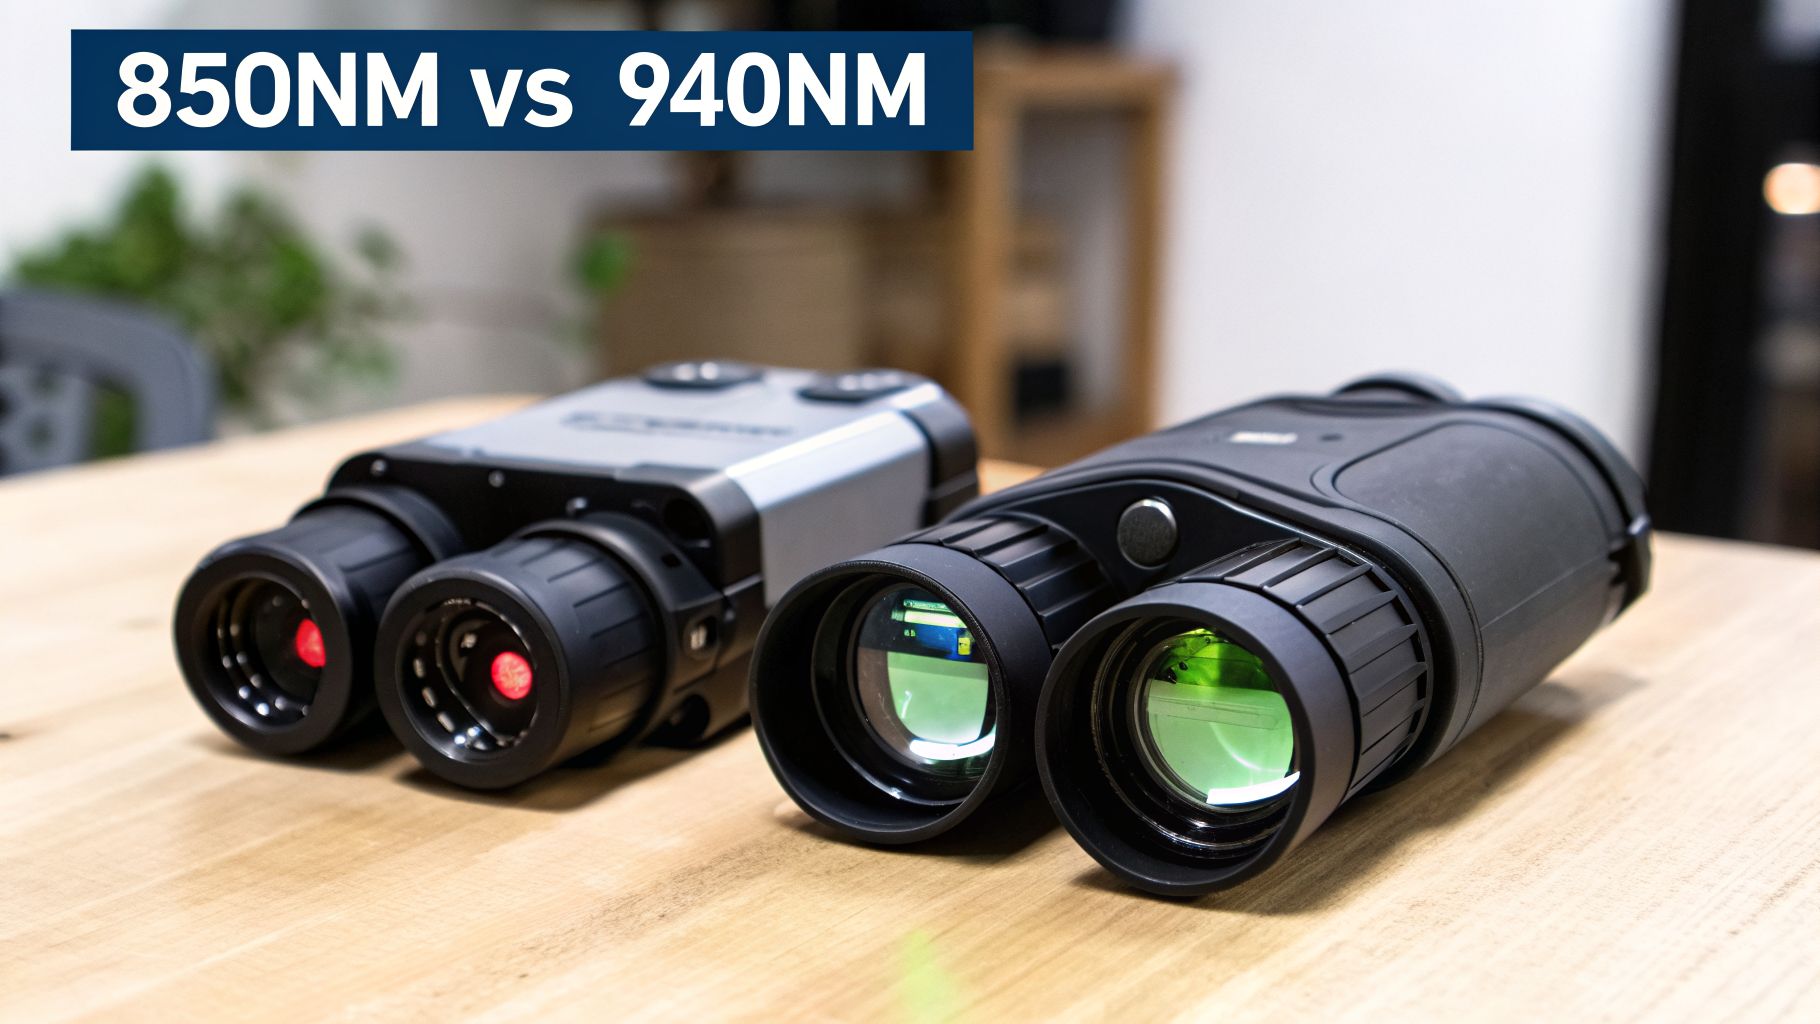
Choosing Your Wavelength: 850nm vs. 940nm
Not all IR is created equal. When you’re shopping for IR lasers or illuminators, the wavelength, measured in nanometers (nm), is a critical spec. It dictates how the device performs and how sneaky it is. The two you’ll see everywhere are 850nm and 940nm.
Here’s a simple way to think about it: 850nm is a whisper, while 940nm is complete silence.
850nm (The Whisper): This is the industry workhorse for a reason. It produces a powerful beam that your night vision can easily see, giving you better range and a much brighter picture. The trade-off? The emitter itself has a very faint, dull red glow that can be spotted by the naked eye if someone is close and looking right at it.
940nm (The Silence): This is your true stealth operator. A 940nm laser is totally invisible to the human eye, offering the ultimate in covert operation. The price for this invisibility is performance. NVDs are less sensitive to this wavelength, so your illumination range and the laser's brightness will be noticeably reduced.
So, which one is for you? For most hunters and tactical users who need to see and identify things at a distance, 850nm is the clear winner. If your work is primarily up close or in situations where being detected is an absolute non-starter, 940nm offers a stealth advantage you can't ignore.
The choice between 850nm and 940nm is always a tactical compromise. You’re trading peak performance for maximum stealth. Fully understanding this trade-off is the key to picking the right tool for your mission.
Your Two Primary Tools: Illuminator and Aimer
Most modern IR laser units are actually two-in-one devices. They contain an IR illuminator and an IR aiming laser. While they often live in the same box, they have completely different jobs. Getting this difference straight is fundamental to using them effectively.
A helpful way to understand the two main types of IR devices is to see one as a floodlight and the other as a laser pointer.
| Feature | IR Illuminator (The Floodlight) | IR Aiming Laser (The Pointer) |
|---|---|---|
| Function | Casts a wide beam of IR light | Projects a single, precise IR dot |
| Beam Shape | Wide, adjustable cone (flood) | Narrow, focused point (dot) |
| Primary Use | Observation, navigation, and PID | Aiming and target designation |
| Real-World Goal | To see and understand the entire scene | To place a shot accurately on a target |
Let’s break down what that means in the real world.
The IR Illuminator: Your Invisible Floodlight
The illuminator’s job is to splash a wide cone of IR light across your environment, just like a regular flashlight lights up a dark room. You can't see it, but through your NVDs, the world lights up.
This is your go-to for:
- Navigation: Moving confidently through the woods or an unlit building.
- Observation: Scanning a field or ridgeline to spot movement.
- Positive Identification (PID): Getting a good, clear look at something to confirm if it’s a threat, a friendly, or just a stray animal.
A law enforcement officer searching a dark warehouse, for example, would use their IR illuminator to check corners and open spaces without giving away their position with white light.
The IR Aiming Laser: Your Invisible Pointer
The aiming laser does the opposite. It projects a single, sharp dot of IR light that you place directly on your target. When looking through your night vision, that dot becomes your aiming point. It’s simple, fast, and intuitive.
This is your tool for:
- Rapid Target Engagement: Aiming your rifle instantly without needing to line up traditional sights.
- Target Designation: Pointing out a specific target for teammates who are also using night vision.
- Shooting from Unconventional Positions: Staying on target when you can't get a perfect cheek weld, like when shooting around a barricade or under a vehicle.
For a tactical team member making entry into a room, the aiming laser allows them to engage threats with incredible speed and accuracy the moment they appear.
From Snooperscopes to Modern Dominance
Before we had the slick, lightweight IR lasers and NODs (Night Observation Devices) we rely on today, seeing in the dark was a messy and incredibly dangerous business. To really get a handle on how our modern gear works, it helps to look back at where it all started—a journey driven by the brutal lessons of combat.
The first real attempts at night vision, what we now call Generation 0 (Gen 0), were "active" systems. Think of them as a giant, invisible flashlight. They had to blast the entire area with a massive infrared searchlight and then use a simple converter to see the reflected IR light.
It worked, but it had a fatal flaw. That huge IR searchlight was a screaming beacon to anyone else who had even basic night vision. You were essentially painting a massive "I'm right here!" target on your own position.
The Dawn of Active IR
This tech first showed up in a big way toward the end of World War II. From 1944-1945, the Germans fielded the VAMPIR system on their Panther tanks. These active IR devices used searchlights that weighed over 30 pounds just to light up a target. The U.S. followed with its own "snooperscopes," which saw some action in Korea.
While they could amplify light by about 1,000 times, their massive IR illuminators meant operators were easily spotted from miles away. The result? Combat effectiveness rates plummeted to below 20% in total darkness. You were more of a liability than an asset. You can dig into the early history of night vision technology to see just how clunky this gear was.
Using a Gen 0 device was a high-risk gamble. It proved the concept was possible, but the tactical cost was just too high. It was clear that to own the night, you had to see without being seen.
The big problem with Gen 0 was simple: you had to light yourself up to see anything. By projecting a powerful beam, you were handing the enemy your exact location. True night-time dominance demanded a way to see passively.
The Starlight Revolution
The next giant leap forward came with Generation 1 (Gen 1) during the Vietnam War. These were the first truly "passive" systems, earning the nickname "starlight scopes." Instead of projecting their own light, they amplified whatever ambient light was available—from the moon, stars, or even the faint glow of a distant city.
This wasn't just an improvement; it was a complete change in tactics. For the first time, a soldier could move and observe in the dark without sending out a giant IR signal. It handed the element of surprise back to the operator.
Of course, Gen 1 had its own issues. The scopes were still big, they struggled in near-total darkness, and the image was often blurry and distorted around the edges (an effect called "blooming"). But the ability to see passively was such a tactical game-changer that it paved the way for everything that followed.
- Generation 2 (Gen 2): This is where things got serious. The introduction of the Micro-Channel Plate (MCP) was a watershed moment, dramatically boosting image clarity and brightness. Gen 2 gear was smaller, tougher, and worked in much lower light conditions.
- Generation 3 (Gen 3): This was another monumental jump. Using a gallium arsenide photocathode made the tubes incredibly sensitive. Gen 3 delivered the crisp, clear images and outstanding low-light performance that have become the standard for modern military and law enforcement units.
This evolution from active searchlights to passive starlight scopes is exactly why our current setups are so potent. Today's gear combines the best of both worlds: the stealth of a passive Gen 3 device for quiet observation, plus the ability to "go active" with a precise IR laser for aiming or a quick burst from an illuminator when you need to see into the deepest shadows.
Choosing the Right Gear for Your Mission
Picking the right IR laser night vision setup isn't a simple matter of buying the most expensive gear. It’s all about matching the right tools to the job. While any night vision device can see the dot from an IR laser, how well you see it—and from how far away—comes down to the generation of your NVD. Getting this pairing right is the difference between a smart investment and a frustrating waste of money.
Think of it like building a race car. You wouldn't drop a high-performance V8 into a family sedan, nor would you put a four-cylinder engine in a Formula 1 car. Your NVD and IR laser have to be a matched set, working together to accomplish your goals, whether that’s scanning a field for hogs or clearing a dark hallway.
NVD Generations and IR Performance
The biggest single factor that will define your system's performance is the generation of your night vision device. Each "gen" marks a massive leap in technology, specifically in how well the unit amplifies light and how clear the resulting image is. This has a direct and profound impact on how well it works with an IR laser.
Generation 2 (Gen 2): Gen 2 was a huge improvement over older tech, and it's still very capable in many low-light situations. The catch is that these tubes are less sensitive. They often need a powerful IR illuminator to punch through deep shadows or see clearly at a distance. This can sometimes lead to a "blooming" effect where the image washes out at close range, so you have to be mindful of your illuminator's power settings.
Generation 3 (Gen 3): This is the gold standard for a reason. Used by military and law enforcement professionals, Gen 3 tubes are incredibly sensitive to all light, including the infrared spectrum. They can function beautifully with very little ambient light, making them perfect for staying hidden (passive observation). When you do light them up with an IR laser, their sensitivity lets you see the laser dot and illumination with stunning clarity at much greater ranges.
You can really see this evolution in action by looking at the military's own progress. During the Vietnam War, the move to passive Gen 1 scopes like the AN/PVS-2 was a game-changer. They amplified ambient starlight by about 1,000 times, and over 20,000 units were fielded, boosting the effectiveness of nighttime patrols by a staggering 300%. But they were dependent on moonlight and faltered in total darkness.
This led to the Gen 2 revolution in the 1980s, which introduced microchannel plates that cranked up the light amplification to 20,000 times and finally made helmet-mounted systems practical.
Matching Gear to Your Environment
The perfect setup for open-country hunting is going to be wildly different from what an officer needs for close-quarters urban work. It all comes down to what you’re doing and where you’re doing it.
For Law Enforcement in Urban/Suburban Environments:
Officers are constantly moving between different and unpredictable lighting conditions. One minute you're in a pitch-black alley, the next you're in a room contaminated with light from a streetlamp.
- Recommended NVD: A Gen 3 PVS-14 monocular or a set of dual-tube goggles is the way to go. That high sensitivity is critical for passive observation and keeping your situational awareness maxed out.
- Recommended IR Laser: You need a unit that has both a sharp, precise aiming laser and a wide, adjustable illuminator. The ability to instantly flood a room with invisible light for Positive Identification (PID) is non-negotiable.
For Hunters in Rural and Open Terrain:
Most hunters need to spot and identify game at longer ranges, often from a fixed position like a blind or stand.
- Recommended NVD: A high-quality Gen 3 device is still the top choice. Its superior light-gathering lets you scan fields and woodlines for long periods without ever turning on an IR device and giving away your position.
- Recommended IR Laser: The key here is a powerful, civilian-legal laser with a tightly focusable illuminator. This lets you "punch" that IR beam out to 200-400 yards or more to confirm a target is a coyote and not the neighbor’s German Shepherd. You can find more details on how to set up this kind of system in our guide to choosing an infrared illuminator for night vision.
Key Takeaway: Don't mismatch your components. Pairing a high-output IR illuminator with a Gen 2 device can blind you with image washout up close. On the flip side, using a weak illuminator with a top-tier Gen 3 NVD means you’re leaving a ton of performance on the table. Balance is everything.
So, before you spend a dime, take a hard look at your most common use case. What are your typical engagement distances? What are the ambient light conditions? Is stealth your top priority, or is long-range ID more important? Answering these questions first is the only way to build an IR and night vision package that truly works for you.
How to Properly Set Up and Zero Your IR Laser
Getting your hands on a high-quality IR laser is just the start. The real magic happens when you set it up correctly. A solid mount and a perfect zero are what separate a cool gadget from a tool you can bet your life on. Let's walk through how to get it done right.
First things first, you need to mount the laser to your rifle. Most modern laser aiming modules are designed for a standard Picatinny rail. You’ve got two main options for placement: the top rail (12 o’clock) or a side rail (3 or 9 o’clock). Each has its pros and cons.
Top Rail (12 o’clock): This is the go-to position for most shooters, and for good reason. Mounting the laser on the top rail, just in front of your optic, keeps the mechanical offset to a minimum. That's the vertical gap between your barrel and the laser beam. Less offset means your point of impact stays more consistent across different distances. The only real trade-off is that it might crowd your optic’s view a bit.
Side Rail (3 or 9 o’clock): A side mount keeps your top rail completely clear, which is great if you have a complex optic setup or want unobstructed access to iron sights. The catch? You introduce both horizontal and vertical offset, which makes the zeroing process a bit more complicated.
For most people, a top-rail mount is the smarter, simpler choice. Just be sure to push it as far forward as you can without getting in the way of your support hand or any backup sights.
The Fastest Way to a Reliable Zero
The quickest way to get your laser dialed in is to co-witness it with your primary optic, like a red dot, that's already been zeroed. This process simply aligns your IR laser dot with your optic’s reticle, getting you incredibly close to a perfect zero before you ever fire a round.
Co-witnessing is a crucial shortcut. By making your IR laser's dot perfectly overlap your zeroed red dot, you're essentially creating two parallel aiming systems. This saves a ton of time and ammo at the range and gives you a rock-solid reference point.
Here's how to do it. Find a wall at least 25 yards away and get your rifle stable. Look through your zeroed red dot and put the dot on a specific, easy-to-see point. Next, turn on your IR laser. Looking through your night vision, use the laser’s windage and elevation turrets to move the IR dot until it sits right on top of your red dot. That’s all there is to it.
Live-Fire Zeroing and Mechanical Offset
Co-witnessing gets you on paper, but a live-fire zero is what delivers true precision. For most rifle platforms, a 50-meter zero is an incredibly practical and effective choice. At that distance, your bullet’s path is fairly flat, giving you what’s essentially a "point-and-shoot" solution out to around 200-250 meters with little to no guesswork.
Follow these simple steps:
- Set Your Target: Place a target at exactly 50 meters.
- Stabilize the Rifle: Use a bipod, sandbags, or a bench rest. You need it to be absolutely steady.
- Fire a Group: Using your IR laser to aim, fire a 3-5 round group at the center of your target.
- Adjust the Laser: Keeping the rifle aimed at your original spot, use the adjustment dials to "walk" the laser dot over to the center of the bullet group you just fired.
- Confirm Your Zero: Fire another group to make sure your point of aim and point of impact are now the same.
This is where the power of modern night vision really shines. A Gen 3 device paired with a precisely zeroed IR laser can effectively engage targets past 500 meters. Data from U.S. military actions shows that systems equipped with IR lasers were used in 80% of special operations raids, contributing to a 95% success rate in engaging targets and a 70% drop in friendly fire incidents. To learn more about the technology's evolution, check out the history of night vision devices on Wikipedia.
Whether you’re in law enforcement or a serious civilian shooter, mastering this setup is how you unlock that same level of game-changing performance.
Understanding IR Laser Safety and Regulations
Running an IR laser on your rifle isn't just about gaining a tactical edge—it comes with a serious responsibility. Since the infrared beam is totally invisible to your naked eye, it’s dangerously easy to forget you're pointing a powerful tool that deserves every bit of the same respect you give your firearm's muzzle. A safety-first mindset isn't optional. It's a hard rule.
The Food and Drug Administration (FDA) is the agency that sets the rules for laser products in the U.S. They group lasers into different classes based on power output and their potential to cause harm, particularly to your eyes. For anyone outside of the military or law enforcement, knowing these classes is non-negotiable.
Civilian vs. Restricted Laser Classes
Most of the IR aiming lasers you can buy as a civilian are Class 1 devices. You’ll often see them marketed as "eye-safe" because the FDA caps their power at a very low 0.7 milliwatts (mW). This cap is a deliberate safety measure to prevent accidental eye damage from a quick, passing exposure.
Military and law enforcement units, on the other hand, are a different animal entirely. These are typically Class 3B lasers, and their power can jump to 25 mW or even higher. That massive power boost gives them incredible range for both aiming and illuminating a target, but it also makes them extremely dangerous. They can cause instant, permanent blindness faster than you can blink, even from a momentary accidental sweep across someone’s eyes.
Crucial Warning: Never point an IR laser at people, aircraft, or anything reflective like windows or water. The beam is invisible, can travel for miles, and can cause irreversible eye damage. Pointing a laser at an aircraft is a federal crime.
Getting your laser set up correctly is a key part of using it safely and effectively. The process is straightforward.

Following this simple flow—mount, co-witness, and zero—makes sure your laser is accurate, predictable, and always under your control.
The Rules of Responsible Ownership
For civilian users, the legal side of things is pretty clear: stick to civilian-legal, eye-safe lasers. Trying to get your hands on a restricted, full-power unit is not only against federal regulations but opens you up to huge liability. Yes, there's a performance trade-off—a Class 1 laser simply won't reach as far as a military-grade device—but safety has to be the priority.
Responsible ownership really just boils down to a few core disciplines:
- Treat it like a loaded gun. Never point the laser at anything you are not willing to destroy.
- Know your backstop and beyond. That invisible beam doesn't just stop; it can travel for miles.
- Confirm your classification. Always double-check that the device you’re buying is a civilian-legal Class 1 model.
If you understand the rules and handle your gear with discipline, you can safely get the most out of this technology. For a closer look at what's available, our breakdown of different IR laser pointers is a great place to start.
Common Questions About IR Lasers
When you're new to the world of IR lasers and night vision, a few questions always seem to pop up. Getting straight answers is the fastest way to get comfortable with your gear and put it to good use. Let's clear up some of the most common ones.
Can You See an IR Laser Without Night Vision?
The short answer is no, not really. The entire point of an IR laser is that it operates on a wavelength of light our eyes simply can't process. You need a night vision device (NVD) to see the beam and the dot on your target.
Now, there is a tiny exception. With some lower-wavelength lasers, like those around 850nm, you might notice a very faint, dull red glow if you look directly at the emitter diode from just the right angle. This isn't the beam itself, and it’s completely useless for aiming.
Think of it this way: Your IR laser is speaking a language only your NVD can understand. Without that translator, the beam and dot are completely invisible downrange.
What Is the Difference Between Civilian and Full Power Lasers?
This is a big one, and it all boils down to two things: raw power and who the FDA legally allows to own it. The regulations are all about eye safety.
- Civilian-Legal (Class 1) Lasers: These are what's available to the public. The FDA caps their output at 0.7 milliwatts (mW) to ensure they are "eye-safe" under most conditions. This safety feature comes at the cost of range, but it makes them legal to buy and own.
- Full-Power (Class 3B) Lasers: These are a different beast entirely. Reserved strictly for military and law enforcement, these units push out 25mW or more. This raw power gives them incredible range, but it also means they can cause immediate, permanent eye damage if used improperly.
How Does an IR Laser Work in Total Darkness?
This is where an IR laser and illuminator really earn their keep. Standard "passive" night vision works by amplifying tiny amounts of existing light—from the moon, stars, or even distant city glow. But in a place with zero ambient light, like a sealed building or a cave, your NVD is blind. It has no light to amplify.
An IR laser system solves this problem by creating its own light. It actively paints the scene with infrared light that's invisible to the naked eye. This gives your NVD a bright, clear picture for navigating and aiming, even in what would otherwise be absolute, total darkness.