Choosing Your Ultimate Helmet Mount Flashlight
Ever found yourself needing a third hand just to hold a flashlight? A helmet mount flashlight is the solution—a compact, powerful light source built to clamp directly onto your tactical, rescue, or recreational helmet. It's a simple idea that changes everything: hands-free lighting that moves with your head, letting you focus on the task at hand, whether that's handling a tool, a weapon, or a map.
Why a Helmet Mount Flashlight Is a Critical Tool
Think of it as your personal lighting assistant, one that anticipates your every move. The whole point is to get that flashlight out of your hand and onto your gear. This isn't just a small convenience; it’s a massive upgrade in how you operate in low-light situations.
When your hands are free, you're more capable. It's that simple. If you're a law enforcement officer clearing a building, a paramedic treating a patient after dark, or a climber navigating a tricky pitch, your hands are your most important asset. Occupying one with a flashlight is a handicap you can't afford.
Enhancing Situational Awareness
The real magic of a helmet light is how it syncs illumination with your eyesight. The light goes exactly where you look, instantly. There's no fumbling or awkward wrist-angling to point a handheld beam—it just works, intuitively. This immediate feedback loop shaves off precious seconds in your reaction time and makes spotting obstacles or threats much faster.
A helmet-mounted light perfectly marries your line of sight with your light source. This gets rid of the mental gymnastics needed to aim a separate flashlight, letting you stay locked in on your objective, not your equipment.
This advantage is why these lights are quickly becoming standard issue. The numbers back it up, too. The global tactical flashlight market hit USD 341.6 million in 2024, and North America’s military, law enforcement, and outdoor enthusiasts are driving over 40% of that demand. You can explore more data on tactical lighting trends to see just how fast this segment is growing.
A Versatile Tool for Diverse Missions
The value of a helmet-mounted light isn't limited to just one field; its benefits ripple across dozens of professions and hobbies. For many users, it's not just another piece of gear—it's essential for their safety and success.
We can see how different people get a specific edge from this setup.
Core Advantages of a Helmet Mount Flashlight by User
| User Profile | Primary Advantage | Example Scenario |
|---|---|---|
| Law Enforcement | Hands-Free Threat ID | Keeping a firm, two-handed grip on a firearm while scanning a dark room or alleyway. |
| Search & Rescue | Terrain Navigation | Safely crossing steep, unstable ground at night while using both hands for balance. |
| Industrial Worker | Task Illumination | Performing detailed repairs in a poorly lit engine bay without juggling a light and tools. |
| Outdoor Adventurer | Camp Management | Setting up a tent, cooking a meal, or reading a map after sunset with total ease. |
Ultimately, adding a helmet mount flashlight to your loadout is about making yourself more effective when the lights go out. It guarantees your light is always pointed where you need it, your hands are always ready for action, and your focus never wavers.
Understanding Different Helmet Mounting Systems
Figuring out how to attach your helmet mount flashlight can feel like the trickiest part of the whole setup. Think of it like picking the right tool for a specific job—the hardware you choose dictates how secure, versatile, and ultimately, how effective your light will be. Let's break down the main ways to get your light locked onto your helmet so you can find the perfect fit for your gear.
This diagram shows why a helmet light is such a game-changer, giving you a clear edge in any low-light situation.
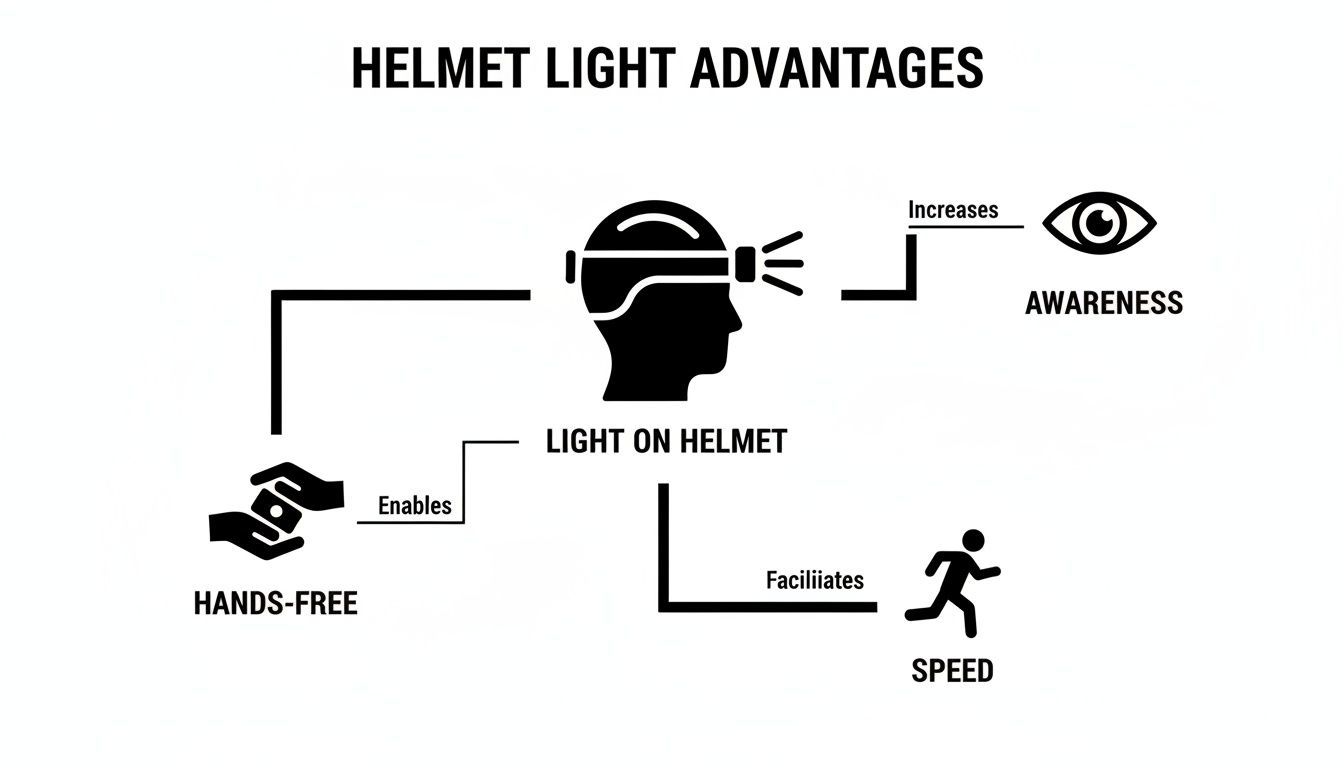
As you can see, it all boils down to keeping your hands free, seeing more of what's around you, and moving faster and more efficiently when visibility drops.
ARC Rails: The Modular Workhorses
Imagine ARC (Accessory Rail Connector) rails as the universal adapter for modern tactical helmets. You'll see them running along the sides of helmets from top brands like Ops-Core and Crye Precision, easily identified by their distinct dovetail groove. This design is brilliant because it lets you slide accessories on and off with almost zero effort.
A flashlight mount designed for an ARC rail simply slides into this groove and locks down, usually with a small set screw or a quick-detach lever.
- Pros: The biggest win here is modularity. You can add, remove, or shift your light in seconds, often without touching a tool. This system supports a massive ecosystem of gear beyond just lights, making it the go-to for anyone who regularly changes their helmet configuration.
- Cons: Since they sit on the outside of the helmet, ARC rail mounts can add a little bulk. If a mount isn't properly tightened, it might also develop a slight wobble over time, so you'll want to make equipment checks a regular habit.
NVG Shrouds: The Dedicated Specialists
The NVG (Night Vision Goggle) shroud is that mounting plate you see right on the front of most tactical helmets. Its main purpose is to be a rock-solid anchor for night vision devices. But smart manufacturers have created specialized flashlight mounts that click right into this very same shroud.
Think of an NVG shroud mount as your helmet's "center stage." It puts your light directly over your brow, casting a beam that aligns almost perfectly with where you're looking. This is fantastic for getting symmetrical, forward-facing light.
This setup is ideal if you want a dedicated, central light and aren't planning to run night vision at the same time. It creates a super stable platform with almost no snag hazard because the light sits tight against the helmet. The only real trade-off is that it’s an either/or situation—you can’t run an NVD and a shroud-mounted light simultaneously.
M-LOK and Other Side Mounts
M-LOK is another hugely popular system, first seen on firearm handguards but now common on helmets from companies like Team Wendy and MTEK. Instead of a rail, M-LOK uses clean, rectangular slots cut into the helmet shell itself. Accessories attach using special T-Nuts that lock in from the inside, giving you an incredibly strong and low-profile connection.
For helmets that don't come with built-in ARC or M-LOK systems, you can often find proprietary clip-on or bolt-on rail sections. These adapters let you add a piece of rail exactly where you need one, offering a flexible fix for less common helmet models. This gives you the freedom to build a custom setup that works for your specific needs.
The widespread adoption of these systems in professional circles shows just how critical they've become. Helmet-mounted lights have completely changed how military and law enforcement operators work. It’s no surprise the wider flashlight market is projected to grow from USD 0.95 billion in 2025 to USD 1.59 billion by 2034. And as the military helmet market itself expands toward a projected USD 5.1 billion by 2033, integrated lighting will only become more essential.
Matching the right mounting system to your helmet is the first step toward building a reliable, wobble-free lighting solution that just works.
How to Evaluate Key Flashlight Specifications
When you're staring at the back of a flashlight package, the wall of technical terms can feel a little overwhelming. Lumens, candela, IP ratings—these aren't just marketing fluff. They're the language that tells you exactly how that light will perform when you actually need it. Let's break down the jargon into real-world terms so you can pick the right tool for the job.
It helps to think of a flashlight like a water hose. You can have a massive amount of water coming out (power), but how it’s delivered—as a wide spray or a focused jet—makes all the difference. Flashlights are no different, and understanding that is the first step.
Lumens and Candela: The Raw Power vs. The Focused Reach
The two most critical specs you’ll see are lumens and candela. They sound similar, but they measure two completely different things. Getting this right is absolutely crucial.
Lumens (lm): This is the total amount of light pouring out of the flashlight. It’s the raw, unfiltered output. Think of it as the total gallons per minute coming out of that water hose. A high lumen count means you're putting out a ton of light in every direction.
Candela (cd): This measures the intensity, or punch, at the very center of the beam. It tells you how far that light will "throw." This is the water pressure in the hose. High pressure shoots a tight, powerful stream a very long way.
Here's the classic rookie mistake: chasing the highest lumen number you can find. A 2,000-lumen light sounds incredible, but if it has low candela, you just get a massive, short-range "wall" of light. That's great for lighting up a room, but it won’t help you identify what's making a noise 100 yards out in a field.
For a helmet light, balance is everything. You need enough lumens to flood your immediate workspace but enough candela to push that light out to a useful distance.
Understanding Beam Profile: Flood vs. Spot
That relationship between lumens and candela is what creates the beam's profile—basically, whether it's a "flood" light or a "spot" light. Most tactical lights are a hybrid, but they almost always lean one way or the other.
A flood beam acts like a work light. It’s wide and even, illuminating a huge area up close. This is exactly what you want for searching a room, working on a vehicle, or navigating through thick brush where your focus is on what’s right in front of you. These lights are high in lumens but lower in candela.
A spot beam, on the other hand, is a tight, focused beam built for distance. It’s like a spotlight. High-candela lights are the champions here, letting you punch through the darkness to see what’s way down the path.
The best helmet lights give you both. They have a bright central "hotspot" for distance and a dimmer, wider "spill" of light around it. That spill is critical for maintaining your peripheral vision so you don't get tunnel vision.
Flashlight Spec Comparison for Mission Profiles
Choosing the right specs really comes down to your primary mission. A light that's perfect for clearing buildings might be less than ideal for scanning a field. This table breaks down how different specs align with common activities.
| Specification | Best for Close Quarters (e.g., Room Clearing) | Best for Long Range (e.g., Hunting) | Best for General Use (e.g., Camping) |
|---|---|---|---|
| Lumens | High (1,000+ lm) to overwhelm a room | Moderate (500-1,000 lm) is sufficient | High (1,000+ lm) for versatility |
| Candela | Low-to-Moderate (<20,000 cd) to avoid backsplash | Very High (50,000+ cd) for maximum throw | Moderate (15,000-40,000 cd) for balance |
| Beam Profile | Wide flood with a soft hotspot and lots of spill | Tight spot with minimal spill | Balanced beam with a defined spot and usable spill |
| Runtime | Focus on high-output runtime for short bursts | Long runtime on medium settings is key | Overall battery efficiency and multiple modes |
| Battery Type | Dual Fuel (CR123A/18350) for flexibility | Rechargeable (18650) for sustained output | Rechargeable for cost-effectiveness; CR123A backup |
Ultimately, there's no single "best" light—only the best light for what you do. Use your intended application to guide your decision on the numbers.
Runtime and Battery Types
A beast of a light is just a paperweight if the battery dies. Runtime charts show how long a light will last at different brightness levels, but read them carefully. Manufacturers love to advertise the runtime on the lowest possible setting. You need to look for the runtime on high or turbo, because that's what you'll be using when things get serious.
The battery itself is just as important. Your choice usually comes down to two main types:
CR123A: These are the workhorses. Disposable lithium batteries with an incredible shelf life (up to 10 years) and fantastic performance in freezing temperatures. They're the standard for "go-bags" or situations where you can't count on a charger.
Rechargeable (18650/18350): These are the modern, cost-effective option for anyone who uses their light often. A single rechargeable battery can be charged hundreds of times, and they often provide better peak performance. Many of the best lights today are "dual fuel," giving you the option to run either type.
Durability and Water Resistance
Your helmet light is going to get beat up. It'll get rained on, banged against walls, and dropped. That's where you need to pay attention to its IP (Ingress Protection) rating.
This rating is simple: it’s two numbers. The first tells you how sealed it is against dust (0-6), and the second tells you how sealed it is against water (0-8). For any serious use, you shouldn't even consider a light rated below IPX7. That means it can be fully submerged in 1 meter of water for 30 minutes and keep on working. IPX8 is even better, offering protection against continuous submersion. Understanding these ratings is a huge part of learning how to spot genuine tactical flashlights when buying online and making sure you get a tool that won’t fail you.
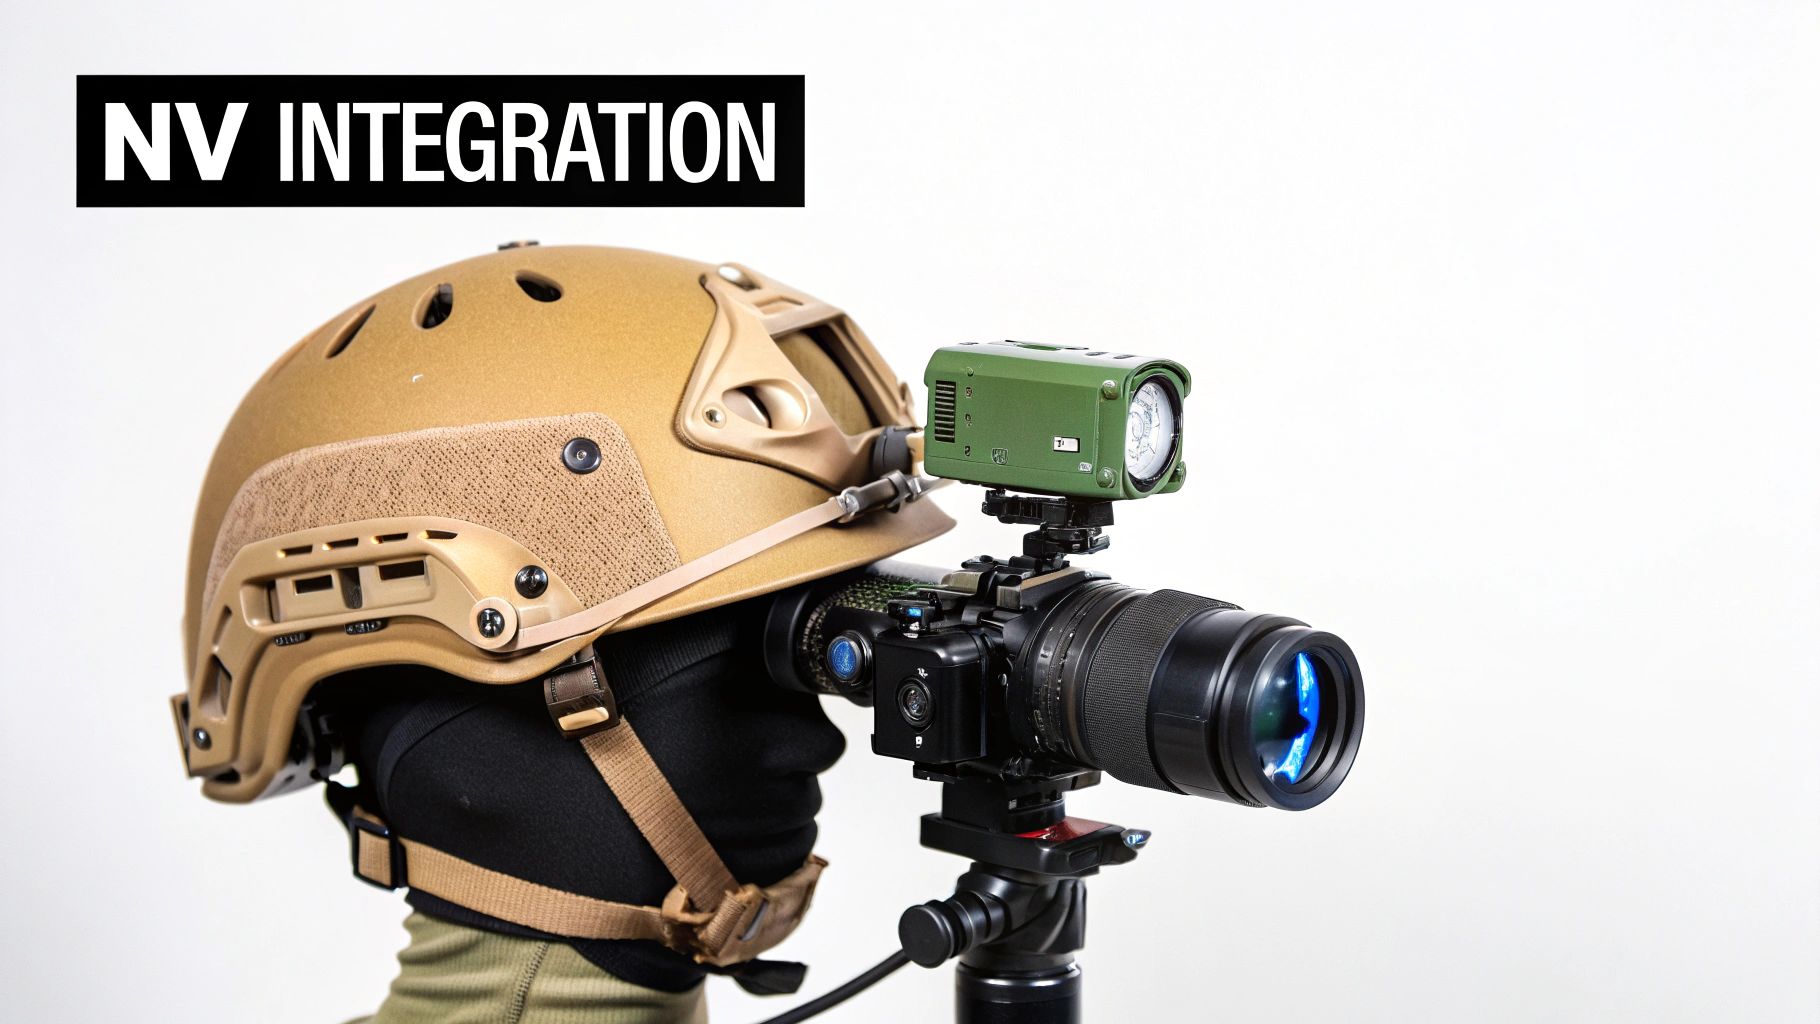
Night Vision Integration: Turning Your Helmet into a Force Multiplier
For anyone running serious kit, a helmet-mounted flashlight is never just a light. It’s part of a complete low-light system. The single most important relationship you'll manage is the one between your flashlight and your night vision device (NVD), a pairing that transforms your helmet into a tool for owning the dark.
This isn't just about bolting two gadgets to your lid. It's about building a seamless system where each piece of gear makes the other better. The goal is to move between visible and invisible light instantly, adapting to your environment without ever fumbling with your equipment.
White Light: Your High-Impact Tool
Even with high-end night vision, your white light is still absolutely essential. A sudden blast from a high-candela beam is a powerful tool for disorientation. It can overwhelm a threat's vision, giving you critical seconds to make a decision, give commands, or press an advantage.
Think of it as a de-escalation tool. A quick flash can be enough to confirm if someone is unarmed or make them hesitate, potentially stopping a bad situation from getting worse. Your white light is your "loud" option—you use it deliberately and with a clear purpose.
Infrared Light: The Unseen Advantage
The real game-changer is pairing your NVD with an infrared (IR) illuminator. Essentially, an IR illuminator is a flashlight that's invisible to the naked eye. It floods an area with light that only your night vision can see, acting like a powerful spotlight that no one else knows is on.
Your NVD works by gathering and amplifying tiny amounts of existing light. But what if there’s no light, like deep inside a windowless building? That's where IR comes in. It provides the "invisible fuel" for your NVDs, painting the scene so you get a crisp, bright image.
This lets you see with perfect clarity without giving away your position. It’s a huge advantage. This fusion of gear is becoming standard practice, with data showing 70% of modern military helmets now include modular mounts for lights. This integration can reduce a user's cognitive load by 30% in high-stress scenarios. For those running a quality light with an NVD like a PVS-14, target acquisition can improve by as much as 60% in low-light conditions.
Positioning: How to Avoid Blinding Yourself
One of the first mistakes people make is mounting their light where it causes "splashback." This is when the beam bounces off your own gear—the side of your rifle, a suppressor, or even your optic—and washes out your NVDs with a blinding glare.
Fortunately, it’s an easy problem to solve. Just follow these simple rules:
- Push It Forward: Mount your light as far forward on the helmet rail as you can. This gets the beam out in front of your gear, minimizing the chance it will reflect back at you.
- Get It High: A higher mount helps the beam clear anything below it. This is especially crucial if you have lasers or other accessories mounted on the top rail of your firearm.
- Use an Offset: Articulating mounts or offset adapters are your best friend here. They push the light out and away from the helmet's centerline, giving the beam an unobstructed path.
A little thought about placement ensures your light is helping, not hurting you. To go even deeper, check out our guide on choosing an infrared illuminator for night vision. Getting your visible and IR light dialed in with your NVDs is what takes a helmet setup from just "good" to truly mission-ready.
Getting Your Helmet Light Set Up and Maintained
Look, a top-tier helmet mount flashlight is a serious investment in your safety and ability to get the job done. But just like any professional tool, it's only as good as its setup and upkeep. Let's walk through how to install and care for your light so it becomes a reliable partner, not a weak link.
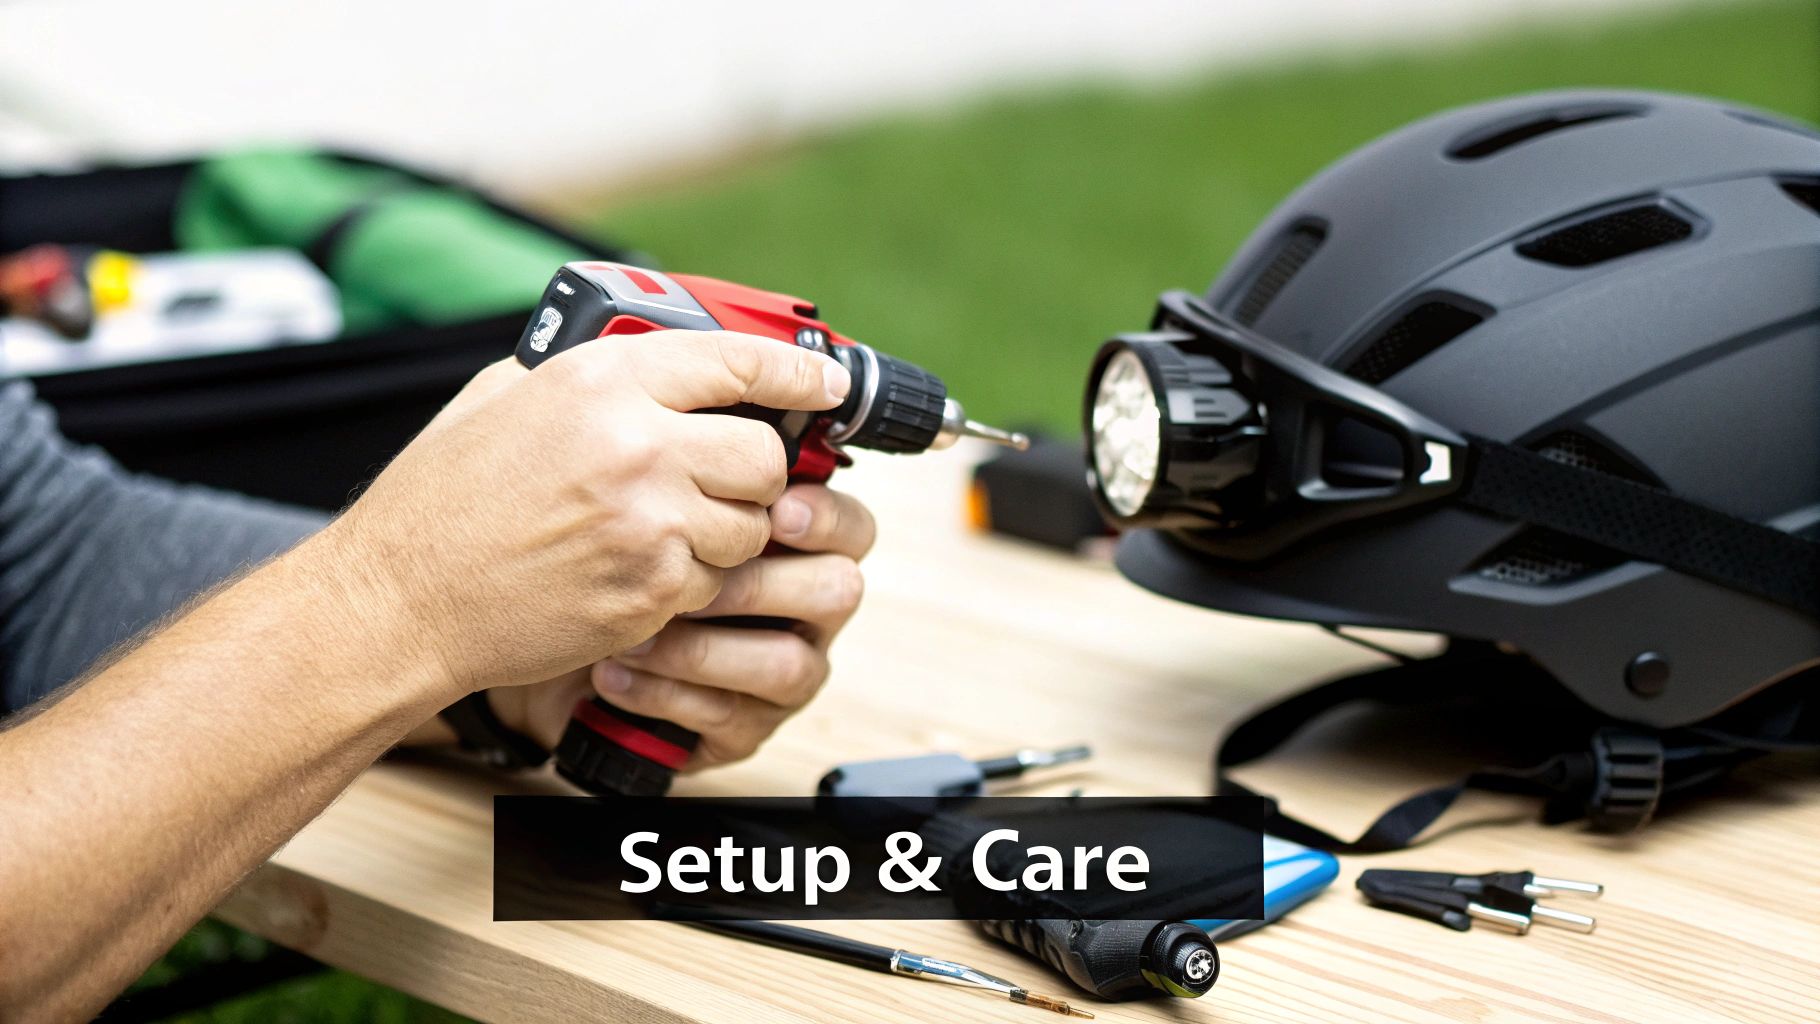
Think about it like mounting a scope on a rifle. You wouldn't just slap it on and hope for the best, right? You have to be deliberate to get it right. Same principle applies here.
The Initial Setup Process
A rock-solid mount is everything. If your light is loose, it's going to wobble, shift your beam when you can't afford it to, or even fall off completely. We can't have that, so let's get it locked down tight.
Prep the Surface: First thing's first. Grab an alcohol wipe and clean the spot on your helmet where the mount will go. This gets rid of any oils or grit, ensuring a perfectly flush and secure fit.
Attach the Mount: Follow the manufacturer's directions and loosely attach the mount. If you're using an ARC or M-LOK rail, make sure the locking lugs are fully seated in the slots before you start cranking down on the screws.
Install the Light: Now, secure the flashlight into the mount itself. Most quality systems, like the S&S Precision M-AX, use a small set screw for this. Don't blow this step off—it's crucial for keeping the light from shifting.
Tighten and Torque: With everything positioned, tighten all the screws to spec. I highly recommend a small dab of a non-permanent thread locker (blue Loctite is perfect) to keep vibrations from loosening anything over time.
Aligning the Beam for Peak Performance
Where the light points is just as important as how it's mounted. The goal is to get the beam perfectly aligned with your natural line of sight so it feels like an extension of your own eyes.
Here’s a pro tip from the field: use a technique called "umbrella lighting." Instead of pointing the beam straight ahead and blasting your teammates every time you look at them, angle the light head up. In a room, this bounces the light off the ceiling, filling the space with soft, usable illumination. It's a game-changer for searches or medical tasks.
When you do need that forward-facing beam, put your helmet on and stand facing a wall about 15-20 feet away. Adjust the light until the brightest part of the beam, the hotspot, is centered exactly where your eyes are naturally looking. That way, your light is always on target.
Routine Maintenance and Proactive Care
Your gear takes a beating. A few minutes of preventative maintenance can make all the difference. Get in the habit of running these quick checks.
Battery Management: Batteries die, often at the worst possible moment. Check your charge before you head out and swap them out early. If you're running CR123As, something like the Thyrm CellVault is a great way to carry spares securely.
Lens Cleaning: A grimy lens can cut your light output by 20% or more. Just a quick wipe with a microfiber cloth will keep your beam bright and clear.
Seal Inspection: Take a second to check the little rubber O-rings that keep water out. Make sure they're clean, aren't cracked, and have a thin coat of silicone grease to maintain that waterproof seal.
Function Check: Before you rely on it, run through all the modes—white light, IR, strobe, everything. This simple check takes five seconds and can save you from a massive headache later.
By putting in a little effort upfront and making these checks a habit, you can be confident your helmet light will work exactly as it should, every single time. It's not just about taking care of your equipment; it's about making sure your equipment is ready to take care of you.
Your Final Pre-Purchase Checklist
Alright, let's cut through the noise. Choosing the right piece of kit can feel like a minefield of specs and marketing hype, but getting it right is simpler than you think. It really just boils down to a few honest questions about what you actually need.
This isn't just another checklist; think of it as your final gut check. Running through these points will make sure the helmet light you're eyeing is a perfect match for your mission and your existing gear. No one wants to deal with buyer's remorse, especially when it comes to tools you depend on.
What’s the Mission?
First things first: what are you really going to be doing with this light? The primary use dictates everything.
What's your typical engagement distance? Are you clearing rooms and working inside vehicles, or are you trying to spot something 100 yards out? For close-quarters work, a wide, high-lumen flood beam is your best friend. For anything at a distance, you need a high-candela "thrower" beam to punch through the darkness. Nailing this down will immediately cut your options in half.
Is this for duty or recreation? A light that’s going on a patrol helmet needs to withstand a whole different level of abuse than one used for a weekend airsoft game. Be honest about how bombproof it needs to be—look at impact resistance and IP ratings for waterproofing.
A purpose-built tool that perfectly handles 80% of what you do is infinitely better than a "jack-of-all-trades, master-of-none" gadget. Don't water down your primary requirement for features you'll barely use.
How Does It Fit With Your Current Kit?
The best flashlight in the world is useless if it doesn't play nice with your existing setup. Compatibility isn't a small detail; it's a deal-breaker.
What kind of helmet are you running? Take a look at your helmet. Do you have ARC rails? M-LOK slots? Or just a standard NVG shroud up front? Buying a light with the wrong mount is the number one mistake people make, and it's the easiest one to avoid.
Are you running night vision? If you ever plan on using this light with NVDs, then IR capability is mandatory. A white-light-only model is a liability under night vision. Make sure the light not only has a dedicated IR mode but also that you can mount it in a way that minimizes splashback off your gear.
Walking through these questions turns a confusing search into a clear, methodical process. You're no longer just guessing; you're matching the right tool to the job. Do this, and you'll end up with a helmet light you can trust to perform when it counts.
Got Questions? We've Got Answers.
We get a lot of questions about helmet-mounted lights. It makes sense—this is a critical piece of gear, and the details matter. Here are straight answers to some of the most common things we hear from customers.
Can I Just Strap Any Old Flashlight to My Helmet?
You could, but you really shouldn't. A dedicated helmet mount flashlight is built for this specific job. They're lightweight, tough as nails, and designed to balance perfectly on your head.
Trying to rig up a heavy, handheld flashlight is a recipe for neck strain. It'll be wobbly, unstable, and a major distraction when you need to focus. Purpose-built lights are made to lock securely onto systems like ARC rails or M-LOK, so you can count on them to stay put.
What's the Real Difference Between Lumens and Candela?
This is probably the most important thing to understand when picking a light. Let’s break it down simply:
- Lumens are all about the total amount of light coming out. Think of it as a floodlight filling a whole room. It's great for seeing everything up close.
- Candela is about intensity and distance. This is the tight, focused beam that punches through the darkness to let you see things far away.
A light with high lumens but low candela gives you a massive, soft flood of light for tasks right in front of you. Flip that, and a high-candela light creates a laser-like "spot" beam for identifying targets way downrange. The sweet spot for a tactical light is a healthy balance of both.
How Do I Stop My Light from Blinding My Optic?
Ah, "splashback." That frustrating glare that bounces off your rifle and washes out your red dot or night vision. The fix is all about placement.
You need to mount your flashlight as far forward on your helmet as you can. Pushing the light's source ahead of your rifle means the beam won't clip any part of your gear, giving you a crystal-clear sight picture.
Rule of thumb: When you shoulder your rifle, the front bezel of your light should be ahead of any part of your weapon. Get that right, and you’ll eliminate splashback before it ever becomes an issue.
Are Rechargeable Batteries Better Than CR123As?
This one really comes down to your mission. There’s a time and place for both.
Rechargeable batteries (like the popular 18650 or 18350) are awesome for training and everyday use. They'll save you a ton of money in the long run.
On the other hand, disposable CR123A batteries are the undisputed king of reliability and long-term storage. They can sit in a go-bag for up to 10 years and still work perfectly. They also perform much better in freezing temperatures. The best setup? A "dual fuel" light that takes both, giving you the best of both worlds.
Ready to see in the dark? The team at Superior Tactical LLC has spent over a decade helping operators get the right gear. Find your perfect helmet mount flashlight and accessories today.