A Complete Guide to the Types of Night Vision Technology
When you're staring out into a moonless night, the world simply vanishes. But with the right gear, that darkness isn't an obstacle—it's an advantage. There are two fundamental ways to own the night: image intensification, which is all about amplifying what little light exists, and thermal imaging, which sees the world in terms of heat. They're completely different approaches, each with its own strengths for seeing what goes bump in the night.
How We See in Complete Darkness

Before we get into the tech, let's think about how our eyes work. We see things because light bounces off them and into our eyes. No light, no sight. It's that simple. Night vision technology is all about finding clever ways to work around that fundamental limitation.
The first, and probably most well-known, method is image intensification (I²). Think of it like a souped-up amplifier for light. It takes the faintest traces of ambient light—from a sliver of moon, starlight, or even the glow from a distant town—and cranks up the brightness by thousands of times. This is what creates that classic, glowing green view we all recognize from movies.
Image Intensification and Thermal Imaging
Then you have thermal imaging, which plays by a totally different set of rules. It couldn't care less about visible light. Instead, it sees the invisible world of infrared energy, or what we feel as heat. Every object, living or not, gives off a heat signature. Thermal devices translate these temperature differences into a visible picture, letting you spot a warm target against a cool background, even in a sealed room with zero light.
These two technologies are the bedrock of everything we do in the night vision world. Grasping how they differ is the first and most important step in picking the right device.
- Image Intensification: This tech needs some light to function, even if it's imperceptible to you. It's fantastic for getting a clear, detailed picture that lets you navigate terrain and identify what you're looking at.
- Thermal Imaging: This works with no light at all and can punch through visual barriers like smoke, dust, and fog. For pure detection—finding a heat signature, period—nothing beats thermal.
The easiest way to think about it is this: image intensification lets you see a super-bright version of what's actually there, while thermal shows you an entirely different world of heat that your eyes can't see. One gives you clarity, the other gives you detection.
If you're interested in the nitty-gritty science behind it all, you can learn more about how night vision works and see what makes these devices tick. Knowing the "why" helps make sense of which gear is best for your mission, whether you're hunting hogs or running a security patrol. Picking the right tool starts with knowing how it sees.
The Real Magic Behind Night Vision: Image Intensification

When you picture night vision, you're almost certainly thinking of image intensification, or I². This is the classic "green screen" technology that has dominated military and professional use for decades. It doesn’t create light; it multiplies it.
Think of it like an incredible amplifier. An I² device grabs the tiny, scarce photons from starlight or moonlight and runs them through a process that multiplies their energy thousands of times. What starts as a faint, invisible scene becomes a bright, clear image you can navigate and operate in. It's a game-changing capability, and it has come a long way since its inception.
Generation 0: The Active Beginning
The very first night vision systems, now called Generation 0, weren't the stealthy tools we use today. Developed back in World War II, they were "active" systems. This meant they had to blast the area with a powerful infrared (IR) spotlight, which was totally invisible to the naked eye.
While it let soldiers see in the dark, this approach had a massive drawback. Anyone else with an IR detector could see that beam shining like a beacon, immediately giving away the user's position. Effective, but far from subtle.
Generation 1: A Passive Revolution
Things really changed in the 1960s with Generation 1 (Gen 1). For the first time, these devices could operate "passively," meaning they could amplify existing ambient light without needing that giant IR flashlight. It was a massive leap forward in stealth and usability.
Gen 1 tubes gave users around 1,000x light amplification, which was impressive for its time. However, they had their issues:
- Images were often blurry or distorted around the edges, creating a "fisheye" effect.
- They struggled on moonless nights, often forcing users to switch on a small IR illuminator anyway.
- The tubes themselves had a fairly short lifespan.
Even with its flaws, Gen 1 set the stage for modern night vision by proving passive observation was possible.
Generation 2: The Microchannel Plate Breakthrough
The 1970s brought the next quantum leap: Generation 2 (Gen 2). The secret ingredient was the microchannel plate (MCP), a tiny glass wafer filled with millions of microscopic channels. When electrons enter these channels, they bounce off the walls, creating a cascade that releases thousands of additional electrons.
This single innovation boosted light amplification to around 20,000x. Suddenly, the image was dramatically brighter, sharper, and usable in much darker conditions. Gen 2 truly minimized the need for IR illuminators and delivered the clear, high-quality performance users had been waiting for.
The MCP is the engine of modern image intensification. It's what allows a high-quality tube to turn a handful of photons from a distant star into a usable, detailed image, giving operators a decisive advantage on the darkest nights.
Generation 3: The Professional Standard
Today, Generation 3 (Gen 3) is the undisputed gold standard for military, law enforcement, and serious civilian operators. The key advancement was a new photocathode material—gallium arsenide—which is incredibly efficient at converting light into an electronic signal.
This upgrade pushes light amplification to 50,000x and beyond. The result is an exceptionally clean, crisp image, even on nights so dark you can't see your hand in front of your face. Further improvements like autogating (protecting the tube from sudden bright lights) and filmless tubes have continued to push the boundaries of what’s possible.
At Superior Tactical, we focus on providing top-tier Gen 3 devices because we know they deliver the performance our customers need for critical work. Our industry-leading 10-year warranty is a testament to the reliability of this technology. To get a much deeper understanding of the nuances, check out our complete guide on understanding night vision generations.
Image Intensifier Generations Compared
This table provides a quick side-by-side look at how each generation stacks up, showing the clear evolution in performance over time.
| Generation | Key Technology | Light Amplification | Typical Lifespan (Hours) | Performance Notes |
|---|---|---|---|---|
| Gen 0 | Active IR Illumination | N/A (Active System) | ~1,000 | Required a powerful, easily detectable IR light source. Bulky. |
| Gen 1 | Passive S-20 Photocathode | ~1,000x | 1,500 – 2,000 | First passive system. Prone to image distortion and needs moonlight. |
| Gen 2 | Microchannel Plate (MCP) | ~20,000x | 2,500 – 5,000 | Huge leap in brightness and clarity. Works well in low light. |
| Gen 3 | Gallium Arsenide (GaAs) Photocathode | 50,000x+ | 10,000+ | The professional standard. Exceptional low-light performance and clarity. |
As you can see, the jump from one generation to the next isn't just a small step—it's a massive leap in capability that directly translates to better performance in the field.
How Thermal Imaging Sees Heat
Where image intensifiers master the art of seeing in the dark, thermal imaging plays a completely different game. It doesn't need any light. At all. Instead, it lets you see the invisible world of heat signatures, revealing things the naked eye—and even the best Gen 3 tube—will never pick up.
Here’s the simplest way to think about it: everything gives off heat. A person, a running engine, even a rock that’s been sitting in the sun all day. Thermal devices capture that infrared energy and paint a picture with it. A warm body glows against a cool hillside, a recently driven car is impossible to miss in a dark parking lot, and you can even spot the faint heat of footprints on a cold floor for a few moments.
The Unbeatable Power of Heat Signatures
While image intensification (I²) gives you a crisp, detailed picture of the environment, thermal is the undisputed king of detection. Its core strength is making temperature differences stand out, which gives it a huge tactical advantage.
- Camouflage is Useless: Standard camo is designed to trick your eyes by blending into the visible light spectrum. Thermal couldn't care less. It sees the heat signature of a person or animal no matter what they're wearing.
- Cuts Through Obscurants: Because thermal reads heat instead of reflected light, it can see right through smoke, fog, dust, and even light brush that would completely blind a traditional night vision device. This is a game-changer for search and rescue operations or security in bad weather.
This technology has come a long way. The first thermal imagers were massive, power-hungry systems that only top-tier military units could get their hands on. Today, modern uncooled microbolometer sensors have made this technology smaller, lighter, and more affordable than ever before. To really dig into how these two technologies stack up, check out our in-depth guide on thermal imaging vs. night vision, where we break down the pros and cons of each.
What to Look for in a Thermal Device
When you're shopping for a thermal optic, a few key specs tell you almost everything you need to know about its performance.
First up is resolution, which is the pixel count of the thermal sensor. A higher resolution, like 640×480, packs more pixels onto the sensor, giving you a much sharper and more detailed image. That extra detail is what allows you to positively identify a target at longer distances—telling a coyote from a deer with confidence.
Next is the refresh rate, measured in Hertz (Hz). This is simply how many times per second the image updates. A fast refresh rate, like 60Hz, creates a smooth, fluid picture that’s crucial for tracking anything that moves. A lower rate, like 9Hz, will look choppy and can make it tough to follow fast action.
Finally, you’ll see different color palettes offered. The sensor only detects heat, but it can display that information in different color schemes to help your brain process what you're seeing more easily.
Common Palettes and Their Uses:
- White-Hot: The go-to for most people. It shows warmer objects as white, creating a natural, high-contrast image that’s great for spotting targets quickly.
- Black-Hot: This flips the script, showing warmer objects as black. Many users find this palette causes less eye strain, making it ideal for long nights of scanning.
- Rainbow/Ironbow: These palettes use a whole spectrum of colors to show subtle temperature differences. They’re fantastic for specialized tasks, like tracking a blood trail or spotting an overheating part on a machine.
Thermal imaging has exploded from a niche military technology in the 1960s into a multi-billion dollar global market. The big breakthrough came in the 1990s and 2000s with the development of uncooled sensors, which drastically cut costs and power consumption. This innovation led directly to the handheld and weapon-mounted devices we see today. While military and law enforcement are still the biggest users, thermal is now an essential tool for serious hunters, security professionals, and SAR teams across the country.
Choosing the Right Device for Your Mission
Now that we've broken down the tech that makes night vision possible, let's talk about putting it to use in the real world. The most sophisticated image intensifier tube or thermal core is useless if it's not in the right package for the job. Choosing the right form factor—the physical style of the device—is every bit as important as the technology inside.
The way a unit is built determines how you use it, what it’s good for, and where it falls short. A device that’s perfect for navigating on foot through rough country could be a terrible choice for engaging targets from a distance. Each design is a calculated compromise, built for a specific kind of mission.
Monoculars: The Versatile Workhorse
The night vision monocular is without a doubt the most popular and flexible form factor out there. The classic PVS-14 is the perfect example. Think of it as the Swiss Army knife of the night vision world. Its main advantage is its incredible adaptability.
A single monocular can be:
- Hand-held: Use it like a spotter's scope to quickly scan an area.
- Head-mounted: Wear it over one eye, which leaves your other eye free to preserve its natural night-adapted vision. This is a huge help when moving through areas with mixed lighting.
- Weapon-mounted: Pop it on a rail behind a red dot sight for a fast, effective nighttime aiming setup.
This jack-of-all-trades nature makes it a fantastic option for a cop who might go from driving a patrol car to clearing a dark building, or for a hog hunter who needs to both hike into a field and take a shot. The ability to switch roles on the fly is what makes the monocular a true workhorse.
Dual-Tube Goggles and Binoculars for Depth Perception
When moving through the dark is your top priority, especially over tricky terrain, dual-tube goggles (or binoculars) are king. By feeding an image to both of your eyes, they bring back something a monocular just can't offer: depth perception.
Try driving a car with one eye shut. You could probably manage, but judging distance becomes a real challenge. It's the same principle at night. A dual-tube setup gives your brain the stereoscopic input it’s used to, letting you navigate confidently and quickly without second-guessing every step.
This is exactly why dual-tube systems are the gold standard for special operations teams, pilots, and anyone who needs to move fluidly through the dark. The experience is so immersive it feels completely natural, which is a massive advantage when things get serious.
Dedicated and Clip-On Weapon Sights
If your main job after sundown is putting rounds on target, a dedicated weapon sight is usually the best way to go. These are purpose-built optics, whether image-intensified or thermal, designed from the ground up to be mounted on a firearm and take a beating from recoil. They give you a rock-solid and consistent aiming platform built for precision.
For a more flexible approach, there’s the clip-on night vision device (CNVD). This brilliant piece of kit mounts in front of your existing day scope. The magic here is that you get to keep using the optic, reticle, and zero you’ve trained with all day. There’s no need to swap scopes or re-zero your rifle. It’s an incredibly effective solution for designated marksmen and serious hunters who live by the "one rifle" philosophy.
This guide helps visualize how specs like resolution, refresh rate, and color palettes steer you toward the right thermal device for your specific goals.
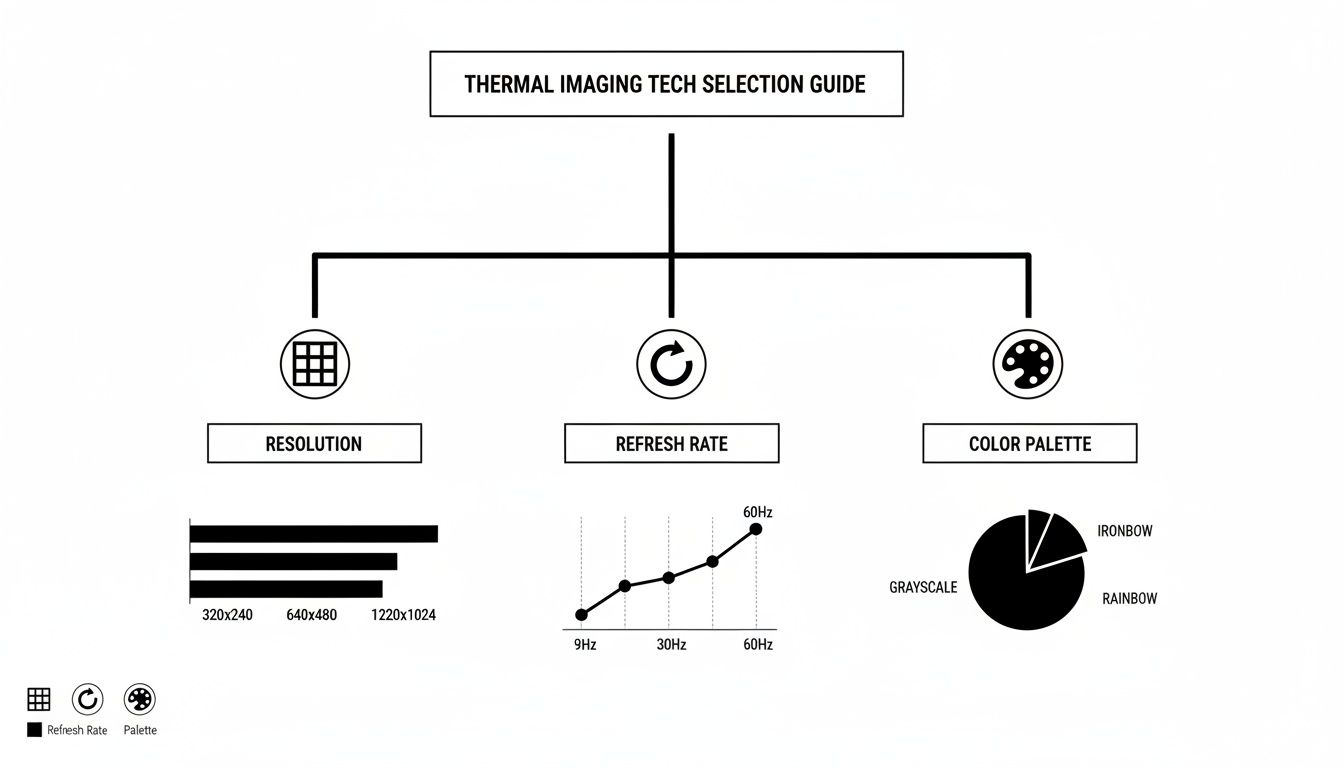
As the chart shows, if you need to identify targets at long range or track fast-moving objects, you'll need to prioritize higher resolution and refresh rates. This helps you narrow down the technical specs to what actually matters for your mission.
Matching the Device to the Mission
So who's actually using all this gear? The demand for quality night vision is primarily driven by law enforcement, security professionals, and hunters. Back in the day, night vision was almost exclusively military-issue, but that started to change in the 1970s and 80s as Gen 2 devices became more accessible.
Today, while professional-grade Gen 3 gear is still a serious investment, it’s the standard for police departments, private contractors, and dedicated enthusiasts. Market data consistently shows that a huge chunk of civilian sales—often 40-60%—goes to hunters, with the remainder used for security and emergency preparedness. These numbers show a clear and strong demand for reliable Gen 3 PVS-14s, dual-tube goggles, and thermal scopes right here at home. If you want to understand these market dynamics better, you can dive into the history and market forces shaping night vision technology.
Why Your Night Vision Provider Matters
You can know the difference between a Gen 3 tube and a thermal core, but that knowledge only becomes an advantage when you have quality gear in your hands. The distinction between image intensification and thermal imaging isn't just an academic exercise—it directly impacts how you find, identify, and move through the dark. Picking the right device is crucial, but who you buy it from is just as important.
A night vision device is a serious investment in your ability to get the job done, whether you're on a SWAT team, tracking hogs, or securing a perimeter. The market is flooded with options, and frankly, not all of them are built to last. The real-world performance and longevity of a unit come down to the quality of its guts and the expertise of the people who sold it to you. This is where a good provider really makes a difference.
More Than Just a Transaction
At Superior Tactical, we've spent over a decade in this field, using and vetting the gear ourselves. We don't just move boxes. We offer mission-ready solutions from brands we’ve personally come to trust. Our job doesn’t end when you click "buy"—we're here to make sure your equipment stays a reliable tool for years.
This partnership is built on three core ideas:
- Unmatched Reliability: We put an industry-leading 10-year warranty on our Gen 3 systems. That’s not a marketing gimmick; it's a reflection of our confidence in the gear we’ve chosen to stock.
- Expert In-House Support: Gear that gets used hard will eventually need service. We handle repairs and offer free diagnostics right here, in-house, to get your equipment back in the fight with minimal downtime.
- Guidance You Can Trust: Our team gives you straight, honest advice to help you choose the right device. We listen to what you're doing and match the tech to your mission, so you don't end up with the wrong tool for the job.
Choosing a provider isn't just about buying a product. It's about gaining a partner who understands the stakes and is committed to your success when it matters most.
We believe that being mission-ready means having gear that you know will work, every single time. You’re not just a customer to us; you’re an operator who needs tools you can depend on. Take a look at our night vision solutions or contact our team for some one-on-one advice. Let us show you why having the right partner is the ultimate advantage when the lights go out.
Frequently Asked Questions About Night Vision
Even after you get the basics down, you’ll always have more specific questions when it comes time to actually choose your gear. We get it. We've compiled some of the most common questions our team hears every day from law enforcement, dedicated hunters, and security professionals. Here are some straightforward answers to help you lock in your decision.
What Is the Difference Between Digital and Analog Night Vision?
The real difference is how they see in the dark. Traditional image intensification (I²), which covers everything from Gen 1 to Gen 3, is an analog process. It works by taking the few photons of light available, converting them into electrons, amplifying them thousands of times through a tube, and then turning them back into a visible image. It’s like turning the volume way up on reality itself.
Digital night vision is a different beast altogether. It operates more like a highly sensitive video camera, using a digital sensor (a CCD or CMOS chip) to capture light. A processor inside the unit then turns that digital signal into an image you see on a tiny screen in the eyepiece.
So, which one wins?
- Analog I² (Gen 3): This is the gold standard for a reason. It delivers unmatched performance in the darkest conditions, giving you a crisp, clear, and natural-looking view with excellent contrast. For professionals, it's non-negotiable.
- Digital: It’s often more affordable and has the huge advantage of being safe to use in broad daylight. The trade-off is that it can't quite match the raw low-light performance of Gen 3, often has a noticeable "screen door" effect, and can struggle when there's almost no light to work with.
When performance is the only thing that matters, analog Gen 3 technology is still king of the hill.
Can I Use My Night Vision Device During the Day?
This is a big one, and getting it wrong can be a very expensive mistake. The answer depends entirely on what kind of device you have. If you expose a traditional image intensifier tube (Gen 1, 2, or 3) to bright daylight, you will cause permanent damage. Just a few seconds of direct sunlight can burn the photocathode, leaving permanent black spots in your field of view forever.
Now, modern autogated Gen 3 tubes have technology that protects them from sudden bright flashes—like a muzzle flash or car headlights. This is a fantastic feature for protecting your investment, but it is not a green light for daytime use.
Thermal and digital systems are a whole different ballgame. Their sensors don't care about bright light, making them perfectly safe to use 24/7. In fact, thermal can be a game-changer during the day for spotting heat signatures that are perfectly camouflaged to the naked eye.
Should I Choose White Phosphor or Green Phosphor?
This all comes down to the color of the image you see through the device. For decades, that iconic "night vision green" was the only option. It works well because the human eye is extremely sensitive to shades of green, which makes it easier to spot fine details.
White phosphor is the newer technology on the block, and it produces a crisp black-and-white image. A lot of operators find this view feels more natural and is significantly easier on the eyes, reducing fatigue during long nights of observation. Many also feel it provides better contrast, which can make all the difference when you're trying to identify a target.
Ultimately, it’s mostly a personal preference. That said, white phosphor has become the new standard for most high-end Gen 3 systems because of its exceptional clarity and reduced eye strain.
What Is the Difference Between Active and Passive Night Vision?
Understanding this is crucial for anyone concerned with staying hidden. The difference is simple: does the device have to broadcast its own light source?
A passive system, like a good Gen 2 or Gen 3 unit, works by simply amplifying whatever ambient light is already there—from the moon, stars, or distant city glow. It’s completely silent in the energy spectrum, meaning the user is totally undetectable.
An active system needs a little help. It uses a built-in infrared (IR) illuminator to throw out a beam of light that’s invisible to the human eye. To the night vision device, it’s like turning on a high-powered flashlight. The earliest "Gen 0" systems were all active.
The problem? Anyone else with night vision can see that IR beam clear as day. Firing up your illuminator is like painting a giant "I'm right here!" sign on your position for other NV users to see. Most modern passive devices still have a small IR illuminator for pitch-black situations, but you should only use it when you absolutely have to.
At Superior Tactical LLC, our mission is to equip you with the knowledge and the gear to own the night. Whether you need a versatile PVS-14 for professional duty or a high-performance thermal scope for your next hunt, our curated selection and expert support ensure you get a reliable, mission-ready solution. Explore our full range of night vision and thermal optics today.