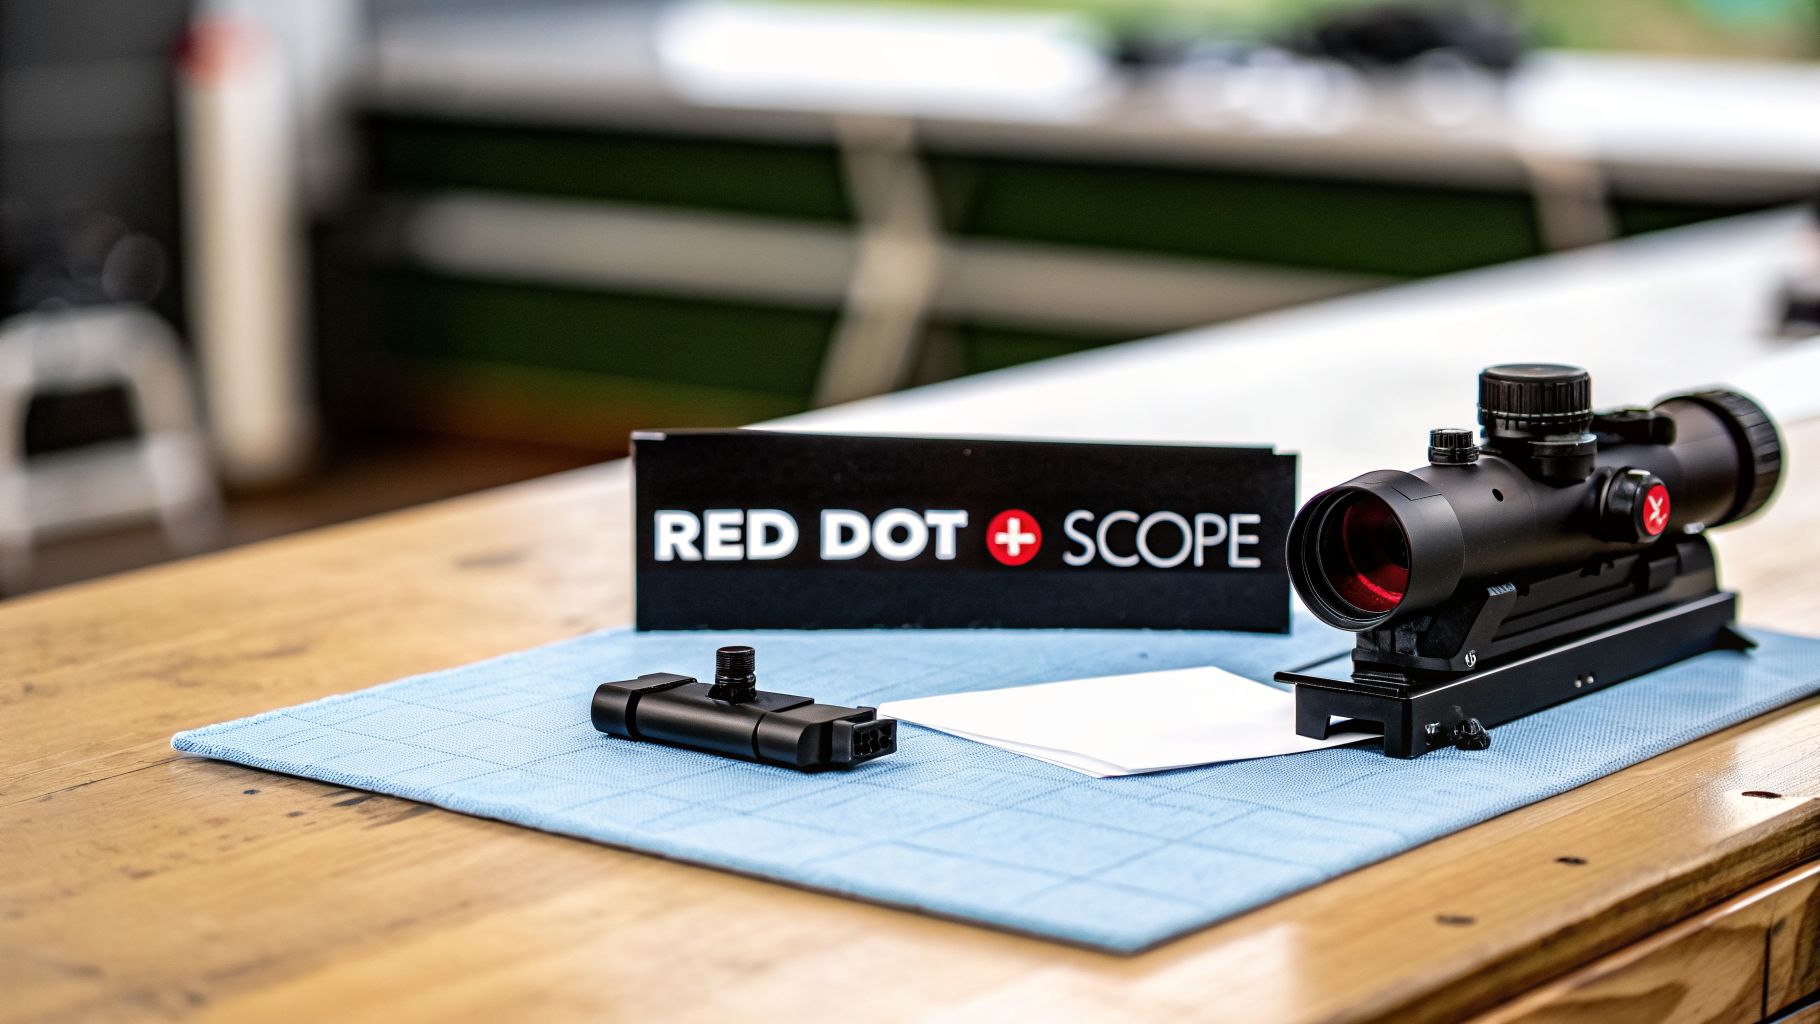
Red Dot and Scope Combo The Ultimate Tactical Guide
A red dot and scope combo is an elegant solution to a classic shooter's dilemma. It pairs a non-magnified red dot sight, built for speed up close, with a magnified scope designed for precision at a distance. This gives you one system that can handle just about any situation you throw at it.
The Ultimate Advantage of a Dual Optic System
For years, setting up a rifle meant making a tough choice: go with a red dot for close-quarters speed, or a magnified scope for identifying and engaging targets farther out. You couldn't really have both. Combining them on a single rifle changes the game completely.
A red dot is king inside 100 yards. The simple dot and unlimited eye relief let you get on target instantly with both eyes open—a non-negotiable for fast-paced, close-quarters work.
But what about identifying a threat or making a precise shot from a few hundred yards away? That's where a magnified scope is essential. A hunter needs that magnification to confirm their target, just as an officer needs it to evaluate a situation from a safe standoff distance.
The Best of Both Worlds
A combo setup means you no longer have to compromise. You get instant access to both capabilities, making your rifle incredibly adaptable to unpredictable environments.
- For Law Enforcement: An officer can use the scope to observe a subject from down the street, then instantly transition to the red dot for clearing a room.
- For Hunters: A hunter can track game through thick brush using the fast-sighting red dot, but still have the magnification needed for a confident shot across an open field.
- For Competitive Shooters: In a 3-gun match, a shooter can blaze through close-range targets with the red dot before switching to the scope to ring steel at distance, shaving precious seconds off their time.
This trend is exploding in popularity. The global market for red dot sights is expected to hit USD 1,410.48 million by 2035, and a huge part of that growth comes from shooters pairing them with scopes and magnifiers on platforms like the AR-15. You can see the full breakdown of this trend in the latest market analysis report.
The core principle is simple: You're equipping your rifle for the unexpected. Instead of being locked into one optic's specialty, you have a fluid system that can adapt from point-blank range to several hundred yards out in a split second.
To put it all together, here's a quick summary of the main advantages of running a red dot and scope combination.
Red Dot and Scope Combo At a Glance
This table breaks down the primary benefits you gain from a combined optics system, helping you quickly see why it’s become such a popular choice.
| Benefit | Description | Best For |
|---|---|---|
| Versatility | Seamlessly transition between close-quarters and long-range targeting. | Dynamic environments with unknown distances. |
| Speed | Utilize the red dot for rapid, instinctive aiming on close targets. | CQB, competitive shooting, home defense. |
| Precision | Employ the magnified scope for positive ID and accurate shots at distance. | Hunting, law enforcement overwatch, long-range shooting. |
| Adaptability | Configure your rifle for any mission without swapping optics. | General purpose rifles, patrol carbines. |
Ultimately, a dual-optic setup provides a level of readiness that a single optic just can't match.
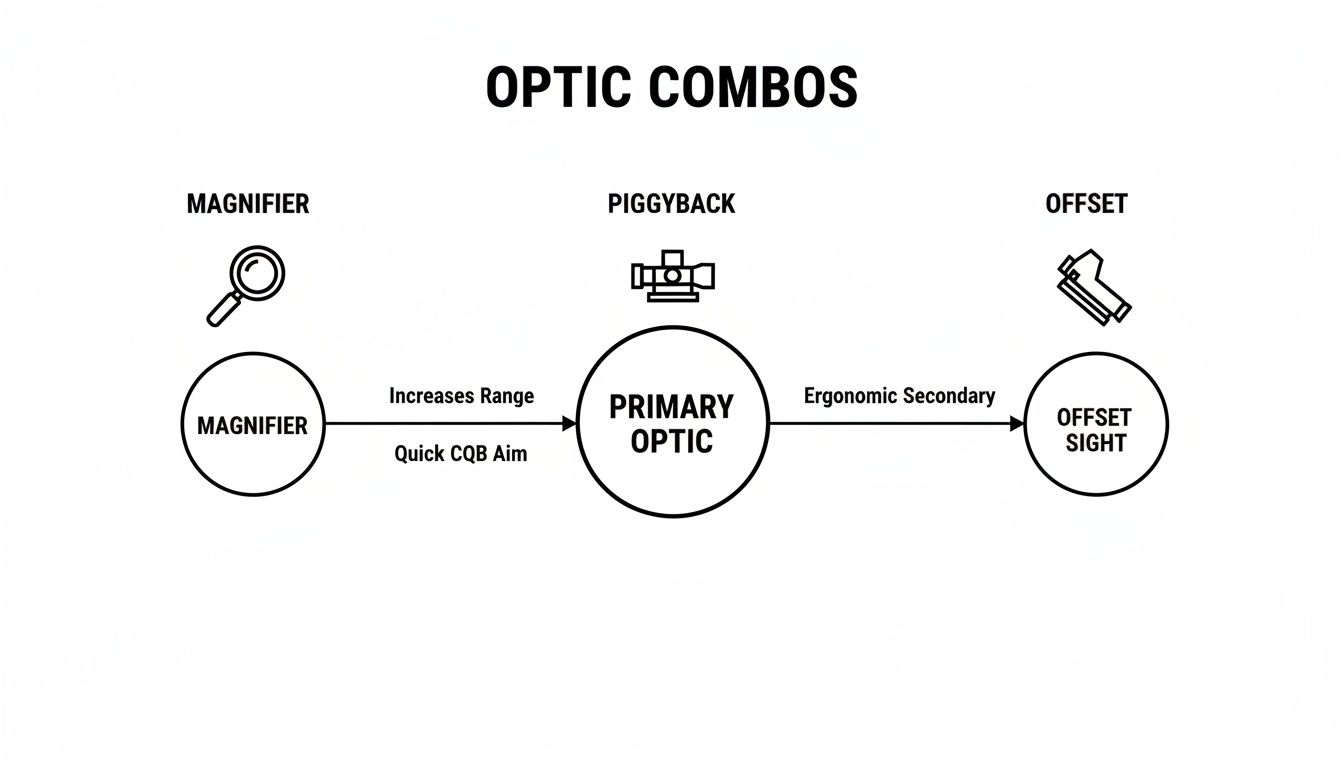
Comparing the Top Optic Combo Configurations
So, you want the best of both worlds: the lightning-fast target acquisition of a red dot and the precision reach of a magnified scope. The good news is, you can have it. The real question is, which setup is right for you?
There’s no single correct answer. The best configuration boils down to your rifle's primary job, your shooting style, and your budget. We're going to walk through the most common ways to pair these optics—from magnifier combos to piggyback and offset red dots—and see how they measure up against the do-it-all LPVO.
The Red Dot and Magnifier Combo
This is probably the most common way shooters add some reach to their red dot. It’s a simple, intuitive system: you have your primary red dot sight, and right behind it, you mount a magnifier (usually 3x or 5x) on a flip-to-side mount.
Need to engage a target 200 yards out? Just flip the magnifier into place. Your sight picture is instantly magnified, making it easier to identify the target and place that dot precisely. When things get up close and personal, you just slap the magnifier out of the way and you’re back to a pure, unadulterated 1x red dot.
Think of it as an on-demand turbo button for your red dot. It's perfect for anyone who spends most of their time inside 100 yards but wants a simple way to stretch their legs without sacrificing close-quarters speed.
Of course, there are trade-offs. The magnifier adds a good bit of weight and eats up rail space. You’re also stuck with just two settings: 1x and whatever power your magnifier is (3x, 5x, etc.). If you want a more detailed breakdown, our guide on choosing the right red dot magnifier is a great next step.
The Piggyback Red Dot on a Scope
Another popular route is the "piggyback" setup. This involves mounting a small micro red dot directly on top of your main magnified scope, typically using a special scope ring with a mounting plate.
With this configuration, your primary optic is the scope. You keep a standard cheek weld to scan for and engage distant targets. If a threat suddenly appears up close, you simply lift your head a bit to look through the red dot sitting on top. It’s a very heads-up, intuitive motion.
This method requires breaking your cheek weld, which some shooters find less stable for rapid fire. However, it's a fantastic option for those who live in their scope but need an "oh-crap" button for close-range surprises. It's a favorite among hunters glassing open fields who might need to react to an animal popping out of nearby cover.
The Offset Red Dot
Now we’re talking speed. An offset red dot sits on a 45-degree mount right next to your primary scope. Instead of lifting your head, you simply cant—or roll—the rifle slightly inward. This motion brings the red dot perfectly into your line of sight.
This is, hands down, the fastest way to transition between your magnified optic and your red dot. Your cheek stays glued to the stock, giving you a much more stable platform for making quick, accurate shots up close. For this reason, it's the dominant setup in the world of competitive shooting, like 3-gun.
The main drawback? It adds width to your rifle, creating a potential snag point on gear, barricades, or in tight spaces. It takes a little practice to make the canting motion feel natural, but most people pick it up in a single range session.
Optic Configuration Comparison
Before we look at the Low Power Variable Optic (LPVO) as an alternative, let's put these combo setups side-by-side. An LPVO is a single scope designed to do it all, offering a seamless zoom range from a true 1x up to 6x, 8x, or even 10x. It's an excellent solution, but it comes with its own set of compromises compared to a dedicated two-optic system.
Here’s how these optic setups compare head-to-head:
| Configuration | Pros | Cons | Primary Use Case |
|---|---|---|---|
| Red Dot + Magnifier | Maintains true 1x red dot speed; simple to use; good for astigmatism. | Limited to two magnification levels; adds weight and bulk. | General purpose rifles; home defense; law enforcement patrol. |
| Piggyback Red Dot | Intuitive "heads-up" transition; leaves scope view unobstructed. | Requires breaking cheek weld; adds height to the rifle; can be slower. | Hunting; law enforcement overwatch; designated marksman. |
| Offset Red Dot | Fastest transition speed; maintains a solid cheek weld for stability. | Adds width to the rifle; can snag on gear; requires practice to master the cant. | Competitive shooting (3-Gun); tactical applications requiring rapid transitions. |
| LPVO (Alternative) | All-in-one seamless magnification; etched reticle works without power. | Can have a tighter eye box at 1x; often heavier than a red dot alone. | Do-it-all rifles for dynamic environments with varied engagement distances. |
Ultimately, a dedicated red dot (whether piggyback or offset) will almost always feel faster at 1x than an LPVO. An LPVO, however, offers unparalleled flexibility for shots at varying intermediate distances. The choice comes down to prioritizing either pure close-quarters speed or mid-range versatility.
How to Mount and Zero Your Optics System
Even the most expensive red dot and scope combo is useless if it isn't mounted correctly. A sloppy installation is a one-way ticket to a shifting zero, endless frustration, and, ultimately, missed shots. Let's walk through the right way to build a rock-solid system, from mounting the hardware to getting a reliable zero.
Think of your mount as the foundation for your precision optic. You wouldn’t build a house on sand, so don't bolt a high-end scope to your rifle with flimsy or poorly installed hardware. The goal is to create one solid, immovable unit that can withstand recoil and abuse.
Foundational Mounting Best Practices
Before you even think about picking up a wrench, degrease everything. I mean everything—the screws, the mount surfaces, the rings, and the Picatinny rail itself. A good degreaser ensures that when you apply thread locker, it actually bites into the metal and creates a solid bond.
When you're ready to install, follow these non-negotiable rules:
- Torque to Spec: Your optic and mount manufacturer will specify a torque value, almost always in inch-pounds (in-lbs). Use a proper torque wrench. If you overtighten, you risk crushing your scope tube or stripping screws. Undertighten, and you’re just asking for your zero to wander.
- Blue Loctite is Your Friend: A tiny drop of blue (medium strength) thread locker on the mount screws is your best insurance against recoil. It keeps things from vibrating loose over time without being so permanent that you can't make adjustments later.
- Never Bridge the Gap: This is a cardinal sin of mounting. Your optic mount must be installed entirely on the receiver's upper Picatinny rail. Never let it "bridge" the gap onto the handguard. Handguards have a tiny bit of flex, and that's all it takes to throw your zero completely off.
This image shows the three most common ways you'll see these systems put together. Each one has a slightly different mounting process, but the core principles remain the same.
Whether you're running a magnifier, a piggyback dot, or an offset sight, none of them will work as intended without that secure foundation.
Zeroing Your Dual Optic System
With everything bolted down tight, it's time to hit the range. Zeroing is the process of aligning your point of aim with your bullet's point of impact at a set distance. For a combo setup, you have to zero both optics, but they each have a distinct job to do.
First, zero your primary scope. Before you do anything else, set your eye relief. Get into a comfortable shooting position and slide the scope back and forth in its rings until you have a full, clear sight picture with no dark edges. Once it's perfect, torque down the ring caps. Zero this primary optic first, usually at 100 yards, as this is your tool for precision at a distance.
Pro Tip: Zero each optic by itself. When you’re zeroing the main scope, take the offset red dot off or flip the magnifier out of the way. This eliminates any confusion and ensures each sight is perfectly dialed in on its own terms.
Now, let's get the red dot dialed in. The process changes slightly based on your configuration:
- Magnifier Combo: This is the easy one. Zero the red dot at your preferred close-range distance (a 50-yard zero is a popular choice). When you flip the magnifier into place, it just enlarges the dot and your target; it won't and shouldn't change your point of impact.
- Piggyback or Offset Red Dot: These are all about speed up close. A 50-yard zero works incredibly well here, too. It gives you a "maximum point-blank range" where your shots will land within a few inches of your dot from point-blank out to well past 200 yards.
The demand for these versatile systems is exploding. The red dot riflescope market was valued at a staggering USD 69.6 billion in 2024 and is on track to hit USD 98.6 billion by 2031. Shooters in law enforcement, hunting, and tactical fields are all recognizing the power a red dot and scope combo provides.
Once you have your initial zero, always confirm your holds at different distances to see how your bullet drops. A solid mount is what makes all of this possible. If you want to do a deeper dive into the different rail systems themselves, check out our guide to Picatinny rail scope mounting.
Matching Your Optic Setup to Your Mission
The best red dot and scope combo isn’t the one with the biggest price tag—it’s the one that’s right for the job. Think of it like a mechanic's toolbox; you wouldn't use a single wrench for every bolt. A serious shooter needs an optic configured for their specific environment and goals. The perfect setup for a police officer clearing a building is going to be wildly different from what a hunter needs when glassing a distant mountainside.
It all starts with one question: What are you trying to accomplish? Once you define your primary use case, you can build a system that plays to your strengths and shores up your weaknesses, giving you a real advantage when things get serious.
For Law Enforcement: The Patrol Rifle
A patrol officer’s world is unpredictable. One minute, you could be observing a situation from a distance; the next, you're making a dynamic entry into a tight space. You need an optic system that can swap between those roles instantly, with zero hesitation.
This is where an LPVO (Low Power Variable Optic) combined with an offset red dot has become the go-to solution.
- The LPVO (1-6x or 1-8x): This acts as your primary optic. It gives an officer the magnification needed to identify threats, read a license plate, or gather intel from a safe standoff distance. Crucially, a good LPVO has an etched reticle, meaning it works even if the battery dies—a non-negotiable feature for duty use.
- The Offset Red Dot: When things go sideways and you have to move indoors or deal with threats up close, you don't have time to fiddle with dials. A quick roll of the rifle is all it takes to bring the offset red dot into your line of sight. This is worlds faster and more intuitive under stress than trying to find the eye box on a scope, even at 1x.
This combo provides the long-range positive identification (PID) of a scope and the close-quarters speed of a true red dot, all on a single rifle.
This dual-optic philosophy isn't just a trend; it's a proven advantage. Since 2020, law enforcement agencies have reported that 40% of new rifle procurements now include versatile setups designed for both CQB and mid-range threats.
For the Modern Hunter: Field and Forest
Hunting is a game of patience and opportunity. You might spend hours glassing a remote ridgeline for any sign of movement, needing all the magnification you can get. Then, minutes later, you could find yourself pushing through thick brush where a clean shot might only be possible at 30 yards.
For this mix of patient observation and sudden action, a higher-magnification scope with a piggybacked red dot is an exceptional choice.
- The Primary Scope (e.g., 3-15x or 4-16x): This is your main tool for spotting, identifying, and taking ethical shots at a distance. That higher magnification is what allows you to confirm your target and place a precise, humane shot.
- The Piggyback Red Dot: Mounted right on top of the scope tube, the red dot is your immediate answer for close encounters. When a buck or a hog suddenly appears in dense cover, you just lift your head slightly for a fast, heads-up aiming solution. It's also far better for shooting dark-hided animals like bears in low light, where black crosshairs can easily disappear against the target.
This kind of setup ensures you're ready for any opportunity, whether it's a 400-yard shot across a canyon or a 40-yard snap-shot in the timber. While a magnifier and red dot is another option, understanding the differences between a magnifier and a holographic sight setup can help you determine if that's a better fit for your style of hunting.
For the Competitive Shooter: Speed Is Everything
In 3-gun and other action shooting sports, wins are decided by fractions of a second. You have to burn down close-range targets and then seamlessly transition to engaging steel plates hundreds of yards away, all on the clock.
For competitors, the LPVO with an offset red dot is king for one simple reason: raw speed.
- The LPVO: This is dialed up for the longer stages, giving shooters the variable power to engage targets anywhere from 100 to 500+ yards.
- The Offset Red Dot: This is what wins the close-quarters stages. Canting the rifle is the absolute fastest way to get on a 1x dot, letting you stay on the move while delivering rapid, accurate shots without breaking your cheek weld.
The market has absolutely exploded to meet this demand. The U.S. riflescope and red dot sight market is projected to hit USD 4.51 billion by 2034. The 8-15x magnification segment commanded a huge revenue share in 2024, proving just how many shooters want a powerful scope they can pair with a secondary dot for ultimate flexibility.
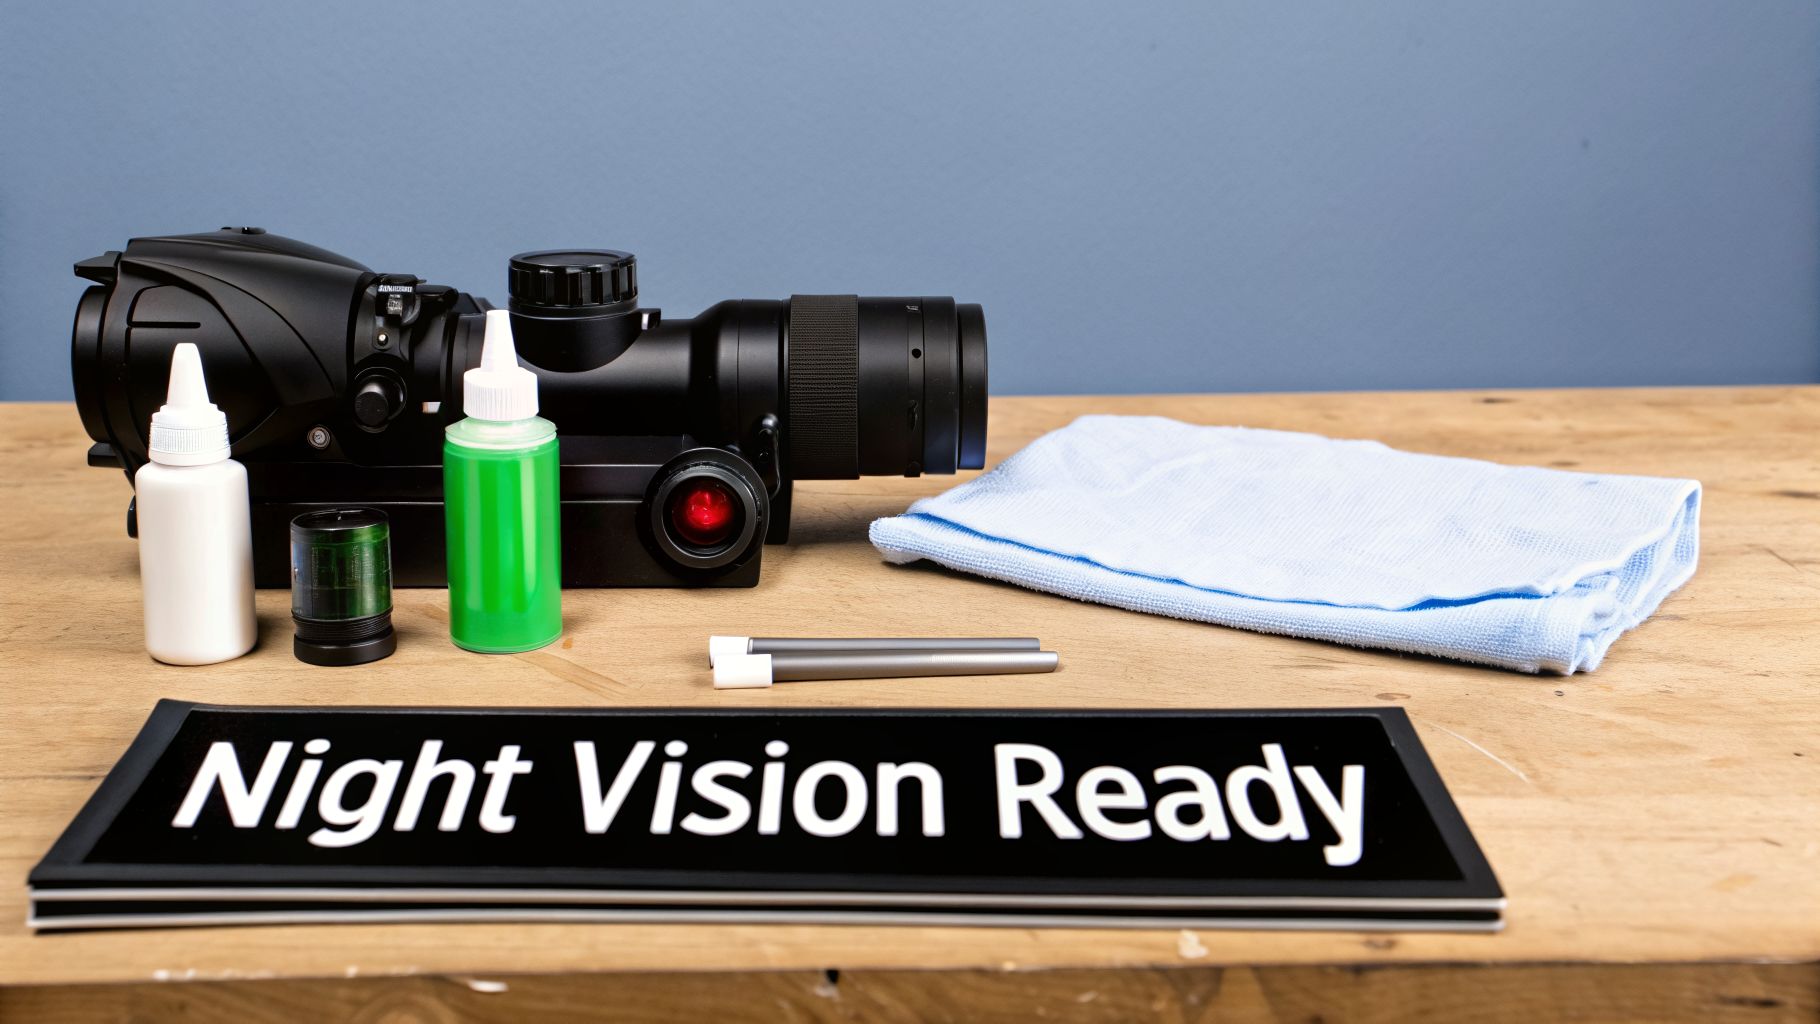
Keeping Your Gear Running: Maintenance and Night Vision
Once you've spent the time and money to get your red dot and scope combo perfectly zeroed, the work isn’t over. Your optic is a precision instrument, and like any high-performance tool, it needs regular upkeep to stay reliable. Ignoring it is asking for trouble when you can least afford it.
This is about more than a quick wipe-down. We're talking about preserving the clarity of your glass, ensuring your mount never shifts, and managing your power source. A smudged lens can turn a clear target into a blurry mess, and a loose mount will throw your zero completely off, guaranteed.
Your rifle should be something you can grab and trust without a second thought. Building that trust starts with a simple, consistent maintenance routine.
Your Essential Optics Maintenance Checklist
Think of this as your pre-flight check before heading out. Whether it's for a training class, a hunt, or a duty shift, running through these steps will catch problems before they find you.
- Lens Cleaning: First, always blow off any loose dirt or grit using canned air or a lens pen brush. Then, apply a few drops of a dedicated lens cleaning solution to a microfiber cloth and gently wipe the glass. Never use your shirt or a paper towel—they’re abrasive and will grind that grit right into your expensive lens coatings.
- Torque Confirmation: Get a good torque wrench and learn your manufacturer’s specs. Every so often, check that your mount screws are still tightened to the correct inch-pounds. Recoil is a powerful force, and it will eventually work things loose. This is non-negotiable, especially for an offset red dot that takes a lot of bumps.
- Battery Management: If your red dot doesn’t have a multi-year battery life, get in the habit of turning it off. For duty optics with "shake-awake" features, know the expected battery life and replace it before it dies. A good rule of thumb is to swap your batteries once a year, no matter what.
A well-maintained optic is a predictable optic. By turning these steps into a habit, you eliminate variables and ensure that when you look through your sights, the only thing you have to worry about is your own skill.
Integrating Your Combo with Night Vision
For many of us, the mission doesn't end when the sun goes down. This is where integrating your optics with night vision can give you a massive advantage in low-light environments. While you can’t just stick a PVS-14 monocular behind a magnified scope and expect it to work, you absolutely can pair one with a red dot.
The key is using a night vision (NV) compatible red dot. These models have specific settings that are dim enough to be viewed through an NV device without causing "bloom"—a bright flare that washes out the image and can damage the intensifier tube.
The most practical setup is a helmet-mounted monocular (like a PVS-14) and a rifle-mounted red dot with NV settings. You simply look through your NODs (Night Observation Device) on your helmet and see the red dot projected on your target. This is called passive aiming, and it lets you target without an IR laser that could give your position away.
This is where a red dot and scope combo with an offset or piggybacked red dot really proves its worth. Your scope is for the day, but that red dot handles double duty: it’s your go-to for close-quarters speed in the light and your primary aiming solution for passive targeting in the dark. It’s an indispensable setup for law enforcement, hog hunters, and anyone serious about 24/7 readiness.
Your Ultimate Buyer's Checklist
Alright, let's bring it all home. We've covered a lot of ground, but now it's time to turn that knowledge into the right gear for your rifle. Think of this checklist as your final gut-check before you click "buy."
Answering these questions honestly will cut through the noise and point you to the setup that actually makes sense for you. It’s never about finding the single "best" optic, but about building the right system for your specific needs.
Defining Your Engagement Window
First, get real about the distances you’ll actually be shooting. Where will you spend 90% of your time?
Primarily Under 100 Yards: If your world is close-quarters, a red dot and magnifier combo is tough to beat. You get the raw speed of a true 1x red dot for fast work, with the option to pop on the magnifier for a surprise long shot. It's a simple, rugged, and incredibly effective solution.
A Mix of Long and Short Range: Do you find yourself needing to scan a field one minute and clear a room the next? This is where an LPVO with an offset red dot truly shines. The LPVO is your workhorse for anything from 100 to 500+ yards, but a quick roll of the rifle gives you an instant, dedicated red dot for any sudden, up-close threats.
Mostly Distance, with Close-Up as a Backup: If you're a hunter or a designated marksman who practically lives behind your scope, a piggyback red dot makes a ton of sense. It gives you a "heads-up" aiming point for that deer that pops out at 20 yards, without adding clutter or getting in the way of your primary scope.
Pro Tip: For hunters, especially those after dark-hided game like hogs or bears in fading light, a red dot is a lifesaver. A standard black reticle can completely disappear against a dark animal's coat. That bright red dot, however, stays sharp and clear, ensuring you have a perfect point of aim.
Factoring in Weight, Bulk, and Special Needs
Once you've zeroed in on your primary setup, let's refine the choice with a few final, practical considerations.
How important is a lightweight build? Every ounce counts, whether you're on a long foot patrol or hiking deep into the backcountry. An offset red dot adds almost no noticeable weight, while a magnifier and its flip-mount can add a significant chunk.
Will you operate in low-light or no-light conditions? If the answer is yes, you absolutely need a night vision compatible red dot. These models feature ultra-dim settings that won't "bloom out" when viewed through night vision devices (NODs), allowing you to aim passively without needing an IR laser that screams "I'm right here!" to anyone else with NVGs.
Walking through these questions helps you look past the marketing and focus on what will genuinely improve your performance. It's how you build the perfect red dot and scope combo that gives you a real-world advantage, built just for you.
Common Questions About Red Dot and Scope Combos
Alright, you’ve done the research and have a general idea of what you want. But a few nagging questions can still pop up before you pull the trigger on a new optics setup. That's completely normal.
Let's dive into some of the most common questions we hear from shooters. Getting these details right is what really separates a functional rifle from a truly dialed-in system.
Is an LPVO Better Than a Red Dot and Magnifier Combo?
This is the big one, and the honest answer is: it depends entirely on your primary mission. Neither one is "better" across the board.
An LPVO (Low Power Variable Optic) gives you a seamless magnification range, all in one package. Plus, its etched reticle means that even if the battery dies, you still have a usable aiming point. On the other hand, nothing beats the raw speed and massive, forgiving eye box of a quality red dot at a true 1x magnification. For clearing rooms or engaging targets up close, the red dot is king. But for versatility at those intermediate distances, say 75 to 400 yards, the LPVO often pulls ahead.
Here’s a good way to think about it: A red dot and magnifier is like carrying a dedicated hammer and a separate pry bar. An LPVO is more like a top-of-the-line multi-tool. Both get jobs done, but one is a set of specialized tools, while the other is built for all-around flexibility.
What Is the Best Distance to Zero an Offset Red Dot?
An offset red dot is your "break glass in case of emergency" sight for close-quarters work. Its zero should reflect that. For most standard rifle cartridges like 5.56, a 50-meter zero is the go-to choice for a reason. It's incredibly practical.
A 50-meter zero gives you a surprisingly flat trajectory. Your point of impact will stay within a couple of inches of your point of aim all the way from point-blank range out to around 200-250 meters. This creates what we call a "maximum point-blank range"—you just put the dot on the torso and press the trigger without thinking about holdovers. While some shooters like a 25-meter zero for very tight environments, the 50-meter zero provides far more practical, all-purpose performance.
Can I Use Any Red Dot with Any Magnifier?
Definitely not. This is a common mistake that can be frustrating and expensive. For a magnifier and red dot to play nice, their optical centerline height must match up. If they don't, the dot will be off-center or completely outside the magnifier's window when you flip it over.
The two most common heights you'll encounter are:
- Absolute Co-Witness: The red dot sits at the same height as your standard iron sights.
- Lower 1/3 Co-Witness: The red dot is mounted slightly higher, putting the iron sights in the lower third of your view.
Most reputable brands (like EOTech, Aimpoint, and Vortex) design their magnifiers to line up perfectly with their own red dots out of the box. Always double-check the manufacturer's specs for both your dot and the magnifier you plan to buy. If they don't match, you'll need to find a specific mount designed to correct the height difference.
Ready to build a rifle that's prepared for anything? At Superior Tactical LLC, we live and breathe this stuff. We only stock professional-grade red dots, magnifiers, and night vision that we'd trust on our own gear.
Explore our curated selection of tactical optics and accessories and find the perfect setup for your needs.