A Complete Guide to the Night Vision IR Illuminator
Think of a night vision IR illuminator as an invisible flashlight for your night vision device. It blasts an area with infrared light—a spectrum completely hidden from the human eye—allowing your gear to see clearly even in what seems like total, absolute darkness.
What Exactly Is a Night Vision IR Illuminator?
Imagine you're in a room with zero light, trying to navigate. Your night vision device is fantastic at amplifying tiny bits of light from the moon or stars, but in here, there's nothing to amplify. It's just black.
This is where an IR illuminator changes the game entirely. It’s the difference between guessing what's in front of you and knowing for sure.
Turning Darkness into an Advantage
An IR illuminator projects a focused beam of infrared light, usually at a wavelength of 850nm (faint red glow visible to the naked eye) or 940nm (completely invisible). This light hits everything in its path and bounces back.
Your night vision device's image intensifier tube is specifically designed to see this reflected IR energy. It gathers that invisible light and converts it into the crisp, green-hued image you see through the eyepiece. Suddenly, the pitch-black room is lit up as if by a spotlight, but only for you.
A common myth is that high-end gear, like Gen 3 night vision, doesn't need an illuminator. While top-tier tubes are incredibly sensitive to ambient light, they can't create light from nothing. An IR illuminator is your guarantee of a clear picture, no matter how dark it gets.
The secret is out, and the demand for this capability is surging. The global market for IR illuminators is set to climb from $1.24 billion in 2024 to an estimated $1.95 billion by 2029, a clear sign of just how essential this technology has become in professional and civilian circles alike.
Why It's More Than Just an Accessory
For anyone who relies on night vision—be it law enforcement, hunters, or search and rescue teams—an illuminator isn't just a nice-to-have gadget. It's a critical piece of kit. It provides the light needed to positively identify a target, navigate treacherous terrain, or find someone in the dark.
Understanding this simple principle is key. It’s what turns your night vision from a passive tool that just gathers existing light into an active system that lets you own the night. To get a better handle on the science behind the scenes, check out our deep dive into how night vision works.
An IR illuminator doesn't just help you see in the dark; it gives you a decisive advantage. Let's break down the core benefits.
Core Benefits of Using an IR Illuminator
| Benefit | Impact on Operations |
|---|---|
| Eliminates No-Light Situations | Guarantees visibility inside buildings, tunnels, or on moonless nights where passive NV fails. |
| Increases Effective Range | Pushes your identification range far beyond what ambient light alone would allow. |
| Improves Image Clarity | "Washes" the scene with clean IR light, reducing graininess and improving target detail. |
| Provides Covert Illumination | Allows you to light up an area without alerting anyone not equipped with night vision. |
Ultimately, adding an illuminator to your setup is one of the single most effective upgrades you can make, ensuring your equipment performs when you need it most.
Decoding The Key Specs Of An IR Illuminator
Choosing the right night vision IR illuminator can feel like trying to decipher a foreign language. The spec sheet is a wall of numbers and jargon, but each one tells a critical story about how the device will actually perform when you’re out in the field. Once you get a handle on what these numbers mean, you can pick the perfect tool for the job with confidence.
Think of an illuminator's specifications as its DNA—they define its strengths, its weaknesses, and what it’s truly built for. Let’s break down the most important metrics you’ll see, starting with the one that determines just how stealthy you can be.
Wavelength: The Stealth Factor
The first number you’ll probably run into is the wavelength, measured in nanometers (nm). This spec dictates the "color" of the invisible light and, more importantly, whether any part of it is visible to the naked eye. The two most common flavors you'll find are 850nm and 940nm.
-
850nm (Semi-Covert): This is the workhorse of the IR world. Illuminators running at this wavelength throw a powerful beam that can punch out to incredible distances, making them fantastic for long-range identification. The catch? The LED emitter gives off a faint, dull red glow that looks a bit like the last ember of a dying campfire. Most people won’t notice it from far away, but sharp-eyed animals or an observant adversary just might.
-
940nm (Fully Covert): When you need to be a ghost, 940nm is the answer. These illuminators produce a beam that is completely invisible to the naked eye, with no visible signature at all. This is the go-to for hunting easily spooked game or for tactical situations where giving away your position isn't an option. The trade-off is performance; you’ll sacrifice roughly 30-40% of the effective range compared to an 850nm illuminator with similar power.
To make this choice clearer, think about the classic trade-off: power versus stealth.
Comparing 850nm vs 940nm IR Illuminators
| Specification | 850nm (Semi-Covert) | 940nm (Fully Covert) |
|---|---|---|
| Visibility | Faint red glow visible from the emitter | Completely invisible to the naked eye |
| Effective Range | Longer range, maximum illumination power | Shorter range (approx. 30-40% less) |
| Night Vision Sensitivity | Most NV devices are highly sensitive to it | Less sensitive, requires a more powerful unit |
| Best Use Case | Long-range target ID, hunting, general use | Covert operations, hunting wary animals |
Ultimately, if maximum reach is your priority and a tiny glow is an acceptable risk, 850nm is the clear winner. But if total invisibility is non-negotiable, 940nm is the only real choice.
Beam Pattern: Flood vs. Spot
Just as important as the type of light is how it's shaped. The beam pattern dictates whether your IR light blankets a wide area up close or shoots out like a laser to a distant target. Most quality illuminators have an adjustable focus, letting you switch between a "flood" and a "spot" beam on the fly.
-
Flood Beam: A wide beam is all about situational awareness. It lights up a huge area, perfect for scanning a field, navigating tricky terrain, or clearing a room. You get a great view of everything nearby, but the light runs out of steam quickly and won't reach very far.
-
Spot Beam: By twisting the head of the illuminator, you can tighten that beam, focusing all its power into a concentrated point. This "spot" setting is what you need for getting a positive ID on a target way out there, letting your night vision device see fine details far beyond what a floodlight could ever reach.
The concept map below shows how an IR beam works with your night vision device to cut through the darkness and create a usable image.
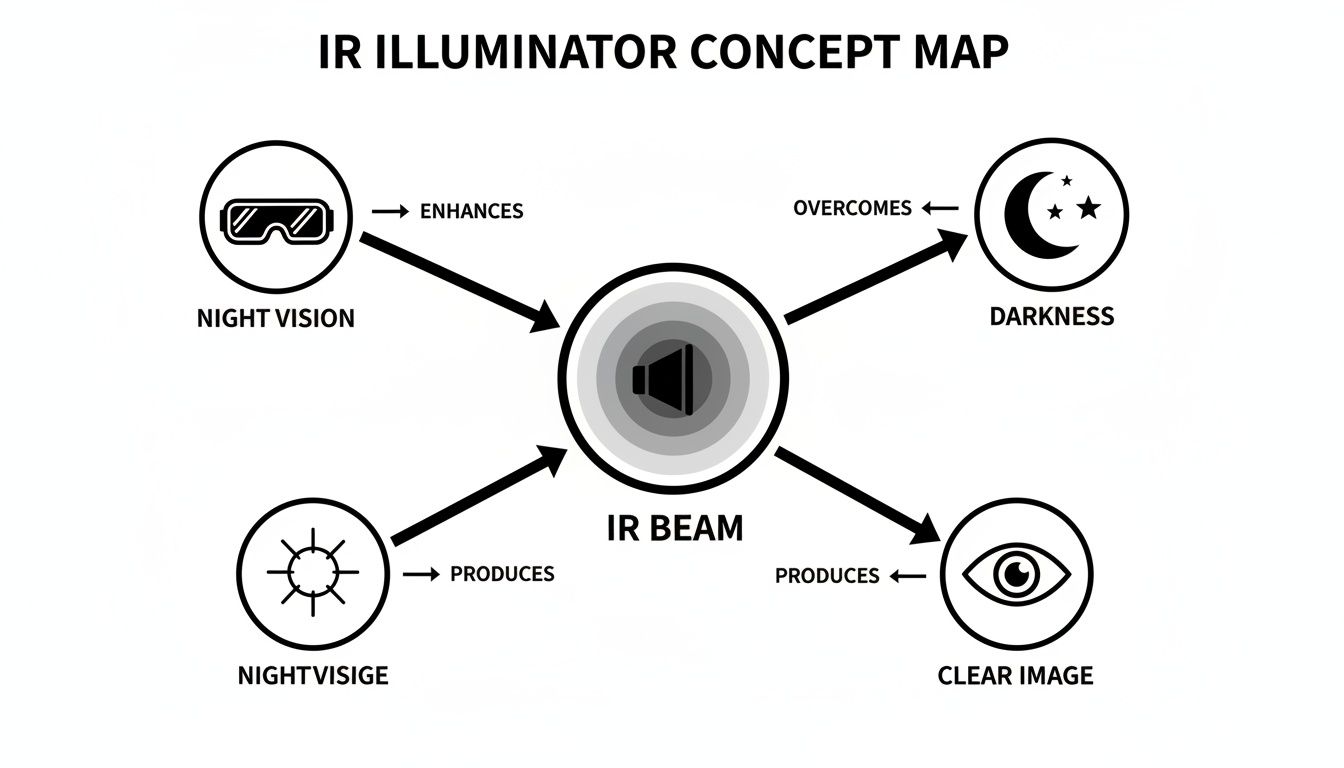
This visual perfectly illustrates the illuminator's job: it's a critical link that projects invisible light, which your gear then turns into sight.
Output Power And Effective Range
Output power, usually measured in milliwatts (mW), is the raw horsepower of the illuminator. It directly translates to how far the beam can effectively reach. More power means more photons are being thrown downrange, giving you a brighter image and a longer identification distance. The downside? More power drains your batteries much faster.
Be wary of "effective range" claims from manufacturers. There's no industry standard for measuring it, and performance depends heavily on atmospheric conditions (like humidity or fog), the quality of your night vision device, and your target. A high-end Gen 3 unit will see much farther with the same IR illuminator than an entry-level Gen 1 device will. Treat those range numbers as a best-case-scenario baseline.
Power Sources And Runtime
Finally, you have to think about what keeps the lights on. The type of battery you use affects not just how long the illuminator runs, but also your logistics and readiness in the field.
-
CR123A Batteries: These disposables are the gold standard for tactical equipment. They perform well in extreme cold, have an incredibly long shelf life, and are easy to find. Their only real drawback is the recurring cost if you use your gear a lot.
-
18650 Batteries: These rechargeable lithium-ion cells have become a favorite for good reason. They pack a ton of power and can be recharged hundreds of times, making them a very cost-effective solution for frequent users. The only thing to remember is that you have to plan ahead to keep them charged up.
Your choice here should match how you operate. For a go-bag or emergency kit, the 10-year shelf life of CR123As is a massive plus. For regular night hunts or training, the long-term savings of rechargeable 18650s are tough to beat.
Pairing Your Illuminator with Night Vision Gear
A good night vision IR illuminator is a serious force multiplier, but its real-world performance is completely tied to the gear you're running it with. The relationship between an illuminator and a night vision device isn't one-size-fits-all; it changes dramatically depending on the tech inside your optic. Getting this synergy right is the key to getting the most out of your setup.
Think of it like pairing an engine with a car. You wouldn't put a four-cylinder in a semi-truck and expect it to haul a heavy load. In the same way, different generations of night vision have vastly different appetites for infrared light.
Gen 1 and Gen 2: The Light-Hungry Generations
First-generation (Gen 1) night vision is where it all started. It gives you a huge advantage over the naked eye, but it’s not very good at amplifying what little ambient light is available. In anything close to total darkness, a Gen 1 device is pretty much a paperweight without an IR illuminator—the image will be dark, grainy, and functionally useless.
For Gen 1 and most Gen 2 systems, an external IR illuminator isn't just a nice-to-have accessory. It’s a mandatory piece of kit for the device to work effectively. It provides the raw infrared light these less sensitive tubes need to build a clear picture.
Gen 2 devices were a major leap forward, offering much better image clarity and performance in low light. Still, they rely heavily on a decent light source. A Gen 2 unit might get you by on a moonlit night, but it will start to struggle in deep shadows or under heavy cloud cover. A quality illuminator completely transforms a Gen 2 device, pushing its effective range and clarity far beyond its native capabilities.
Gen 3 and Beyond: The Apex Predators
This is where the game really changes. Third-generation (Gen 3) night vision, the gold standard for military and law enforcement, is incredibly efficient. Its gallium arsenide image intensifier tube can take the faintest starlight and turn it into a bright, crisp image. So, does a high-end Gen 3 unit even need an IR illuminator?
Yes, absolutely. While Gen 3 can practically see in the dark, it can't create light out of thin air.
- Deep Woods: Under a thick forest canopy, there’s often zero ambient light making it to the ground.
- Basements and Tunnels: Subterranean structures are a black hole for natural light.
- No-Moon Nights: An overcast, moonless night can challenge even the best tubes out there.
In these pitch-black scenarios, an illuminator provides the photons the Gen 3 tube needs to work its magic. It allows for positive target identification at much greater distances and "paints" the scene with clean IR light, which helps cut through the image scintillation (that sparkly effect) for a much clearer view. The demand for this level of capability is why the global night vision market is projected to skyrocket from $8.57 billion in 2025 to $12.91 billion by 2030. You can see this in major military contracts, like the U.S. Army's $263 million investment in ENVG-B systems that fuse thermal and night vision. You can read more about the growth of the night vision market to see just where the industry is headed.
The Thermal Incompatibility Myth
One of the most common points of confusion is whether an IR illuminator works with thermal optics. The answer is a hard no.
Thermal imagers don't see light; they see heat. They build an image based on the different infrared heat signatures emitted by objects in the environment. An IR illuminator, on the other hand, projects reflected light, which is completely invisible to a thermal sensor. Shining an illuminator at something won't make it any brighter or clearer through a standalone thermal scope. Our guide on choosing a night vision monocular head mount can help you get your traditional NVD set up correctly to use with an illuminator.
However, the story is a little different with cutting-edge "fused" systems. These devices overlay a thermal image on top of a traditional night vision image. In this case, the IR illuminator enhances the night vision layer, giving you clearer detail of the terrain and obstacles, while the thermal layer makes heat signatures pop. This combination offers incredible situational awareness, truly giving the user the best of both worlds.
Choosing the Right IR Illuminator for Your Mission
Picking out a night vision IR illuminator isn't about grabbing the most powerful or expensive one off the shelf. It’s all about matching the tool to the job. The illuminator a police officer needs to clear a building is worlds apart from what a hunter uses to spot coyotes across a pasture. When you move from theory to practice, you have to line up the features with your specific environment to really get an edge.
This mission-first approach helps you cut through all the technical jargon. Once you nail down your primary use, you can zero in on the exact blend of wavelength, beam pattern, and durability that will serve you best when the lights go out. Let’s look at what some key users really need.

For Law Enforcement and Tactical Teams
Operators in law enforcement and tactical roles are thrown into dynamic, high-stakes situations where equipment failure simply isn't an option. For them, it’s all about versatility, sheer ruggedness, and the ability to adapt on the fly.
An officer might have to go from a long-range surveillance post to a close-quarters building search in just a few seconds. That requires a night vision IR illuminator with a beam that can be adjusted instantly—switching from a tight, focused spot to identify a threat at a distance, to a wide flood for total situational awareness inside.
Key features boil down to:
- Adjustable Beam Focus: The ability to snap between a spot and flood beam is non-negotiable when moving between open areas and tight spaces.
- Weapon-Mount Durability: The unit has to be tough enough to handle the repeated shock and recoil from a firearm without losing its zero or just plain breaking.
- Intuitive Controls: Switches and focus rings need to be dead simple to use with gloves on and under stress, without fumbling.
- Quick-Detach Mounts: Being able to slap the illuminator on or rip it off a weapon system adds critical flexibility.
Tactical users often gravitate toward an 850nm illuminator. Yes, it has a faint red glow, but its superior range and power provide a critical advantage in positively identifying a threat before it gets too close.
For the Modern Hunter
A hunter’s needs are completely different, shifting toward stealth, range, and portability. The main goal is to see without being seen, often from a good ways off. Spooking your game with a visible light signature can be the difference between a successful hunt and going home empty-handed.
This is where the 940nm wavelength becomes the star of the show. Its beam is completely covert and invisible to the sharp eyes of animals like hogs, predators, and deer. This lets a hunter light up a target without giving away their position. The trade-off is that 940nm light doesn't reach as far, so hunters often need a more powerful unit to make up for it, especially for those long shots.
Important things for hunters to think about:
- 940nm Wavelength: This is priority number one for staying hidden from wary animals.
- Extended Range: A powerful illuminator that can throw a focused beam several hundred yards is a must for hunting in open country.
- Lightweight Design: Every ounce counts when you're hiking into your spot, so a light but potent illuminator is the ideal combo.
For Search and Rescue Professionals
Search and Rescue (SAR) teams work under incredible pressure, often scouring huge, difficult areas for long stretches. Their gear has to prioritize wide area coverage and long-term reliability over everything else.
For SAR, the most valuable feature is a wide, powerful flood beam. They aren't trying to pinpoint a small target hundreds of yards out; they’re trying to scan massive areas like a mountainside or dense woods as efficiently as possible. A tight spot beam would just create tunnel vision and slow them down.
What SAR teams need:
- Wide Flood Beam: A consistent, clean floodlight is crucial for covering the most ground with every sweep.
- Extended Battery Life: Missions can last all night, sometimes for days. An illuminator with a long runtime that takes common batteries is vital.
- Weather Resistance: SAR teams work in any weather, so a waterproof and durable illuminator is mandatory.
The critical role of IR technology has expanded far beyond its military origins. It's now a cornerstone of the modern $7.5 billion night vision device market in 2023, a number expected to climb to $11.2 billion by 2028. This boom is a direct result of the surging demand from police, security, and rescue crews who depend on this tech to see what’s hidden in the dark. You can get more insights on the growing demand for night vision technology and its market trends. By really understanding your mission, you can pick the right tool to own the night.
Getting Your IR Illuminator Mounted and Maintained
You can have the best night vision IR illuminator on the market, but if it's not set up right, it's not much better than a paperweight. Getting the mounting, aiming, and basic upkeep dialed in is what really unlocks its power and makes sure it’s ready to go when the lights go out.
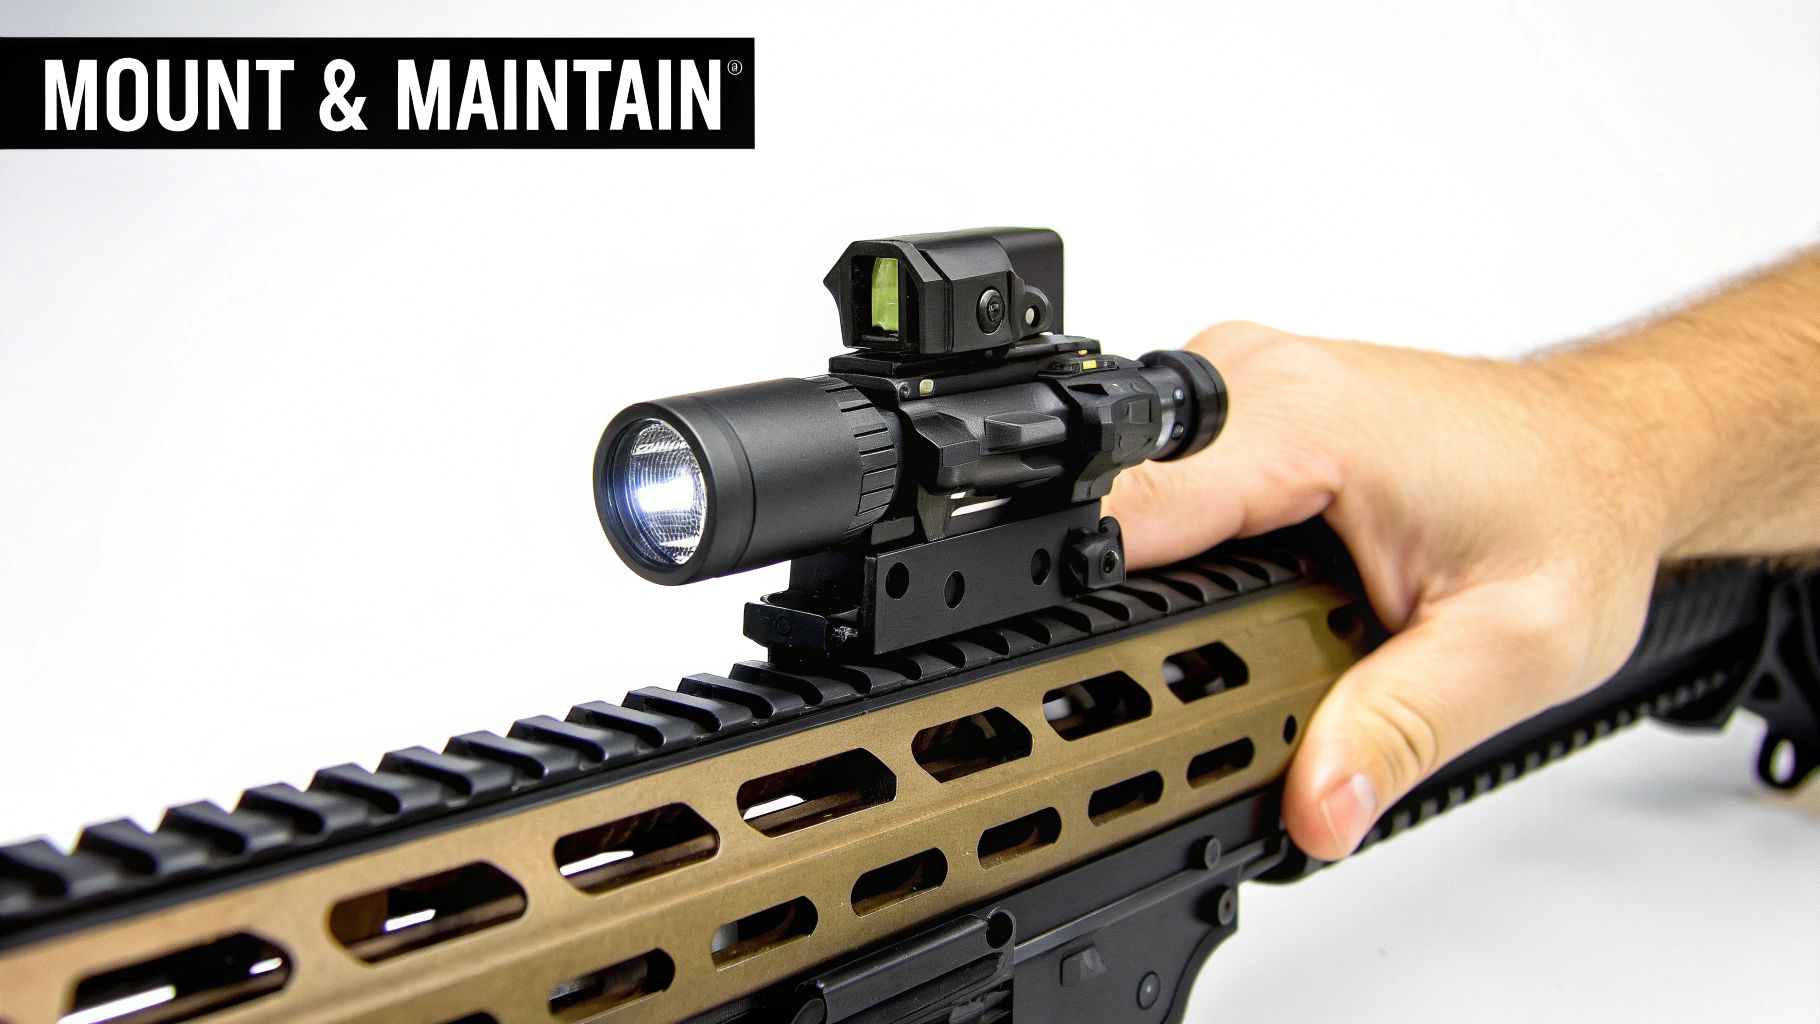
Think of it this way: a solid setup is cheap insurance for your expensive gear. Whether it's on your rifle or your helmet, doing it right from the start prevents those head-scratching performance issues down the road.
Finding the Right Spot for Your Illuminator
The go-to method for most people is slapping the illuminator right onto a weapon’s Picatinny rail. It’s a stable, repeatable platform, which is exactly what you need to keep it lined up with your optic or laser.
But that's not the only game in town. A helmet-mounted illuminator is fantastic for when you need your hands free—think navigating in the dark, working on a vehicle, or performing medical tasks. The light goes wherever you look. If you're weighing your options for helmet setups, our guide comparing the Wilcox G24 vs Argus A4 night vision mounts is a great place to start.
No matter where you put it, one thing is non-negotiable: the mount has to be rock-solid. A wobbly illuminator means your beam will wander, making it pretty much useless for any kind of precise work.
Aiming and Alignment: How to Kill That Annoying "Splash"
Getting your IR beam aligned correctly is the secret to a crystal-clear picture. One of the most common headaches is "splash"—that blinding glare you get when the IR light bounces off your suppressor or front sight post and floods your night vision.
Here’s how to fix it:
- Push It Forward: Mount the illuminator as far out on your handguard as you can. This gives the beam a better chance of clearing anything sticking off the end of your rifle.
- Try an Offset Mount: A simple 45-degree offset mount can kick the illuminator out to the side. That small change in angle is often all it takes to get the beam to fly past your suppressor.
- Focus the Beam: If your illuminator lets you, tighten the beam down to a focused spot. A narrow, concentrated beam is way easier to aim around obstacles than a wide, splashy flood.
Nailing this step keeps your field of view clean and lets you stay focused on what matters.
Powering Up: Choosing the Right Batteries
The batteries you choose directly affect your illuminator’s performance, how long it runs, and your whole logistical plan. The two main players here each have their place.
For a bug-out bag or a rifle that sits ready for emergencies, you can't go wrong with disposable CR123A batteries. They have a shelf life of up to 10 years, so you know they'll work when you grab them. But if you’re using your gear a lot, rechargeable 18650 batteries are the smarter move, offering better performance and saving you a ton of money over time.
Just think about how you use your gear. If you’re training frequently, that initial cost for a good 18650 charger and a few batteries will pay for itself in no time.
Simple Upkeep for Long-Term Reliability
Your IR illuminator is built to be tough, but a little bit of preventative maintenance goes a long way in keeping it dependable.
- Keep the Lens Clean: A quick wipe with a microfiber cloth and some proper lens cleaner gets rid of any dust or smudges. A clean lens means a brighter beam.
- Check Your O-Rings: Take a look at the rubber O-rings that seal the battery cap and head. If they look dry or cracked, a tiny dab of silicone grease will keep them pliable and maintain water resistance.
- Inspect the Contacts: Make sure the metal contacts inside the battery compartment are clean. If you see any corrosion building up, a pencil eraser is a great tool for gently scrubbing it away.
These checks take less than five minutes but can be the difference between a working tool and a dead one when you're out in the field.
Safety, Legality, and Best Practices
Using a high-powered night vision IR illuminator isn't just about flipping a switch; it demands a disciplined and heads-up approach. While the light it throws is invisible to the naked eye, the energy it emits is very real and can be surprisingly dangerous if you're not careful.
The biggest concern? Eye safety.
Think of it like this: you know instinctually not to stare at the sun. The same exact principle applies to an IR illuminator, but it’s even trickier. Since you can't see the beam, you don't get that natural "blink and look away" reflex that protects you from bright visible light. But the concentrated infrared energy is still there, and it can absolutely damage the retina.
The Golden Rule: Muzzle Discipline for Your Light
The most critical rule is simple and non-negotiable: never, ever point an IR illuminator directly at anyone's eyes. This goes for your buddy next to you, a potential threat, or even your own reflection. It applies to common LED illuminators and is even more critical for powerful, laser-based units. The risk of causing permanent eye damage is very real, especially up close.
A good habit to build is treating your IR illuminator with the same discipline you'd use for a firearm muzzle. Always be aware of where that beam is pointed so you never accidentally "paint" someone with direct IR energy.
Know Before You Go: Understanding the Rules
Beyond just being safe, you have to operate within legal and ethical lines. The laws around using night vision and infrared equipment can vary wildly from one place to another, especially when it comes to activities like hunting.
- Hunting Regulations: Many states and counties have specific laws that either restrict or completely ban using IR devices to hunt certain game. Ignorance isn't an excuse, so always check your local wildlife and game laws before you head into the field.
- Professional Use: For law enforcement or security personnel, your department's standard operating procedures (SOPs) and rules of engagement will dictate how and when you can use IR gear. Following these protocols is mandatory for staying on the right side of the law and making sound ethical decisions.
Taking the time to know and respect these rules is a fundamental part of being a responsible owner. It ensures you can get the most out of your equipment without endangering others or getting into legal trouble.
Your Top Questions About IR Illuminators, Answered
Alright, we've gone through the technical details, but I know you probably have some real-world questions bouncing around in your head. Getting those sorted is the last step before you can confidently pick out and use your gear. Let's tackle the most common ones.
Can Other People See My IR Beam?
Yes, absolutely. Anyone else using a night vision device will see your IR beam shining like a massive flashlight, and they can easily trace it right back to you. This is one of the most critical things to understand from a tactical standpoint.
The moment you switch on that illuminator, you're essentially announcing your exact position to anyone on the field with NVGs. Because of this, the golden rule is to use it only when you have to. Flick it on for a quick moment to identify a potential target or navigate a tricky spot in pitch-black conditions, then turn it off. This "painting" technique keeps you from being a walking beacon.
How Far Can These Things Actually Reach?
That's the million-dollar question, and the honest answer is: it depends. The real-world range of an IR illuminator is a mix of its power, the quality of your night vision device, and even the weather. But we can set some realistic expectations.
- Onboard Illuminators: Those tiny illuminators built into many PVS-14s or other monoculars? They're great for close-up tasks within 25-50 yards—think reading a map, fixing a piece of gear, or clearing a small room.
- Mid-Range Illuminators: A solid weapon-mounted or handheld unit will give you positive target identification out to 150-300 yards. This is the sweet spot for most hunting and tactical applications.
- High-Power Illuminators: The big guns. These specialized units can throw a beam out to 500 yards and beyond. To really make use of that much light at that distance, you'll need a high-spec Gen 3 device to see the return.
And always remember, things like heavy fog, rain, or even just high humidity will slash these distances pretty significantly.
I Have Gen 3 Night Vision. Do I Really Still Need an Illuminator?
You bet you do. It's true that a good Gen 3 tube is incredibly sensitive and can practically see in the dark on a starlit night. But it can't invent light that isn't there. In a true "zero light" situation, even the best tube is just an expensive paperweight.
Here's a simple way to think about it: A Gen 3 device is like having superhuman hearing. But if you're in a perfectly soundproof room, there's nothing to hear. An IR illuminator is like clapping your hands—it creates the "sound" that your superhuman "ears" can pick up.
You absolutely need a night vision IR illuminator if you're operating in places with no ambient light. We're talking deep inside a windowless building, a cave, a tunnel, or under a dense forest canopy on an overcast, moonless night. An illuminator bridges that gap, turning a liability into an advantage. Going without one is like buying a Ferrari and never taking it out of first gear.
Ready to take your night vision setup to the next level? The team at Superior Tactical LLC lives and breathes this stuff. We can get you squared away with the right IR illuminator and gear for your needs. Check out our hand-picked selection at https://superiortac.com.