IR Illuminator Night Vision a Complete Guide
At its core, an IR illuminator is an invisible flashlight. It throws a beam of infrared light out into the world, painting the environment with a light source that only your night vision device can see.
This turns a pitch-black scene, where your gear would otherwise be blind, into a clear, visible landscape.
What Is an IR Illuminator and Why Do You Need One?
Think about trying to read a book in a completely sealed, lightless room. Your eyes can't create light, so they're useless. Night vision devices work on the same principle—they are incredible light amplifiers. They take tiny amounts of ambient light from the moon and stars and magnify it thousands of times.
But what happens when there's zero ambient light, like inside a windowless building or a deep cave? Your night vision has nothing to amplify. This is where an IR illuminator becomes an absolute necessity.
The illuminator provides its own portable, invisible light source. It floods the area with infrared energy that the naked eye can't perceive, but to your night vision goggles, it's like flipping on a stadium floodlight. This active illumination is the critical bridge between low-light and no-light situations.
The Invisible Advantage in the Dark
Having an IR illuminator gives you a massive tactical and practical edge because you're no longer dependent on the moon or stars. You create your own favorable conditions. This capability is crucial for a few key reasons:
-
Positive Identification: When hunting or in a tactical situation, you can't afford to be unsure. An illuminator punches through deep shadows and reaches out to extended ranges, helping you confirm your target and avoid tragic mistakes.
-
Navigation: It lights up the path ahead, revealing trip hazards, terrain changes, and obstacles that are completely hidden in the dark. This makes moving at night much safer and faster.
-
Observation: For surveillance work or watching wildlife, an illuminator brings out fine details that ambient light just can't resolve, giving you a much richer picture of what's happening.
In short, an IR illuminator lets you own the darkness. It transforms your night vision device from a passive tool that just gathers light into an active system that can dominate any environment, on your terms.
To fully grasp why an illuminator is so important, it helps to understand the different types of night vision out there. Our detailed guide comparing thermal imaging vs. digital vs. analog night vision explains why illuminators are a perfect match for analog and digital systems, but don't work with thermal imaging.
How IR Illuminators Turn Darkness Into Daylight
Think of an IR illuminator as a high-tech flashlight, but for your night vision. Instead of throwing a beam of visible light that our eyes can see, it floods an area with infrared (IR) light—a part of the light spectrum that’s completely invisible to us. Your night vision device, however, sees it perfectly.
This is the secret to seeing in pitch-black conditions. While your night vision goggles are fantastic at amplifying tiny amounts of ambient light (like from the moon or stars), they're useless in a sealed room with zero light. There’s simply nothing to amplify. The IR illuminator provides that crucial light source, "painting" the scene so your gear can turn it into a crisp, recognizable image.
To really get a handle on this, you need to understand three core concepts that define an illuminator's performance: wavelength, power output, and beam pattern. Getting these right is the key to picking the perfect tool for your needs.
This simple diagram shows exactly what's happening. In total darkness, you see nothing. Add an IR illuminator, and suddenly your night vision device has everything it needs to give you a clear view.
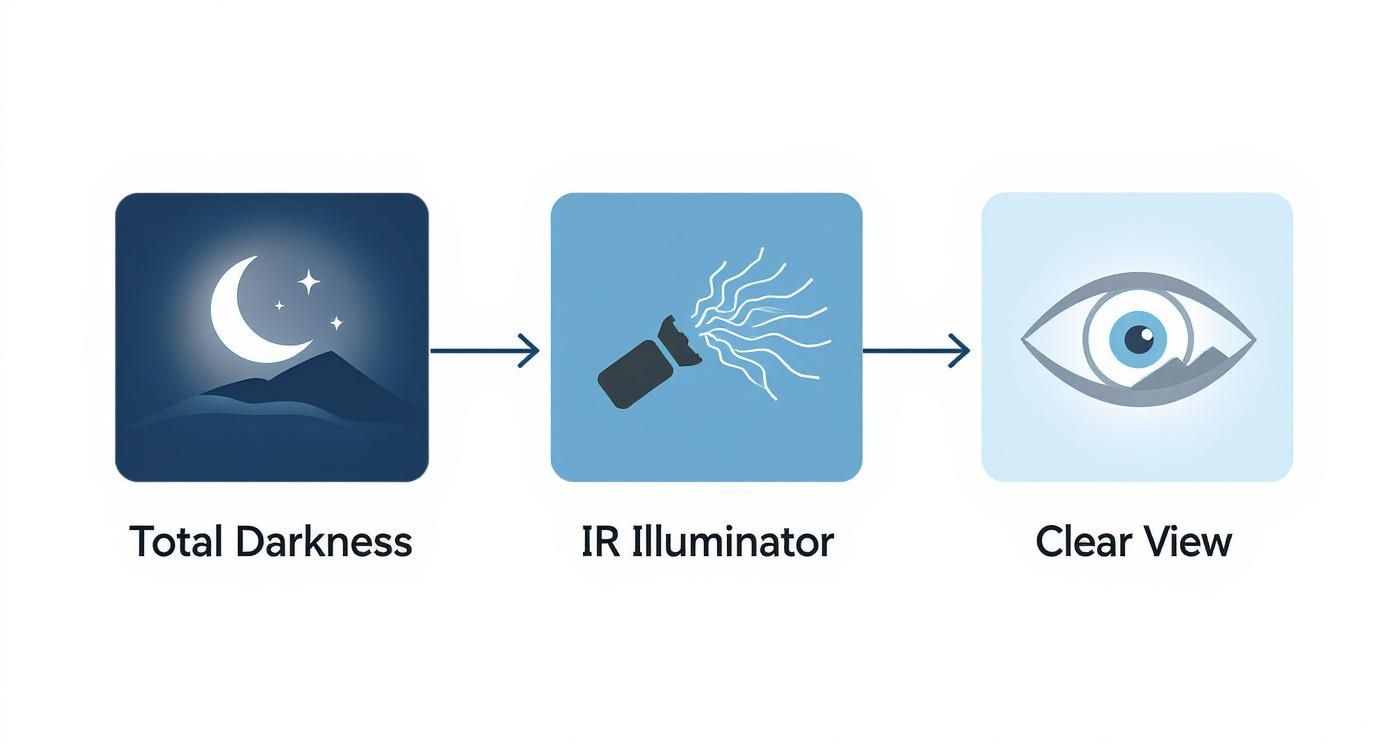
As you can see, the illuminator is the missing link, providing the light in an environment that has none.
Wavelength: The Stealth Factor
The first spec to wrap your head around is wavelength, which is measured in nanometers (nm). You'll almost always see two options: 850nm and 940nm. The choice here is a classic trade-off between raw power and staying hidden.
-
850nm Illuminators: These are the industry standard and for good reason. They pack a serious punch, offering incredible range and brightness for identifying targets at a distance. The catch? The emitter itself gives off a faint, dull red glow if you look directly at it. This makes it "semi-covert"—great for most uses, but potentially a giveaway if someone is looking for you.
-
940nm Illuminators: These are your "fully covert" or "stealth" models. The light they produce is totally invisible to the naked eye. No red glow, period. This is essential for tactical situations or wildlife observation where you can't afford to be seen. The price for this stealth is a noticeable drop in performance, usually about 30-40% less range than a comparable 850nm unit.
To make this decision easier, here's a quick breakdown of the key differences.
IR Wavelength Comparison 850nm vs 940nm
| Feature | 850nm (Semi-Covert) | 940nm (Fully Covert) |
|---|---|---|
| Visibility | Faint red glow visible at the source | Completely invisible to the naked eye |
| Range | Maximum performance and illumination distance | Reduced range (approx. 30-40% less) |
| Brightness | Brighter output for clearer images at distance | Softer illumination, less effective at long range |
| Best For | Hunting, long-range observation, general use | Tactical ops, law enforcement, close-range covert work |
Ultimately, choosing your wavelength is mission-dependent. If you need to see as far as possible and a tiny signature is an acceptable risk, 850nm is the way to go. If being seen is not an option, you need 940nm.
Power Output and Beam Pattern
Beyond wavelength, two other factors control how your illuminator performs. First is power output, measured in milliwatts (mW). It’s simple: more power means a brighter beam and more reach. A higher mW rating will light up targets further away and give your night vision a cleaner image to work with.
The second is the beam pattern, which is all about how that light is shaped. Any good illuminator will have an adjustable focus, letting you shift between two patterns on the fly.
-
Flood Beam: This gives you a wide, soft cone of light that’s perfect for lighting up a big area up close. It’s what you want for walking through the woods or scanning a field without getting tunnel vision.
-
Spot Beam: This concentrates all the power into a tight, intense beam that punches way out into the darkness. It’s absolutely critical for getting positive identification on a distant target or checking out a specific point of interest.
A truly versatile ir illuminator night vision setup lets you switch from a wide flood to a tight spot in seconds. This gives you total control, allowing you to adapt from navigating terrain to identifying a threat instantly.
Matching Your Illuminator to Your Night Vision System
Pairing the right IR illuminator with your night vision gear is a lot like choosing the right engine for a car. Get it wrong, and you'll be left with a system that never hits its full potential. The right match, however, creates a seamless and incredibly powerful unit.
The key is understanding that not all night vision is created equal. The way different technologies "see" infrared light determines everything. Think of the different generations—Gen 1, Gen 2, and Gen 3—as having varying levels of natural eyesight in the dark. How sensitive each generation is to light dictates just how much it needs an external IR source to paint a clear picture.
This synergy is what it's all about. It’s also the engine behind the growing infrared night vision camera market, which is projected to hit USD 2.5 billion by 2025. This growth is all about pushing sensor technology forward, and that technology relies on smart, compatible illumination. If you're interested in the numbers, you can explore more data about this expanding market and its key drivers.
Gen 1: The Illuminator-Dependent System
First-generation night vision is where most people get their start. These devices work by amplifying whatever ambient light is available, but their image intensifier tubes are far less efficient than their more advanced cousins. The result? They're extremely thirsty for light.
In anything less than a bright, moonlit night, a Gen 1 device will give you a grainy, often distorted image. In a truly dark environment, like a windowless room, it’s completely blind. This is where an IR illuminator stops being an accessory and becomes a mandatory piece of the puzzle.
A powerful IR illuminator is the lifeblood of a Gen 1 system. Without it, the device is severely limited. With it, you can turn a pitch-black space into a usable, visible environment.
For anyone running Gen 1 gear, a high-output illuminator is non-negotiable. It’s got to be powerful enough to paint the entire scene with infrared light. The illuminator does all the heavy lifting, providing the raw energy the less sensitive tube needs to build an image.
Gen 2 and Gen 3: Strategic Illumination
When you step up to Gen 2 and especially Gen 3 night vision, the relationship with IR illuminators changes completely. These devices are incredibly efficient at gathering and amplifying even the faintest starlight. On many nights, they can produce a stunningly clear image with no supplemental IR at all.
So why even bother using an illuminator with a high-end device? Because its role shifts from a primary light source to a strategic tool for specific jobs.
-
Punching Through Shadows: Even on a clear night, deep shadows under trees or inside a doorway can hide a lot. A quick splash from an IR illuminator instantly reveals what's lurking in those dark corners.
-
Extending Identification Range: You might be able to detect a figure at 400 yards with just ambient light, but you won't be able to tell friend from foe. Focusing an IR beam on that target can give you the clarity needed for positive identification at a distance.
-
Navigating Absolute Darkness: When you’re dealing with zero ambient light—think deep inside a building or a cave—an illuminator provides the necessary light for the Gen 3 tube to work its magic.
With these advanced systems, you learn to use an illuminator deliberately and sparingly. It becomes more like a surgical instrument than a floodlight.
The Critical Mismatch: Thermal Imaging
One of the most common and costly mistakes we see is people trying to pair an IR illuminator with a thermal imaging system. It's crucial to understand that these two technologies operate on completely different principles and simply don't speak the same language.
-
Night Vision: Sees reflected light, including the infrared light from an illuminator.
-
Thermal Imaging: Sees emitted heat energy.
An IR illuminator produces light, not heat. To a thermal scope, a blasting IR beam is completely invisible because it doesn't register on the heat-sensing core. Trying to use an illuminator to enhance a thermal image is like trying to use a flashlight to hear better—the two are fundamentally incompatible because they sense different parts of the electromagnetic spectrum.
Getting this right ensures you invest in components that actually work together to create a cohesive and effective system.
Where IR Illuminators Shine in the Real World

All the technical talk is great, but the real test for any piece of gear is how it performs when it counts. Out in the field, an IR illuminator isn't just a gadget—it's what turns your night vision from a passive viewing device into an active tool that gives you a serious advantage in the dark.
Whether you're navigating dense woods or scanning an urban landscape, that extra IR light is what allows you to own the night. It's the key to navigating, identifying, and staying safe when visibility drops to zero.
Tactical and Law Enforcement Operations
For anyone in uniform, positive identification is everything. In a no-light scenario, you simply can't rely on faint starlight to tell you if someone downrange is a threat or a friendly. This is precisely where a high-quality, focusable IR illuminator proves its worth.
A tight, focused beam can slice through hundreds of yards of darkness, cutting through haze and deep shadows to put a spotlight on a specific person or object. It’s what gives an operator the clarity to confirm identities, read intent, and make those split-second decisions with confidence. The ability to quickly switch from a wide "flood" for clearing a room to a pinpoint "spot" for long-range observation is a game-changer.
This need for a tactical edge is fueling massive growth in the night vision market. Valued around USD 8.57 billion in 2023, it's expected to climb to USD 12.91 billion by 2030, largely driven by increasing defense and security demands. For a closer look at the numbers, you can discover more insights about night vision market growth and see where the industry is headed.
Hunting and Wildlife Observation
Hunters and wildlife photographers have a completely different mission, but they rely on IR just as heavily. Their goal is simple: see without being seen. The last thing you want is to spook an animal with the telltale red glow of a lesser illuminator.
This is where wavelength choice is critical. A covert 940nm illuminator is the perfect tool for staying invisible. It produces no visible signature, letting you watch nocturnal animals behave naturally from a distance. This stealthy approach is essential for:
-
Ethical Hunting: Getting a crystal-clear view to confirm your target's species and what's behind it before taking the shot.
-
Wildlife Research: Gathering data on animal behavior without your presence influencing the results.
-
Photography: Capturing those stunning, tack-sharp images that are impossible to get in near-total darkness.
You're essentially painting the landscape with invisible light, giving you a front-row seat to the nocturnal world.
For the serious outdoorsman, an illuminator isn't just about seeing in the dark; it's about seeing without being seen. It provides a window into the nocturnal world that remains undisturbed and authentic.
Search and Rescue Missions
When someone is lost, the clock is always ticking, and search efforts don't stop when the sun goes down. For Search and Rescue (SAR) teams, an IR illuminator and night vision setup is a genuine force multiplier, making a nighttime search exponentially more effective.
In a SAR scenario, a wide "flood" beam is your best friend. A powerful illuminator can light up a huge swath of a field, forest, or mountainside in an instant. This makes it far easier for volunteers to spot a person, a piece of discarded clothing, or even tracks on the ground, allowing a small team to cover a massive area in a fraction of the time.
With an illuminator and NVGs, SAR teams can:
-
Scan Large Areas Rapidly: They can clear ground far faster than teams using regular flashlights.
-
Reduce Team Fatigue: Staring into the darkness is exhausting; IR illumination dramatically reduces eye strain.
-
Improve Safety: Team members can spot hazards like drop-offs, unstable ground, or wildlife long before they become a problem.
As you can see, an illuminator is far more than an accessory—it's a purpose-built tool that directly shapes the outcome of critical missions. To learn more about how this tech is used, check out our detailed guide on the applications of night vision in wildlife, SAR, and security.
How to Choose the Right IR Illuminator for Your Needs
Picking the right IR illuminator can feel like you’re staring at a wall of technical specs. Instead of getting lost in the weeds, let's flip the script. Start with what you need to do, and then find the tool that gets it done. Answering a few straightforward questions about how you’ll actually use the device will cut through the noise and point you to the right one.
It’s all about matching the tool to the task. You wouldn't use a sledgehammer to hang a picture frame, and the same logic applies here. Your illuminator needs to work in concert with your night vision device, your environment, and what you’re trying to accomplish. When everything works together, that's when you really own the dark.
Define Your Operational Range
First things first: how far do you need to see? Your answer to this single question will determine the power output and beam focus you need more than anything else. If you're identifying targets several hundred yards out, you'll need a high-power illuminator with a tight, focused beam. This is the go-to for long-range hunters and surveillance teams.
On the other hand, if you're mostly moving through buildings or thick woods, that same high-power beam becomes a liability. It will create a massive "IR splash"—a blinding glare that bounces off nearby walls and trees, completely washing out your vision. For close-quarters work, a lower-power illuminator with a wide, soft flood beam is what you want.
Think about your typical engagement distance. Grabbing an illuminator built for 50-yard navigation when you need 300-yard identification is a recipe for failure—and vice versa. The environment dictates the gear.
Consider Power and Battery Life
A dead battery turns your high-tech gear into dead weight. That’s why your illuminator's runtime and power source are just as critical as its performance.
-
Battery Type: A lot of illuminators run on common CR123A batteries, which are powerful and easy to find. Others use rechargeable 18650s, which deliver great performance and can save you money in the long run. Try to standardize batteries across your gear to simplify logistics.
-
Runtime: Always check the manufacturer's specs for runtime, especially at the highest setting. If you're out for hours at a time, picking an efficient model means carrying fewer spare batteries and less weight.
Evaluate Mounting and Ergonomics
How you attach your ir illuminator night vision accessory to your gear has a huge impact on how useful it is. The three main options each have their own pros and cons.
-
Weapon-Mounted: This is the standard for most tactical and hunting setups. Make sure the illuminator works with your rail system, like Picatinny or M-LOK. You'll want something durable and light enough that it won't throw off the balance of your rifle. A remote pressure switch is also a must-have for activating the light without shifting your grip.
-
Helmet-Mounted: Putting an illuminator on your helmet means the light goes wherever you look, which is perfect for hands-free navigation. Just be mindful of the weight. Even a few extra ounces on your head can lead to serious neck fatigue over a long night.
-
Handheld: A simple handheld illuminator gives you a ton of flexibility but ties up one of your hands. It's an excellent, affordable choice for general observation or as a solid backup to your primary unit.
Finally, think about the controls. Can you change the power level or adjust the beam focus with gloves on, under stress? The controls need to be dead simple and intuitive. An illuminator should feel like a part of you, not some clumsy gadget you have to fight with. For more expert advice, our guide on how to choose night vision accessories online offers additional tips that can help you make a well-rounded decision. By thinking through these practical factors, you can get past the spec sheets and find an IR illuminator that truly makes you more capable in the dark.
Getting the Most Out of Your IR Illuminator

Having the right gear is one thing; knowing how to squeeze every ounce of performance out of it is another. Dialing in your ir illuminator night vision setup is what separates a decent experience from a truly effective one, giving you a sharp, clean image when it counts. It all comes down to proper alignment and a few field-tested tricks of the trade.
The real goal here is to get your illuminator and your night vision device working as a single, seamless unit. This starts with getting the mounting and alignment just right, which is the secret to killing those annoying dark spots and making sure your beam lands exactly where your eyes are.
Mounting and Aiming Your Illuminator
Getting the alignment right isn't just a suggestion—it's absolutely essential. You want to co-align the center of your IR beam with the center of your NVD’s field of view. If the beam is off-center, you're just wasting light and potentially leaving your target area in the dark.
First, get the illuminator mounted securely on your helmet or weapon. Head into a dark space and find a plain, light-colored wall or surface about 20-25 yards away. Fire up your NVD and illuminator, then crank the beam down to its tightest focus. You’ll immediately see the IR "hotspot" through your optic.
The secret to a perfect setup is making small, patient adjustments. Tweak the illuminator's mount bit by bit, checking the alignment through your NVD after each change. Keep going until that hotspot is dead center. That's how you know every bit of IR energy is going exactly where you're looking.
Dealing with IR Splash and Glare
One of the first problems you’ll run into, especially indoors or in thick woods, is "IR splash." It’s that blinding glare you get when your powerful beam bounces off nearby objects, completely washing out your night vision. Learning to manage this is critical for keeping your head in the game.
There are a couple of solid ways to handle this:
-
Adjust Your Beam Focus: Switch from a tight "spot" to a wide "flood" pattern. Spreading the beam out diffuses the light, which dramatically cuts down on the intensity of reflections from things up close.
-
Use Your Power Settings: If your illuminator has adjustable power, it’s your best friend here. Dial back the intensity for close-quarters environments. You only need enough light to see, not enough to cause a total whiteout.
Getting a feel for these adjustments will let you move from an open field into a tight building without missing a beat.
Field Maintenance and Battery Smarts
Out in the field, reliability is everything. That comes from good habits, both in maintaining your gear and managing your power source. Before you pack your illuminator away, run through a quick function check.
-
Keep the Lens Clean: A simple wipe with a microfiber cloth is all it takes. Dust, dirt, and fingerprints can mess with your beam and cut down on its performance.
-
Pull the Batteries for Storage: If you’re putting the gear away for a while, take the batteries out. A leaking battery can cause corrosion that will absolutely wreck the electronics.
-
Standardize Your Batteries: This is a huge logistical win. If you can, try to run all your gear on the same battery type, like the CR123A. It means you only have to pack one kind of spare, simplifying your loadout.
These small routines make a huge difference, ensuring your equipment works flawlessly when you can't afford a failure.
Got Questions About Your IR Illuminator? We've Got Answers.
Even after you get the hang of the tech, putting an ir illuminator night vision setup to work in the real world always brings up new questions. Let's tackle some of the most common ones we hear from guys on the range and in the field, from greenhorns to seasoned pros.
Can I See an IR Beam with the Naked Eye?
The short answer is no, not really. Your eyes aren't built to see light in the infrared spectrum, which is where these illuminators do their work. But there's a little more to it than that, and the difference comes down to wavelength.
If you're running an 850nm illuminator, you might notice a faint, cherry-red glow if you look straight into the emitter. You're not seeing the beam itself, just the source. That tiny signature is why 850nm is often called "semi-covert."
Jump up to a 940nm illuminator, and that glow is gone. Completely. The light it puts out is so far beyond what we can see that it's totally invisible to the naked eye. This makes it the go-to for situations where staying hidden is non-negotiable.
Will an IR Illuminator Work with a Thermal Scope?
This is a big one, and the answer is a hard no. An IR illuminator and a thermal optic are completely incompatible. They're built on entirely different technologies and one simply cannot see what the other is doing.
Here's the breakdown:
-
Night Vision needs light to work. It takes tiny amounts of ambient or IR light and amplifies it so you can see.
-
Thermal Imaging doesn't see light at all. It sees heat, detecting the infrared energy that objects give off.
An IR illuminator creates light, not a heat signature. Firing up your illuminator in front of a thermal scope is pointless; the thermal sensor won't even know it's there.
Think of it this way: Night vision sees reflected light, while thermal sees emitted heat. Trying to use an IR illuminator with a thermal optic is like using a flashlight to help you hear better—you're using the wrong tool for the job.
How Do I Deal with Glare or "IR Splash"?
You’ve probably seen it. You light up a target, but the IR light bounces off a nearby wall, sign, or even thick brush, and suddenly your tube is completely washed out. That blinding reflection is what we call "IR splash."
Thankfully, managing it is pretty straightforward. The first thing to try is adjusting your beam. If you can, open it up from a tight "spot" to a wide "flood." This spreads out the light and softens the reflection. Even better, if your illuminator has adjustable power, just dial back the intensity. In close-quarters, you rarely need to be on full blast.
At Superior Tactical LLC, we know that having the right knowledge is just as critical as having the right gear. Our team is here to help you get answers and build the exact night vision system you need. Check out our hand-picked selection of illuminators and accessories at https://superiortac.com.