A Practical Guide to Helmet Mounted Night Vision
Think of helmet-mounted night vision as your personal superpower for operating after dark. It works by grabbing the faintest traces of ambient light—from the moon, stars, or even distant city glow—and amplifying it tens of thousands of times to paint a clear, bright picture. Suddenly, you can see in what looks like total darkness, turning the night from a liability into a tactical advantage.
This isn't just a tool for special forces anymore. It's becoming an essential piece of kit for law enforcement, dedicated hunters, and serious prepared citizens.
How Helmet Mounted Night Vision Works

So, how does it turn a moonless night into a visible landscape? The magic is in a process called image intensification. It's not about seeing heat like thermal imaging; it's about making the most of the light that’s already there.
Here's the quick and dirty breakdown of what happens inside the tube:
-
Light In: The front lens, called the objective lens, gathers up all the available photons (the tiny particles of light) from the scene.
-
Photons to Electrons: These photons hit a special surface called a photocathode, which instantly converts them into electrons.
-
The Multiplier Effect: The electrons are then fired into a microchannel plate (MCP). Think of the MCP as a paper-thin disc honeycombed with millions of microscopic tubes. As a single electron zips through, it bounces off the walls, knocking loose thousands more electrons in a chain reaction.
-
Image Out: This now massive cascade of electrons slams into a phosphor screen at the back, causing it to glow brightly wherever the original light was detected. This creates the green or white image you see through the eyepiece.
This all happens in a fraction of a second, giving you a real-time view of your surroundings. Understanding this analog process is key, as it's a world apart from digital or thermal systems. We get into the weeds on this in our guide explaining the different types of night vision technology.
Key Form Factors
When you're ready to get a set, your first big decision is choosing between the different device styles, or "form factors." Each one strikes a different balance between performance, awareness, and what it'll cost you.
-
Monoculars: A single-tube device, like the classic PVS-14, that covers one eye. This setup is great because it leaves your other eye free to see naturally, which helps your brain adjust to changing light conditions and preserves some of your unaided night vision. They’re also lighter and more budget-friendly.
-
Binoculars: Often called dual-tube goggles, these give an intensified image to both eyes. The game-changer here is true stereoscopic vision, which gives you actual depth perception. Being able to judge distances is a massive advantage for driving, moving over rough ground, or engaging targets.
-
Panoramic Goggles: The top-tier stuff. These use four or more tubes to create an incredibly wide field of view (FOV) that’s much closer to what your eyes see naturally. The situational awareness is unmatched, but their serious cost and weight mean they're typically reserved for elite military units.
The market for hands-free night vision is absolutely exploding. The head-mounted segment is on track to nearly double, jumping from USD 2.55 billion in 2025 to a projected USD 5 billion by 2035. This just goes to show how vital this capability has become for pros and civilians alike.
Night Vision Form Factor Quick Comparison
To help you visualize the trade-offs, here’s a quick summary of how these form factors stack up for the user.
| Form Factor | Primary Advantage | Key Disadvantage | Best For |
|---|---|---|---|
| Monocular | Preserves unaided night vision; lighter & affordable | No depth perception; can cause eye strain | Entry-level users, budget-conscious buyers, mixed-lighting environments |
| Binocular | True depth perception; reduced eye fatigue | Heavier and significantly more expensive | Serious users who need to navigate terrain, drive, or judge distances |
| Panoramic | Unmatched situational awareness (wide FOV) | Extremely expensive, heavy, and complex | Specialized military and government teams with no budget constraints |
Ultimately, choosing the right form factor comes down to your mission and your budget. A monocular gets you in the game, but dual tubes are what most serious users end up running for the massive boost in capability.
Choosing Your System: Monocular vs. Dual-Tube Setups
When you decide to put night vision on a helmet, your first big decision is a simple one: one tube or two? This choice, between a monocular and a dual-tube goggle, sets the stage for everything else. It dictates your budget, how the system feels on your head, and ultimately, how you see and move in the dark. Each option has its own serious pros and cons, and the right answer depends entirely on what you need to do.
A monocular, like the legendary PVS-14, is where most people start their journey into night vision, and for good reason. It covers just one of your eyes, leaving the other free to adjust to the ambient light around you. This "one eye in, one eye out" approach is a huge advantage when you’re moving through areas with mixed lighting, like going from a pitch-black field into a dimly lit building.
Your brain gets two different pictures to work with, which gives you a ton of situational awareness. On top of that, monoculars are generally lighter, simpler, and way less expensive than a dual-tube setup. They're a powerful and accessible way to own the night. For a deeper dive into what makes a good monocular tick, check out our guide on the top features to look for in a quality night vision monocular.
The Case for Dual-Tube Binoculars
A monocular gets you in the game, but dual-tube systems change how you play it. Giving an intensified image to both eyes unlocks a massive advantage that a single tube just can’t touch: true stereoscopic vision. It’s the same way your brain perceives depth during the day.
With duals, you can judge distances accurately. You can walk over uneven ground without tripping. You can grab a doorknob or step off a curb without fumbling. All those little things that feel clumsy with a monocular suddenly become second nature again.
Depth perception isn't a luxury; it's a critical tool for speed and safety. Anyone who needs to move fast and with confidence through the dark will find that the investment in dual tubes pays for itself by minimizing mistakes and maximizing efficiency.
Of course, this extra capability comes with a higher price tag. Binocular systems are significantly more expensive and add more weight to the front of your helmet. You'll almost certainly need a counterweight to keep things balanced and comfortable for more than a few minutes.
Articulating Goggles: The Best of Both Worlds?
Today's best dual-tube systems have another trick up their sleeve: articulation. This means you can flip each tube pod up and out of the way, independently of the other. It’s a design that offers incredible flexibility on the fly.
Here’s why that matters:
-
Hybrid Vision: Flip one pod up and you’ve essentially got a monocular. This lets you use one eye for night vision while your other eye is free to use a weapon-mounted optic or just scan the area.
-
Low-Profile Stowage: When you fold both pods back against the helmet, the whole unit sits much flatter than a monocular flipped up on a J-arm. That’s a lifesaver when you’re getting in and out of vehicles or moving through tight spaces where snagging your gear is a real risk.
-
Instant Transition: Need your natural vision back? Just flip the pods up. It’s a faster and smoother transition than having to dismount the entire device.
In the end, it all comes down to balancing your budget against your mission. If you need a solid, capable system that can handle varied lighting and won't break the bank, a high-quality monocular is an excellent choice. But if your work involves driving, navigating complex terrain, or anything where depth perception is non-negotiable, the superior performance of a dual-tube system is worth every penny.
Decoding the Numbers: What Night Vision Specs Actually Mean
Jumping into the world of helmet-mounted night vision can feel like learning a new language. You're immediately hit with a wall of acronyms and technical jargon. But don't get intimidated. A spec sheet is just a story about the device's performance, and once you learn a few key terms, you'll be able to read that story loud and clear.
Think of it like learning the stats on a high-performance engine—once you understand what horsepower and torque really mean, you know exactly how that car will feel on the road. This is where you learn to spot the difference between a top-tier system and an entry-level unit just by looking at the numbers.
Gen and FOM: The Big Picture
The first thing you’ll probably see is "Generation," or Gen. This is a broad-strokes way to classify the technology inside the image intensifier tube. While Gen 2 was a big step up from older tech and still works for some uses, Gen 3 is the modern gold standard for any serious professional or civilian. It pulls in way more light, giving you a much brighter and clearer picture when it's really dark out.
But to get more specific, the industry uses a single, powerful number called Figure of Merit (FOM). If a night vision tube were an engine, FOM would be its horsepower rating. A higher number is almost always better.
It’s calculated by multiplying two other key stats:
-
Resolution (lp/mm): How much detail the tube can actually see.
-
Signal-to-Noise Ratio (SNR): How "clean" or "grainy" the image is.
FOM is the go-to number for a quick and dirty comparison between tubes. Anything with a FOM of 2000 or higher is generally considered high-performance, delivering that crisp, clean image you want when conditions are tough.
Resolution and SNR: The Building Blocks of a Great Image
While FOM gives you the highlight reel, the real story is in its two components: resolution and SNR. These two specs are what truly define the quality of the image you see through your device.
Resolution, measured in line pairs per millimeter (lp/mm), is all about detail. A higher lp/mm means you can distinguish smaller objects from farther away. It's the difference between seeing a vague blob in the woods and being able to clearly identify it as a coyote.
Signal-to-Noise Ratio (SNR) is arguably the more critical of the two. It measures the purity of the image. The "signal" is the light from the scene you're trying to see, and the "noise" is that fuzzy, static-like sparkle that can fill the view in extreme darkness. A high SNR gives you a solid, stable picture instead of a screen full of distracting "snow."

This choice between a single eye (monocular) and both eyes (bino/dual-tube) is a fundamental decision that flows from understanding these specs and how they translate to real-world performance.
Autogating and Phosphor: The Must-Have Features
Beyond raw performance numbers, a couple of features have a huge impact on how usable and safe your night vision is.
First up is autogating. Think of it as a super-fast set of sunglasses for your tube. If you're suddenly hit with a bright light—like a car’s headlights or a muzzle flash—autogating instantly dials back the power. This does two crucial things: it protects the expensive tube from getting burned, and more importantly, it stops you from being temporarily blinded.
Your other big choice is Green Phosphor (P43) vs. White Phosphor (P45). This mostly comes down to personal preference and budget. Green is the classic night vision look we all know, and it works great. White phosphor gives you a black-and-white image that many people find feels more natural and causes less eye strain over long nights. While it usually costs a bit more, white phosphor is often praised for showing better contrast and detail.
To give you a clearer picture, here’s a breakdown of the most critical specs you'll encounter.
Key Night Vision Specifications Explained
This table breaks down the essential performance metrics, what they mean in plain English, and why they should matter to you.
| Specification | What It Measures | Why It's Important | Good/Better/Best Range |
|---|---|---|---|
| Figure of Merit (FOM) | Overall tube performance (Resolution x SNR) | The single best at-a-glance metric for comparing tubes. Higher is better. | Good: 1600-1800 |
| Better: 1800-2200 | |||
| Best: 2200+ | |||
| Resolution (lp/mm) | Image sharpness and detail | Determines how clearly you can distinguish objects at a distance. | Good: 64 lp/mm |
| Better: 72 lp/mm | |||
| Best: 81+ lp/mm | |||
| Signal-to-Noise (SNR) | Image clarity vs. electronic "snow" or static | A high SNR provides a clean, crisp image, especially in very dark conditions. | Good: 25-28 |
| Better: 28-32 | |||
| Best: 32+ | |||
| Autogating | The tube's ability to rapidly adapt to bright light | Protects the tube from damage and prevents the user from being temporarily blinded. | Not a range, but a must-have feature for any serious use. |
| Phosphor Type | The color of the image (Green or White) | User preference for comfort and perceived contrast. | P43 (Green): Standard, cost-effective. |
| P45 (White): Higher cost, often preferred for clarity. |
Understanding these numbers empowers you to look past the marketing and choose a system based on real, measurable performance.
Of course, the technology doesn't stand still. Innovations like fusion night vision, which overlays a thermal image on top of the intensified image, are already changing the game. These advanced systems give users incredible depth perception and help them spot targets much faster, which is why they are seeing rapid adoption. To get a sense of where the high-end market is heading, you can dig into research on the military helmet display market.
By arming yourself with this knowledge, you're ready to make a smart investment in a helmet-mounted night vision system that actually meets your needs.
Building Your Helmet and Mounting System
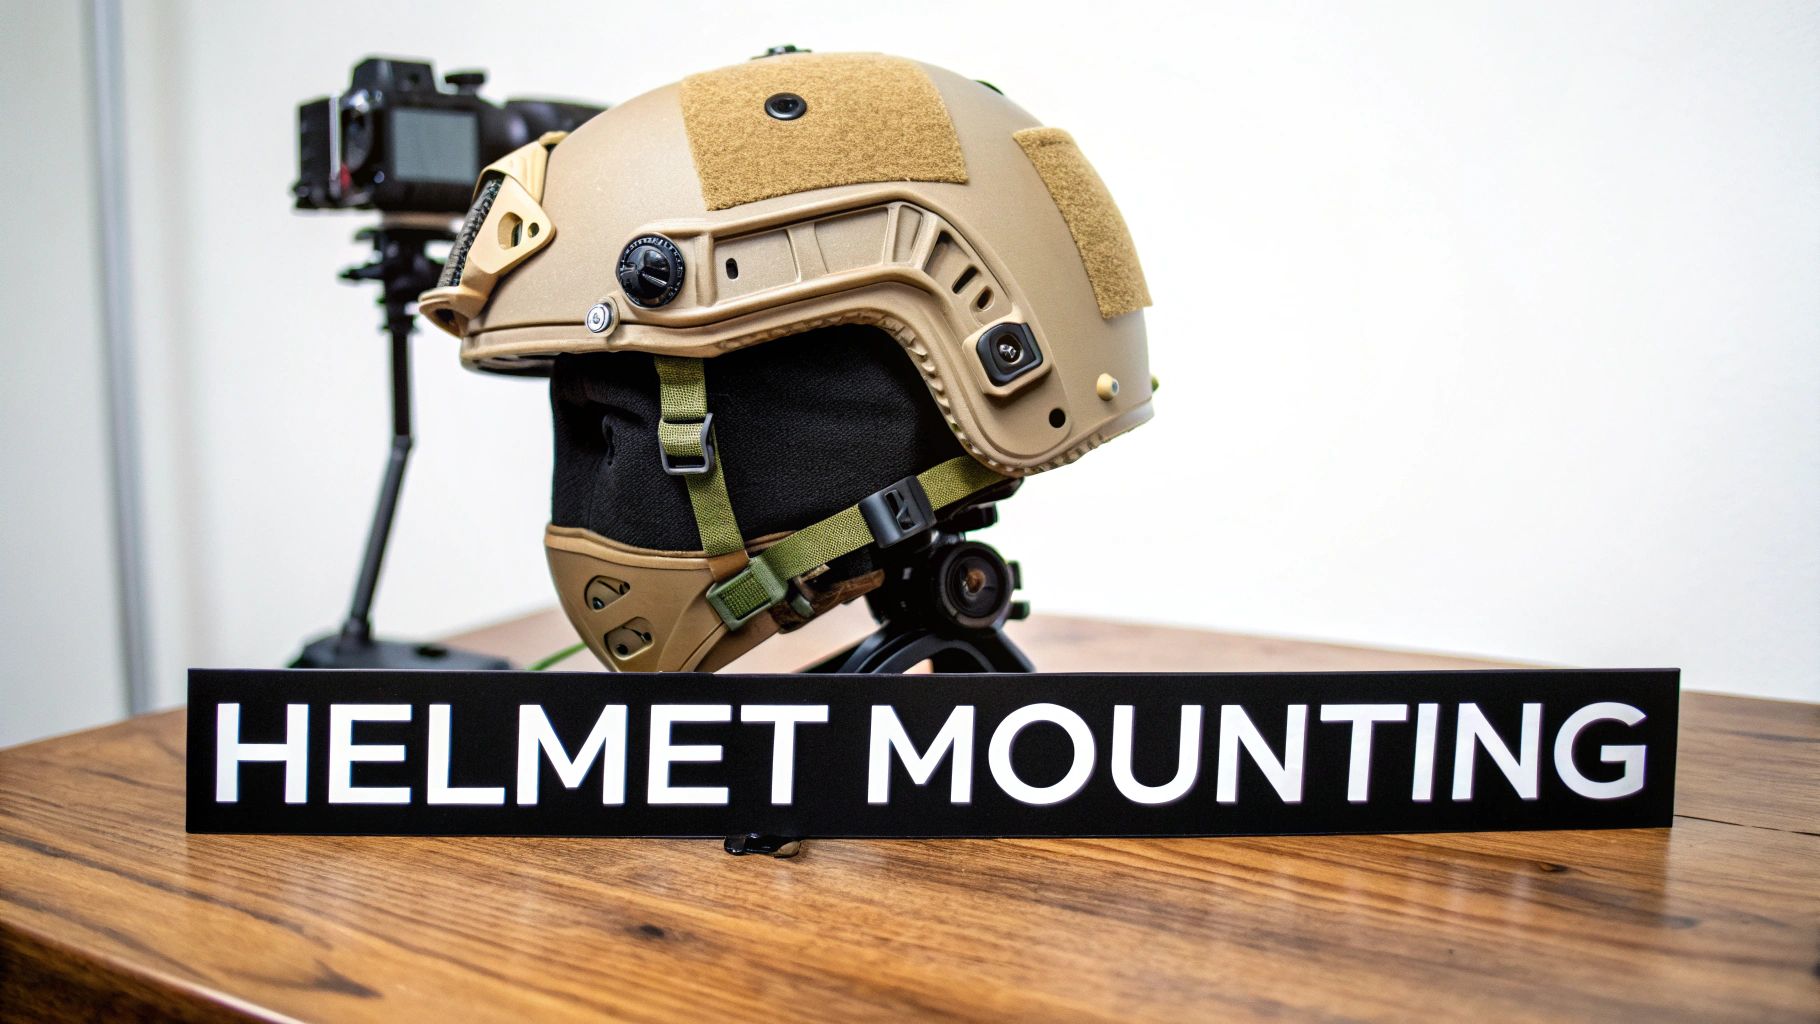
A high-end night vision device is an amazing piece of kit, but it’s completely useless without a solid system holding it to your head. Think of your helmet and mount as the chassis of a high-performance car. You can have all the horsepower in the world, but without a rigid, stable frame, you can't put any of that power to the ground.
It's this crucial link between the helmet, mount, and goggle that turns three separate items into one seamless system. When it’s done right, the device feels like an extension of your own vision, not a heavy, wobbly accessory you’re fighting with all night.
The Foundation: Your Helmet and Shroud
Everything starts with the helmet. Your choice typically boils down to two main types: ballistic helmets for projectile and frag protection, or non-ballistic bump helmets that are lighter and guard against impacts. Most modern tactical helmets come with a shroud molded right into the shell, giving you a rock-solid point to attach your night vision mount.
That shroud is the universal interface on the front of the helmet, and it’s what your mount actually locks into. A high-quality, secure shroud is absolutely non-negotiable. Any play or wobble here gets magnified through the optics, leading to a shaky image that's nauseating at best and unusable at worst.
The growing reliance on this tech is clear when you look at the market. Valued at roughly USD 876.7 million in 2025, the global helmet-mounted display market is expected to hit USD 1.59 billion by 2035, a surge driven by defense and security spending.
The Critical Connection: The Mount
The mount is the articulated arm that connects your NVD to the helmet shroud, and this is where precision engineering is paramount. For any serious user, the industry standard is a mount with a dovetail interface. It provides a dramatically more secure and stable lockup than the older, rattle-prone bayonet-style mounts.
A quality mount, like the ubiquitous Wilcox G24, gives you several essential adjustments:
-
Fore/Aft Adjustment: Lets you slide the device closer to or further from your eyes.
-
Vertical Adjustment: Moves the unit up or down to align perfectly with your line of sight.
-
Tilt Adjustment: Fine-tunes the angle of the device relative to your face.
One of the most vital features on a modern mount is its breakaway capability. If your goggles snag on a branch or a vehicle door, this feature allows the mount to snap away from the shroud under force. It’s a simple mechanism that can save both your expensive gear from being destroyed and your neck from serious injury. To get a deeper look into these crucial components, check out our dovetail mounts for night vision goggles guide.
A stable mount isn't just a quality-of-life feature; it's a performance multiplier. The ability to precisely adjust eye relief and alignment is what eliminates dark rings around the image and gives you a full, clear picture, maximizing the capability of your image intensifier tubes.
The Balancing Act: Counterweights
Finally, you can’t ignore physics. Hanging a one or two-pound device off the front of your helmet creates a powerful lever that will constantly pull your head forward and cause major neck strain over time. This is where counterweights are absolutely essential.
A counterweight is just a weight, often in a purpose-built pouch or integrated into a battery pack, attached to the rear of the helmet. Its sole job is to perfectly balance the NVD on the front. With the right balance, the helmet should feel neutral on your head, staying put even when you look down without you having to crank down the chin strap. This simple addition is arguably the single most important element for long-term comfort, turning your setup from a heavy burden into a seamless tool.
Training and Operating with Night Vision
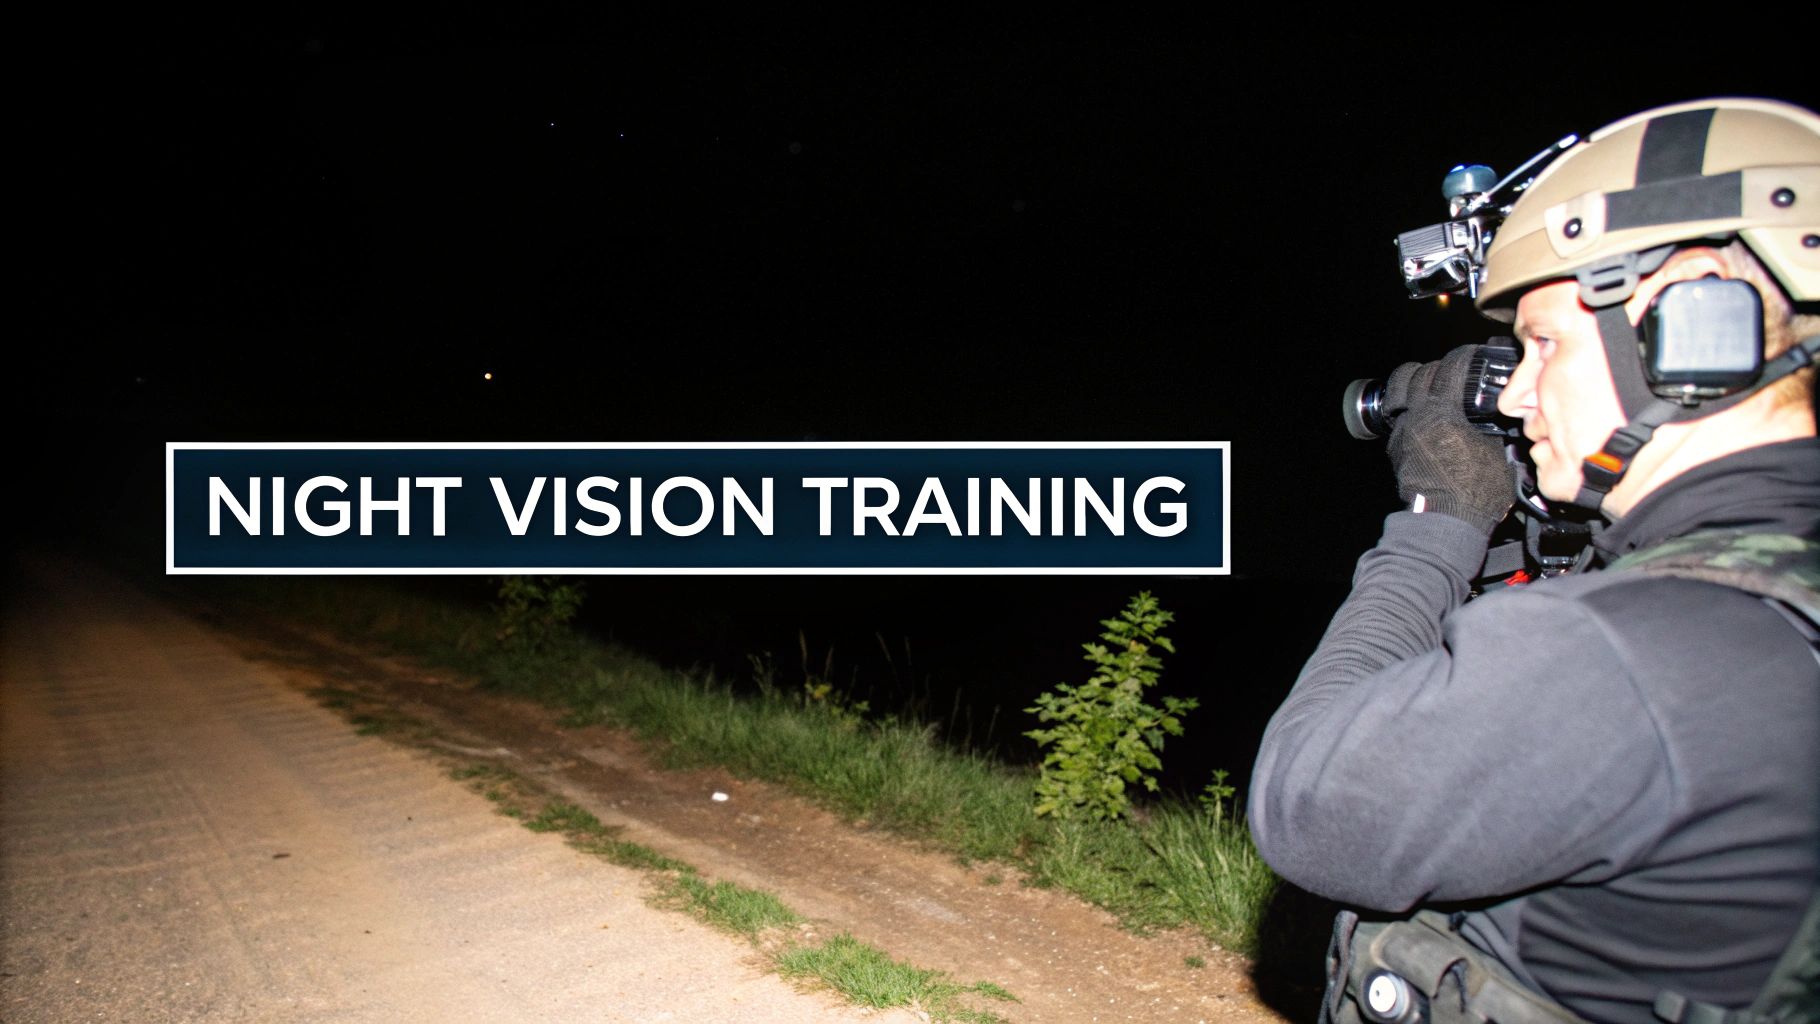
Owning a high-performance helmet mounted night vision system is one thing. Actually using it effectively is something else entirely. The real work begins after you’ve made the investment, bridging the gap between having the hardware and building genuine skill. You have to learn to work with the device, not against it, and retrain your brain to see the world through a glowing phosphor screen.
The learning curve is steep at first, and it’s about more than just flipping a switch. Your brain is wired for a lifetime of natural vision, so adapting to the world through a narrow tube takes dedicated practice. Getting this right is what turns a cool piece of gear into a real-world advantage in the dark.
Dialing in Your Setup for Comfort and Clarity
Before you even think about moving around in the dark, your first job is to get the device fitted perfectly to your eyes. An improper setup is the number one cause of headaches, eye strain, and a fuzzy, disappointing image. Nailing this is foundational to everything else.
There are two critical settings you need to master:
-
Eye Relief: This is simply the distance between the eyepiece and your eye. If it’s too far, you’ll get black rings cutting into your view. Too close, and the housing will smack you in the face when you move. You’re looking for that sweet spot where you see a full, clear image.
-
Interpupillary Distance (IPD): This one’s for the dual-tube users. It’s the distance between the centers of your pupils. You need to adjust the pods until the two images from each tube merge into one cohesive picture, killing any double vision.
Getting these adjustments right means you’ll see the best possible image your tubes can produce, and you’ll be able to wear the unit for hours without feeling like your head is in a vise.
Overcoming the Limited Field of View
The biggest shock for most new users is the incredibly narrow Field of View (FOV). Most night vision devices give you about a 40-degree FOV, which feels like looking through a cardboard tube. For comparison, your natural vision spans nearly 200 degrees.
Newbies instinctively try to look around with their eyes, which does absolutely nothing. You just end up staring at the inside edge of the device.
The secret is learning to move your head, not your eyes. You have to build a new habit of constantly scanning your environment—left, right, up, and down—to paint a mental picture of what's around you. This active scanning is how you make up for the lost peripheral vision.
This doesn't feel natural at first, so it requires conscious effort. Start in a safe, familiar place, like your backyard. Practice walking around while deliberately turning your head to see things. Over time, that constant head movement becomes second nature, and you’ll regain the situational awareness you need to operate safely and effectively.
Essential Support Equipment
Finally, remember that your night vision is just one part of a system. To really put it to work for hunting or tactical use, you need a way to aim your rifle. Since looking through a normal scope is impossible with NVGs on, an infrared (IR) laser is non-negotiable.
An IR laser mounts to your firearm and projects a beam that's completely invisible to the naked eye but shines like a bright dot through your night vision. It allows for fast, heads-up aiming in total darkness. Pairing it with a supplemental IR illuminator—basically an invisible flashlight—is also a game-changer. It throws extra IR light downrange, helping you see into deep shadows or inside buildings where there’s no ambient light at all.
Caring for Your Gear and Staying Legal
When you invest in a serious piece of kit like a helmet-mounted night vision system, you’re not just buying another gadget. You're taking on a piece of regulated, high-performance technology that requires both responsible care and an understanding of the law. Getting these two things right will protect your investment and keep you out of serious trouble.
Proper maintenance isn't complicated, but it's absolutely essential. The heart of your device, the image intensifier tube, is incredibly sensitive. A few simple habits will keep it running strong for years to come.
Protecting Your Investment
Your number one job is to shield the objective lens and the image intensifier tube from harm. The golden rule is simple: always keep the day cap on whenever the device isn't in use, especially in daylight. Powering up a tube and pointing it at a bright light source is the fastest way to cause permanent damage, leaving you with ugly blemishes or a completely dead unit.
Beyond that, a little common sense goes a long way.
-
Cleaning Lenses: Don't even think about using your t-shirt. The specialized coatings on night vision lenses are easily scratched. Stick with a dedicated lens pen or a fresh microfiber cloth and a quality lens cleaning solution.
-
Battery Removal: If your unit is going into storage for more than a couple of days, take the batteries out. A leaking battery can corrode the contacts and fry the electronics, turning your high-tech device into a very expensive paperweight.
-
Safe Storage: When it's not on your helmet, your night vision should live in a padded, hard-sided case. This protects it from bumps, drops, dust, and moisture—all enemies of high-performance optics.
Think of maintenance as preventative medicine for your night vision. A few minutes of proper care after each use can prevent thousands of dollars in repairs and ensure the device is ready to perform when you need it most.
Understanding ITAR Regulations
High-performance night vision, especially Gen 3 and above, falls under the International Traffic in Arms Regulations (ITAR). These are strict U.S. federal laws that control the export of defense-related technology to safeguard national security.
For you, the owner, the rule is simple and absolute: it is illegal to take your helmet-mounted night vision device outside of the United States without an explicit license from the U.S. State Department. This means you can't travel with it, ship it internationally, or even sell it to a non-U.S. citizen. The penalties for violating ITAR are no joke—we're talking massive fines and potential prison time.
This is exactly why you must buy your gear from a reputable, U.S.-based dealer. Doing so ensures you're getting a legitimate device that isn't stolen property and that you are its legal, registered owner. Be extremely wary of deals that seem too good to be true, particularly from private sellers or sketchy overseas websites. You could end up with stolen military gear or a gray-market unit with no warranty and a whole lot of legal baggage.
Common Questions We Get About Night Vision
Even after you've done your homework, some specific questions always seem to pop up. Let's tackle a few of the most common ones we hear from folks who are dialing in their first helmet rig.
Is White Phosphor Really Better Than Green?
Fundamentally, the tube technology is the same. The only difference is the color you see when you look through the device. Green is that classic, iconic look everyone associates with night vision. It gets the job done and is often easier on the wallet. The downside? Some people find it causes eye strain after a few hours under the nods.
White phosphor, on the other hand, gives you a black-and-white image. It's become the go-to for most serious users, both professional and civilian. Many people feel it's more natural on the eyes, making it easier to pick out details and notice contrast. It usually costs a bit more, but for anyone putting in serious time in the dark, that extra clarity and reduced eye fatigue is money well spent.
Do I Actually Need a Counterweight?
For just about any setup out there, the answer is a hard yes. Think about it: a monocular like a PVS-14 is about a pound, and dual tubes are even heavier. When you hang that weight off the front of your helmet, it acts like a lever, creating a ton of strain right on your neck.
A good counterweight—whether it's a dedicated pouch with weights or a battery pack—sits on the back of your helmet and balances everything out perfectly. This isn't just a "nice-to-have" accessory; it’s what makes the whole system comfortable and usable for more than a few minutes. It keeps the helmet from constantly trying to dive down your forehead and lets you operate for hours without feeling it.
One of the biggest mistakes we see new users make is skipping the counterweight. It’s not an optional upgrade—it's a core component of a functional helmet system.
Can I Really Drive with Night Vision?
Yes, but this is a serious skill that takes the right gear and a lot of practice in a safe, controlled place first. To even consider driving under NODs, you absolutely need dual-tube goggles. They're essential for the depth perception you need to judge speed, distance, and changes in the road.
Trying to drive with a single-tube monocular is a recipe for disaster and should never, ever be attempted. Even with duals, your peripheral vision is practically gone, so you have to learn to constantly scan by moving your entire head. It's a skill you have to build carefully and maintain with regular practice.
Ready to build a helmet rig that works for you? The team at Superior Tactical LLC has spent over a decade outfitting professionals and dedicated enthusiasts with the right gear. Check out our hand-picked selection of monoculars, dual-tube goggles, and mounting solutions, all backed by a 10-year warranty.
Shop the full collection of night vision and tactical gear at SuperiorTac.com