The Ultimate Guide to Helmet Mounted Lights
In any situation where the lights go out and the stakes are high, having your hands free isn't just a convenience—it's a critical advantage. Modern helmet-mounted lights have become just as essential as your armor or night vision, giving you the power to see, move, and identify what's in front of you without ever taking your hands off your primary tools. This isn't just a small upgrade; it fundamentally changes how you operate and stay safe.
Why a Helmet Light is Non-Negotiable
Picture this: you're moving through a building with zero light. You need both hands to handle your weapon, open a door, or clear a jam. A handheld flashlight is now a liability, forcing you to choose between seeing and doing. This is exactly where a helmet-mounted light proves its worth, turning your helmet from a simple piece of protection into an active, intelligent tool.
The real magic is how intuitive it is. The light beam goes exactly where you look, illuminating your point of focus instantly. There's no fumbling, no delay between looking and seeing. In moments where split-second decisions count, that seamless integration is everything for threat assessment and keeping your head on a swivel.
From Clunky Add-on to Essential Kit
It wasn't always this way. The first attempts at head-mounted lights were often heavy, fragile, and chewed through batteries. They were niche gadgets for specific jobs, not something you’d see on every operator's helmet. But then came the revolution in LED technology, along with stronger, lighter materials, and everything changed.
Today’s top-tier systems are a world apart, offering serious benefits:
- Hands-Free Control: You can reload, give first aid, or work your gear without ever losing your light.
- Total Situational Awareness: The beam follows your natural head movements, giving you a crystal-clear view of what's in front of you and in your periphery.
- Instant Threat ID: The second you look at a potential threat, it's lit up. No aiming, no wasted time.
- Safer Navigation: Move confidently through tricky terrain by seeing every root and rock right in your path.
The most important job of a helmet-mounted light is to give you your hands back. It frees up mental bandwidth and physical ability so you can focus 100% on the task, not on juggling a flashlight.
The Modern Tactical Edge
The move to compact, powerful LED and IR systems has cemented the helmet light's place as a must-have. Unlike a weapon light, which only points where your muzzle is pointed, a helmet light works independently. This is a huge deal for all the things you do that don't involve aiming your weapon—like reading a map, checking on a teammate, or scanning an area without flagging everyone in it.
This flexibility makes a helmet light a true force multiplier. Whether you're a cop clearing a house, a hunter on a trail after sunset, or a security professional on patrol, the ability to put light exactly where you need it—without tying up your hands—is fundamental to being effective and staying safe.
Decoding the Language of Light
Choosing the right helmet-mounted light feels a lot like learning a new language. All those specs on the box—lumens, candela, beam patterns—aren't just technical jargon. They're the words that describe exactly how that light will perform when you're counting on it. Getting a handle on this language is the first real step toward picking a tool that actually fits your mission.
The infographic below boils this down perfectly. It shows how a good helmet light improves your ability to see, navigate, and identify what's in front of you.
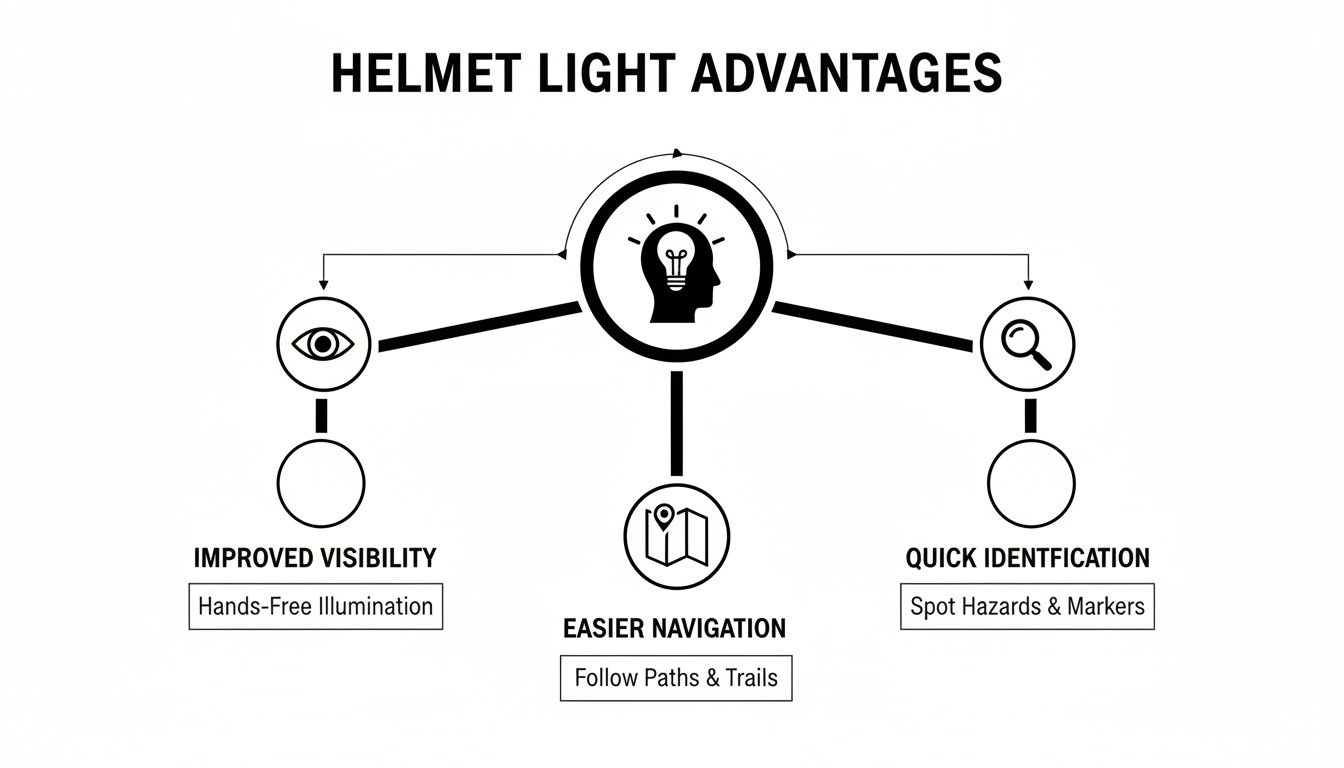
As you can see, each of these functions is separate but totally interconnected. This synergy is what makes a helmet light such a critical piece of gear for any professional operating in low-light conditions.
Lumens and Candela: The Power and the Push
Let's clear up the two most important, and most confused, metrics: lumens and candela.
Think of your light like a fire hose. Lumens are the total volume of water gushing out of the nozzle—the raw amount of light being produced. A high-lumen light floods an area with a massive amount of light.
Candela, on the other hand, is the pressure behind that water. It measures the beam's peak intensity, which is what gives it reach. A high-candela light creates a tight, focused beam that punches through the darkness, smoke, or fog to hit distant targets.
You need a good balance of both, and that balance depends entirely on the job. For clearing a small room, high lumens and a wider beam are your friend. But for identifying a threat across an open field, high candela is absolutely non-negotiable.
Beam Patterns: Flood vs. Spot
That push-and-pull between lumens and candela is what creates the light's beam pattern. This is the literal shape of the light coming out of the lens, and it’s just as critical as the raw output. You'll mainly run into two types.
- Flood Beams: This is like flipping on the lights in a room. A flood beam gives you a wide, even spread of light with soft edges, making it great for peripheral vision and situational awareness up close. It's the right choice for navigating tricky terrain, working on a vehicle, or rendering aid.
- Spot Beams: A spot beam is the opposite—it’s a tight, intense shaft of light built for long-distance identification. You're sacrificing that wide peripheral view for maximum throw, which is perfect for searching large, open areas or putting eyes on something way out there.
Many of the best helmet lights today offer a "hybrid" or "combo" beam that tries to give you the best of both. They usually have a bright central hotspot for distance, surrounded by a dimmer "spill" of floodlight that helps with awareness right in front of you.
The table below breaks down how these patterns apply in common tactical situations, helping you match the beam to your needs.
Beam Pattern Comparison for Tactical Scenarios
| Beam Pattern Type | Primary Use Case | Effective Range | Ideal Scenario Example |
|---|---|---|---|
| Flood | Close-quarters situational awareness | Up to 50 meters | Clearing rooms in an urban environment; vehicle maintenance. |
| Spot | Long-range target identification | 150+ meters | Searching an open field; identifying a potential threat at distance. |
| Hybrid/Combo | Versatile, all-purpose use | Varies (e.g., 100m spot, 30m flood) | Patrolling mixed terrain with both open and confined spaces. |
Ultimately, the choice is simple: flood for seeing wide, spot for seeing far. Let your operational environment dictate what you need most.
The Invisible Advantage of Infrared Illuminators
For anyone running night vision, visible light is only half the equation. Infrared (IR) illuminators are what unlock the true potential of your NVDs. Goggles and monoculars work by amplifying ambient light, but what happens when there's no light to amplify—like inside a sealed building?
That’s where an IR illuminator saves the day. It’s essentially a flashlight that projects light in the infrared spectrum. It's completely invisible to the naked eye but shows up bright and clear through your NVDs. It lets you "paint" a dark area with invisible light, drastically improving clarity, range, and your ability to identify threats without giving away your position. To dig deeper, check out our guide on how IR illuminators work with night vision.
Mission-Critical Power: Runtimes and Batteries
At the end of the day, a light is useless without power. Your choice of battery is a logistical decision that can make or break things in the field.
- CR123A Batteries: These are the old-school workhorses of the tactical world for a reason. They have an incredible shelf life (up to 10 years), perform reliably in extreme hot and cold, and are easy to find. The only real downside is that they're disposable, and the cost can add up.
- Rechargeable Batteries (e.g., 18650, 18350): Rechargeable lithium-ion cells are gaining ground fast due to their cost-effectiveness. The trade-off is a shorter shelf life and sometimes finicky performance in extreme temperatures. If you go this route, you need a disciplined charging routine and plenty of spares.
The right choice comes down to logistics. If you need batteries you can throw in a go-bag for years and trust to work no matter what, CR123As are a safe bet. If you're using your light constantly and want to keep long-term costs down, a good rechargeable system is the way to go.
Mastering Your Mounting System and Setup
A high-performance light is only as good as its connection to your helmet. That mounting system is the critical link, the one piece that ensures your light stays put, stays functional, and stays pointed exactly where you need it, no matter what you're doing. It's crucial to understand the different mounting ecosystems out there so you can build a setup that works with you, not against you.
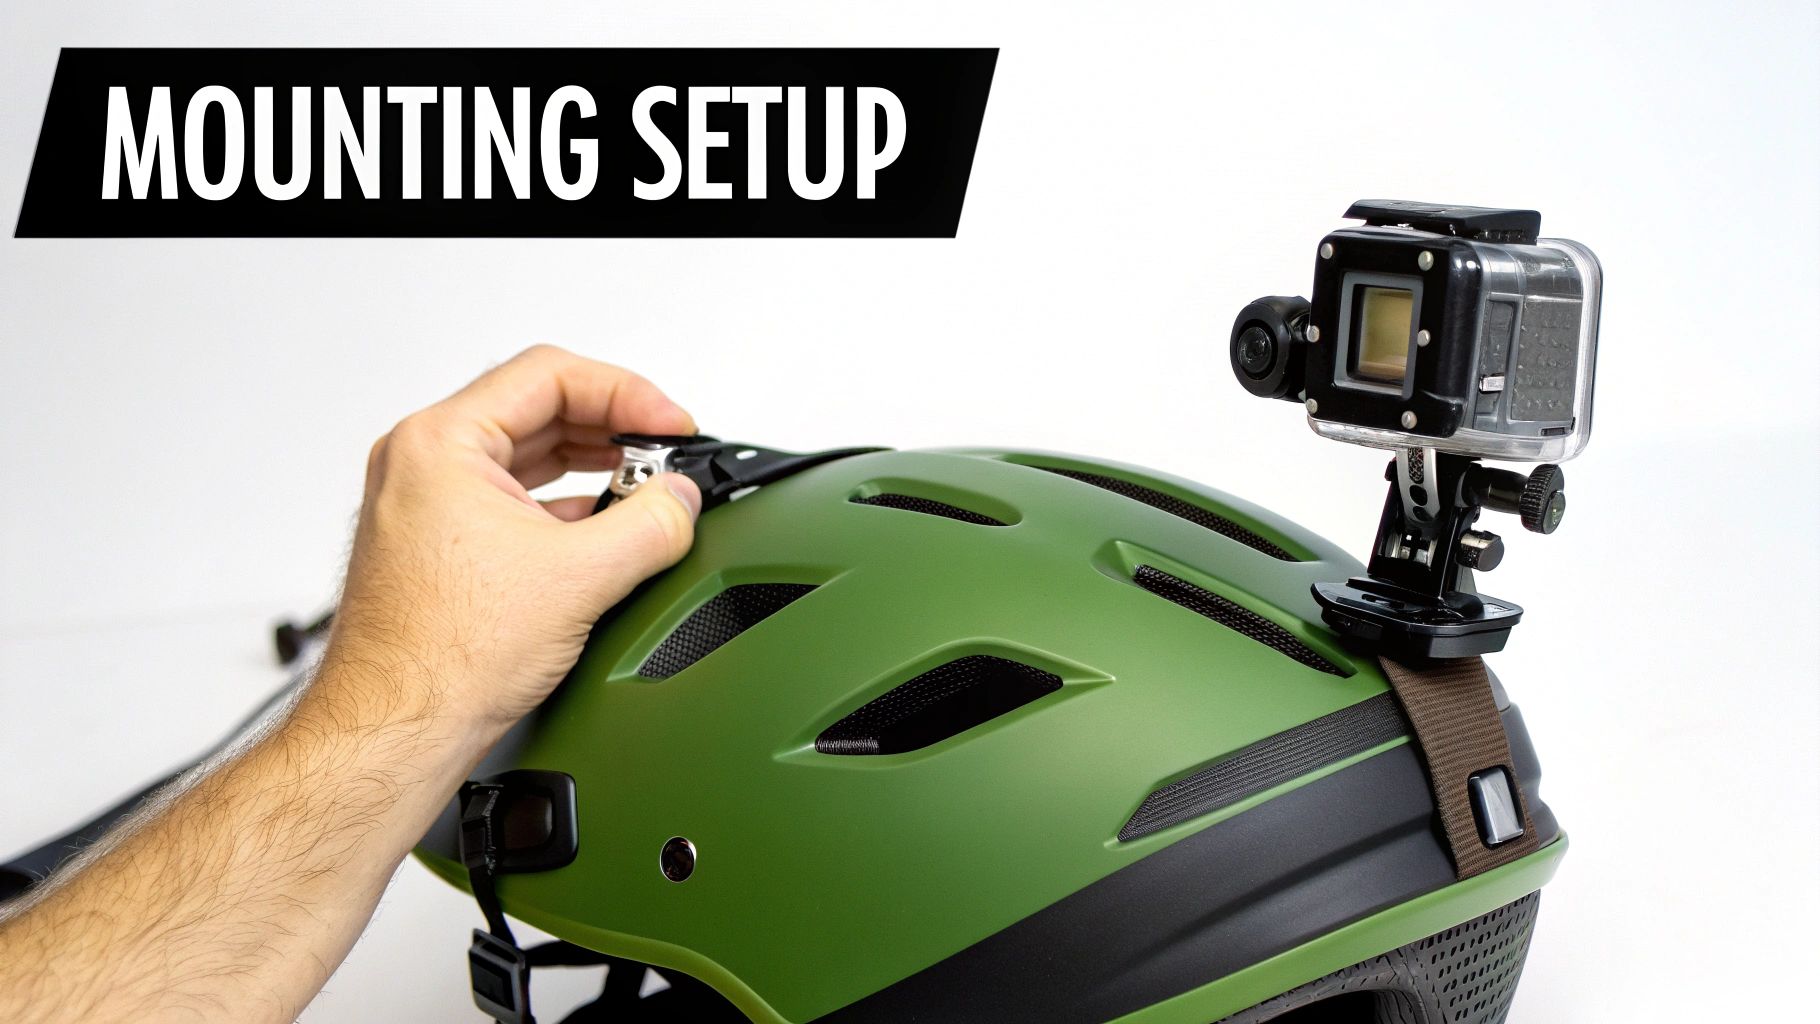
This synergy between your gear and how you use it can't be overstated. Think of it like a fire hose and a hydrant—without a solid coupling, all that power is useless. Your light needs a rock-solid mount to deliver illumination exactly where you need it, every single time. A loose or poorly placed light can create dangerous shadows, snag on obstacles, or simply fail at the worst possible moment.
Common Mounting Interfaces
Modern helmets are often kitted out with standardized platforms for slapping on accessories. Think of these as the USB ports on a computer—they're universal connection points for all your gear. Each system has its own quirks and strengths, making them better suited for different helmets and tasks.
- ARC Rails (Accessory Rail Connector): This is the industry standard you'll find on most high-cut ballistic and bump helmets. These rails let you slide gear on and off quickly, making it a breeze to adjust your lights, comms, and ear pro.
- M-LOK: Originally built for firearm handguards, M-LOK has started popping up on some newer helmets. It’s an incredibly strong, low-profile system that lets you bolt accessories directly on, which is great for minimizing snag hazards.
- Picatinny Rails: While you won't see Picatinny rails built directly into most helmets, you’ll find plenty of adapters for ARC rails. This is a huge plus, as it lets you use weapon-light accessories you might already own, giving you fantastic cross-compatibility.
This push toward adaptable, high-performance lighting isn't just for the pros anymore. The same kind of military-grade reliability is revolutionizing recreational and adventure sports. Global market forecasts predict steady growth from 2025-2031, especially as security and training applications expand thanks to innovations like digital light processing. As detailed in a recent market report, this crossover from professional to civilian tech is what’s really driving the market forward.
Managing Your Helmet Real Estate
Your helmet has limited space, and every square inch counts. This idea is what we call "helmet real estate," and it’s all about strategically placing your gear to get the most function out of it without throwing off your balance or getting in your way. Bad placement isn't just annoying; it can be dangerous.
A well-configured helmet should feel like a natural extension of your body. The goal is to stick your light where it illuminates your workspace without creating blind spots or fighting for space with other essential gear like your NODs or headset.
For instance, mount a light too far forward, and you might get a blinding "splash" of light off your weapon's suppressor, totally washing out your vision. Put it too far back, and you might cast a shadow from your ear protection. The trick is finding that sweet spot that gives you a clear beam and plays nicely with everything else on your lid.
The Compatibility Checklist
Before you pull the trigger on a light or a mount, run through this quick checklist. It’s a simple step that can save you a ton of time, money, and frustration down the line. To get started, you may want to check out our detailed overview of light helmet mounts.
- Confirm Your Helmet's Rail Type: First things first—does your helmet have ARC, M-LOK, or something else entirely?
- Verify the Mount Interface: Double-check that the mount you're buying is made specifically for your helmet's rail system.
- Check for Gear Interference: Will the light's position get in the way of your hearing protection, comms, or night vision mount?
- Consider Your Dominant Side: Most right-handed operators mount their light on the left side. This keeps it clear of ejected brass and helps balance the weight of other gear.
- Assess Cable Management: If your light uses a remote switch, map out a clean route for the cable so it won't snag on branches or gear.
Thinking through these factors beforehand helps you build a streamlined, highly effective lighting setup. It ensures all your gear works together as one cohesive system, letting you focus on the task at hand.
Effective Use and Light Discipline in the Field
Having the best helmet light money can buy is one thing, but knowing how and—more importantly—when to use it is what truly matters in the field. This is where light discipline comes in. Think of it as the art of using illumination as a scalpel, not a sledgehammer, letting you see exactly what you need to without painting a target on your back.
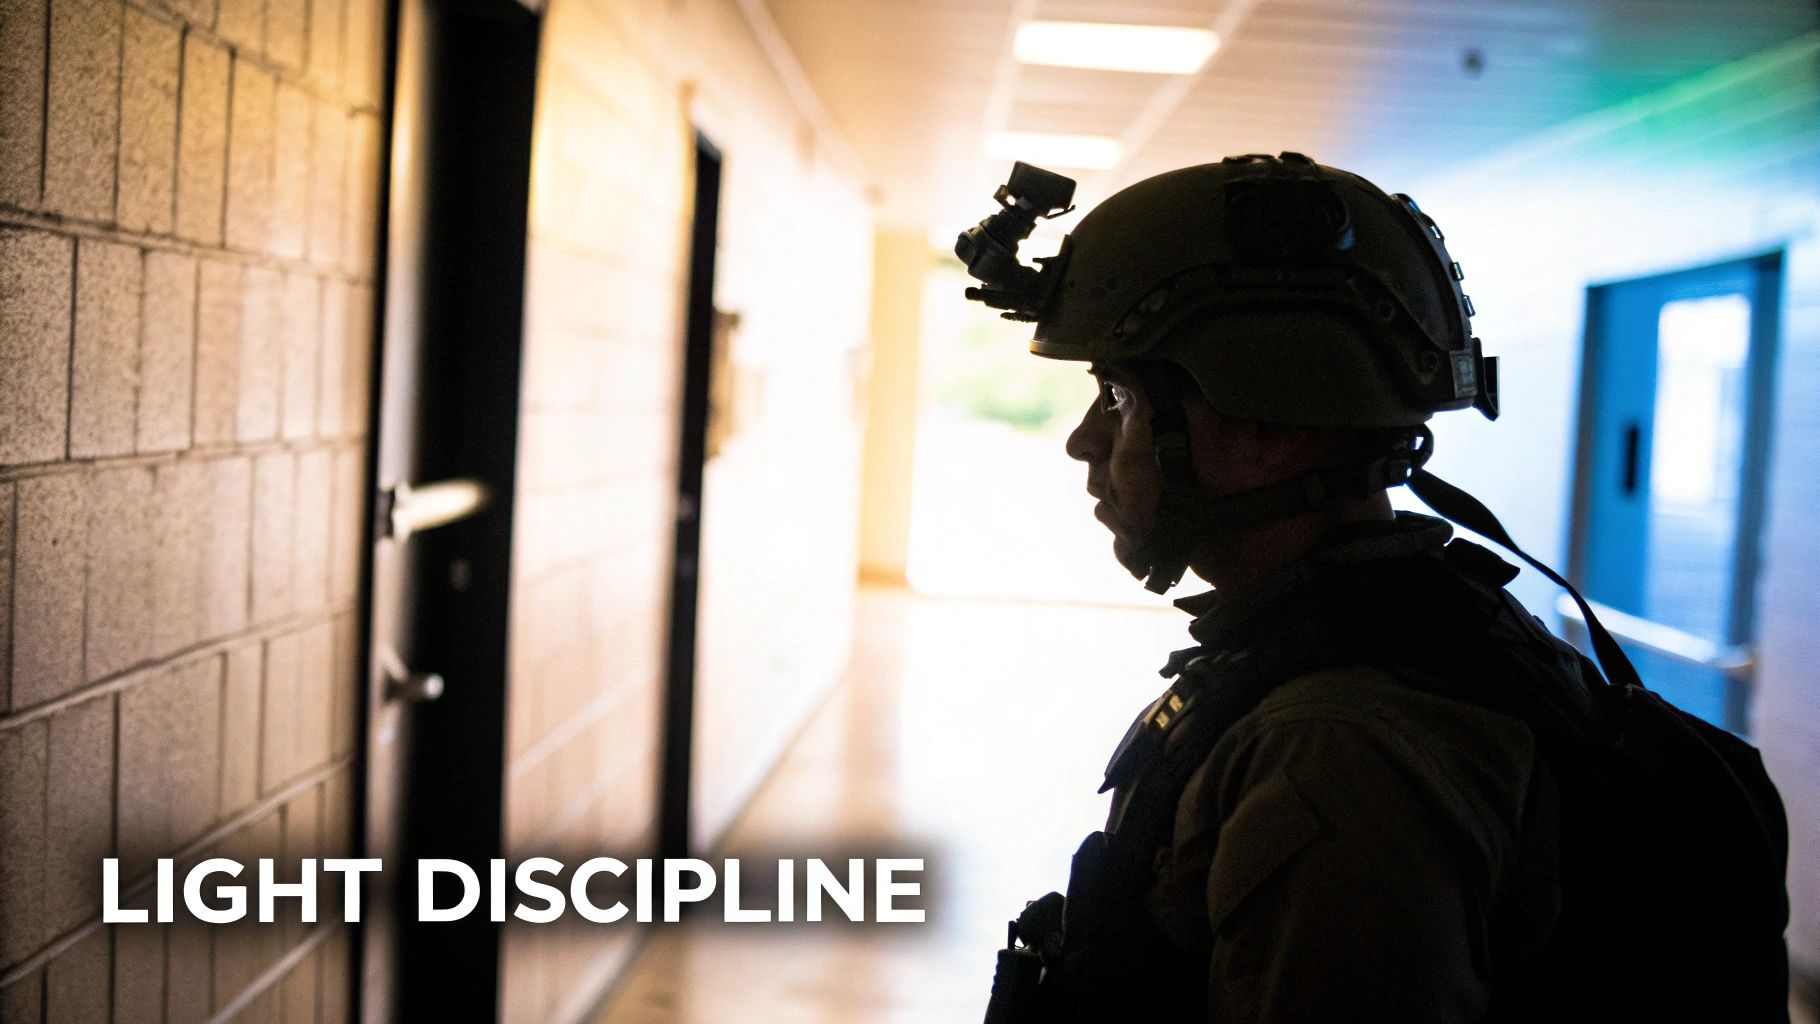
Mastering this discipline starts with your light's activation method. A simple push-button is dead reliable, but remote pressure switches, often routed along the helmet's shell, give you instantaneous control without ever needing to break your grip or shift your focus. Each setup has its place and enables different tactics.
Momentary On Versus Constant On
Every professional-grade helmet light has two core modes: momentary-on and constant-on. Understanding the tactical difference is fundamental.
Momentary-On: This should be your default. A light press of the switch gives you a quick blast of light that disappears the second you let go. This is perfect for "painting" an area—using short, deliberate flashes to check a room, spot a threat, or navigate an obstacle. You get the information you need without becoming a stationary beacon.
Constant-On: With a full press or click, the light stays on, freeing up your hands for tasks that need steady light. Think rendering first aid, conducting a detailed search of an already-cleared space, or working on a piece of gear. Just remember, using constant-on in an unsecured area is like sending up a flare.
The core principle of light discipline is simple: use only as much light as you need, for only as long as you need it. Every second your light is on is a second you're broadcasting your position.
Integrating Your Helmet and Weapon Lights
In a dynamic situation like clearing a building, your helmet light doesn't work alone. It's part of a system, working in tandem with your weapon-mounted light (WML). These two tools have different jobs, but when used together, they create a massive advantage in situational awareness.
Your helmet light follows where you look, making it the perfect tool for scanning and navigating. It lets you check corners, ceilings, and your periphery without sweeping your muzzle over everything and everyone. This keeps you clued into your surroundings and helps prevent flagging your teammates.
Your WML, on the other hand, is for identifying and engaging threats. It stays off until you have a good reason to think a threat is in that direction. You might spot something with your helmet light, then transition to your more powerful WML to positively identify it and, if needed, take action. This layered approach means you’re always assessing the environment while keeping your weapon ready.
This seamless integration is exactly why helmet-mounted lights have become indispensable for modern military forces, giving soldiers critical hands-free illumination in the dark. Paired with Gen 3 night vision, these lights allow special forces to maintain weapon readiness while moving through pitch-black environments. The push toward lighter designs with powerful LEDs has also dramatically eased battery concerns, boosting operational endurance by up to 20-30% compared to older tech. You can learn more about these technological advancements and their impact from recent industry analyses.
Keeping Your Light Mission Ready
Your gear is only as good as the shape you keep it in. A high-performance helmet light is a critical piece of life-saving equipment, and just like your primary weapon or comms, it needs regular upkeep to work when you need it most. You can't afford for your light to die when the mission depends on your ability to see.
This isn't about becoming an armorer for your flashlight. It's about building simple, repeatable habits that prevent failure. Think of it like checking the tire pressure on your truck before a long haul—these quick inspections take seconds but can stop a catastrophic failure at the worst possible time.
Your Pre-Mission Inspection Checklist
Before you even think about stepping out, run through a quick function check. This simple routine isn't just about checking the gear; it's about building the muscle memory and confidence that your kit is 100% ready. A consistent process helps you spot tiny issues before they turn into mission-ending problems.
- Activation Check: Cycle through every single mode. Constant-on, momentary, and IR if you have it. You're looking for a crisp, positive click from the buttons or switches—no mushiness, no hesitation.
- Beam Quality: Pop the light on and shine it against a plain wall. Do you see any flickering, dimming, or weird spots in the beam? Any of those could signal a loose connection or a failing LED.
- Mount Security: Grab the light and give it a solid wiggle. It should be rock-solid on your helmet's rail. If there's any play or looseness, it could shift or even fall off when you're moving hard.
Preventing Common Failures
Most lights don't fail spectacularly. They die a slow death from neglect, usually because of two things: batteries and seals. Getting ahead of these common problems is your best defense.
The most reliable piece of equipment is the one that's consistently maintained. A few minutes of preventative care is worth hours of troubleshooting in the field.
The number one killer is battery corrosion. Moisture, grime, and battery residue can build up on the terminals and the contacts inside the light itself, causing flickering power or a total inability to turn on. Just take a cotton swab with a little bit of isopropyl alcohol and gently clean those contact points.
Just as critical are the little rubber O-rings that seal the battery compartment. They are your light’s only defense against water, mud, and dust. Check them for cracks, dryness, or any gunk caught in them. A tiny dab of silicone grease every so often will keep them from drying out and ensure a watertight seal, protecting the electronics inside. And of course, using the right power source is non-negotiable; you can learn more about picking the best batteries for high-output flashlights to get the most out of your gear.
Finally, keep that lens clean. A smudged or dirty lens chokes your light output. A quick wipe with a microfiber cloth is usually all it takes to clear away the dust and fingerprints that can rob your beam of its power and clarity.
How to Choose the Right Helmet Mounted Light
You’ve got the lingo down and understand how these lights attach to a helmet. Now, let’s put it all together. Choosing the right helmet-mounted light isn't about finding some mythical "best" model on the market; it’s about finding the perfect tool for your specific job.
Think of it like a mechanic picking a wrench. They don't just grab the biggest one they can find. They choose the exact size and type needed for the task at hand. Your helmet light is the same. The ideal setup for a cop clearing a building is going to be worlds apart from what a hunter needs to track through the woods after sunset.
Start With Your Mission
First things first: be brutally honest about where you'll be using this light most of the time. Are you working inside tight hallways and small rooms, or are you scanning wide-open fields? Just answering that one question cuts your options down dramatically and tells you which specs actually matter.
This simple step keeps you from dropping cash on features you’ll never use or—even worse—finding yourself under-equipped when things get serious.
For instance, a security contractor patrolling a massive, unlit perimeter needs a light with a ton of candela. They need that beam to slice through the darkness and spot a potential threat from a safe distance. On the other hand, someone doing vehicle maintenance or just setting up camp needs a soft, wide flood beam to light up their immediate area without blinding them with a harsh hotspot.
Your environment dictates your needs. A light built for long-range spotting will feel clumsy and overpowering up close, while a wide flood beam will leave you blind at a distance. You have to match the tool to the terrain.
The Professional’s Checklist
To make this dead simple, let's look at what matters most for a few common professional roles. Find the profile that best matches your own work to build a clear picture of your ideal light. This turns a confusing list of technical specs into a practical shopping list.
The table below breaks down the priorities for different user profiles. Use it as a quick-reference guide to see which features should be at the top of your list based on your primary mission.
Helmet Light Selection Checklist by User Profile
| Feature/Specification | Law Enforcement Priority | Hunter/Outdoorsman Priority | Security Contractor Priority |
|---|---|---|---|
| High Candela | High: Needed to punch through photonic barriers and PID at a distance. | Medium: Useful for spotting game, but not the primary concern. | High: Essential for long-range perimeter scans and threat identification. |
| Wide Flood Beam | Low: Can cause backsplash in CQB; less critical than a focused beam. | High: Crucial for trail navigation and general area awareness. | Medium: Important for close-in tasks like ID checks or equipment inspection. |
| Disorienting Strobe | High: A key non-lethal tool for gaining a tactical advantage. | Low: No practical application; can be a nuisance. | Medium: Can be useful for signaling or disorientation in certain scenarios. |
| IR Illuminator | High: A must-have for agencies running night vision. | Medium: Depends on whether night-vision hunting is legal and practiced. | High: A core requirement for covert surveillance and operations. |
| Extended Runtime | Medium: Important, but missions are often shorter. Battery swaps are feasible. | High: Critical for multi-day trips where recharging isn't an option. | High: Long shifts demand a light that won't die mid-patrol. |
| Low-Light Modes | Medium: Useful for administrative tasks, but not the primary tactical need. | High: Absolutely essential for preserving night vision during map checks or tasks. | Medium: Good for low-profile tasks and conserving battery. |
| Durable Mount | High: Must withstand dynamic movement and be easily activated under stress. | Medium: Needs to be secure, but less likely to see extreme impacts. | High: Must be rock-solid for daily, hard-use environments. |
| Dual Fuel Capability | Medium: Nice to have for logistical flexibility, but agencies often standardize. | High: A huge advantage for remote use (CR123A availability). | High: Provides crucial flexibility for deployments in varied locations. |
This checklist isn’t about finding a light that checks every single box, but rather about understanding the trade-offs. By focusing on what's most important for your world, you can confidently filter through the dozens of options out there and pick a tool that feels like a natural extension of your skills.
A Few Final Questions About Helmet Lights
Even after breaking down all the specs and features, a few specific questions always pop up. Let's tackle some of the most common ones to clear up any lingering details before you commit to a setup.
Why Do I Need an IR Illuminator with My Night Vision?
Night vision devices (NVDs) are incredible light amplifiers, but they can't create light out of thin air. So, what happens when you’re in a place with absolutely zero ambient light—think deep inside a building with no windows or a pitch-black tunnel? That's when an IR illuminator becomes non-negotiable.
Picture it as a flashlight that's totally invisible to the human eye. It bathes the area in infrared light that your NVDs see perfectly, letting you operate as if the lights were on. Without an IR illuminator, your expensive NODs are basically useless in true darkness. It’s what turns your night vision from a passive tool into an active system, giving you the power to see, move, and identify threats without giving away your position with a white light.
What’s the Difference Between a Helmet Light and a Weapon Light?
This is a big one. While both are lights, they have completely different jobs. A weapon-mounted light (WML) is for identifying and dealing with threats. Its beam is tied to your muzzle, so it only lights up whatever you're aiming at. Using your WML to just look around means you're flagging everything—and everyone—with your weapon, which is a major safety breach.
A helmet-mounted light, on the other hand, is for navigation and general awareness. It moves with your head, following your line of sight naturally. This lets you scan your surroundings, look at a map, check on your team, or handle a task without pointing your rifle at things you don't intend to shoot.
The rule of thumb is simple: use your helmet light to look and your weapon light to target. Having both gives you a layered system that keeps you safe and tactically sound.
What Kind of Batteries Should I Run in My Helmet Light?
The classic debate: CR123As versus rechargeables like 18650s. The right answer really depends on your mission, logistics, and personal discipline.
- CR123A Batteries: These are the benchmark for absolute reliability. They boast an incredible shelf life—up to 10 years—and don't flinch in extreme temperatures. You can find them almost anywhere, but they're single-use, so the cost adds up if you're a heavy user.
- Rechargeable Batteries: Cells like the 18650 or 18350 are fantastic for saving money if you're running your light constantly. The catch? You have to be diligent about keeping them charged, and their performance can sometimes take a hit in the bitter cold.
For a light packed in a go-bag or something you need to trust will work after sitting for months, CR123As are the safest choice. If you're using it every night and have a solid charging routine down, rechargeables deliver great performance and value.
At Superior Tactical LLC, we stock the mission-ready helmet-mounted lights and accessories you need to own the dark. Check out our curated selection of proven, high-performance gear at https://superiortac.com.