Helmet Mount Night Vision A Practical Setup Guide
Everything in your helmet mount night vision system starts with one critical decision: the helmet itself. Think of it as the foundation of a house. If it's weak or unstable, everything you build on top of it—no matter how expensive—is compromised. Getting this first step right is the difference between a rock-solid, comfortable setup and a wobbly, frustrating mess.
Building Your Foundation: The Right Helmet and Shroud

Before you even think about mounting arms or optics, you need the right lid. Your choice here directly impacts how well your NVGs integrate with the rest of your gear. The two main paths you can go down are ballistic or non-ballistic "bump" helmets.
Ballistic helmets are your go-to for serious protection. Made from tough materials like aramid fibers or UHMWPE, they’re designed to stop fragments and projectiles. This inherent rigidity also creates an incredibly stable mounting platform, which is why they’re the standard for military and LE professionals. The trade-off? Weight.
On the other hand, you have bump helmets. These are typically built from carbon fiber or high-impact polymer and protect you from bumps, scrapes, and falls—but not bullets. Their biggest selling point is how light they are. For long nights of search and rescue, recreational use, or training, a bump helmet will save your neck a ton of strain.
Selecting the Right Shroud
Once you’ve settled on a helmet, the next piece of the puzzle is the shroud. This is the hardware that bolts to the front of the helmet, acting as the interface where your NVG arm mount clicks in. It’s a small part, but it’s the crucial link holding everything together. It has to be secure.
Most modern tactical helmets use a three-hole mounting pattern, which provides a much more secure lockup than older single-hole designs. When it comes to brands, Wilcox L4 series shrouds are a top-tier choice, known for their precise tolerances and rugged aluminum construction. Norotos also produces some excellent universal shrouds that are proven performers.
For those focused on shedding every possible ounce, the Unity Tactical SUMMIT Shroud is a fantastic option that delivers serious strength in a minimalist package.
Key Takeaway: Whatever you do, don't cheap out on the shroud. A flimsy, out-of-spec shroud will introduce slop and wobble into your entire system, no matter how good your mount or goggles are. It is the literal bedrock of your setup.
Choosing the right helmet and shroud combination can feel overwhelming, so here’s a quick overview to help you match common helmet types with the interfaces they typically support.
Helmet and Shroud Compatibility Overview
| Helmet Type | Common Material | Primary Use Case | Compatible Shroud Interfaces |
|---|---|---|---|
| ACH/MICH | Aramid (Kevlar) | Military, Law Enforcement | Single-Hole, Three-Hole (with drilling) |
| FAST/High-Cut | UHMWPE, Aramid, Polymer | Special Operations, Tactical | Three-Hole (Standard) |
| Bump Helmet | Polymer, Carbon Fiber | Training, Recreation, SAR | Three-Hole (Standard) |
| PASGT | Aramid (Kevlar) | Older Military/Surplus | Strap-on Mounts, Single-Hole |
This table should give you a solid starting point. A modern high-cut helmet with a factory-installed three-hole shroud is by far the most common and versatile platform today.
The helmet industry is moving fast. What was once just head protection is now a fully integrated platform. The global advanced combat helmet market, valued at around USD 2.7 billion in 2025, is expected to explode to USD 5.3 billion by 2035. This growth is all about integrating comms, augmented reality, and, of course, night vision mounts right from the factory. Making a smart choice on your helmet and shroud today sets you up for success now and ensures your gear is ready for the future.
Connecting Your Gear: Choosing an NVG Arm Mount
Think of the arm mount as the mechanical heart of your whole helmet setup. It's the critical piece that connects your expensive night vision device to the shroud on your helmet, and it dictates everything from how the goggle sits in front of your eye to how it stows away. Getting this component right is just as important as picking the right NVG.
Your choice really comes down to two main interface types: the older bayonet style (which you'll often hear called a "J-arm") and the now-standard dovetail system. The J-arm is that classic horn-shaped mount that clicks into a socket. You’ll see it most often on standard-issue PVS-14 monoculars.
It works, but honestly, the J-arm is infamous for developing a noticeable "wobble" over time. The connection just isn't that secure, which can give you an unstable image and make it tough to keep a consistent sight picture when you're moving.
The Dovetail Advantage
There's a good reason the dovetail interface has become the professional standard. It uses a trapezoidal male end that slides securely into a female receiver, creating a much tighter, more stable lockup. This design practically eliminates the wobble you get from J-arms and gives you a far more secure platform—something that's absolutely critical if you're running a heavier dual-tube goggle.
If your NVG already has a dovetail, you're good to go. But if you have a PVS-14 with a standard J-arm, one of the single best upgrades you can make is swapping it for a dovetail adapter. It's a night-and-day difference. We dive deep into the options in our guide on dovetail mounts for night vision goggles.
Comparing Popular Mount Options
Once you've sorted out the interface, you can pick an arm mount that truly fits your needs. Three legendary designs pretty much own the market, and each brings something different to the table.
-
Wilcox G24: This is the undisputed king of the hill. It's famous for being incredibly lightweight, low-profile, and having a patented breakaway feature. If you take a hard knock, the mount will detach from the shroud, which can save you from a serious neck injury.
-
Norotos INVG: The big selling point for the INVG is its incredible range of motion. It lets you swing the NVG up and over to the side of the helmet, which is fantastic for quickly switching between looking through your optic and using your naked eye without a big snag hazard sticking up.
-
Norotos AKA2: If rock-solid stability is your top priority, the AKA2 is your mount. It's a bit heavier than the G24 and doesn't have the breakaway feature, but it locks up like a bank vault.
The demand for this kind of gear is on a serious upswing. The night vision device market was valued at USD 7.5 billion in 2024 and is on track to hit around USD 9.5 billion by 2030. That growth is heavily driven by ground forces around the world where helmet-mounted NVGs are mission-essential. You can get more details on this expanding market on Stratview Research.
A key takeaway here is to think about your environment. If you're working in and out of vehicles or in tight spaces, the G24's low-profile stowage is a lifesaver, keeping the NVG tucked close to the helmet to avoid snags. On the other hand, if you're moving through thick brush, the INVG's ability to swing the optic completely out of the way is a huge plus. Picking the right mount isn't just about holding your NVG—it's about making you more effective.
Putting It All Together: Assembling Your Night Vision Helmet Rig
Alright, you've picked out your gear. Now for the fun part—building your complete night vision setup. This isn't rocket science, but getting it right from the start is crucial. A sloppy assembly means wobbly optics, potential damage to expensive equipment, and a frustrating experience when you need it most.
Think of it as building from the inside out. Your helmet is the foundation, and every piece needs to be rock-solid.

This diagram gives you the basic sequence: helmet first, then the arm mount, and finally the night vision device itself. Each component stacks onto the last, creating a single, stable unit.
Getting the Shroud Mounted
First things first, let's get that shroud attached to your helmet. Most modern tactical helmets come with a standard three-hole pattern right out of the box. You'll want to use the hardware that came with your shroud; don't just grab random screws from your parts bin, as that's a surefire way to get a poor fit or even damage your gear.
Start each screw by hand. This prevents cross-threading, which can be a nightmare to fix. Once they're all in, snug them down with a screwdriver in a star or alternating pattern, just like you would with lug nuts on a car tire. This ensures the pressure is distributed evenly.
Be careful not to crank down on them too hard. You want it tight and free of any wiggle, but over-torquing can strip the screws or crack the helmet. Here’s a pro tip I swear by: put a small drop of blue (medium strength) thread locker on each screw. It’s cheap insurance against vibrations working them loose, but it won’t make them impossible to remove later if you need to.
Connecting the Arm Mount and NVG
With the shroud locked down, attaching the arm mount is usually pretty simple. For popular dovetail mounts like the Wilcox G24, you just press the release button, slide the mount into the shroud until you hear a solid click, and give it a quick tug to make sure it’s fully seated. You should feel zero wobble or play.
Now, connect your optic to the arm mount. It doesn't matter if you're running a PVS-14 monocular or a set of dual-tube goggles; the interface, whether it's a dovetail or a J-arm, should slide in and lock up securely.
Field-Tested Tip: Before you call it a day, do a full function check. Flip the mount up and down a few times. Make sure the NVG powers on and off correctly as you move it. This is also the perfect time to ensure your PVS-14 housing is working properly before you get out in the dark. If you want a deeper dive into what makes your monocular tick, check out our quick guide for PVS-14 housing.
By taking your time here, you're building a reliable helmet mount night vision system that won't let you down. With the hardware assembled, you're ready to move on to the most critical part of the setup: aligning the optics to your eyes for a clear, comfortable view.
Fine-Tuning Your Setup for Peak Performance
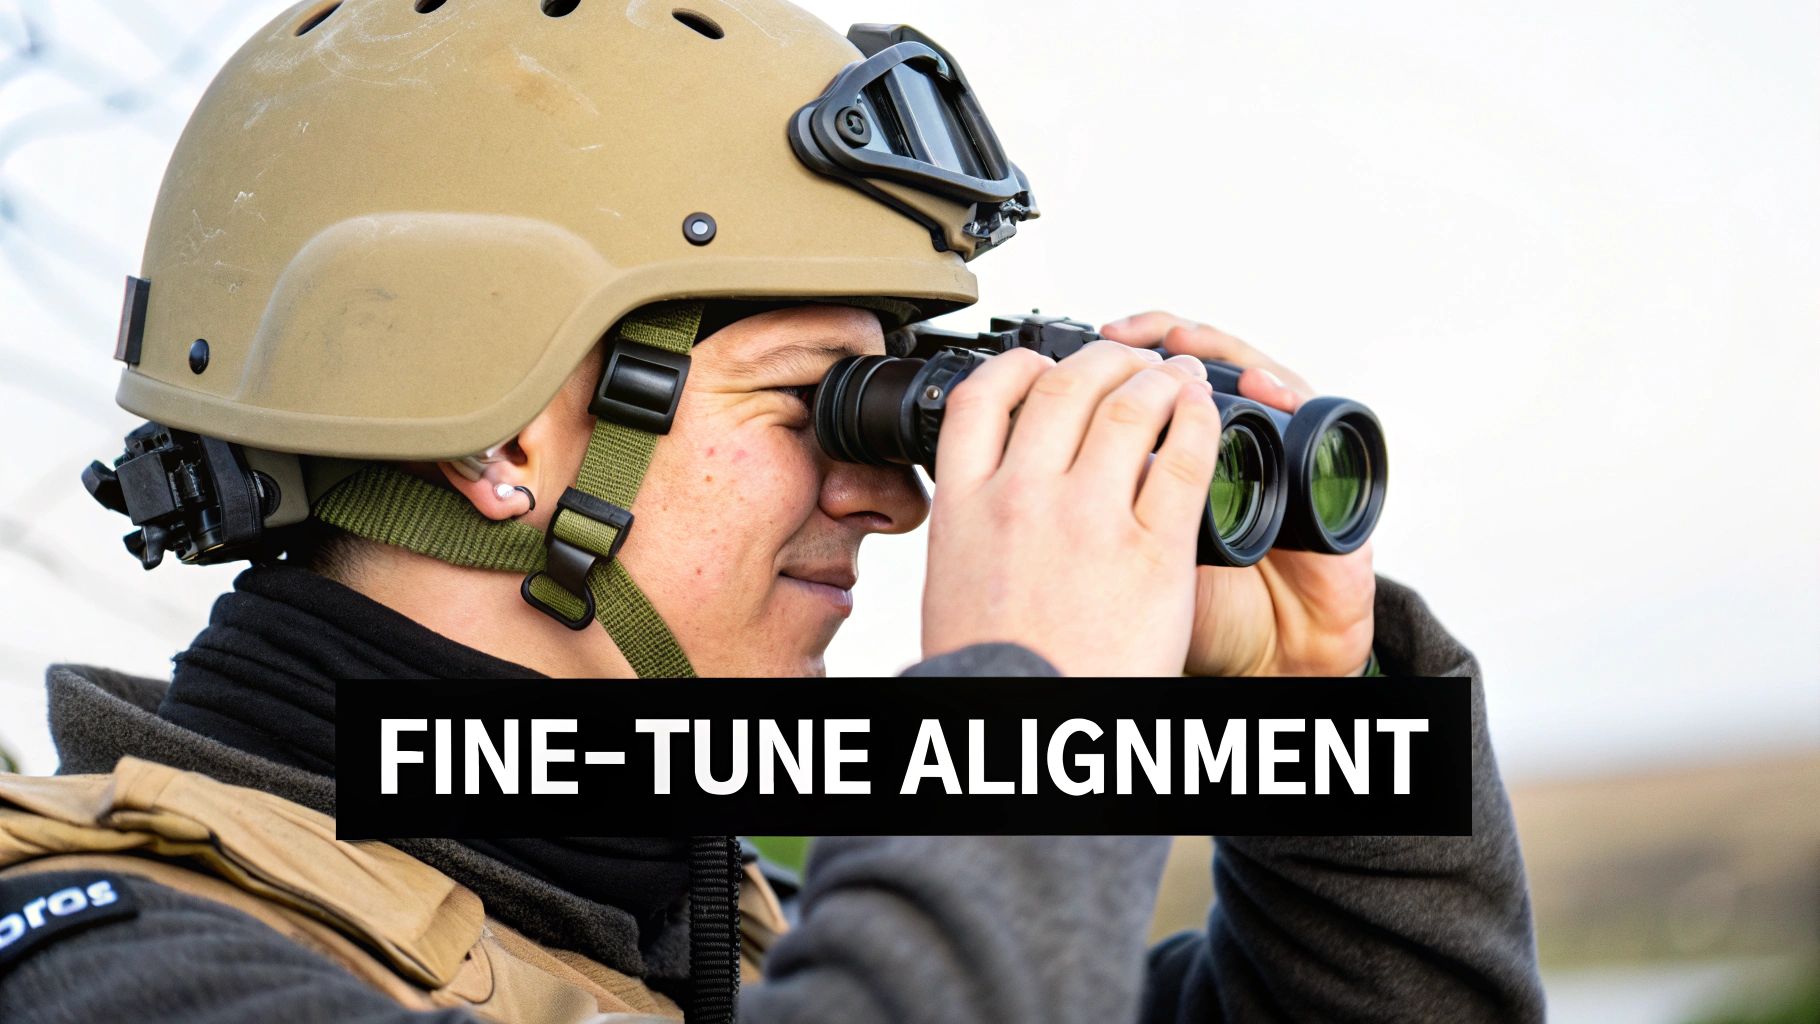
Getting your rig securely bolted together is just the starting line. The real work—the part that turns a pile of expensive hardware into an actual tactical advantage—happens when you start fine-tuning the fit. This is where you transform it into a seamless extension of your own vision.
It’s tempting to skip this part, but that's a classic rookie mistake. Doing so is a fast track to eye strain, splitting headaches, and a sight picture that's more frustrating than functional.
What you're chasing is a perfect, full circle of view through the optic. No dark, shadowy crescents, no "scoping" around the edges. You get there by dialing in the three primary adjustments on your arm mount: vertical, fore/aft, and tilt. Each one is crucial for lining up the device's exit pupil perfectly with your eye.
Think of it like getting the driver's seat just right in your truck. You don't just hop in and go; you move it forward, tweak the height, and adjust the backrest until it feels like it was made for you. Your night vision setup demands that same level of personalized attention.
Dialing in the Perfect Fit
First up is the vertical height. You'll want to move the goggle up or down on its track until the image is perfectly centered in your natural line of sight. You shouldn't have to awkwardly crane your neck up or tuck your chin down to get a clear view.
With that set, let's move on to the fore/aft adjustment. This is all about eye relief—the distance from the eyepiece to your eye. Slide the whole unit forward or backward until you see that full, crisp image fill your vision. Too far away and you'll get a dark ring around the view. Too close, and you won’t even be able to blink comfortably, which gets old fast.
Last but not least is the tilt. This adjustment angles the bottom of the NVG either toward or away from your face. A proper tilt ensures the entire image plane sits parallel to your eye, which is key to eliminating weird distortion and getting maximum clarity across the whole field of view.
Expert Insight: If you're running dual tubes, you have an extra step: setting the interpupillary distance (IPD). This is just a fancy way of saying you need to slide the pods closer together or farther apart to match the distance between your own pupils. Get this right, and the two separate images will merge into one seamless, binocular view.
If you’re seeing something you don’t like through the tubes, don't just live with it. Most common alignment problems have a straightforward fix.
This little table should help you troubleshoot what’s going on.
Mount Adjustment Troubleshooting Guide
| Symptom / Issue | Potential Cause | Recommended Adjustment |
|---|---|---|
| Dark crescent at the top/bottom | Incorrect vertical height | Adjust the mount's vertical slide until the image is centered. |
| Dark ring around the full image | Improper fore/aft position | Slide the mount forward or backward to find the optimal eye relief. |
| Blurry or distorted edges | Incorrect tilt adjustment | Adjust the tilt angle to make the eyepiece parallel with your eye. |
| Seeing double or eye strain (duals) | Incorrect IPD or collimation | Adjust the interpupillary distance; seek professional collimation if needed. |
Proper alignment isn't just a nice-to-have; it's absolutely non-negotiable for anyone planning to wear this gear for more than a few minutes at a time.
Spending ten minutes to meticulously dial these settings in will pay you back tenfold in comfort and performance. It lets you focus on what's downrange instead of fighting with the gear on your head.
Keeping Your Gear Running for the Long Haul
Think of your night vision setup like any other high-end tool. It’s a serious investment, and a little preventative care goes a long way in making sure it works flawlessly when you absolutely need it. This isn't about breaking out the tool kit for a full teardown every time you use it. It's about building smart, simple habits that prevent small problems from turning into mission-ending failures.
The easiest habit to build is a quick pre- and post-use inspection. Before you even put the helmet on, give everything a once-over. Are the screws on your shroud and arm mount still tight? A quick wiggle test of the entire assembly will immediately tell you if something has worked itself loose. Don't just look—feel for any new play or wobble.
When you get back, take 30 seconds to clean the mounting interfaces. Dust, dirt, and especially sand love to grind away at the dovetail or bayonet connection. This leads to that sloppy, wobbly fit you want to avoid. A soft brush or a quick blast of compressed air is usually all it takes to keep those critical surfaces pristine.
Pre-Mission Checks: More Than Just Tight Screws
Once you've made a habit of the basic checks, there are a few function tests you should perform before every single use. These are non-negotiable for ensuring your helmet mount night vision system is both safe and ready for action.
-
Test the Breakaway: If your mount has a breakaway feature, like the one on the Wilcox G24, actually test it. A firm, controlled push forward should pop it right off the shroud. This feature is your neck's best friend and can prevent serious injury. Don’t just assume it works.
-
Check the Articulation: Run your mount through its full range of motion. Swing it up into the stowed position and back down into the deployed position. It should lock into place with a positive, audible click, with no sticking or grinding along the way.
-
Inspect Battery Contacts: Pop open the battery compartments on your NVG and any external packs. You're looking for that nasty green or white fuzz—corrosion. Clean contacts are essential for reliable power, especially in damp conditions.
Pro Tip: How you store your gear is just as important as how you clean it. Always store your NVGs in a padded, hard-sided case. And most importantly, take the batteries out! Leaky batteries have ruined more expensive electronics than almost anything else. Also, try to avoid leaving your setup in a hot car for hours, as the heat can do a number on the internal components over time.
These quick checks aren't busy work. They're the little disciplines that separate a reliable tool from a liability. It’s this consistency that guarantees your gear will be ready to perform when the lights go out.
Making Your Helmet a Complete System with the Right Accessories
Getting your night vision mounted is just the first step. To turn your helmet from a simple goggle-holder into a truly effective platform, you need to think about accessories. We're not just bolting on gear for the sake of it; we're solving real problems like neck strain, power management, and team identification.
The first thing you'll notice after a few minutes under NODs is the weight. That constant forward pull from a pound or more of gear hanging off your face gets old, fast. This is where a counterweight becomes your best friend. By adding some ballast to the back of your helmet, you balance the entire load, making the whole setup feel surprisingly lighter and saving your neck from serious fatigue during long nights.
Power, Lights, and Staying Organized
Why just add dead weight? Make it useful. Many modern counterweight pouches are built to carry battery packs for your NVGs or other electronics. This is a brilliant two-for-one solution. You get the balance you need while also moving the power source off the goggle itself, which takes a bit of weight off your face and dramatically extends your runtime.
With the basics covered, think about what you need to see and be seen.
-
IR Strobes: If you're working with a team, an infrared strobe is non-negotiable. Something like a Hel-Star or a V-Lite lets your buddies identify you under night vision without broadcasting your position to anyone without it.
-
Task Lights: A small, helmet-mounted white and red light is incredibly useful. It gives you instant, hands-free illumination for things like checking a map, fixing a piece of gear, or patching someone up, all without having to flip up your NODs.
Finally, clean up your wiring. Loose cables from battery packs or comms gear are a major snag hazard. A few small zip ties, some ranger bands, or dedicated cable management clips will keep everything tucked in and prevent you from losing power at the worst possible moment.
The real goal here is to build a system that enhances your awareness and capability. The industry is constantly pushing this forward with technologies like fusion, which combines thermal and night vision into a single, data-rich display. To see where this is headed, check out how these advancements are shaping the helmet-mounted display market on OpenPR.
Answering Common Questions About Your Night Vision Setup
Even after you've got all the pieces, a few questions always pop up when you're putting together a night vision helmet rig. Getting these sorted out early will save you a ton of headaches (and maybe some neck pain) down the line. Let's dig into a couple of the most common ones I hear.
Dovetail vs. J-Arm: What's the Real Difference?
This is probably the number one question people have, and for good reason. It comes down to stability and what you're running.
-
A dovetail mount is the gold standard. It provides a much more solid, secure lock-up with less wobble. If you're running dual-tube goggles or just want the most professional-grade setup, this is the way to go.
-
A J-arm (also called a bayonet mount) is the more traditional, budget-friendly choice, most often seen with a PVS-14 monocular. While it gets the job done, it's notorious for having a bit of play and fewer fine-tuning adjustments.
For serious use, the stability of a dovetail is tough to beat. The last thing you want is your optic wobbling around when you're trying to move quietly.
Is a Counterweight Really Necessary?
Short answer: Yes, almost always. Hanging a pound or more of gear off the front of your helmet creates a ton of leverage that your neck has to fight against.
A good counterweight system balances everything out, making the whole setup feel surprisingly lighter and much more stable. This isn't just about comfort; it's about reducing fatigue over long periods. A few hours with an unbalanced helmet will have your neck screaming.
Pro Tip: Don't just guess on compatibility. Before you click "buy" on anything, triple-check that your NVG's interface (dovetail or bayonet) matches the arm mount, and that the arm mount fits the shroud on your helmet. It's an expensive mistake to make.
At Superior Tactical LLC, we've got the high-quality mounts, shrouds, and accessories you need to build a rock-solid, high-performance system. Explore our full catalog of night vision gear at superiortac.com.