Finding the Best Night Vision Camera of 2026
When it comes to finding the best night vision camera, the first thing you need to realize is that there's no single "best" device. It’s all about matching the right tool to the job. For a law enforcement officer needing positive identification, a Gen 3 Image Intensification (I²) monocular is the gold standard. But if you’re trying to spot a heat signature from hundreds of yards away or through thick fog, Thermal Imaging is king. Then you have Digital Night Vision, which brings recording and versatility to the table for hobbyists and general security use.
Choosing Your Best Night Vision Camera
Stepping into the world of night vision can feel like learning a new language. You're hit with a wall of acronyms, specs, and competing claims. The honest truth? The best device for a hunter scanning a field is completely different from what a security professional needs to clear a dark building. This guide is here to cut through that noise and give you the real-world context you need to choose wisely.
The market for this equipment is huge and getting bigger every year, which tells you just how critical these tools have become. The global night vision surveillance camera market was valued at USD 190.08 billion in 2025 and is on track to hit an incredible USD 1.57 trillion by 2035. That's driven by a 23.5% compound annual growth rate (CAGR), and North America is expected to lead the way, holding a 36.1% market share by 2035 as security demands increase. You can discover more about these market projections to see just how fast this industry is moving.
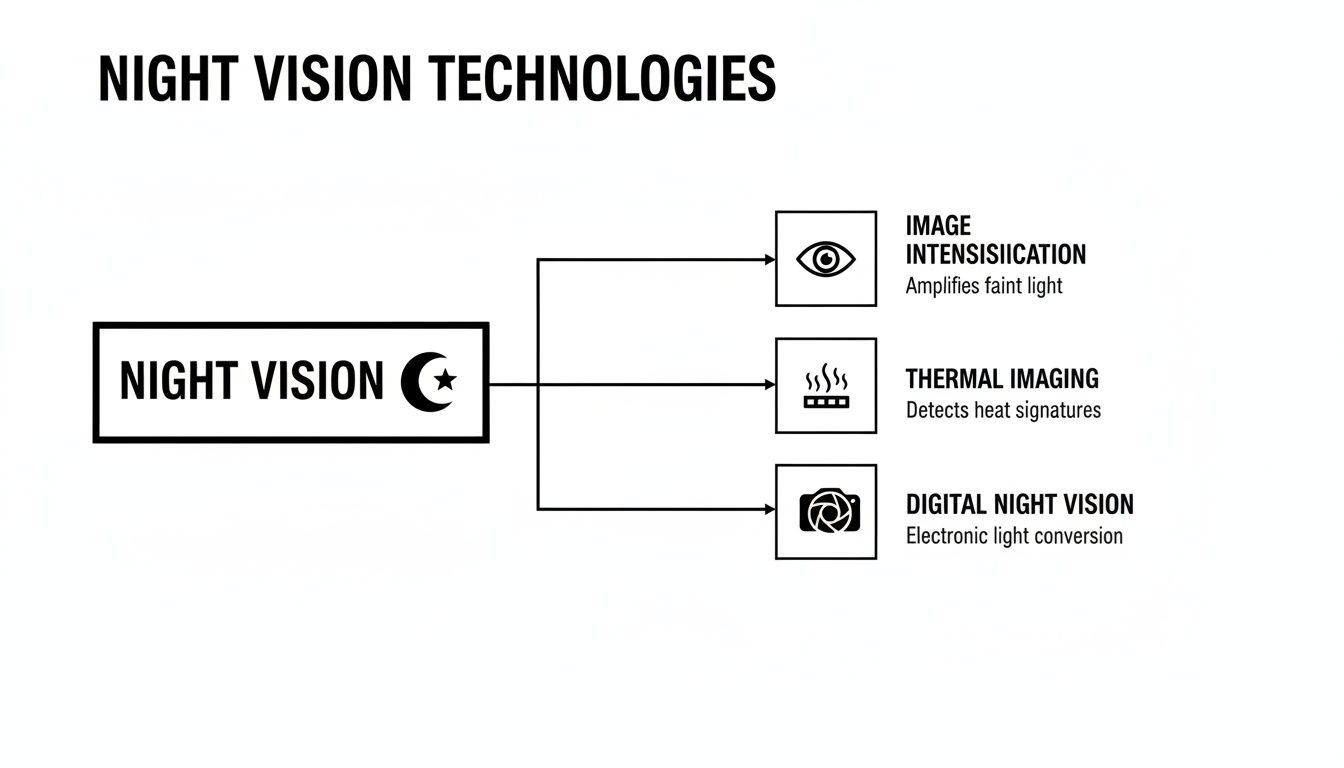
Quick Guide to Night Vision Technologies
Before we get into the weeds, let's cover the three main technologies. Each one works differently, giving it a unique set of strengths and weaknesses. Think of it like a toolbox—you need to know whether to grab a wrench, a hammer, or a screwdriver.
This table breaks down the core technologies to help you get your bearings and see which one aligns with your primary needs.
| Technology Type | Primary Function | Best For | Key Limitation |
|---|---|---|---|
| Image Intensification (I²) | Amplifies tiny amounts of ambient light to create a detailed green-hued image. | Positive Target Identification (ID), navigating on foot, maintaining situational awareness. | Needs at least a little ambient light (from stars or the moon) to work. |
| Thermal Imaging | Detects differences in heat signatures, creating an image from infrared radiation. | Detecting living targets, tracking movement, and seeing through smoke, fog, or brush. | Can't see details needed for positive ID—it only sees heat, not light or texture. |
| Digital Night Vision | Uses a digital sensor (like in a regular camera) to process light and display an image electronically. | Recording video, affordability, and the flexibility to be used in both day and night. | Often suffers from image lag and typically has lower sensitivity than I² or thermal. |
This quick overview should make the fundamental differences clear. Each technology is a specialized solution for a specific problem.
Key Insight: The most critical choice you'll make is between seeing for identification (Image Intensification) and seeing for detection (Thermal Imaging). Digital systems provide a more accessible, hybrid option but usually don't match the peak performance of the other two in their specialized roles.
Keeping that core distinction in mind is the first and most important step. As you look at specific models, always bring it back to what you actually need to accomplish in the dark. If you're ready to go deeper, a practical guide to finding the best night vision gear offers more on making these tough choices. In the next sections, we’ll break these technologies down even further with detailed, situational comparisons.
Image Intensification vs. Thermal vs. Digital
When you're looking to buy a night vision camera, the first thing to get straight is that you're not just choosing between different models. You're choosing between three entirely different technologies: Image Intensification (I²), thermal imaging, and digital night vision. These aren't just variations on a theme; they are fundamentally separate tools, each built to solve a specific problem when the lights go out.
The right choice comes down to your mission. Are you trying to see what’s there with clarity, detect a living target through cover, or get a versatile, recordable device? Let's break down which one does what best.
Image Intensification: The Standard for Identification
Most people picture that classic green-glow image when they think of night vision. That's Image Intensification, or I². This tech works by gathering whatever tiny bits of ambient light it can find—from starlight, moonlight, or even distant city glow—and amplifying that light thousands of times over. The result is a surprisingly detailed and recognizable picture, making it the absolute gold standard for positive identification.
For a law enforcement officer clearing a dark building, being able to see a face, a weapon, or other crucial details is a matter of life and death. Gen 3 I² delivers that high-resolution image, giving you the depth and texture needed for split-second decisions. You know exactly who and what you're looking at, a capability other technologies just can't match.
Of course, it has its limits. I² has to have some light to work with. In a completely sealed, pitch-black room, it's blind without an external infrared (IR) illuminator. It's also hampered by things that block light, like heavy fog or thick smoke, just like your own eyes would be.
Key Differentiator: Image Intensification is all about identification. When you absolutely must confirm the details of a person or object in the dark, I² is the only professional choice.
Thermal Imaging: Unmatched for Detection
Thermal imaging plays by a completely different set of rules. It doesn't see light; it sees heat. Every object, living or not, gives off some amount of thermal energy. A thermal camera picks up on these tiny temperature differences and paints a picture from them, usually as a black-and-white or color-coded heat map.
Its biggest advantage is detection, especially through things that block your view. A hunter scanning a tree line can easily spot an animal's heat signature through dense brush or fog, long before an I² device would see anything. Thermal cuts right through visual clutter, making it phenomenal for finding targets that are camouflaged or trying to hide.
The trade-off? Thermal gives you zero identifying details. You'll see the distinct shape of a person, but you won't be able to make out their face or read anything on their clothing. It tells you something is out there, but it can't tell you what it is. This makes it the perfect partner to an I² device but a poor substitute for one in most tactical situations.
Digital Night Vision: The Versatile Modern Option
Digital night vision functions a lot like the camera sensor in your phone. It uses a digital chip (a CMOS or CCD sensor) to gather light and process it into an image you see on a small screen. The main draw here is versatility. Many digital devices work in both daylight and darkness, and they really shine when it comes to recording high-quality video, often with audio.
For a lot of folks, digital strikes a great balance between performance and price. It's typically more affordable than top-tier Gen 3 I² or thermal units, and it comes packed with modern features like Wi-Fi streaming, integrated rangefinders, and onboard recording. This makes it an excellent pick for recreational use, hunting, or general home security.
The compromise is that digital systems often have a slight image lag and just can't compete with analog I² in extremely dark conditions. While the technology is getting better every year, professionals who operate in high-stakes environments still put their trust in the raw, unfiltered performance of I² and thermal. For a deeper dive into the technical specifics, check out our comprehensive guide to night vision technology.
How to Evaluate Critical Night Vision Specs

It’s easy to get lost in a sea of technical jargon on a spec sheet. Marketing can make any device sound impressive, but a few key numbers separate genuine high-performance gear from the hype. Knowing what to look for is the only way to ensure the best night vision camera you buy is the right one for your mission.
Think of these specs as the language of night vision. Once you learn to speak it, you can confidently compare different models and know exactly what you’re paying for. Let's break down the metrics that truly matter for Image Intensification, Thermal, and Digital systems.
Decoding Image Intensification Specs
When you're looking at a Gen 3 Image Intensification (I²) device, your eyes should go to one number first: the Figure of Merit, or FOM. This is the gold standard for performance, calculated by multiplying the tube's resolution (lp/mm) by its signal-to-noise ratio (SNR).
Simply put, a higher FOM means a cleaner, sharper image, especially when the lights are almost completely out.
- Resolution (lp/mm): This tells you how much detail the tube can resolve, measured in line pairs per millimeter. A spec like 64 lp/mm or 72 lp/mm indicates the device can render finer details, helping you distinguish between a threat and a non-threat.
- Signal-to-Noise Ratio (SNR): This is all about image clarity. A high SNR means you see less of that distracting sparkling or "snow" in the image. For any serious professional use, an SNR above 30 is what you want for a clean, workable picture.
FOM is the bottom line for I² performance. A tube with a FOM of 2300 will dramatically outperform one with a FOM of 1800 in near-total darkness. It allows for positive identification at much greater distances and is the main reason for the price and capability differences in Gen 3 systems.
Understanding Thermal Imaging Metrics
Thermal imaging plays by a different set of rules. Here, performance is all about the sensor's ability to pick up tiny differences in heat and display them clearly. The two specs you need to focus on are sensor resolution and refresh rate.
Thermal Sensor Resolution
Just like a digital camera, this is measured in pixels. You’ll typically see resolutions like 384×288 or 640×480. More pixels give you a far more detailed thermal image, which is critical for identifying targets at range. A 640×480 sensor gives you more than double the thermal data of a 384×288 sensor, and the difference in clarity is immediately obvious.
Refresh Rate
Measured in Hertz (Hz), the refresh rate is how many times per second the image updates. If you plan on tracking anything that moves—whether it's a coyote on the run or a vehicle down the road—a high refresh rate is essential.
- 9 Hz: This slow rate creates a choppy, lagging image that makes it incredibly difficult to follow moving objects.
- 30 Hz to 60 Hz: This is the sweet spot. It produces a smooth, fluid picture that feels natural, allowing you to track fast-moving targets without issue. Most high-end thermal scopes operate at 50 Hz or 60 Hz for this very reason.
Key Digital Night Vision Features
Digital night vision works differently, using a CMOS sensor and an IR illuminator to see in the dark. The quality of these two parts dictates the device's real-world range and how clear the image will be.
Sensor Sensitivity
This is the digital equivalent of an I² tube's light amplification. While manufacturers don't always provide a straightforward number for this, a high-quality sensor can produce a decent image with very little ambient light. This capability is what truly separates a budget-friendly digital unit from a serious, high-performance model.
IR Illuminator Range
Since digital units often depend on an infrared illuminator, the power of that light source is a make-or-break feature. An illuminator with a 300-yard effective range gives you the ability to see and identify things much farther out than a basic unit with a 100-yard illuminator. Always check this spec—it directly defines how far your device can actually see in total darkness.
A Situational Guide for Professionals and Enthusiasts
The first rule of night vision is that the mission dictates the gear, not the other way around. There’s no single "best" camera out there. The right choice for a law enforcement officer clearing a building is absolutely the wrong choice for a hunter scanning a field 300 yards away.
Forget abstract specs for a moment. Let's get into how these devices are actually used in the real world. This is where you find clarity and make a decision that truly serves your operational needs.
For Law Enforcement and Security Professionals
When the mission demands subject identification, threat assessment, and unwavering situational awareness, there’s no room for compromise. The standard is, and remains, a high-quality Gen 3 Image Intensification (I²) monocular. The detail and clarity from a Gen 3 tube are what allow you to make lawful, life-or-death decisions in an instant.
We often see pros gravitate towards a monocular like the PVS-14, and for good reason. Mounting it over one eye leaves your other eye free, preserving your natural night vision. This is critical for navigating unpredictable light conditions, like moving from a dark alley into a lit entryway, and it helps avoid the tunnel vision that can plague dual-tube setups.
Key Implementation Insights for Law Enforcement:
- Helmet Mounting: For any serious operator, a quality helmet mount is non-negotiable. It keeps your hands on your weapon, on a door, or on your comms.
- IR Laser Pairing: An IR laser on your duty rifle, paired with your head-mounted monocular, is the key to fast and accurate target acquisition without needing a traditional cheek weld.
- Situational Awareness: Can you read the text on a suspect's shirt? Can you see what's in their hands? Can you distinguish facial features? I² is the only technology that gives you this level of granular detail, which thermal imaging just can't match.
For professional use, the ability to positively identify is paramount. A Gen 3 monocular gives you the clear, recognizable image needed to differentiate between a threat and a non-threat, a capability no other technology can reliably offer in low-light environments.
For the Modern Hunter
A hunter’s needs in the dark are really a two-part problem: detection, then identification. This is where the strategic choice between thermal and traditional night vision comes into play, and it often carries serious ethical weight.
For pure detection, thermal is king. There's just no arguing with its ability to pick out a heat signature through fog, brush, or heavy camouflage from hundreds of yards out. You can scan an entire treeline and instantly spot an animal that would otherwise be completely invisible.
The problem is, many states have regulations against hunting with only thermal optics. It can be incredibly difficult to positively identify the species, sex, or what's behind your target. That's where I² or a high-end digital system earns its keep. You use the thermal to find the heat, then switch to an I² or digital scope for positive identification before you even think about taking the shot. It’s the cornerstone of a safe and ethical hunt.
As these tools become more widespread, you're seeing huge leaps in technology. If you're interested in the trends, you can learn more about the growing night vision camera market and the factors making these devices more accessible to serious hunters.
For Preppers and Outdoor Adventurers
If your focus is on self-reliance, navigating unknown terrain, and general observation, the decision often boils down to a classic dilemma: do you go with bombproof analog performance or feature-rich digital versatility?
A battle-proven Gen 3 monocular is the definition of reliability. It needs no active IR illumination to work in ambient starlight, it's incredibly durable, and it gives you a crisp, natural-looking image for moving through the woods at night. Its simplicity is a feature, not a bug—no menus, no software updates, no digital noise. It just works.
On the flip side, a modern digital night vision camera is a jack-of-all-trades. You get features like onboard video recording, digital zoom, and even the ability to use it during the day. For someone documenting a trail, observing wildlife from a distance, or setting up a simple perimeter alert system, a digital unit offers capabilities that a pure Gen 3 device simply wasn’t built for.
So, what's your priority? Is it the raw, passive night vision and ruggedness of an analog system, or the recording features and all-in-one flexibility of digital? Your answer will point you directly to the right gear for your preparedness goals.
To help you see how these choices align with specific roles, here's a quick reference table matching user profiles to the right technology.
Best Night Vision Camera Type by Use Case
| User Profile | Primary Task | Recommended Technology | Example Product |
|---|---|---|---|
| Law Enforcement Officer | Target ID, CQC, Situational Awareness | Gen 3 Image Intensification (I²) | Superior Tactical PVS-14 Monocular |
| Serious Hunter | Long-Range Detection & Ethical ID | Thermal (for detection) + I² or Digital (for ID) | Superior Tactical ST-5X Thermal Scope |
| Security Professional | Perimeter Monitoring, Evidence Gathering | Digital Night Vision | Superior Tactical D-770 Digital Camera |
| Outdoor Adventurer | Navigation, Observation, Reliability | Gen 3 Image Intensification (I²) | Superior Tactical PVS-14 Monocular |
| Prepper / Homesteader | Versatility, Perimeter Security, Recording | Digital Night Vision | Superior Tactical D-770 Digital Camera |
This table serves as a starting point. Your specific environment, budget, and secondary tasks will help you fine-tune your final decision from these recommendations.
Investing in Night Vision on Any Budget
Let’s get right to it: the first question on everyone’s mind is cost. With prices ranging from a few hundred to over ten thousand dollars, it’s easy to feel overwhelmed. It’s also tempting to just assume “you get what you pay for,” but the reality is a little more complicated than that.
A high-end, professional system isn't just a purchase; it's an investment in capability. But whether that investment makes sense depends entirely on what you need to do in the dark. Let's break down what your money actually gets you at different levels.
Entry-Level vs. Mid-Tier vs. Professional-Grade
We can really see the performance gaps when we put a sub-$500 digital unit up against a mid-tier device and a true Gen 3 system. Your specific mission is what makes those gaps either irrelevant or a deal-breaker.
Entry-Level (Under $800): These are almost always digital devices. They’re perfect for spotting a raccoon in your backyard or some casual observation inside 100 yards. Just be prepared for a laggy, often grainy image and a build quality that won’t stand up to serious abuse.
Mid-Tier ($800 – $2,000): This is where things get interesting. You'll find higher-end digital units with much better sensors and more powerful built-in IR illuminators. You also start seeing some entry-level Gen 2 analog tubes. These Gen 2 units offer a huge leap in light amplification over digital, giving you that true "through the tube" experience without the Gen 3 price tag.
Professional-Grade ($2,500+): Welcome to the world of high-FOM Gen 3 image intensifiers and high-definition thermal. A device like a Gen 3 PVS-14 delivers incredible clarity and range, even in near-total darkness, without relying on an active IR illuminator. That passive capability is a serious tactical advantage, and these units are built to take a beating for years.
Think about the total cost of ownership, not just the initial price. A professional-grade device's durability and performance mean you buy it once. When a Gen 3 tube comes with a 10-year warranty, like those from Superior Tactical, it speaks volumes about its expected service life.
Calculating Total Cost of Ownership
Here’s a scenario we see all the time. Someone buys a $600 unit, realizes its limitations within a year, and then upgrades to a $1,500 device. They've now spent $2,100 to get where they could have started. Being honest about your needs from the beginning can actually be the more economical route over the long haul.
If you're working through the numbers, our guide on budgeting for night vision and finding the right balance breaks down how to make a smart purchase without overextending your finances.
The DIY Option for Enthusiasts
If you’re the hands-on type, building your own night vision device is a fantastic way to get top-tier performance for less. You can source a housing kit and a separate image intensifier tube to assemble your own custom PVS-14 or even a dual-tube goggle.
This route gives you total control. You can hunt for a great deal on a high-spec Gen 3 tube and match it with the exact housing and lenses you want. It definitely takes some technical confidence and a steady hand, but a successful build can save you a pile of cash and deliver performance identical to a factory unit.
Tying Up Loose Ends: Your Night Vision Questions Answered
Even after covering the basics, a few key questions always come up. We've heard them all, and getting these details straight is what separates a good purchase from a great one. Let's get them answered.
Green vs. White Phosphor
This is the big one. Everyone wants to know if there's a real-world difference between the classic green display and the newer white phosphor tubes.
The short answer is a definite yes. While both technologies get the job done, many serious users find that white phosphor provides a cleaner image with superior contrast and depth perception. This really comes into play during long nights, as it can significantly reduce eye fatigue and make picking out details in a cluttered treeline much easier. That said, green phosphor is a battle-proven workhorse and often comes at a more accessible price point, delivering that iconic night vision view many of us started with.
Ultimately, the choice is personal. White phosphor is the premium option for those who want the absolute best clarity, but don't count green out—it's still highly effective and has been trusted for decades.
Can Night Vision See in Complete Darkness?
This is a critical point that trips a lot of people up. Image Intensification (I²) devices are light amplifiers, not magic. They need some ambient light to work—moonlight, starlight, or even faint skyglow from a distant city is enough.
But if you're in a sealed basement with zero ambient light, your I² unit is blind. To see in these pitch-black conditions, you need an infrared (IR) illuminator. Think of it as an invisible flashlight that only your night vision can see.
Thermal optics, on the other hand, don't need any light at all. They read heat signatures, so they can see perfectly in absolute darkness.
How to Properly Maintain Your Device
Your night vision unit is a significant investment, and a little care goes a long way in protecting it. Keeping it in top shape is simple if you follow a few golden rules.
- Avoid Bright Light: This is rule number one. Never, ever turn the device on and point it at the sun or other bright light sources. This can cause permanent burns on the intensifier tube. Always keep the daylight cap on when not in use.
- Keep Lenses Clean: Dust and smudges will degrade your image. Use a dedicated lens pen or a clean microfiber cloth to gently wipe the objective and eyepiece lenses.
- Store It Smart: When you're done for the night, put the device back in its protective case with the lens cap secured. For long-term storage, always take the batteries out to prevent damage from leaks or corrosion.
At Superior Tactical, our job isn't just to sell you equipment. It's to make sure you have the right knowledge and the right tool for whatever you're facing. When you're ready, take a look at our curated collection of professional-grade optics.