Your Complete Guide to Helmet Mount Light Systems
Think of a helmet mount light as a compact, powerful lighting tool built to snap directly onto your helmet. The whole point is to give you hands-free lighting that moves exactly where you look, perfectly in sync with your line of sight. It's a must-have piece of kit for anyone who has to get things done in the dark without tying up their hands.
Why a Helmet Mount Light Is Essential Gear
Ever tried to navigate a building, give first aid, or just hike a tricky trail at night while juggling a flashlight? It’s clumsy at best, and at worst, it’s a major hit to your safety and ability to perform. A helmet mount light solves this problem by making illumination part of your gear, not just another tool you have to carry.
The biggest win is obvious: it frees up your hands. That one simple benefit changes everything. Whether you're a cop with a firearm and a radio, a search and rescue tech handling ropes, or an industrial worker on heavy machinery, you absolutely need both hands free to do your job right.
Who Benefits from Helmet Mounted Lights
This isn't just a niche tool for one specific job. Its value extends across any profession or hobby where seeing what's in front of you is non-negotiable.
- Military and Law Enforcement: For anyone in a tactical role, a helmet light is non-negotiable. It's critical for identifying threats, moving through dark spaces, and communicating, all without fumbling with your weapon.
- First Responders: Think about paramedics, firefighters, and SAR teams working in the chaos of an unlit disaster zone. These lights let them treat patients and clear debris without a second thought.
- Outdoor Adventurers: For cavers, climbers, and anyone hiking after sundown, a helmet light means keeping your hands free for balance and managing your gear on rough terrain.
- Industrial Workers: People working in mines, construction, or utilities count on helmet-mounted lights to work safely in tight spots or on overnight shifts.
The core principle is simple: the light follows your eyes. Wherever you look, the beam is already there. This saves you the mental energy of trying to aim a handheld light, letting you stay 100% focused on the mission.
A Critical Component of Modern Gear
You can tell how important this gear has become just by looking at its rapid evolution, especially in professional circles. The market for military helmets and their integrated display systems—a key part of this tech—is projected to hit a staggering USD 6.00 billion by 2035. This boom is happening because helmet-mounted lighting is simply indispensable for troops in combat and on recon missions. You can dig into more of the data on the military helmet technology market on MarketResearchFuture.com.
When it comes down to it, a helmet mount light is much more than a convenience. It's a genuine force multiplier that boosts your safety, efficiency, and overall performance whenever the lights go out.
Picking the Right Helmet Mounting System
The most powerful helmet light in the world is just dead weight if it isn't securely attached to your helmet. This connection point is where most setups fail and where most of the confusion starts. Think of it like a camera lens—you can't just slap a Canon lens on a Nikon body without the right adapter. It's the same deal here.
Before you spend a dime, you need to understand how these systems work. Each one was designed to solve a specific problem, and knowing which is which will save you a ton of frustration. What works for one helmet might be totally useless on another.
First things first, do you even need one? This quick gut check can help you decide.
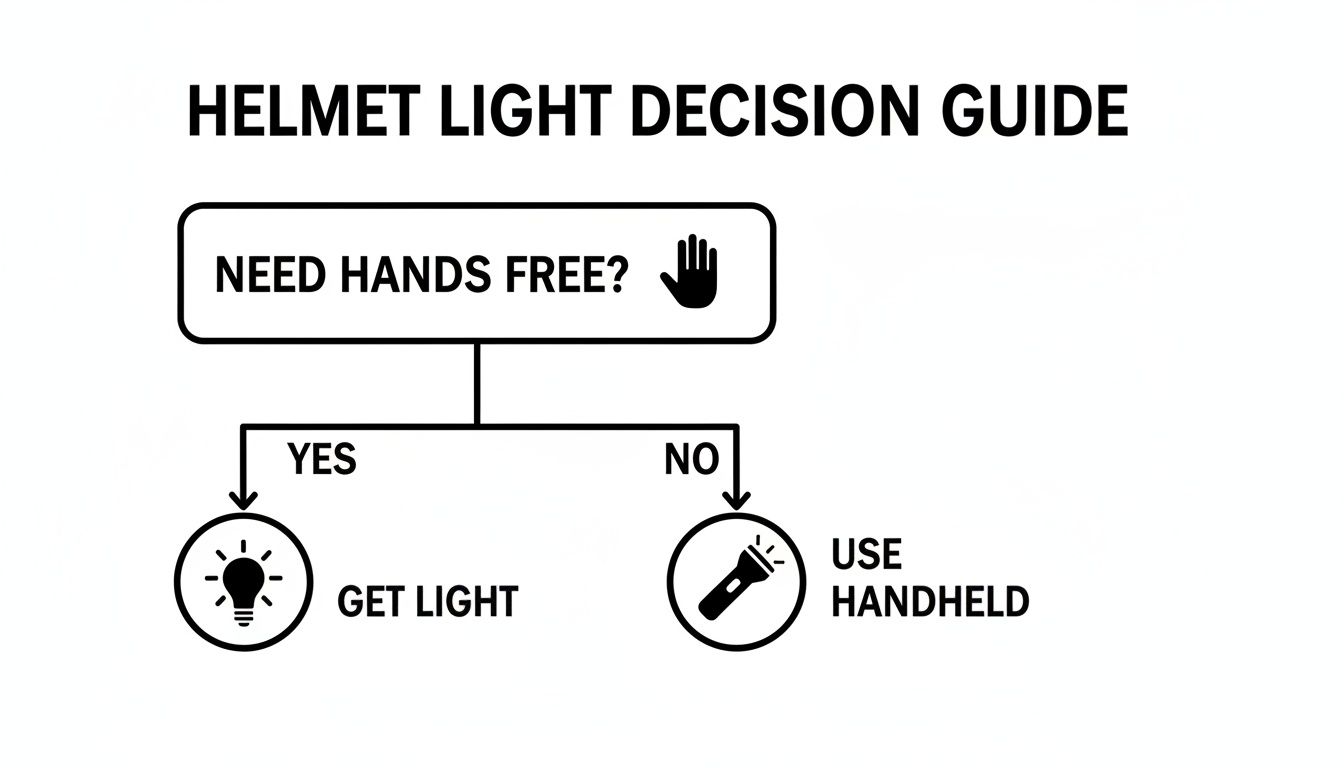
If you need your hands free for a weapon, tools, or anything else, a helmet light isn't a luxury—it's a necessity for being effective and safe.
Helmet Mount System Compatibility Guide
To cut through the noise, here’s a quick-reference table breaking down the most common mounting systems you'll run into.
| Mounting System | Common Helmet Type | Primary Advantage | Key Consideration |
|---|---|---|---|
| ARC Rails | Military, LE (Ops-Core, etc.) | "Plug-and-play" modularity | Most widely supported standard |
| M-LOK Rails | Tactical (Team Wendy, MTEK) | Low-profile and snag-free | Requires direct-mount accessories |
| NVG Shroud | Standard Issue Military/Ballistic | Central, forward-facing light | Requires a shroud-specific adapter |
| Velcro/Straps | Any helmet (non-tactical, etc.) | Universal compatibility | Less secure than hard mounts |
This table should give you a solid starting point. Now, let’s dig into what makes each of these systems tick.
The Gold Standard: ARC Rails
If you see rails running along the sides of a helmet, chances are they're ARC rails (Accessory Rail Connector). Originally developed by Ops-Core, ARC is the Picatinny rail of the helmet world. It’s the industry standard for a reason.
That signature dovetail shape lets you slide accessories on and off in seconds, often without any tools. Pop a light off, click a camera on. It’s that simple. This is why you see ARC rails on virtually every high-end tactical helmet used by military and law enforcement. It just works.
The Sleek Alternative: M-LOK
While ARC dominates, M-LOK has carved out its own space by offering a lighter, lower-profile option. You might recognize M-LOK from the firearms world, where it’s hugely popular on handguards. Instead of a raised rail, it uses simple slots machined directly into the helmet.
This design creates an incredibly secure, direct-mount connection that’s less likely to snag on gear. While it’s not as "quick-detach" as an ARC rail, it’s a fantastic choice if you want to set your light up and leave it there, prioritizing a minimalist and bomb-proof configuration.
The Bottom Line: Your helmet's rail system—ARC or M-LOK—is the single biggest factor in what lights will work. Figure out what you have before you start shopping for a light.
Don't Forget the NVG Shroud
What if you don’t have side rails at all? Look at the front of your helmet. That bracket right in the center is the NVG shroud, and it's prime real estate for a light.
Originally designed to hold night vision goggles, this sturdy mount point can be repurposed with the right adapter. A shroud-mounted light gives you a perfectly centered beam that points exactly where you're looking. It’s a brilliant and simple way to get a forward-facing light without the cost or complexity of a full rail system. To get a better idea of what adapters are out there, check out our guide on the essential parts of a light helmet mount to see what fits this kind of setup.
The Universal Fix: Velcro and Straps
For every other helmet out there—from old surplus brain buckets to construction hard hats—Velcro and strap-based mounts are the answer. The concept is as simple as it sounds: use high-strength adhesive Velcro or elastic straps to stick a light wherever you need it.
Don't underestimate modern Velcro; it's surprisingly strong and reliable. While not as rigid as a hard mount, it’s a cost-effective and incredibly versatile way to get hands-free light on pretty much any headgear imaginable.
Decoding Your Light’s Specifications
Stepping into the world of tactical lighting can feel like trying to learn a new language. You'll see terms like lumens, candela, and runtime plastered on every product page, but those numbers are useless if you don't know what they actually mean for you out in the field. Let’s be clear: choosing the right helmet light isn't about finding the biggest numbers; it’s about matching its performance to your mission.
Think of it like buying a vehicle just based on its horsepower. A dragster has incredible horsepower, but it’s completely useless for hauling lumber. In the same way, a light with insanely high lumens isn't always the best tool for the job. We're going to translate the technical jargon into practical knowledge so you can pick a light based on how it will perform in the real world, not just on marketing hype.
Lumens and Candela: The Two Sides of Brightness
The single biggest mistake people make is getting lumens and candela mixed up. They both relate to brightness, but they measure two completely different things. Nailing this distinction is the most important step in choosing the right light for your helmet.
Lumens measure the total amount of light a source pumps out in every direction. Picture a bare lightbulb hanging in a small room. The total light filling that room—up, down, and sideways—is its lumen output. A high-lumen light is fantastic for flooding an area with general, usable light.
Candela, on the other hand, measures the peak beam intensity. It tells you how bright the most concentrated part of the beam is. Think of a laser pointer. It has very few lumens, but all its light is focused into a single, intensely bright spot that travels a long way. That's high candela.
In short: Lumens fill a space, while candela cuts through the darkness. A high-candela helmet light is what you need to identify things at a distance, making it absolutely critical for search operations or assessing threats from afar.
Beam Pattern: Flood vs. Spot
The way lumens and candela work together is what creates the light's beam pattern. Every helmet light is engineered with a specific balance to produce either a "flood" beam, a "spot" beam, or something in between.
-
Flood Beam (High Lumens, Low Candela): This gives you a wide, even spread of light that’s perfect for lighting up your immediate surroundings. It’s ideal for admin tasks, working on a vehicle, or moving through tight indoor spaces where you need to see everything around you without a blinding central hotspot.
-
Spot Beam (High Candela, Lower Lumens): This produces a tight, focused beam designed to throw light as far as possible. It excels at long-range spotting, letting you see objects hundreds of meters away. This is the go-to for anyone doing surveillance or searching large, open areas.
-
Combination Beam: Many of the best modern lights offer a balanced beam. You get a bright central spot for distance, surrounded by a softer "spill" of floodlight for your peripheral vision. This is often the most versatile and useful option for general-purpose use.
Special Modes and Advanced Features
Beyond just turning on and off, many tactical helmet lights come packed with specialized modes for specific situations. These aren't just gimmicks; they are serious tools that can give you a real advantage when you know how to use them.
The most common special modes you'll find are:
-
Strobe Mode: This produces a rapid, disorienting flash of high-intensity light. Its primary use is tactical: to confuse a potential threat and create a split-second window of opportunity.
-
Infrared (IR) Mode: An IR function emits light that is completely invisible to the naked eye but brightly illuminates the scene when you're looking through night vision devices (NVDs). This is a non-negotiable feature for military, law enforcement, and serious hunters who need to operate covertly at night. If you’re building a night vision setup, understanding how an infrared illuminator for night vision complements your gear is crucial.
-
Task Lighting: Some advanced lights or filter caps have a tiny pinhole aperture. This cuts a powerful beam down to a soft, low-signature light that’s perfect for reading a map or performing delicate tasks without destroying your natural night vision or giving away your position.
The demand for these kinds of features is growing fast. The global market for helmet-mounted displays, which includes these integrated light systems, was valued at USD 2.1 billion in 2024 and is expected to keep climbing. You can dig into the full report on the helmet-mounted display market on StratviewResearch.com to see where the industry is headed.
Runtime and Power Source
Finally, you have to consider the light’s runtime and what powers it. The runtime you see on the box is almost always for the light’s highest setting; it will last significantly longer on lower power modes. A light that can run for 1.5 hours on high might last for over 50 hours on its lowest setting.
Pay close attention to the battery type, as this is a major logistical factor.
- CR123A: A disposable battery famous for its long shelf life and rock-solid reliability in extreme temperatures.
- 18650/18350: Rechargeable lithium-ion batteries that pack a serious punch and will save you a lot of money over time.
- AA/AAA: You can find them anywhere, but they generally offer lower performance compared to lithium options.
Your choice really comes down to logistics. If you need a grab-and-go light that's always ready, CR123As are a great bet. If you use your light all the time, the long-term cost savings of rechargeables are tough to ignore. No matter what, always check the manufacturer’s specs to make sure you're using the right battery for safety and peak performance.
Getting Your Helmet Light Set Up the Right Way
So, you’ve got your new helmet light. Great. But just slapping it on there isn't going to cut it. A sloppy setup can turn a great piece of gear into a genuine liability. Wires get snagged, an off-balance helmet wears you out, and fumbling for a switch in the dark is the last thing you need when things get serious.
Let's move past the what and get into the how. We're not just attaching a light; we're building a clean, functional system. It's about smart cable management and thoughtful placement so your helmet feels less like a clunky piece of equipment and more like a part of you.
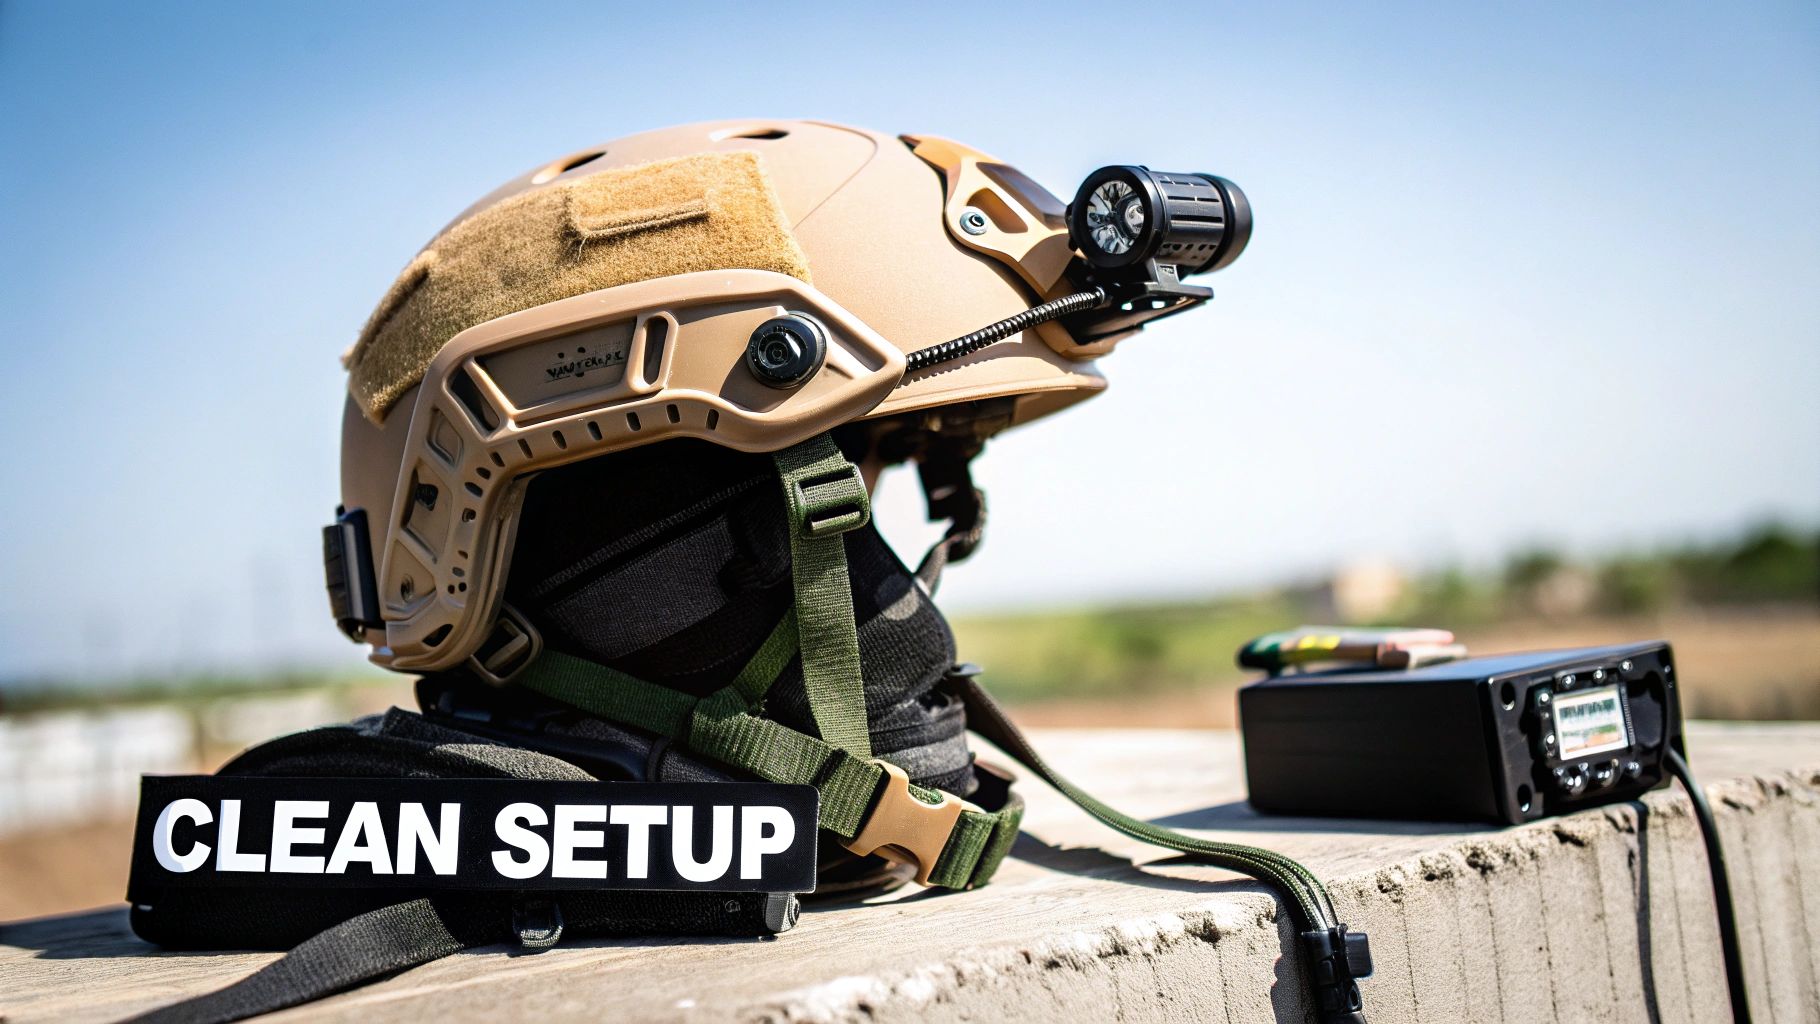
Step 1: Lock Down the Light (and Battery)
First things first, get your light and battery pack (if it has one) securely mounted. Follow the manufacturer's directions for your specific mount—whether it’s ARC, M-LOK, or an NVG shroud adapter. The goal here is a connection that's absolutely rock-solid. No wobble, no play.
From the moment you start, think about balance. If your light is on the right side, you'll probably want the battery pack or a counterweight on the left or rear to keep things from feeling lopsided. A helmet that's constantly trying to pull your head to one side will lead to some serious neck fatigue after a few hours.
A well-balanced helmet shouldn't feel front-heavy or list to one side. The ideal setup feels weightless and neutral when you move your head, preventing fatigue and allowing you to stay focused on the task at hand.
Step 2: Tame the Wires Like a Pro
With your main gear in place, you've probably got some wires snaking across your helmet. Loose cables are the number one snag hazard and an instant sign of a rookie setup. Getting those wires under control is crucial for both safety and reliability.
The trick is to route them tight and low, making them follow the helmet's natural lines. Here are a few tools of the trade for getting that clean, professional look:
- Ranger Bands: Think of these as heavy-duty rubber bands on steroids. They're perfect for bundling up extra wire and pinning it flat against the helmet shell or rails.
- Zip Ties: For a more permanent fix, small zip ties are your best friend. You can use them to lock cables directly to rails or through vent holes. Just make sure you snip the ends flush so you don't leave any sharp edges.
- Helmet Covers: A good fabric helmet cover is probably the cleanest solution. You can run all your wires underneath it, keeping them completely protected, hidden, and out of the way.
Start at the light and work your way to the battery or switch, securing the cable every few inches. It takes a little patience, but the result is a snag-free setup you can truly rely on.
Step 3: Smart Placement for Switches and Batteries
Where you stick your pressure switch and battery pack is just as important as where the light goes. It needs to be completely intuitive, so you can hit the switch instantly without fumbling or breaking your grip.
Think about your dominant hand and how you run the rest of your kit. If you're a right-handed shooter, putting the pressure switch on the left side of the helmet makes sense. You can easily hit it with your support hand without ever moving your primary grip. Find a spot that's easy to reach but won't get bumped on accident.
The same logic applies to your battery pack. It's often pulling double duty as a counterweight, so the rear of the helmet is a popular spot. This helps offset the weight of a light or NVGs up front, giving you that balanced feel that's essential for comfort and performance.
Integrating Your Light with Advanced Gear
For serious users, a helmet light is never just a light. It’s one piece of a much larger puzzle, an essential part of an entire ecosystem of gear. The real magic happens when it works hand-in-glove with equipment like Night Vision Devices (NVDs), and getting that synergy right is what separates a merely functional setup from a truly high-performance one. When things get serious, those details are what count.
The most critical partnership you'll manage is between your NVD and a light equipped with an Infrared (IR) illuminator. Think about it: your NVD works by amplifying whatever tiny bit of light is available. But what happens when you're in a pitch-black basement with zero ambient light? Nothing. That's where an IR illuminator saves the day. It floods the area with infrared light—totally invisible to the naked eye, but to your NVD, it’s like flipping on a massive spotlight. You get a perfectly clear picture.
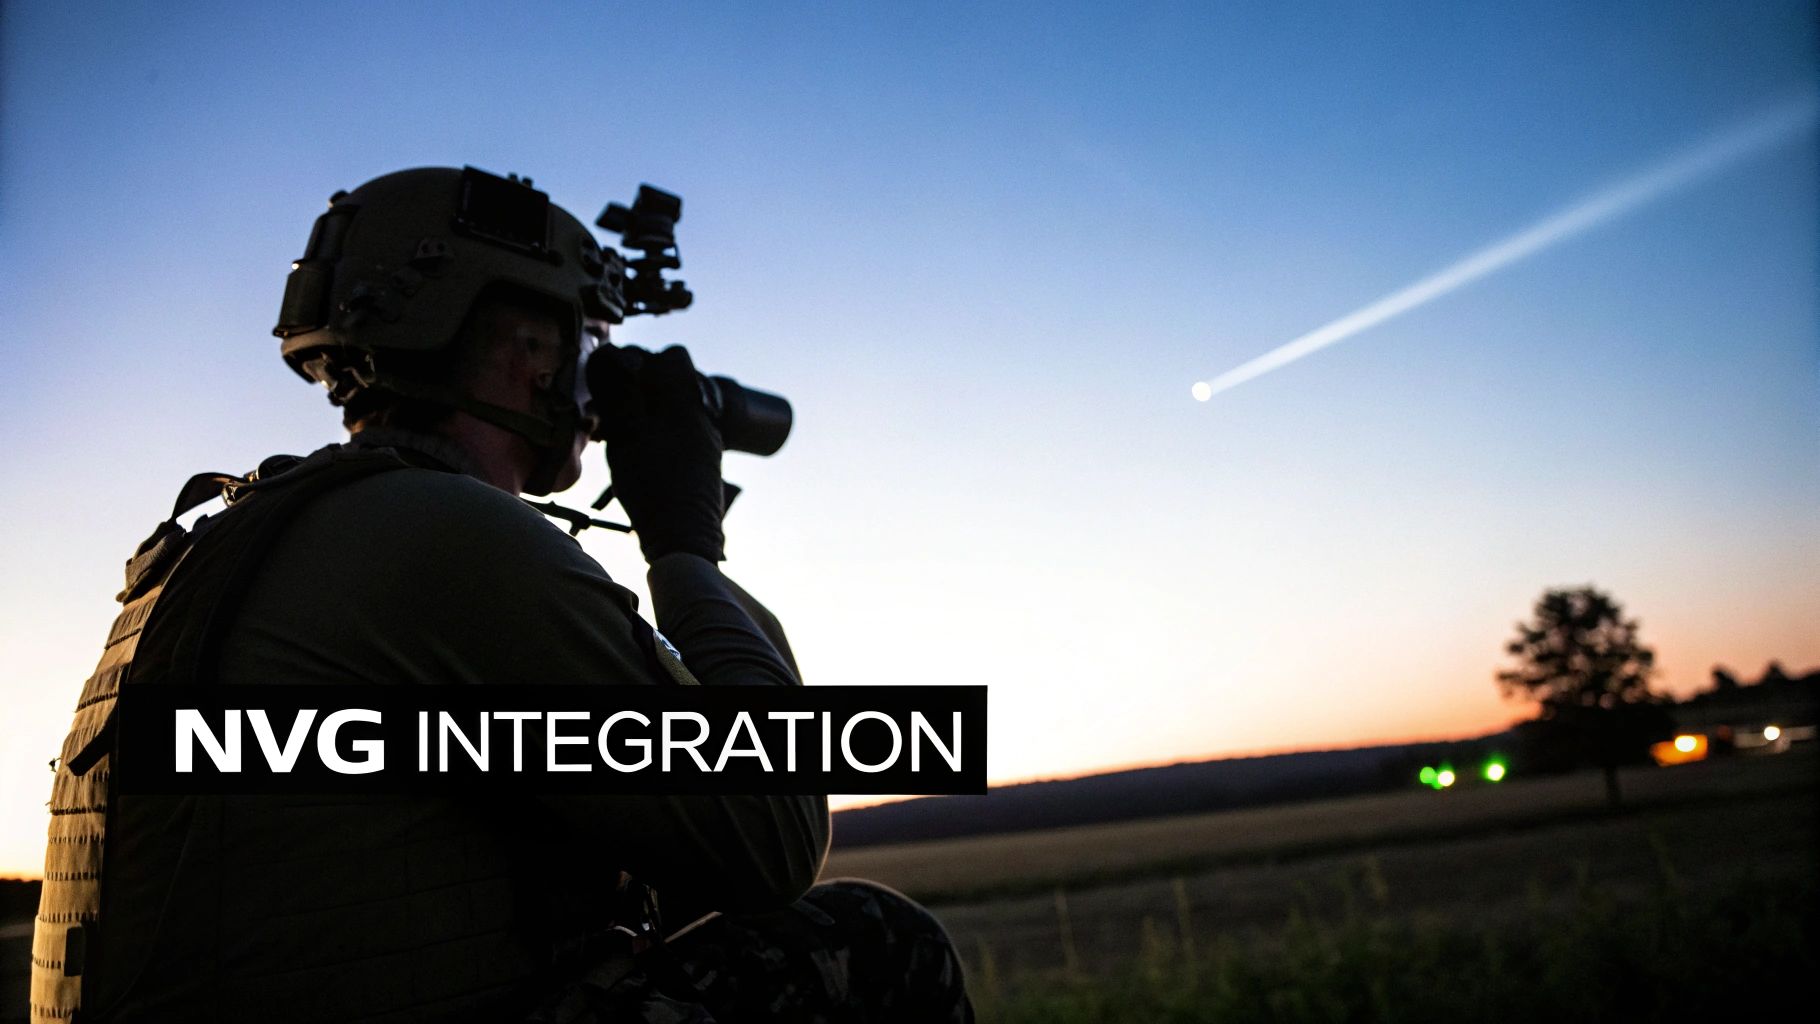
Night Vision Integration and Tactics
Just owning an IR light doesn't cut it. You have to be smart about how you use it to avoid some common, and frankly dangerous, mistakes. One of the biggest headaches is splashback. This happens when your IR beam hits a nearby surface, like the wall right next to you or a door frame, and reflects back into your NVD. The result? Your image gets completely washed out, and you're effectively blind.
Positioning is everything here. Mount your light high and a bit off to the side, away from the direct line of sight of your NVD. This simple tweak makes a huge difference in cutting down that blinding reflection, especially when you're moving through tight spaces. The goal is to "paint" things in the distance with IR without sabotaging your own close-quarters awareness.
Pro Tip: When you're about to enter a room, try the "umbrella lighting" technique. Point your IR illuminator up at the ceiling. The IR light will bounce down and give you a soft, diffused illumination across the whole room. This kills splashback and gets rid of harsh shadows, giving you a much cleaner view of what's inside.
Mastering Light Discipline
In any low-light operation, light discipline is non-negotiable. It’s simple in theory: use your light—whether it’s visible or IR—only when you absolutely have to, and for the shortest time possible. A single accidental flash of white light, what we call a "white light negligent discharge," can give away your position and completely wreck the night-adapted vision of your whole team.
To stay disciplined under pressure, operators rely on a few key tools and habits:
- Momentary-On Switches: Forget constant-on toggles for most tasks. A momentary switch only activates the light as long as you're pressing it. This forces you into the habit of using quick, controlled bursts of light just to get the information you need.
- Mode Selection: Before you even move out, double-check that your light is set to the right mode (like IR, not white light). Many tactical lights have a physical lockout or a dedicated selector switch to stop you from accidentally switching modes when your adrenaline is pumping.
- Strobe Functionality: A strobe can be a fantastic tool for disorienting an adversary, but it has to be a deliberate choice. Its jarring, pulsing effect can break someone's focus and buy you a precious split-second to act.
This level of integration is pushing helmet technology forward at an incredible pace. Just look at the HUD helmet market, which is all about blending vision systems with data overlays. It's projected to hit USD 1,827.6 million by 2032, growing at an insane 30.3% each year. This boom shows just how much demand there is for systems where lights, vision, and information all work together seamlessly. You can see the full market projections on the HUD helmet market on PrecedenceResearch.com.
At the end of the day, your helmet-mounted light is far more than a simple tool for illumination; it’s a critical link in your entire equipment network. For anyone serious about building a complete system, checking out the full range of available ballistic helmet accessories is the next logical step to maximizing your capability in any environment.
Helmet Light FAQs: Your Questions, Answered
Jumping into helmet-mounted lights can bring up a lot of questions. That’s perfectly normal. Getting straight answers is the first step to building a setup you can actually trust out in the field. Let's tackle some of the most common things people ask when choosing and using a helmet light.
Can I Just Slap Any Flashlight on My Helmet?
Not quite. Whether a light will work depends entirely on your helmet's mounting system—like ARC rails, M-LOK slots, or an NVG shroud—and the hardware on the light itself. In almost every case, you'll need a specific adapter to connect the two.
Before you spend a dime, check what system your helmet uses and what the light requires. This one simple step saves you from the headache of a wobbly, unreliable fit that's bound to fail you when it matters most.
How Many Lumens Do I Actually Need?
This really comes down to what you'll be doing.
- For close-up admin tasks like reading a map or working on your gear, a lower output of 50-300 lumens is perfect. It's enough to see without blinding yourself.
- If you're navigating a dark trail or need to see what's going on at a medium distance, stepping up to the 300-800 lumen range is a good move.
- For situations where you need to spot things far away or in a high-threat environment, 1000+ lumens is the go-to.
But don't get totally hung up on lumens. Pay just as much attention to candela, which is all about beam intensity and how far it punches through the darkness. For distance, high candela is arguably even more important than raw lumen output.
What’s the Deal with White Light vs. IR Light?
Think of it this way: white light is what your own eyes can see. It’s your standard flashlight beam for general navigation and figuring out what’s in front of you.
IR (Infrared) light, on the other hand, puts out a beam that's completely invisible to the naked eye. But, when you look through a night vision device (NVD), it lights up the world like daytime.
IR light is a purely tactical tool. It lets you see, move, and illuminate targets in total darkness without revealing your position to anyone who isn't using night vision.
My Helmet Keeps Tipping Forward. How Do I Balance It?
Balancing your helmet isn't just about comfort—it’s critical for avoiding major neck strain over long periods. The fix is a good counterweight system. If you've mounted a light and maybe a battery pack on the front or side, you need to add weight to the back to even things out.
You can get dedicated counterweight pouches that attach to the rear of your helmet. You fill these with small, purpose-built weights to offset the forward load. The goal is a neutral center of gravity, so the helmet feels like it’s floating on your head instead of constantly trying to pull your face to the ground.
Ready to build your ultimate low-light setup? Explore our curated selection of high-performance lights, mounts, and accessories at Superior Tactical LLC. Find the reliable gear you need to stay mission-ready. https://superiortac.com