A Guide to the PVS 14 Image Intensifier Tube
When you get down to it, the PVS 14 image intensifier tube is the absolute heart of your night vision device. It’s the engine that takes a scene cloaked in darkness and transforms it into a clear, visible image. Think of it less like a camera sensor and more like a light-gathering superpower.
What Is a PVS 14 Image Intensifier Tube
In simple terms, the image intensifier tube is a highly advanced vacuum tube that captures whatever faint light is available—starlight, moonlight, you name it—and amplifies it thousands of times. It doesn’t generate its own light; it just takes the tiny, invisible particles of light called photons and multiplies them on a massive scale.
Picture standing in a room so dark you can’t see your hand in front of your face. Your eyes simply aren’t sensitive enough to collect the few photons bouncing around. An image intensifier tube, on the other hand, acts like a giant funnel for light, grabbing every last photon your naked eye would miss and cranking up the signal. The quality of that final image—its brightness, sharpness, and clarity—all comes down to the performance of this single component.
The Engine of Your Night Vision System
The best way to think about the intensifier tube is to compare it to the engine in a high-performance car. You can have the best chassis, tires, and aerodynamics in the world, but if the engine is weak, the car won’t perform. The same is true for a PVS-14. The housing, lenses, and electronics are all critical, but they’re just there to support what the tube can do.
This is why the tube is, by far, the most important factor when it comes to both the cost and the performance of any night vision unit. You could have two PVS-14s that look identical on the outside, but one might completely outperform the other simply because it has a better “engine” inside.
Key Takeaway: The image intensifier tube isn’t just a part of your PVS-14; for all practical purposes, it is the PVS-14’s vision. Its specs dictate everything you see, from how clean the image is to how well it works when it gets really, really dark.
This is where the real magic of night vision happens. Once you grasp how central the tube is, you start to understand what separates a decent unit from a truly exceptional one. Without a quality tube, the most advanced night vision housing is little more than an empty shell.
How a Tube Creates Vision from Darkness
To really get what’s happening inside a PVS 14 image intensifier tube, it’s helpful to trace the path of a single particle of light—a photon—from the dark world, through the device, and into your eye. This whole trip is an incredibly fast, multi-stage process of converting and amplifying light, and it all kicks off the second that faint ambient light passes through the objective lens.
Think of the first component, the photocathode, as a super-sensitive catcher’s mitt for light. Its only job is to catch incoming photons. When a photon smacks into this specially coated surface, it kicks loose an electron. In short, the photocathode turns light energy (photons) into electrical energy (electrons), which is the first crucial step before the real magic can happen.
Of course, just one electron isn’t enough to see anything. A one-to-one swap from a photon to an electron wouldn’t do us much good. The real power comes from the next stage, which is where the light multiplication truly begins.
Multiplying Light with the Microchannel Plate
Once an electron is set free from the photocathode, it’s immediately pulled toward the Microchannel Plate (MCP). The best way to picture an MCP is like a microscopic honeycomb—a wafer-thin slice of glass packed with millions of tiny, angled tubes. As our electron zips into one of these channels, it strikes the wall, which in turn knocks several more electrons loose.
This starts a cascade. Those new electrons accelerate down the tube, hitting the walls over and over, and each impact releases a torrent of additional electrons. This chain reaction turns a single electron into thousands, creating a massively amplified signal. It’s a remarkably effective way to multiply the original light signal without introducing a ton of noise or distortion.
The infographic below really helps visualize this flow, from just a few photons being captured to a fully amplified signal ready to be turned into a visible image.
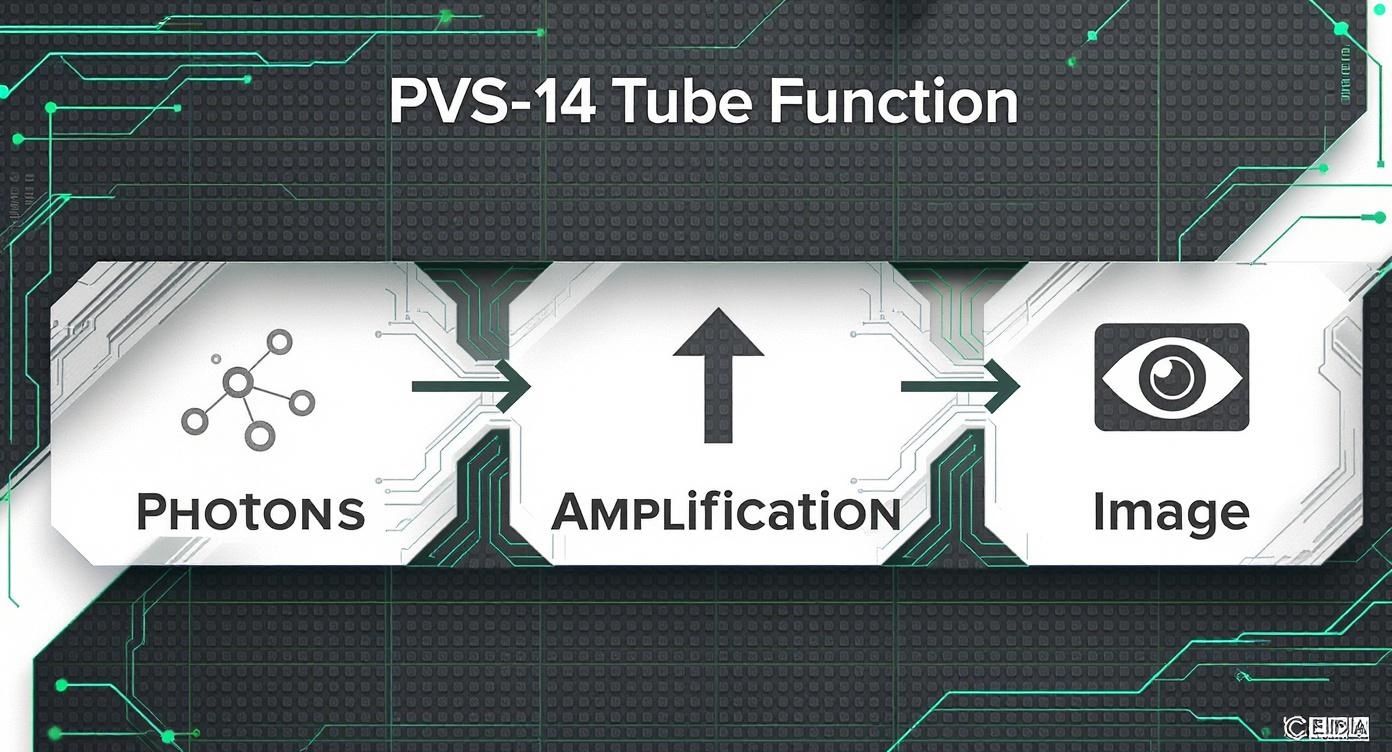
This breaks down the complex physics into something simple, showing how the tube turns a tiny trickle of photons into an absolute flood of electrons—the core principle of all night vision.
Creating the Final Image
Finally, this dense cloud of amplified electrons shoots out of the MCP, flies across a tiny gap, and slams into the phosphor screen. This screen works a lot like an old-school CRT television, as it’s coated with materials that light up when hit by electrons. When the thousands of electrons from the MCP hit this screen, they create a bright point of light.
Millions of these impacts happen at the same time all across the screen, perfectly recreating the original scene but now thousands of times brighter. That glowing green or white image you see on the phosphor screen is what you’re actually looking at through the eyepiece. Modern Generation III tubes, like those found in the AN/PVS-14, can amplify light by around 30,000 times. They achieve this incredible performance by using a gallium arsenide (GaAs) photocathode, which is extremely sensitive to the near-infrared light spectrum that’s so common on dark nights. For a deeper dive, you can check out the official military training documents on night observation theory.
Every single component—from the light-catching photocathode to the electron-multiplying MCP and the image-forming phosphor screen—has to work in perfect sync to give you a clear, bright view in what seems like total darkness.
Decoding the Spec Sheet: What the Numbers Really Mean

When you start shopping for a PVS-14 image intensifier tube, you’re going to get hit with a spec sheet. Let’s be honest, it can look like a foreign language at first—just a bunch of acronyms and numbers. But learning to read that sheet is the single most important skill for picking the right tube and making a smart buy.
Think of it less like a technical manual and more like a report card for your night vision. Every number tells you something about how that tube is going to perform when you’re out in the dark. Let’s break down the specs that matter most so you can read any data sheet like a pro.
The Critical Performance Specs
These are the numbers that directly translate into what you actually see through the eyepiece. They’re the meat and potatoes of any spec sheet.
- Signal-to-Noise Ratio (SNR): If you only learn one spec, make it this one. SNR is the measure of clean image (“signal”) versus the electronic static or “scintillation” you see (“noise”). A higher SNR gives you a much cleaner, less “grainy” image, which is a massive advantage in super low-light environments.
- Resolution (lp/mm): Measured in line pairs per millimeter, this is all about detail. It’s basically the “pixels” of your night vision. A higher resolution means you can pick out finer details, like the branches on a tree or the texture of a wall, from farther away. It’s the difference between standard-def and high-def.
- Equivalent Background Illumination (EBI): EBI tells you how much light the tube produces on its own, even in absolute, pitch-black darkness. You want this number to be as low as possible. A low EBI lets you see into the darkest shadows without the tube’s own faint glow washing out the scene.
- Halo: This number measures the size of the bright ring that shows up around concentrated light sources, like a car’s headlights or a porch light. A lower Halo value (think 0.7 versus 1.2) means that glowing ring is smaller and less distracting, which is a huge deal if you’re operating in an urban area.
PVS-14 Image Intensifier Tube Specifications Explained
To make it even clearer, here’s a quick-reference table that breaks down these key performance metrics. This will help you connect the numbers on the page to the performance you’ll get in the field.
| Specification | What It Measures | Impact on Performance |
|---|---|---|
| Signal-to-Noise Ratio (SNR) | The ratio of clean image (signal) to electronic static (noise). | Higher SNR = A clearer, less “grainy” image, especially in very dark conditions. |
| Resolution (lp/mm) | The tube’s ability to resolve fine details, measured in line pairs per millimeter. | Higher resolution = A sharper image, allowing you to identify smaller objects at a distance. |
| Equivalent Background Illumination (EBI) | The amount of light the tube generates internally in complete darkness. | Lower EBI = Better visibility in the darkest shadows without image washout. |
| Halo | The size of the bright ring that appears around concentrated light sources. | Lower Halo = Less bloom from lights, providing a clearer view in mixed-light environments. |
Understanding these individual components gives you a much more complete picture of a tube’s capabilities than just looking at one “master” stat.
Figure of Merit: The Overall Score
You’ll almost always see a spec called Figure of Merit (FOM). This is a quick-and-dirty way to get a general sense of a tube’s overall performance potential.
FOM is calculated by multiplying the tube’s Resolution (lp/mm) by its Signal-to-Noise Ratio (SNR). So, a tube with 72 lp/mm resolution and a 35 SNR would have a FOM of 2520.
While FOM is a handy benchmark, it’s not the whole story. You can easily have two tubes with the exact same FOM that provide very different visual experiences. For instance, a tube with a monster SNR and average resolution might be a superstar in the deep woods, while one with crazy high resolution but a lower SNR might be better suited for a different task.
It’s absolutely critical to look at the individual specs to understand a tube’s specific strengths and weaknesses. These numbers are also heavily influenced by the tube’s internal construction—whether it’s thin-filmed or unfilmed. To dive deeper into that, our comparison of thin-filmed and unfilmed image intensifier tubes is a great next read.
Ultimately, making the right choice means looking past a single number and understanding how each metric serves your specific needs. Once you can decode these key figures, you can pick a PVS-14 image intensifier tube that will perform exactly how you need it to.
Green vs. White Phosphor: The Evolution of PVS-14 Tubes
When you picture night vision, what comes to mind? For most people, it’s that classic, almost iconic green glow. We’ve all seen it in movies and video games for decades, and for a long time, that green hue was the undisputed king of night ops. But it wasn’t an aesthetic choice—there’s real science behind it.
The screen inside a PVS-14 image intensifier tube uses phosphor to create the image you see, and early tubes used a P43 green phosphor. The human eye happens to be most sensitive to the green part of the light spectrum, which means we can pick out more shades and details within that single color. This simple biological fact made green the practical, go-to standard for years, as it provided a solid combination of brightness and detail.
But as with all tech, things evolve. A new contender stepped into the ring and has quickly become the preferred choice for serious users: white phosphor.
The Rise of White Phosphor
Instead of a green glow, white phosphor tubes give you a crisp black-and-white image. Many users find this view much more natural and significantly easier on the eyes, especially if you’re spending hours behind the device. It’s like the difference between staring at an old-school green monochrome computer screen and looking at a sharp, well-defined black-and-white photo.
This shift delivers some major real-world advantages that go far beyond looks.
- Better Contrast and Detail: White phosphor often gives a perception of greater contrast. This makes it much easier to tell objects apart, spot figures lurking in the shadows, and see subtle textures that might otherwise get lost in a sea of green.
- Reduced Eye Strain: This is a big one. Operators consistently report feeling less eye fatigue after long nights using white phosphor. A grayscale image is just more intuitive for our brains to interpret, which cuts down on the mental workload.
- Superior in Mixed Lighting: In places with inconsistent light—think urban areas with random streetlights and deep shadows—white phosphor really shines. It tends to handle the bright spots with less “bloom” or washout, letting you see crucial details in the darker areas.
This move to white phosphor is just one part of the PVS-14’s long story of innovation. When the AN/PVS-14 first appeared in the late 1990s, it completely changed the game. It was built around the revolutionary MX-11769 Gen 3 tube and gave users manual gain control for the first time. Weighing in at only 10 to 12 ounces, its versatility as a handheld, head-mounted, or weapon-mounted unit cemented its legendary status.
The change from green to white phosphor is more than just a color swap. It’s a true performance upgrade that enhances target identification, improves user comfort, and provides a clearer picture in challenging environments.
So, Which One is Right for You?
At the end of the day, the choice between green and white phosphor often boils down to personal preference and, of course, budget. Green phosphor is still incredibly effective and is the more affordable entry point into quality night vision.
However, the benefits of white phosphor are hard to ignore. For anyone who demands the absolute best performance, the extra investment is almost always worth it. If you want to dive deeper, you can learn more about the specific advantages of white phosphor night vision right here.
How to Choose the Right PVS-14 Tube for Your Needs
Picking the perfect PVS-14 image intensifier tube can seem like a daunting task, but it really just comes down to answering three questions about how you’ll be using it. If you think through your primary use case, your budget, and what you expect in terms of performance, you can cut right through the noise and find the tube that’s made for you. This isn’t about chasing the “best” specs on paper; it’s about finding the best tube for your mission.
First thing’s first: define what you’ll be doing. Are you going to be navigating through deep, dark woods where the only light is from the stars? Or will you be in a suburban area with streetlights and porch lights scattered around? The answer completely changes which specs you should care about most.
Out in the middle of nowhere, a high Signal-to-Noise Ratio (SNR) and a low EBI are your absolute best friends. These specs work together to give you a clean, crisp image when there’s barely any light to work with. On the other hand, in a city or suburb, a low Halo value becomes way more important to keep the bloom from artificial lights from blinding you, while a sky-high SNR might be overkill.
Setting a Realistic Budget
Let’s be honest, night vision is a serious investment, and what you’re willing to spend is a huge part of the equation. You can find everything from commercially graded tubes to top-tier, military-spec units from manufacturers like Elbit and L3Harris. Generally, paying more gets you a cleaner tube with fewer cosmetic blems and better performance numbers, especially when it comes to FOM.
But you have to remember the law of diminishing returns. A tube with a FOM of 2800 is undeniably incredible, but one with a FOM of 2400 is still a phenomenal performer and could be significantly easier on your wallet. Don’t get so hung up on chasing a flawless spec sheet that you pass up a perfectly good tube that does everything you need it to.
Key Insight: A tiny blemish on the very edge of the screen might be a non-starter for some, but for many people, it’s a smart compromise that frees up budget for better performance. Focus on the specs that actually impact what you see, not just what looks perfect on a data sheet.
Understanding the Trade-Offs
Choosing a PVS-14 tube is all about balancing priorities. There’s no magic tube that’s the best at everything. You have to decide what’s most critical for how you’ll be using it.
Here’s a quick way to think about it:
- For Long-Range Identification: You’ll want to prioritize a high Resolution (lp/mm). This is what gives you that razor-sharp image needed to make out details from far away.
- For Extreme Low-Light Performance: Hunt for the highest SNR you can afford. This is what cuts through the “snow” or “static” and gives you a usable image on a moonless night.
- For Mixed-Lighting Environments: Look for a low Halo value. This keeps bright lights from washing out your entire view, which is essential for any kind of urban or suburban work.
At the end of the day, the tube is the heart of the system, but the housing that holds it is just as important. Once you’ve picked your intensifier, the next step is figuring out the rest of the package. You can learn more by checking out our quick guide for night vision users on PVS-14 housing to complete your setup. By matching your tube’s strengths to your specific environment, you make sure every dollar you spend is working toward your success.
Answering Your PVS-14 Tube Questions
Alright, let’s get into the questions that come up after you’ve waded through all the technical specs. These are the practical, real-world things people wonder about when they’re about to own a serious piece of equipment like a PVS-14 image intensifier tube. Knowing the answers to these will help you get the most out of your gear and make sure it lasts.
We’ll tackle the big ones: how long the tube actually lasts, what those little black spots are, and the all-important question about bright light.
How Long Does a PVS 14 Tube Last?
This is usually the first thing people ask, and for good reason. The good news is, a modern Gen 3 tube is built to last a very, very long time. We’re talking a rated lifespan of around 10,000+ operating hours.
Let’s put that number into perspective. If you ran your PVS-14 for three hours every single night of the year, it would still take you more than nine years to hit that 10,000-hour mark. For most of us who aren’t using it professionally every night, that tube will be with us for decades. Honestly, you’re far more likely to damage the unit by dropping it than you are to ever wear out the tube from just using it.
The Takeaway: The operational life of a PVS-14 tube is so incredibly long that it’s a non-issue for the vast majority of owners. Focus on taking care of it, not on the runtime.
What Is a Tube Blemish?
You’ll hear people talk about “blems,” which is just shorthand for tube blemishes. These are tiny black spots you might see when looking through the device, and they are a totally normal part of the manufacturing process. They don’t impact the tube’s performance or its lifespan one bit.
When you buy a tube, the spec sheet will tell you if there are any blems, how big they are, and where they’re located. Most of the time, they are minuscule specks pushed way out to the edge of your view (Zone 3), and you’ll never even notice them in actual use. While everyone dreams of a perfectly flawless tube, a unit with a few minor blems is completely normal and can often be a much better value.
Can Bright Light Damage My Tube?
Yes, absolutely. This is the one you really need to pay attention to. Exposing your image intensifier to a direct, bright light source can cause permanent damage. The tube is designed to scoop up and multiply tiny amounts of light, so hitting it with something like the sun, a car’s high beams, or a powerful weapon light at close range can overload the system and burn the photocathode.
Now, modern PVS-14s have a safety net called an Autogated Power Supply (ATG). This feature reacts almost instantly to sudden flashes of light, throttling the power to protect the tube. But you have to think of it as a safety feature, like airbags in a car—it’s there for emergencies, not for you to be reckless.
The best habit you can form is a simple one: keep the daylight cap on your lens whenever you’re not using it. Never point your NVD directly at a bright light. Following that one rule is the single most important thing you can do to protect your investment and make sure your PVS 14 image intensifier tube serves you well for years to come.
Ready to find the perfect night vision solution for your needs? The team at Superior Tactical LLC has over a decade of experience helping customers choose the right gear. Explore our curated selection of PVS-14s and tactical accessories today at https://superiortac.com.