A Practical Guide to the Picatinny Riser Mount
A Picatinny riser mount is a simple piece of kit that lifts your optic—like a red dot or a scope—to get it exactly where your eye needs it to be. Think of it as a custom-fit booster seat for your sight. Getting this small component right is one of the keys to building a rifle that feels natural and works effectively for you.
What Is a Picatinny Riser Mount and Why Use One?
Ever tried to shoulder a rifle and found yourself having to crane your neck down just to see through the scope? It's awkward, uncomfortable, and slows you down when seconds count. Over a long day at the range or in the field, that strain builds up. A Picatinny riser mount solves this problem directly.
By adding a little height, a riser brings the optic up to your natural line of sight when you shoulder the rifle. This lets you keep your head up, your posture solid, and your awareness of what's around you intact. The whole point is to make aiming feel intuitive, not like you're forcing your body into an unnatural position.
Achieving a Clear Sight Picture
Good ergonomics are huge, but one of the most common reasons people reach for a riser is to get a clear, unobstructed view. A classic example is the fixed front sight post on many AR-15s, which can get in the way and clutter the sight picture of a low-mounted red dot. A riser simply lifts the optic high enough to see right over it.
It also helps you make room for other essential gear on your top rail:
- Accessory Clearance: Need to mount an IR laser or a weapon light in front of your optic? A riser creates the space you need so your gear doesn't block your view.
- Backup Iron Sights: Risers are essential for "co-witnessing"—aligning your iron sights with your red dot to serve as a reliable backup if your optic goes down.
- Magnifier Compatibility: If you're running a magnifier behind a red dot, a riser ensures both are at the exact same height, so you can flip between magnified and unmagnified views without a hitch.
Sometimes you have to solve a simple problem, like your red dot being too low. Other times, you're trying to make multiple accessories play nicely together. To help you figure out if a riser is what you need, here’s a quick breakdown of the most common reasons shooters install one.
Common Reasons to Use a Picatinny Riser Mount
| Common Problem | How a Riser Mount Solves It | Ideal For |
|---|---|---|
| Uncomfortable Head Position | Lifts the optic to align with your natural line of sight, preventing neck strain. | All shooters, especially those with "heads-up" shooting stances or wearing bulky gear. |
| Obstructed View | Raises the optic high enough to see over a fixed front sight post or other accessories. | AR-15 users with A2-style front sights; shooters with lights/lasers mounted on the top rail. |
| Backup Sight Misalignment | Sets the red dot at the correct height for absolute or lower 1/3 co-witness with iron sights. | Anyone running backup iron sights (BUIS) as a fail-safe. |
| Night Vision Device Interference | Creates clearance for aiming with night vision goggles or passive aiming through the optic. | Tactical operators, law enforcement, and night hunters. |
| Magnifier Height Mismatch | Ensures a red dot and a magnifier mounted behind it are perfectly aligned on the same optical plane. | Shooters who need to switch between close-quarters and medium-range targets. |
As you can see, a riser is a problem-solver. It’s a simple, effective way to fix a whole host of common setup issues.
The Foundation of Modern Customization
The Picatinny rail system, officially known as MIL-STD-1913, truly changed the game by creating a universal mounting standard. It’s the bedrock of modern firearm customization, giving shooters the freedom to attach just about anything they can think of. The Picatinny riser mount is a vital part of this ecosystem, making sure all those different accessories can actually work together properly. If you want to dive deeper, you can learn more about the market dominance of Picatinny systems and their accessories.
A riser isn’t just about adding height; it’s about creating a harmonious system where your body, your rifle, and your optic work together seamlessly. Proper height leads to better posture, faster target acquisition, and greater comfort.
Choosing the Right Riser Height for Your Setup
Picking the right height for your picatinny riser mount isn’t about finding one “correct” answer. It’s about tailoring the gear to your body, your equipment, and how you shoot. Think of it like getting the driver's seat just right in your car—the whole point is to make the alignment between your eyes and your tools feel completely natural. The height you settle on will have a direct impact on your sight picture, posture, and speed.
Most of the time, this decision boils down to a few common standards, and each one has its own set of pros and cons. If you understand the why behind each height, you're well on your way to building a setup that feels right, whether you're just punching paper at the range or depending on it in the field.
Co-Witness Standards: Absolute vs. Lower 1/3
The original height standards for red dots were created with one thing in mind: using your iron sights as a backup. This concept, called co-witnessing, is your insurance policy. It makes sure your iron sights are still usable right through the optic's window if your dot ever goes down.
Absolute Co-witness: This setup puts the red dot and your iron sights on the exact same level. Look through your optic, and the dot will sit perfectly on top of your front sight post. It's a clean, perfectly aligned, redundant system.
Lower 1/3 Co-witness: This is a slightly taller setup. It raises the optic just enough to put your iron sights in the bottom third of the window. The big advantage here is a much less cluttered view. Your irons are out of the way of your red dot, but they're still right there if you dip your head just a little.
Honestly, the choice between them is all about personal preference. Absolute co-witness gives you that unified sight picture, while lower 1/3 opens up your field of view for focusing on the target.
The Modern "Heads-Up" Shooting Heights
Lately, taller mounts have become incredibly popular, especially in tactical shooting circles. These "heads-up" mounts throw the old co-witnessing rules out the window and instead prioritize a natural, upright shooting posture.
The real reason for these taller mounts is ergonomics, especially under pressure. A "heads-up" posture lets you acquire your sight faster, maintain better situational awareness, and switch between targets more quickly because you aren't craning your neck to find the dot.
Common heights you'll see are 1.93" and 2.26" over the rail. These taller mounts are a game-changer for anyone running gear like helmets, night vision, or big ear protection. They create the clearance you need so your equipment doesn't get in the way of a solid cheek weld. If you've ever found yourself struggling to see through your optic while kitted up, a taller picatinny riser is almost certainly your answer.
This decision tree gives you a good visual for how to think through the process.
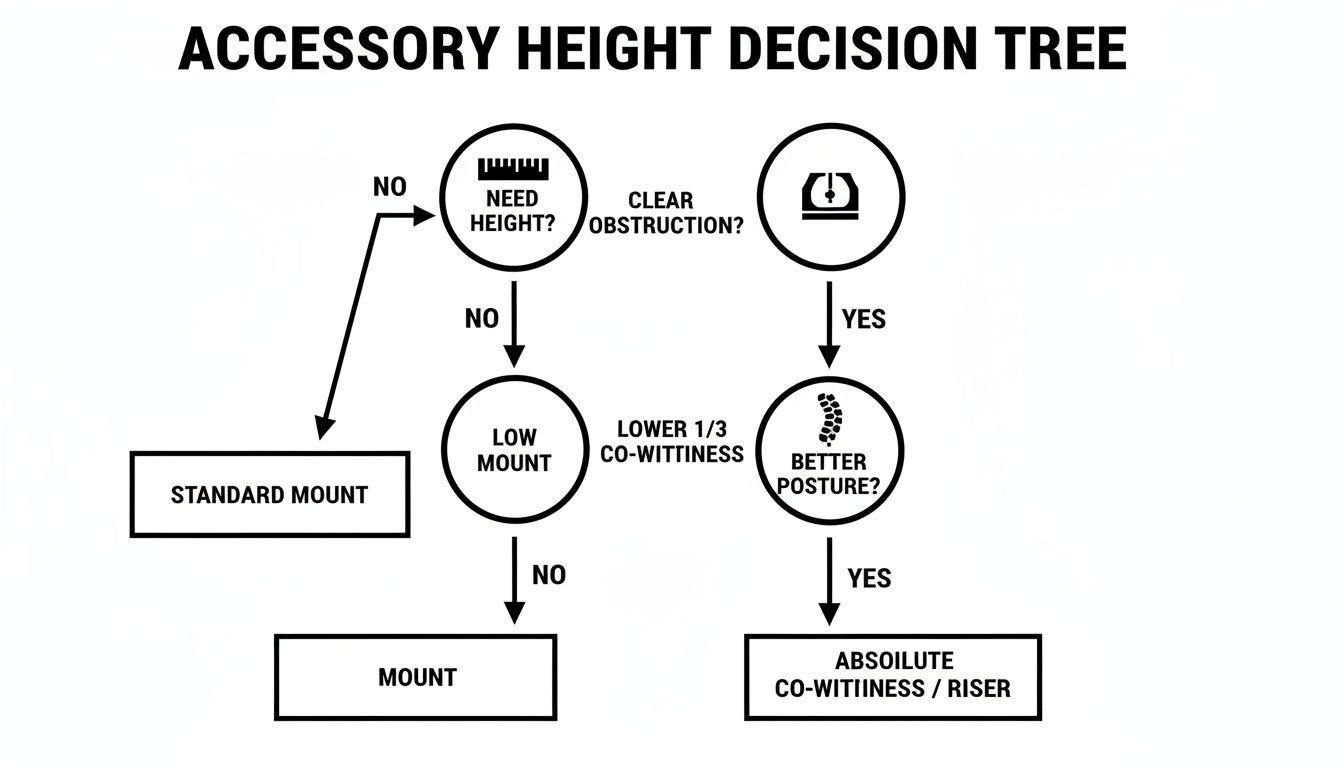
As you can see, the process often starts with a problem you need to solve—either clearing an obstacle like a front sight post or just getting into a more comfortable and effective shooting position.
Making the Final Choice
So, how do you decide what's right for you? It all starts with what you're using the rifle for.
If you want a bulletproof backup: For shooters who still value their iron sights and want a seamless transition, Absolute Co-witness is a rock-solid, time-tested option.
If you want a clearer sight picture: Maybe you like knowing your irons are there, but you don't want them cluttering your view. Lower 1/3 Co-witness gives you the best of both worlds.
If you prioritize speed and ergonomics: If a comfortable, heads-up posture for fast shooting is your goal, or if you run gear like helmets and NVGs, a 1.93" or taller mount is the new standard for a reason.
At the end of the day, the only way to know for sure is to get behind the gun and try a few different heights. But understanding these core concepts will give you a much better place to start. For a deeper dive into the numbers, check out our guide on how to measure scope height to get your calculations dialed in.
What Are These Risers Made Of?
At first glance, a Picatinny riser mount looks like a simple chunk of metal. But don't let its simple shape fool you. The material and how it's put together are everything when it comes to performance. Think of it like a bridge—the materials and the engineering determine if it’s going to stand up to the stress. This directly affects whether your optic will hold zero, shot after shot.
Most quality risers you'll find are machined from aircraft-grade aluminum. But not all aluminum is the same. The two big players you'll see are 6061-T6 and 7075-T6.
Picking the Right Aluminum
Consider 6061-T6 aluminum the dependable workhorse of the industry. It's strong, resists corrosion well, and is a bit easier to machine, which usually makes it more wallet-friendly. For most shooters out there—whether you're hunting, plinking at the range, or just general shooting—a well-made 6061-T6 riser will do the job perfectly.
Now, if you need something a bit more robust, you've got 7075-T6 aluminum. This is the high-performance stuff. It has a much higher tensile strength, which makes it tougher and better at shrugging off impacts and stress. That extra toughness comes with a higher price tag, but it's the go-to choice for law enforcement, military use, and anyone whose rifle sees hard duty where failure just isn't an option.
Solid vs. Skeletonized: Different Approaches to Design
It's not just about the metal; the physical design of the riser has a massive impact on its weight and rigidity. You'll typically find two main schools of thought here.
- Solid Mounts: These are built like a tank for maximum durability. They have thick walls and very few cutouts, creating an absolutely bombproof platform that won't flex under heavy recoil or rough handling.
- Skeletonized Mounts: This approach is all about saving weight. Designers strategically machine away material where it isn't needed, lightening the load without sacrificing strength in the most critical areas. It's a fantastic option for competition shooters or backcountry hunters where every single ounce counts.
At the end of the day, a riser’s only job is to provide a stable, rock-solid platform that doesn’t move. Both solid and skeletonized designs from a good manufacturer will lock onto your rail and hold zero. The choice really boils down to a trade-off: do you want absolute toughness or lightweight agility?
How It Clamps On: The Key to a Good Return-to-Zero
Finally, let's talk about how the riser actually attaches to your rail, because it's critically important. The two most common systems are traditional cross-bolts and quick-detach (QD) levers. Cross-bolts are simple, strong, and effective; you just use a tool to tighten them down to the correct torque spec for a rock-solid fit.
QD levers, on the other hand, let you pop your entire optic setup on and off without any tools. A high-quality QD system is precision-machined to achieve an excellent return-to-zero. That means your optic’s point of impact will be right where you left it, even after you’ve taken it off and put it back on. This is a game-changer for anyone who runs multiple optics or needs to break down their rifle for travel.
How to Properly Install and Torque Your Riser
Even the best Picatinny riser mount on the market is useless if it’s not installed correctly. A loose mount will absolutely kill your accuracy and lead to that frustrating experience of losing your zero. On the flip side, cranking down on it too hard can damage your rail or the riser itself.
Getting this right is pretty straightforward, and it’s the key to making sure your optic stays locked in place, shot after shot. Think of it like changing a tire—you need a clean surface, the lugs seated right, and everything tightened to a specific value. The same logic applies here.
Step 1: Prepare Your Equipment
Before you even think about mounting, start with a clean slate. Any oil, dirt, or leftover gunk on your rail or in the screw threads can prevent a solid lockup.
- Clean the Rail: Grab a clean, dry cloth and a bit of solvent like isopropyl alcohol. Wipe down the exact section of the rail where your riser will sit.
- Degrease the Threads: Do the same for the mounting screws and the threads on the riser’s clamp. This step is crucial for getting accurate torque readings and ensuring a pure metal-on-metal connection.
Step 2: Seat the Riser Correctly
This is probably the single most important step for preventing any shift under recoil. You need to make sure the recoil lugs on the mount are firmly engaged with the rail slots.
Push the riser forward in the Picatinny slot until it comes to a dead stop. This simple action seats the recoil lug flush against the front of the rail slot, which is what will fight the forces of recoil and keep it from shifting. While holding that slight forward pressure, start hand-tightening the cross-bolts or QD levers.
Pro Tip: Always, always push forward as you tighten. Recoil shoves the firearm backward, which means the optic and mount want to creep forward. By seating it forward from the get-go, you eliminate any room for it to move.
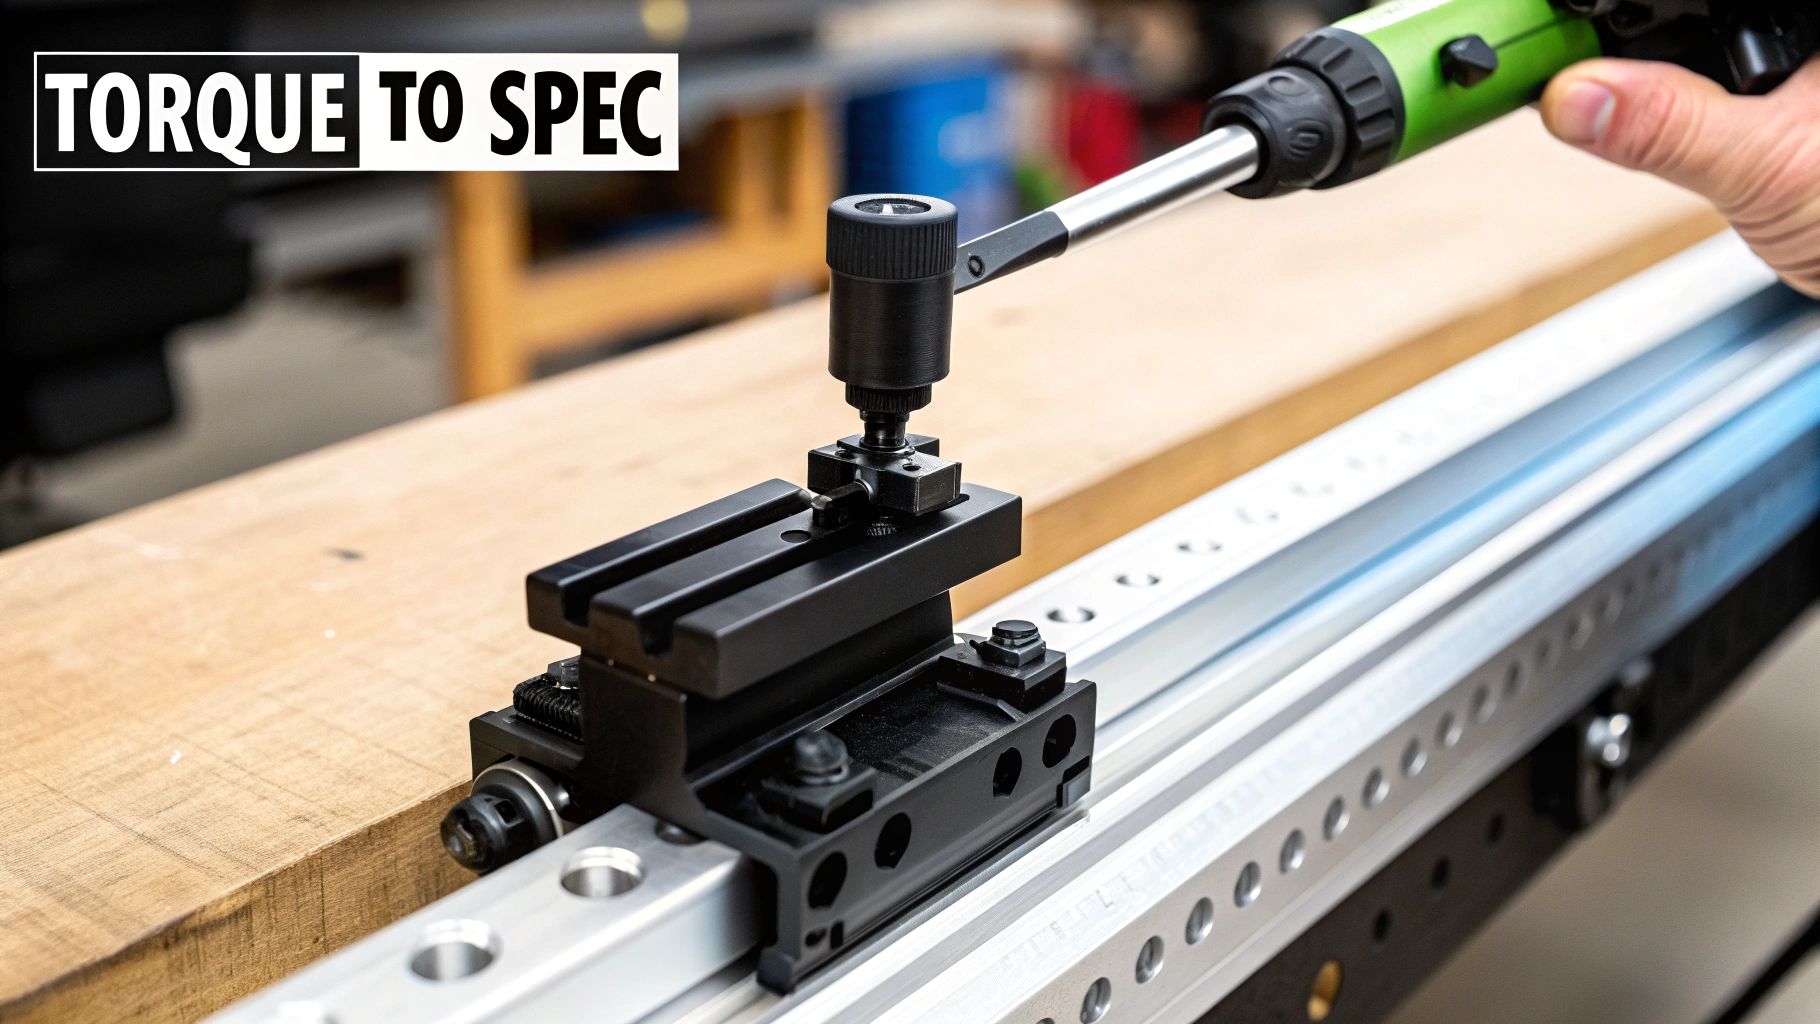
Step 3: Torque to Manufacturer Specs
Here’s where precision really comes into play. Using a dedicated torque driver is non-negotiable if you want a professional-grade, reliable installation. Trying to guess the right tightness by hand is a recipe for disaster.
Look up the manufacturer's recommendation for your specific riser—it’s usually measured in inch-pounds (in-lbs). Set your torque driver to that value. If you have multiple cross-bolts, tighten them in an alternating pattern until you hear or feel that distinct "click." This guarantees a perfectly consistent and secure clamp without stripping screws or damaging your gear.
If you're new to this, our guide to using a Picatinny rail with a scope offers more great tips for getting that perfect, rock-solid fit.
Advanced Applications for Night Vision and Tactical Use
When the sun goes down or a mission calls for a low-light edge, your gear setup has to change. This is where a Picatinny riser mount goes from being a simple ergonomic add-on to a mission-critical piece of kit. It’s the linchpin for getting advanced tools like night vision and thermal optics to play nice with your primary sighting system.
For tactical operators and serious shooters, a key technique is passive aiming. This means looking through your primary optic—usually a red dot—while wearing a helmet-mounted night vision goggle (NVG). Trying to pull this off with a standard-height optic is a nightmare. You’d have to crane your neck at an awkward, unstable angle and completely break your cheek weld just to see the dot. This is precisely where taller mounts prove their worth.
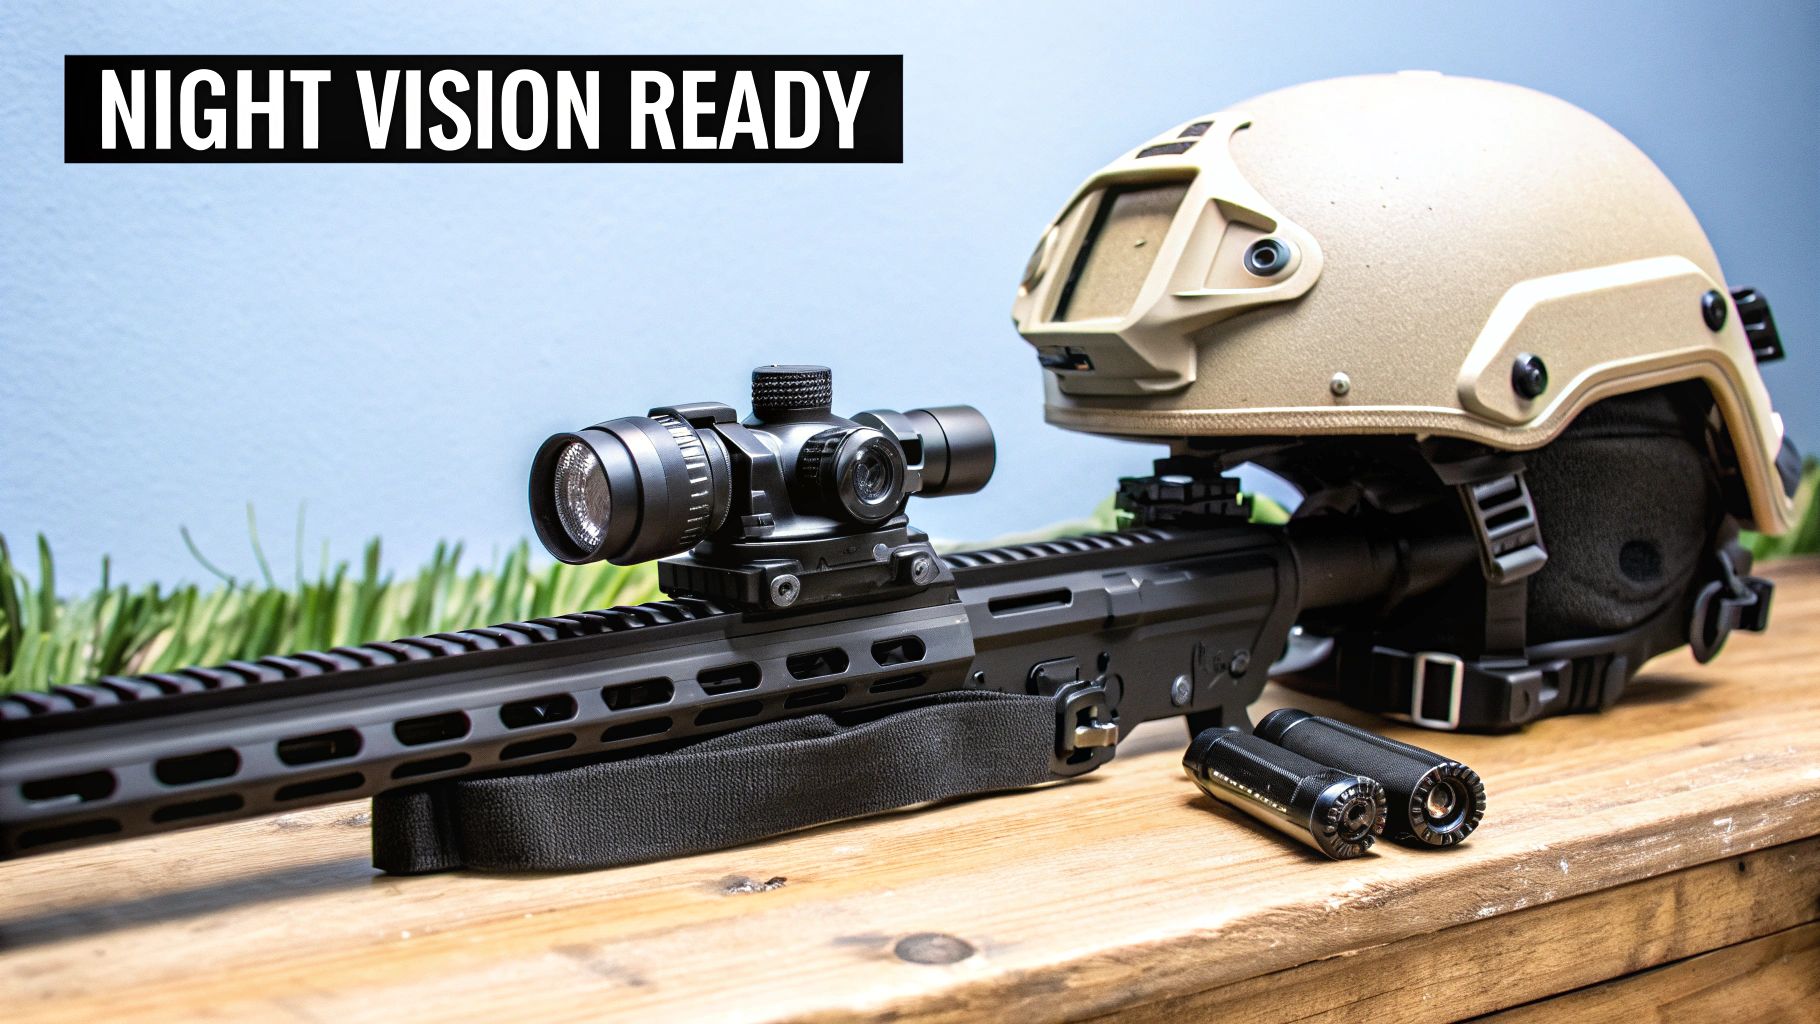
Making Passive Aiming a Reality with Taller Mounts
A riser boosts your red dot to heights like 1.93 inches or 2.26 inches, creating a big, clear window that lines up perfectly with your helmet-mounted NVG. This allows for a natural, comfortable "heads-up" shooting posture.
The advantages are immediate and obvious:
- Faster Target Acquisition: You can snap the rifle up and your dot is just there, no fumbling around required.
- Better Situational Awareness: Keeping your head up lets you scan your environment far more effectively.
- Less Fatigue: A natural posture reduces strain on your neck and back, which makes a huge difference over long nights.
When you're running night vision, a tall Picatinny riser isn't just a comfort item—it's what makes passive aiming a fast and effective technique under pressure. It forces the gear to work with your body, not the other way around.
Clearing Space for Lasers and Other Gear
Beyond just passive aiming, another huge tactical benefit is simply making room for other essential accessories. An infrared (IR) laser aiming module is standard-issue for night ops, and it usually sits on the top rail in front of your optic. Without a riser, the body of the laser can block a significant chunk of your sight picture.
A riser lifts your optic just high enough to see right over the laser, giving you a clean, unobstructed view. The same logic applies to magnifiers. A fully kitted-out rifle might have a red dot, a magnifier, and backup iron sights, all of which need to co-exist at the right heights. The riser is what makes this kind of vertical stacking work.
Picatinny riser mounts are the backbone of modern scope mounting, and they're the most common type for a good reason. The Picatinny system's rugged, standardized design has cemented its place, particularly in North America, which accounts for over 40% of the global market. For law enforcement officers, whose patrol rifles almost universally feature these rails, risers are essential for stacking night vision over red dots in high-stakes urban environments. You can see more in this analysis of the scope mounts market.
With the right setup, you can build a system that moves effortlessly between day and night operations. To get your helmet rig squared away, take a look at our guide on choosing the best night vision mount.
Answering Your Questions About Picatinny Riser Mounts
Even after you get the hang of how a Picatinny riser mount works, a few common questions always seem to pop up. Let's tackle the most frequent ones I hear, giving you some straight answers to help you nail down your setup and avoid any compatibility headaches.
Will a Picatinny Riser Mount Fit on My Weaver Rail?
The short answer is yes, a Picatinny accessory will usually fit on a Weaver-style rail, but it's not a perfect match. Think of it like a puzzle piece that fits, but has a little wiggle room.
The key difference is the size of the recoil slots. Picatinny slots are standardized and wider at 0.206 inches, while Weaver slots are narrower at 0.180 inches. A Picatinny riser's cross-bolt will drop into a Weaver slot, but you'll have a bit of extra space. To make it work, you have to push the riser's cross-bolt all the way forward in the slot before torquing it down. This prevents it from shifting under recoil.
For a truly bomb-proof, repeatable lockup, though, nothing beats matching a Picatinny riser with a genuine MIL-STD-1913 Picatinny rail.
What Does "Return-To-Zero" Really Mean for a Riser Mount?
Return-to-zero (RTZ) is a simple but critical test of a mount's quality. It’s the ability of the riser and your optic to hold its zero even after you take it off the rifle and put it back on in the exact same spot.
A mount with great RTZ means you can pull your optic off to clean your rifle, swap it for another, or pack it for travel, and then clamp it right back on without having to re-zero. It just works. This is the entire point of a good quick-detach (QD) lever system.
If the machining is sloppy or the clamp is weak, you’ll lose your zero every time. A solid RTZ is the signature of a well-made Picatinny riser mount and saves you a ton of time, ammo, and frustration.
Do I Actually Need a Riser for My Red Dot?
If you're running an AR-15 or a similar platform, the answer is almost always a resounding yes. If you mount a standard red dot directly to the rail, it sits way too low. You'll have to smash your cheek into the stock and crane your neck just to find the dot, which is slow and uncomfortable.
A riser mount solves two big problems:
- It’s more comfortable: It brings the optic up to your natural line of sight, allowing for a more heads-up shooting posture. This is faster and gives you better situational awareness.
- It gives you clearance: It lifts the red dot high enough to see over fixed front sights or other gear you might have mounted on the rail.
Whether you go with an Absolute Co-witness, Lower 1/3, or a taller 1.93" height really just comes down to personal preference and what other equipment you're running.
Can I Just Stack Two Risers to Get the Height I Need?
Technically you can, but you absolutely shouldn't. Stacking risers is a bad idea because every connection you add between your optic and your rifle is another potential point of failure.
This problem is often called "tolerance stacking." Each individual riser introduces a tiny bit of potential movement. When you put them together, that movement compounds under recoil, leading to an unstable setup that will absolutely not hold zero. If you need a lot of height, the right way to do it is to buy a single, solid riser built for that specific height. It creates a rigid, monolithic foundation for your optic that you can actually trust.
For a rock-solid foundation for your optics, from red dots to advanced night vision systems, explore the curated selection of mounts and risers at Superior Tactical LLC. Find the perfect height and material for your mission at https://superiortac.com.