A Guide to Night Vision Types for Tactical and Outdoor Use
When you boil it all down, the real difference between night vision technologies is how they see the world after the sun goes down. Some devices work by gathering and boosting the faintest traces of light, while others see the invisible world of heat. Getting a handle on this split is the first, most important step you can take toward picking the right gear.
Decoding the Different Night Vision Technologies
Before you even think about brands or models, you need to understand the three main camps of night vision tech. It's best to think of them as different tools for entirely different jobs. One is basically a light amplifier on steroids, another is like a super-sensitive digital camera, and the third lets you see heat signatures. Each one has its own strengths, whether you're trying to move through the woods, positively identify a target, or spot something hiding in the shadows.
This diagram shows how these technologies branch off from each other.
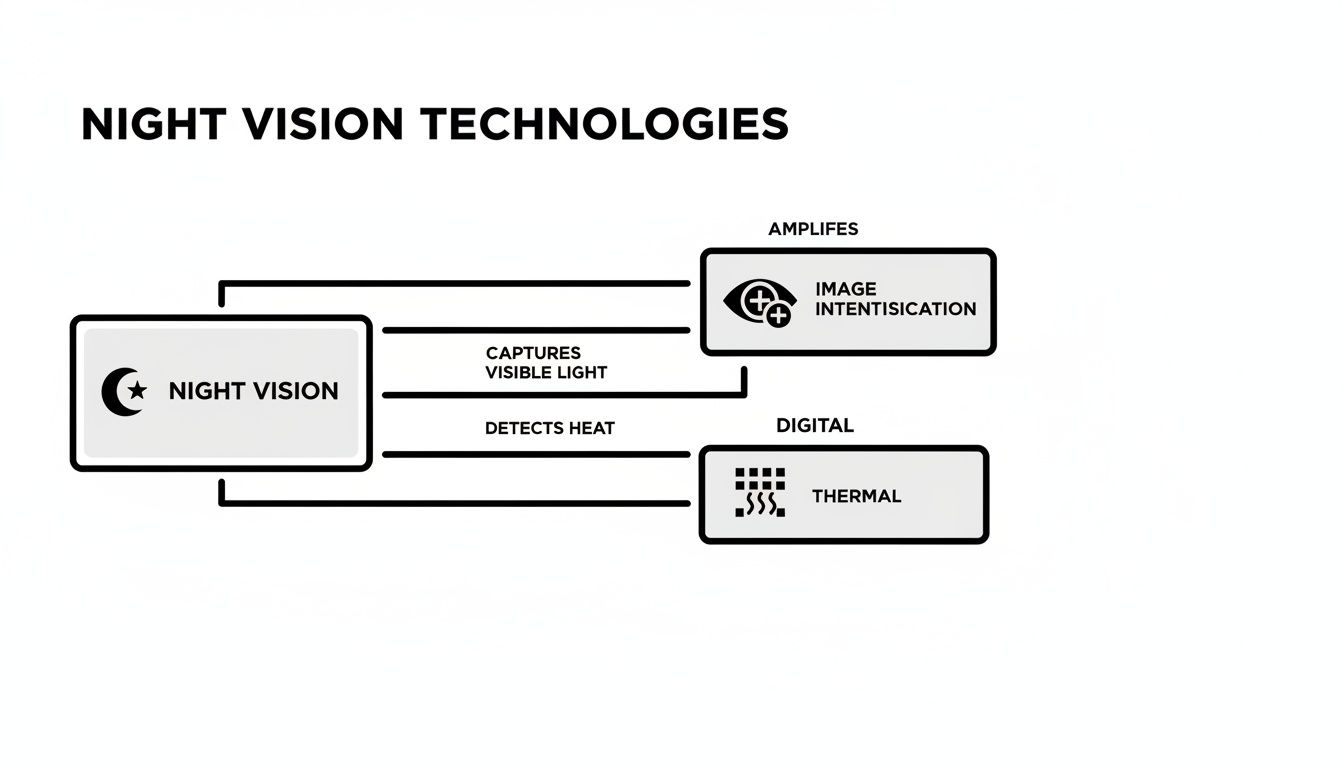
As you can see, Image Intensification and Digital work with light, while Thermal Imaging operates in a totally different spectrum, visualizing heat instead.
The Main Categories of Night Vision
Every night vision device on the market falls into one of these three buckets. Each one is built on a totally different scientific principle, and that directly affects how it performs, what it costs, and what it’s good for. For instance, a system that needs starlight to work is useless in a pitch-black basement, but a thermal imager will work just fine.
-
Image Intensification (I²): This is the classic "green screen" night vision you've seen in movies. It gathers minuscule amounts of ambient light—from the moon, stars, or even distant city glow—and multiplies it thousands of times to create a bright, visible image.
-
Digital Night Vision: Working a lot like the sensor in your digital camera, this technology captures light and converts it into a digital signal. That signal is then shown on a small screen inside the eyepiece. They're incredibly versatile and often come in at a friendlier price point.
-
Thermal Imaging: This one is the odd one out because it doesn't need any light to work. Instead, it detects infrared energy—heat—that all objects give off. It builds a picture based on tiny temperature differences, which is what makes it so amazing for spotting living things.
To help you get a quick sense of how these stack up, here’s a simple breakdown.
Night Vision Technology at a Glance
This table offers a quick comparison of the core technologies, so you can see at a glance which one might be the right fit for what you need to do.
| Technology Type | How It Works | Best For | Key Characteristic |
|---|---|---|---|
| Image Intensification (I²) | Amplifies tiny amounts of ambient light (starlight, moonlight). | Navigation, target identification, and situational awareness. | Provides a detailed, natural-looking image. Performance depends on available light. |
| Digital Night Vision | Uses a digital sensor (like a camera) to process light and display it on a screen. | Recording footage, casual observation, and short-range use. Often more affordable. | Can be used in daylight without damage and often includes recording features. |
| Thermal Imaging | Detects differences in heat (infrared radiation) and creates an image. | Detecting animals or people, seeing through smoke/fog, tracking. | Sees heat, not light. Unbeatable for detection, but doesn't show fine detail. |
This comparison really drives home the unique role each technology plays in the field.
The most critical takeaway is this: Image Intensification and Digital NVGs help you see better in the dark, while Thermal Imaging lets you see heat itself.
That single difference is what separates a tool used for identifying a threat from one that’s purely for spotting its presence. Getting this right from the start ensures you don’t spend a ton of money on gear that can't do the job you need it to do.
A Quick History of Seeing in the Dark
To really get a feel for the night vision gear on the market today, you have to understand where it came from. This technology didn't just pop up out of nowhere; it was a slow, deliberate crawl through different stages, or what we call Generations. Think of it like the jump from an old brick phone to the smartphone in your pocket—each generation was a massive leap forward.
This whole story started way back in the late 1920s, with the first real-world systems showing up in World War II. These early rigs, now known as Generation 0, were a world away from the slick, passive devices we use today. A quick look at the history of these early systems shows just how far we've come.
Generation 0: The Big, Clunky Dawn of Active IR
The very first night vision systems were crude, heavy, and absolutely devoured power. They worked on a principle called active infrared.
Imagine you’re in a pitch-black room and you’re trying to navigate with a special flashlight. The catch is, the light beam is totally invisible to the naked eye. That’s pretty much how Gen 0 worked. A huge infrared spotlight, usually bolted onto a tank or truck, would blast the area with IR light. The operator's scope would then pick up the reflections, making the scene visible.
- The Glaring Problem: That active IR illuminator was like a giant "shoot me" sign. Any enemy with a simple IR detector could spot the source instantly, turning the user into a glowing target.
- Performance: These early scopes, like the U.S. "Sniperscope," only boosted ambient light by about 1,000 times. Their effective range was pretty dismal, often capping out just past 100 yards.
Because they basically announced your position to the world, Gen 0 systems were a non-starter for most ground troops. It was a cool concept, but it desperately needed an upgrade.
The Real Game-Changer: The most critical evolution in night vision was the shift from "active" systems that needed an IR spotlight to "passive" systems that could work with whatever ambient light was available.
Generation 1: Finally Going Passive
The Vietnam War era brought us Generation 1, the first night vision that could operate passively. This changed everything. Gen 1 devices didn’t need a searchlight; they could scoop up the faint light from the moon and stars and amplify it enough to see.
Now, soldiers could finally see in the dark without giving away their position. But Gen 1 tech was far from perfect.
- The images were often blurry and distorted, especially around the edges. We call this geometric distortion, and it makes the view look a bit like you’re looking through a fishbowl.
- They were needy. You needed at least a bit of moonlight for them to work well, and a bright light like a muzzle flash would cause the tube to "bloom" out or even shut down completely.
- The light amplification was still pretty weak, topping out around 1,000x—the same as Gen 0, but at least you didn’t have the giant IR beacon attached.
Despite its flaws, Gen 1 laid the groundwork for every modern image intensifier tube that followed.
Generation 2: A Huge Leap in Clarity
By the 1970s, Generation 2 arrived and introduced a critical piece of hardware: the Micro-Channel Plate (MCP). The easiest way to think of an MCP is as a supercharger for the signal. It’s a tiny glass disc, riddled with millions of microscopic channels, that sits right behind the photocathode.
When electrons fly through these channels, they bounce off the walls, knocking loose thousands of other electrons in a cascading effect. This process jacked up the light amplification to around 20,000x. Suddenly, the image was brighter, sharper, and far less distorted, even on darker nights. Gen 2 is really the point where night vision became a reliable and effective tool for serious tactical work.
Generation 3: The Gold Standard
The 1980s gave us Generation 3, which is still the benchmark for professional-grade night vision today. The secret sauce was switching the photocathode material to gallium arsenide. This new material is incredibly good at converting light particles (photons) into electrical signals (electrons).
That single change boosted the efficiency so much that light amplification jumped to 50,000x or even higher. Gen 3 devices produce an incredibly crisp, clean image with almost no distortion. They work exceptionally well even on those overcast nights with no moon. There’s a reason Gen 3 is the backbone of military and law enforcement units across the globe—it just works, delivering rock-solid performance when you can't afford to fail.
Breaking Down Image Intensifier Generations
Image Intensification (I²) is what most people picture when they think of night vision—that classic technology that turns a sliver of starlight into a bright, usable image. Think of these devices as a massive amplifier for light, but just like audio equipment, not all amps are created equal. The performance gap between the different "Generations" is huge. It’s the difference between a fuzzy AM radio signal and a crystal-clear digital broadcast.
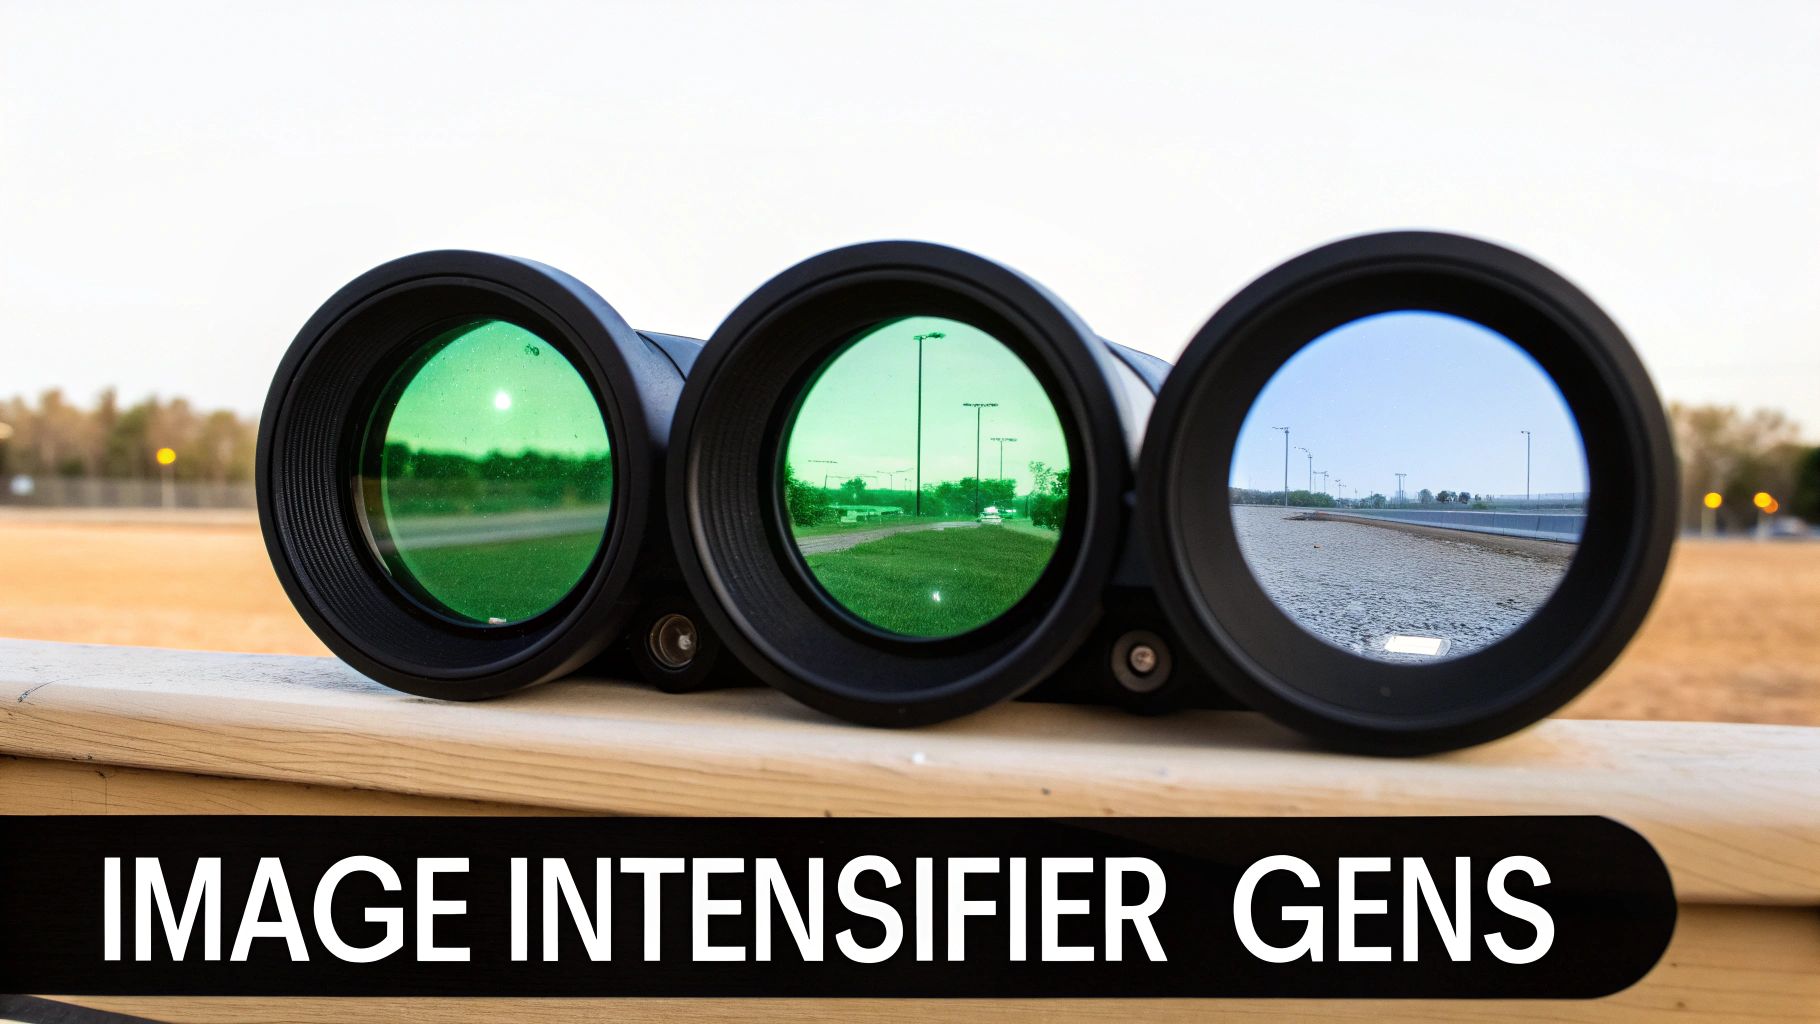
Getting a handle on these generational leaps is the first step to choosing the right gear. Each one brings a totally different level of performance, clarity, and reliability to the table.
Gen 1: The Entry Point
Generation 1 is the most basic and budget-friendly I² technology out there. It’s a fine starting point for backyard stargazing or casual observation, but it’s definitely not without its quirks. Gen 1 tubes give you a modest light boost, typically around 1,000x, and they really need a decent amount of ambient light (think a half-moon or more) to work well.
You'll quickly notice a couple of tell-tale signs with Gen 1 devices:
- Geometric Distortion: The image often looks a bit warped around the edges, almost like you’re looking through a fishbowl.
- Blooming: Point it at a streetlight, and you'll get a big halo effect that washes out everything around it.
It works, but for any serious tactical use or trying to navigate rough country, Gen 1 just doesn't have the clarity or dependability you need.
Gen 2: A Major Jump in Performance
Generation 2 was a game-changer, mainly because it introduced the Micro-Channel Plate (MCP). The best way to think of an MCP is as a supercharger for electrons. It's a tiny glass disc filled with millions of microscopic channels that multiply the electrons hitting it, cranking the light gain up to 20,000x or even more.
This leap forward means you get a much brighter, sharper, and cleaner picture with way less of that Gen 1 distortion. Gen 2 gear can function in much darker conditions, making it a solid choice for more demanding work like hog hunting or property security.
Gen 3: The Professional Standard
When you get to Generation 3, you're talking about the gold standard. This is the tech used by the military, law enforcement, and serious civilian operators for a reason. Its secret sauce is a gallium arsenide (GaAs) photocathode, which is incredibly good at converting light particles (photons) into electrons. This allows for insane light amplification, often over 50,000x, and produces a stunningly crisp image.
Gen 3 gear proved its worth back in the first Gulf War, where over 40,000 NVGs led to a 90% success rate in night fights. Today's tubes are also built to last, running for over 10,000 hours, and often feature autogating to protect the tube from sudden bright lights—a must-have for urban environments.
The Key Takeaway: Gen 3 isn't just a small step up; it's in a completely different league. It delivers the kind of clarity you need to positively identify a target, move safely over unknown ground, and maintain total situational awareness when it matters most.
Comparing Image Intensifier Generations
To help you match the right technology to your needs, here's a practical breakdown of how the three main generations stack up against each other in terms of performance, use cases, and what you can expect to pay.
| Feature | Gen 1 | Gen 2 | Gen 3 / 3+ |
|---|---|---|---|
| Light Gain | ~1,000x | ~20,000x | 50,000x+ |
| Resolution | Lower, with edge distortion | Good, with improved clarity | Excellent, sharp edge-to-edge |
| Image | Often noisy, prone to blooming | Clearer, less noise, much better low-light | Extremely clean, crisp, works in near-darkness |
| Lifespan | ~1,500 hours | ~5,000 hours | 10,000+ hours |
| Best For | Casual use, wildlife observation | Hunting, civilian security, general night use | Military, Law Enforcement, serious tactical use |
| Cost | $ (Most Affordable) | $$ (Mid-Range) | $$$ (Professional Grade) |
Ultimately, the table shows a clear progression. While Gen 1 gets you in the game, Gen 3 is what you need when performance is non-negotiable.
Understanding Performance Specs: FOM And SNR
When you start shopping for high-end night vision, especially Gen 3 units, you'll see a lot of talk about two key specs: Signal-to-Noise Ratio (SNR) and Figure of Merit (FOM).
- Signal-to-Noise Ratio (SNR): This is all about image quality. Think of tuning an old radio: the "signal" is the clear music you want to hear, and the "noise" is the annoying static. In night vision, a higher SNR means you get a cleaner, less "scintillating" or "sparkly" image. This is absolutely critical for picking out details in deep shadow.
- Figure of Merit (FOM): This is basically the unit's overall horsepower rating. It’s a simple calculation: resolution (in line pairs per millimeter, or lp/mm) multiplied by the SNR. A higher FOM number indicates a better all-around performer, with a superior combination of image clarity and the ability to see in the dark. For any professional-grade unit, you want to see a FOM of 1800+.
For a deeper dive into the fine details of tube tech, check out our guide on thin-filmed and unfilmed tubes.
Green Phosphor Versus White Phosphor
The last choice you'll make is about the color of the image. For decades, night vision meant that iconic green glow. But today, high-performance tubes are just as common in white phosphor.
The difference is more than just cosmetic. Looking through green phosphor for hours can feel a bit like staring at an old monochrome computer screen. White phosphor, on the other hand, produces a grayscale image that many people find far more natural and less fatiguing on the eyes. It also tends to provide better perceived contrast, making it easier to pick out shapes, shadows, and textures.
While it comes down to personal preference for some, white phosphor has quickly become the new standard for most tactical and professional users. The added comfort and clarity it provides during long nights are hard to beat.
Thermal Imaging Versus Digital Night Vision
While traditional night vision works by amplifying tiny amounts of existing light, two other technologies play in a completely different ballpark: thermal imaging and digital night vision. One sees the invisible world of heat, and the other acts like a super-sensitive digital camera.
It’s not just a technical difference—it fundamentally changes what you can see and do after dark. Getting this choice right boils down to one critical question: is your priority spotting a target or identifying what it is?
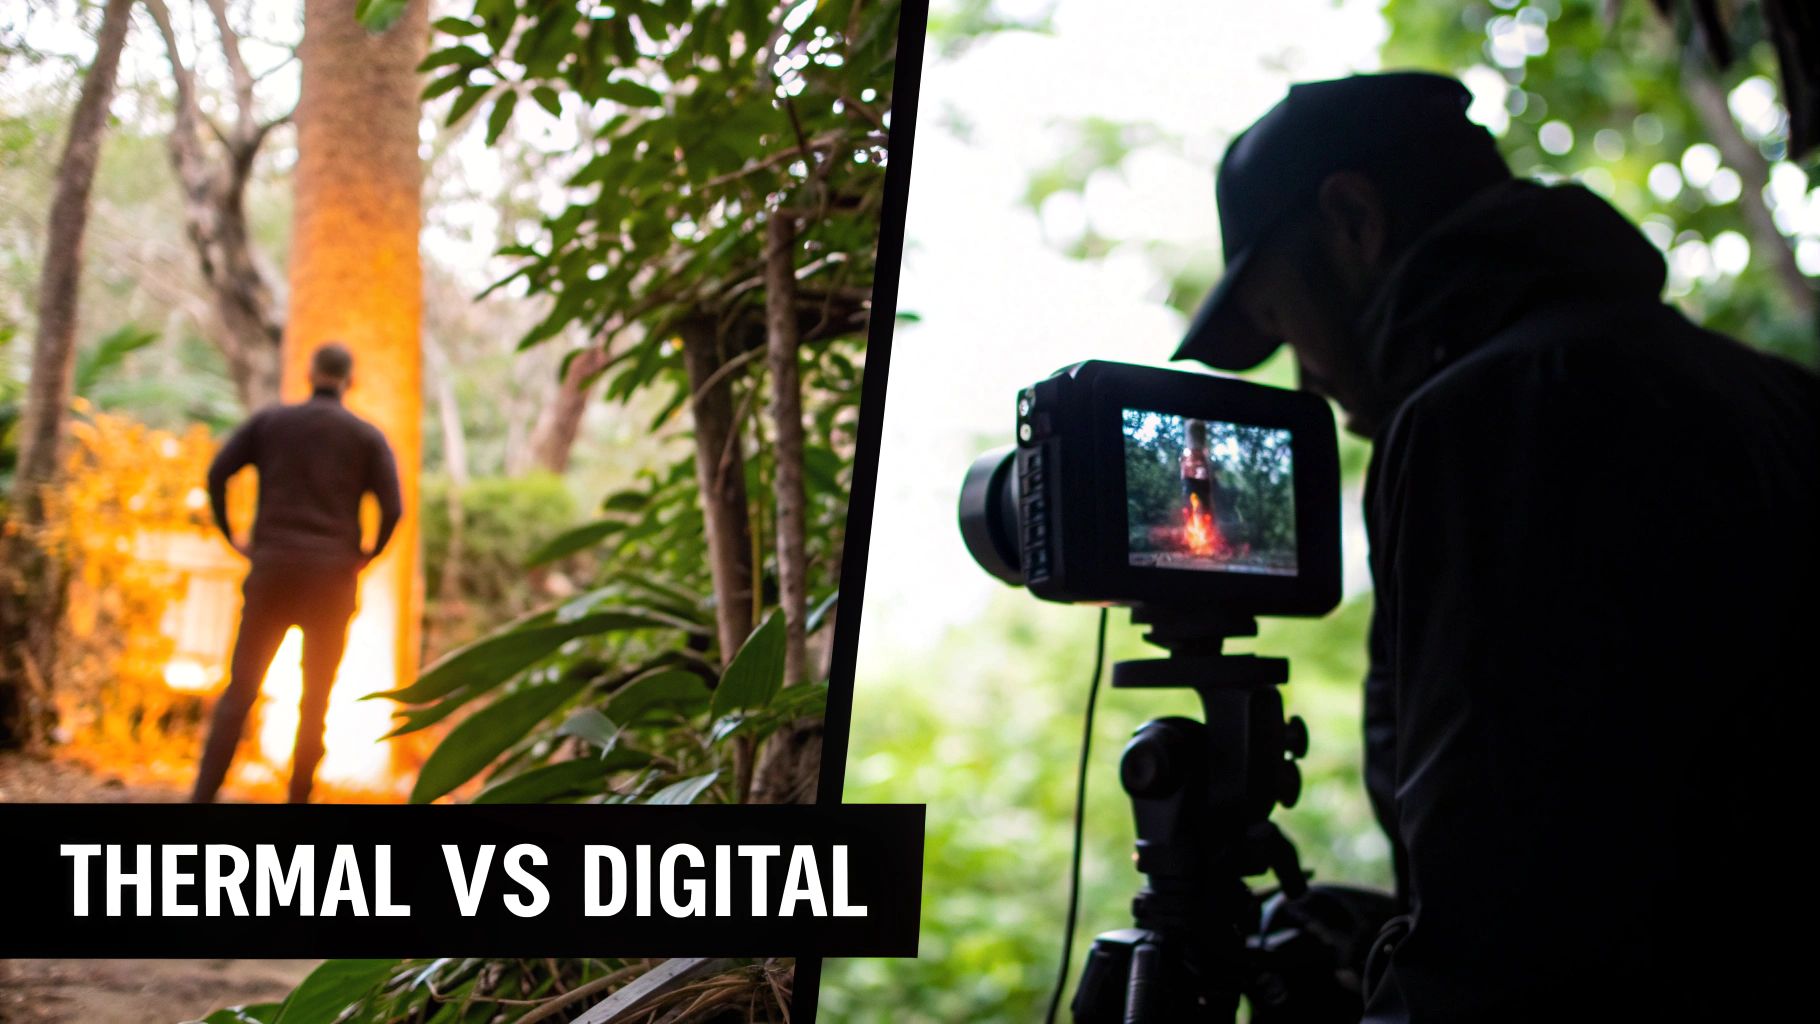
Thermal Imaging: Seeing Heat Signatures
Thermal imaging is a true game-changer because it doesn't need a single photon of light. Instead, it detects infrared radiation—the heat that every object gives off. A running engine, a wild hog, or a person all glow brightly in the thermal spectrum, even on the darkest, stormiest night.
Think of it like this: an image intensifier tube is like having superhuman hearing that can pick up the faintest whisper. But you still need a whisper to hear anything. Thermal is more like a sixth sense, detecting a target's heat whether it’s making a sound or not. This makes it an absolutely phenomenal tool for pure detection.
Key Takeaway: Thermal is the undisputed king of detection. It’ll pick out a warm body hiding in thick brush, shrouded in fog, or behind a cloud of smoke. The trade-off? You get far less detail, making it tough to identify exactly what you’re looking at.
Because the image is built from temperature differences, you can't read a sign or recognize a face. You'll see the distinct shape of a person, but not their features.
Digital Night Vision: Seeing with a Sensor
Digital night vision works a lot like your smartphone camera, just with a sensor that’s been purpose-built for extremely low-light situations. It gathers available light, converts it to a digital signal, and displays the enhanced image on a tiny screen inside the eyepiece.
This technology nicely fills the gap between affordable Gen 1 tubes and the high-end Gen 3 gear, offering a few unique perks that make it a compelling choice for many people.
One of its biggest advantages is toughness. Unlike an analog image intensifier, a digital sensor cannot be damaged by bright light. That means you can flip it on during the day without worrying about burning out an expensive tube—a flexibility that traditional night vision just doesn't have.
Comparing Thermal and Digital Strengths
The best way to figure out which one you need is to put them head-to-head. Each technology really shines in different situations.
Thermal Imaging Is Best For:
- Pure Detection: Nothing beats thermal for spotting a heat signature. It's perfect for hunters scanning a field for game or for a search-and-rescue team looking for a person.
- Seeing Through Obscurants: It cuts right through smoke, fog, dust, and even heavy foliage that would completely blind other types of night vision.
- Operating in Zero Light: Because it sees heat, it works just as well in a pitch-black cave as it does in an open field. No ambient light needed.
Digital Night Vision Is Best For:
- Affordability and Versatility: Digital units are generally much easier on the wallet than high-end analog or thermal systems.
- Recording and Sharing: Most digital devices have built-in recording, letting you capture photos and videos of whatever you're seeing.
- Day and Night Use: With no risk of damage from daylight, it’s a versatile tool you can use anytime, anywhere.
Digital isn't without its own set of compromises, though. The image can sometimes have a slight lag or a lower frame rate, which might feel a little choppy if you’re moving quickly. And when it gets really dark, a digital sensor usually can't match the raw light-gathering power of a top-tier Gen 3 tube.
In the end, it all comes back to your mission. If you need to spot a coyote across a field in total darkness, thermal is your answer. But if you need to identify a potential threat, navigate tricky terrain, and maybe record the event without breaking the bank, digital night vision is a very strong contender. For a deeper dive, check out our detailed breakdown of thermal imaging vs. night vision for more insights.
Choosing Your Device: Monocular, Goggle, or Binocular
Once you've wrapped your head around the technology inside—whether that's a Gen 3 tube or a thermal core—you need to tackle the next big question: how are you going to wear and use this thing? The physical shape of the device, its form factor, is just as critical as the tech that powers it. We mainly break these down into monoculars, goggles, and binoculars, and each one is built for a different way of operating in the dark.
Think of it like picking a tool from a toolbox. A framing hammer and a sledgehammer both drive in big nails, but you wouldn't use one where you need the other. The right night vision housing all comes down to what you'll be doing with it—navigating on foot, driving a vehicle, or aiming a rifle.
The Monocular: The Versatile Workhorse
A night vision monocular, like the legendary PVS-14, is a single-tube unit that feeds an image to one of your eyes. This design is probably the most flexible and popular form factor out there, a favorite of everyone from law enforcement to serious civilian users.
Its biggest advantage is leaving your other eye free, letting it stay adapted to the ambient darkness. That "unaided" eye is crucial for maintaining your immediate situational awareness. It makes judging close-range distances or glancing at a map feel much more natural, without having to flip your NVG up and out of the way.
- Pros: Lightweight and extremely versatile. You can mount it on your head, on a weapon, or just use it as a handheld scanner. It also preserves your natural night vision in one eye and is much friendlier on the wallet than a dual-tube setup.
- Cons: The big trade-off is the lack of true depth perception. This can make moving over tricky ground or driving a vehicle a real challenge.
Imagine a police officer clearing a building. A monocular gives them the flexibility to scan a dark room one second and then quickly interact with their equipment the next. If you want to dive deeper into the trade-offs, check out our guide on night vision monoculars versus binoculars.
Dual-Tube Goggles and Binoculars: The Immersion Kings
When you step up to a dual-tube system—often called night vision goggles (NVGs) or binoculars—you get two separate image intensifier tubes feeding an image to each eye. This design gives you one massive, game-changing advantage over a monocular: true stereoscopic vision and real depth perception.
Having depth perception completely changes how you move at night. Your brain can process distances and navigate around obstacles in a way that feels completely natural and safe. This is absolutely critical if you're driving or moving fast over uneven terrain. The immersive view you get is less like looking through a tube and more like your own eyes can simply see in the dark.
People often describe using dual-tube goggles as "lifting a curtain" on the dark world. That improved depth perception dramatically cuts down on mental strain and gives you a huge boost in confidence when you're on the move.
Of course, all that incredible capability comes at a cost. Dual-tube systems are heavier, bulkier, and represent a much bigger financial jump from a single monocular. These are specialized tools for people who need top-tier mobility and immersion above everything else.
Dedicated and Clip-On Weapon Sights
The last category is all about one thing: shooting. These devices aren't designed for walking around; they're built for putting rounds on a target.
- Dedicated Weapon Sights: These are standalone scopes, either image-intensified or thermal, that completely replace your daytime optic. They're optimized from the ground up for aiming, usually with built-in reticles and beefy housings that can take a beating from recoil. A hog hunter sitting in a blind waiting for a sounder to appear is the perfect user for a dedicated thermal scope.
- Clip-On Systems: A clip-on is a brilliant piece of gear that mounts in front of your existing day scope. This gives you incredible flexibility, letting you add night vision to your rifle without losing the zero on your favorite optic. It's the perfect solution for someone who loves their daytime setup and just wants to add night-time capability to it.
At the end of the day, picking the right form factor boils down to your primary mission. Need a flexible, do-it-all tool for observation and general movement? A monocular is a fantastic choice. Is your job all about high-speed mobility and knowing exactly what’s around you? Dual-tube goggles are the way to go. And if your goal is to shoot in the dark, a dedicated or clip-on sight is the only real answer.
Matching the Right Gear to Your Mission
Now that we’ve covered the tech and the hardware, let's put it all together. The "best" night vision isn't about the highest price tag; it's about picking the right tool for the job you need to do. To make sense of it all, we'll look at a few common scenarios and the gear that makes the most sense.
For The Hog Hunter
Hog hunting presents a very specific problem: you need to find animals that are experts at staying hidden, often across huge, dark fields or in thick woods. The name of the game is detection, pure and simple.
This is exactly where thermal imaging shines. A hunter who can see a hog's body heat glowing against the cool ground has an almost unfair advantage.
- Technology Recommendation: Thermal is the only way to go. It punches right through camouflage, brush, and fog, making it impossible for a warm-blooded animal to blend in. The world turns into a high-contrast map of heat, and your target sticks out like a sore thumb.
- Form Factor Recommendation: A dedicated thermal weapon sight is the gold standard. These are built to handle recoil and come with a reticle right in the optic, so you can go from spotting to aiming in one fluid motion. No extra gear, no fuss.
For The Law Enforcement Officer
Law enforcement missions are a different beast entirely. An officer is working in cities and suburbs, needing to navigate complex environments, see what people are doing, and maintain complete situational awareness. Detection is one thing, but positive identification is everything.
You simply can't afford to get it wrong, which is why traditional image intensification (I²) is the professional choice.
When your job depends on identifying what someone is holding in their hands, a blurry thermal blob just won't cut it. The crisp detail from a high-quality I² tube is essential for safety and legal accountability.
- Technology Recommendation: The standard here is Gen 3 White Phosphor. The clarity is incredible, offering the high resolution and low-light performance needed to see facial features, read street signs, or spot a weapon. Plus, the white image is much easier on the eyes during a long shift.
- Form Factor Recommendation: A helmet-mounted PVS-14 monocular is the top pick for its sheer versatility. An officer can scan with it, keep one eye free to see naturally, and flip it up and out of the way in a second to talk to someone. It’s the perfect blend of capability and practicality.
For The Preparedness Enthusiast
Someone focused on preparedness needs a solid, all-around tool. Think navigating a blackout, checking on your property, or just having a reliable way to see in the dark. You're looking for a jack-of-all-trades that is durable and effective without being pigeonholed into a single use.
The priority here is a system that excels at navigation and general observation.
- Technology Recommendation: A good Gen 2+ or an affordable Gen 3 unit hits the sweet spot between performance and price. You get the clarity you need to move safely and spot potential problems, all without breaking the bank on the latest and greatest military-grade tube.
- Form Factor Recommendation: Just like for law enforcement, a helmet-mounted monocular is the smartest choice. It's the ultimate multi-tool: use it in your hand to scan, pop it on a helmet for hands-free movement, or even rig it up behind a red dot sight on a rifle. Its do-it-all nature makes it the cornerstone of any good preparedness kit.
Common Questions We Hear About Night Vision
Even with all the tech specs laid out, it's totally normal to have a few questions rattling around. Let's tackle some of the most common ones we get from folks who are getting ready to buy their first, or even their fifth, night vision device.
What's the Deal with "FOM" on a Spec Sheet?
Think of FOM, which stands for Figure of Merit, as the overall horsepower rating for a night vision tube. It’s a simple but powerful number.
You get it by multiplying the tube's resolution (lp/mm) by its signal-to-noise ratio (SNR). A higher FOM means a better-performing tube, which translates directly into a cleaner, sharper picture, especially when the lights are really out. For any serious use, you want the highest FOM you can get.
Can I Use My Night Vision During the Day?
This is a big one. For traditional image intensifier (I²) tubes—that's Gen 1, 2, or 3—the answer is a hard no. Exposing them to daylight can cook the tube, causing permanent damage and instantly voiding your warranty. Modern Gen 3 tubes often have autogating to protect them from sudden flashes of light, but they are absolutely not meant for a sunny afternoon.
The only real exception here is Digital Night Vision. Since it works like a specialized camera, you can often use it in the daylight without hurting it, though it's still built for the dark.
Here’s a simple rule to live by with I² gear: if you can see just fine without it, keep the lens cap on. Protect your investment and only run it in the dark.
Is White Phosphor Really Better Than Green?
This is less about "better" and more about preference and performance. For decades, the iconic green glow was all we knew. But today, most experienced users will tell you that white phosphor is the way to go.
Many people find the black-and-white image feels more natural and provides better contrast, which can make it easier to spot details and textures in the dark. It also tends to cause less eye strain over long periods of use. While personal preference is still a factor, white phosphor has become the go-to standard for most high-end tactical and law enforcement units for a reason.
At Superior Tactical LLC, we provide the highest quality night vision and thermal optics to keep you mission-ready. Explore our curated selection of professional-grade gear backed by a 10-year warranty at https://superiortac.com.