A Guide to Night Vision Generations
When you hear people talk about “night vision generations,” they’re referring to the major technological milestones in how these devices have developed over the years. Each generation—from the early Gen 1 to the highly advanced Gen 3—marks a massive jump in performance, bringing better clarity, more powerful light amplification, and greater reliability. Simply put, a higher generation number almost always means you’re getting a more capable piece of gear.
What Are Night Vision Generations
A great way to think about this is to compare it to how smartphone cameras have evolved. Remember those first camera phones? They took grainy, pixelated photos in low light that were barely usable. Fast forward to today, and your phone can capture stunningly crisp images even in a dimly lit room. Night vision technology has made the same kind of progress, with each “generation” representing a fundamental upgrade to the core technology that turns a pitch-black scene into a clear, visible image.
Getting a handle on these differences is the single most important part of choosing the right night vision device. The gap between night vision generations isn’t just a small spec bump; we’re talking about entirely different levels of capability that affect everything from how sharp the image is to how well the unit works on a cloudy, moonless night.
From Grainy Images to Crystal-Clear Views
Looking back at the history of night vision, you see a relentless drive for more light gain and better image quality. The earliest devices were game-changers but had some serious drawbacks. Modern systems, on the other hand, offer performance that was once reserved for top-tier military operators. If you’re curious about the whole story, you can dive into our article covering the evolution of night vision technology from its earliest days.
This infographic gives a quick visual summary of the major leaps from one generation to the next.
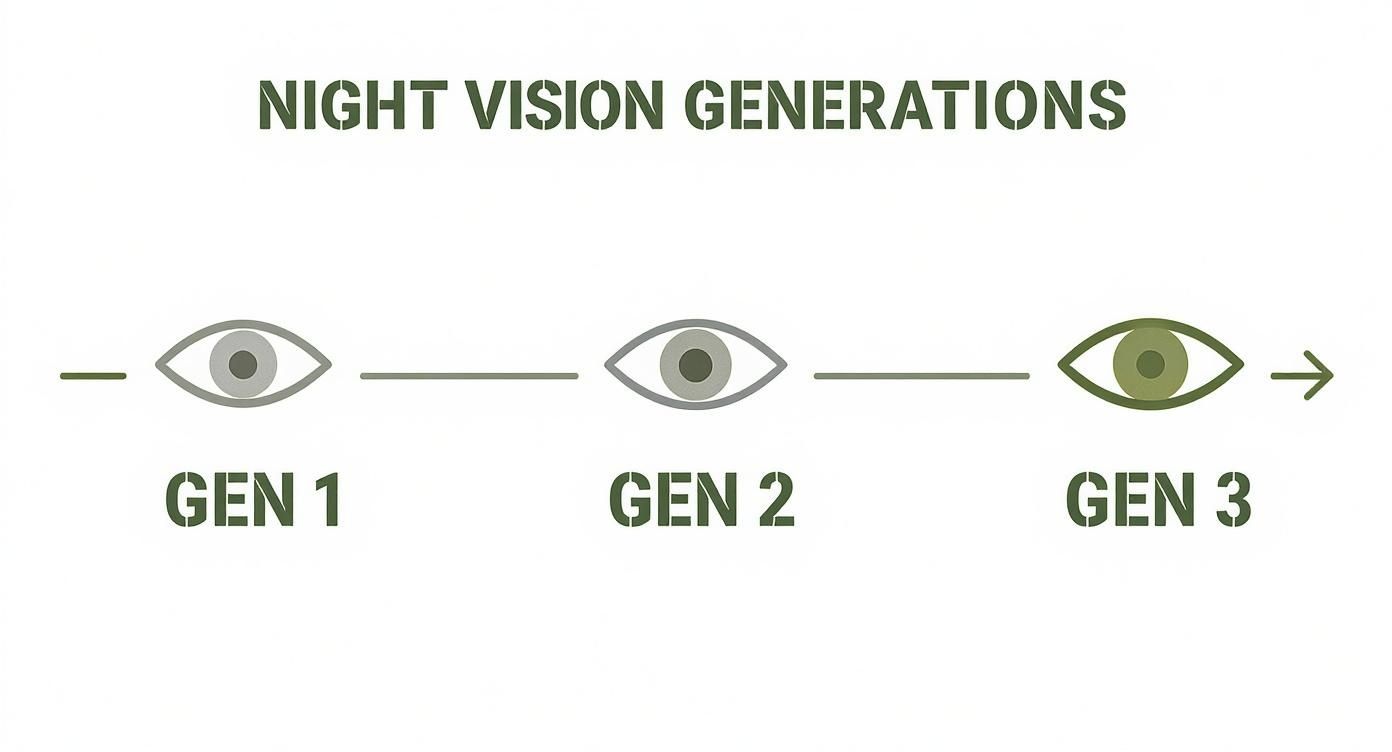
As you can see, the jump from Gen 1 to Gen 3 wasn’t a slow crawl—it was a steep climb in capability, all thanks to some key technological breakthroughs along the way.
Ultimately, the generation label is your starting point for figuring out what a device can do. It tells you about the tech inside and sets a baseline for what to expect when you’re out in the dark. The main factors separating these eras of technology are:
- Light Gain: How much the device can amplify available light. This is what makes the image bright.
- Image Resolution: The sharpness and clarity of the image, which lets you see fine details.
- Tube Longevity: The expected lifespan of the image intensifier tube. This can range from just 1,500 hours in a Gen 1 unit to over 10,000 hours in a modern Gen 3.
- Performance in Low Light: How well a unit functions when there’s almost no light to work with, like on an overcast night with no moon.
At the end of the day, a higher generation gets you a cleaner, brighter picture with less distortion and much better reliability, especially when light is scarce. This is the fundamental difference that dictates both performance and price in the night vision world.
Night Vision Generations At a Glance
To make things easier, here’s a quick-reference table that breaks down the key features and common uses for each generation. It’s a great way to see at a glance how the technology has progressed.
| Generation | Key Technology | Typical Light Gain | Common Application |
|---|---|---|---|
| Gen 1 | Basic photocathode, no Micro-Channel Plate (MCP) | ~1,000x | Hobbyist use, wildlife observation, budget-friendly entry-level devices. |
| Gen 2 | Addition of a Micro-Channel Plate (MCP) | ~20,000x | Law enforcement, serious hunting, professional security, mid-tier tactical use. |
| Gen 3 | Gallium Arsenide (GaAs) photocathode and an ion barrier | ~50,000x+ | Military operations, federal law enforcement, advanced tactical applications. |
| Gen 3+ | Filmless or thin-filmed tubes, autogating | ~80,000x+ | Elite special forces, high-end civilian use where top performance is required. |
This table really highlights the massive leaps in performance. As you move up the generations, the ability to amplify light skyrockets, opening up new possibilities for what you can do in the dark.
To really wrap your head around modern night vision, you have to go back to the beginning. We’re talking about the earliest, clunkiest attempts at seeing in the dark, the kind of tech that laid the groundwork for everything that came after. The story starts with what we now call Generation 0.
Think of Gen 0 as trying to see in a pitch-black room by bringing your own invisible flashlight. These were active systems, meaning they needed a big, powerful infrared (IR) illuminator to blast an area with light that only the scope could pick up. It worked, sure, especially when there was absolutely zero ambient light.
But there was a massive tactical flaw. That powerful IR beam was a dead giveaway. To anyone else with night vision, you might as well have been waving a giant spotlight around. You could see, but you were also screaming your exact location to the enemy.
The First Passive Systems Enter the Scene
The glaring problem with Gen 0 led straight to the development of Generation 1. This was the first real passive night vision. Instead of throwing out its own light, Gen 1 gear was built to gather and amplify whatever tiny bit of light was already there—from the moon, the stars, anything. This was a game-changer, finally letting operators see without advertising their position.
The whole concept of night vision really got going during World War II, with both German and American forces tinkering with Gen 0. But it wasn’t until the 1960s that the first passive Gen 1 devices showed up, and they saw a ton of use in the Vietnam War. These units could boost available light by about 1,000 times, though they really needed a decent amount of moonlight to perform well. You can get the full rundown on the history of night vision development and its military roots.
This new passive capability made Gen 1 a hit for years, not just with the military but with civilians too. It was relatively affordable and gave people a true advantage in the dark, bringing night vision to the masses for the first time.
Gen 1 was the critical shift from “active” IR illumination to “passive” light amplification. That single change made stealthy observation possible and set the stage for every generation of night vision to come.
Understanding Gen 1 Limitations
For all its improvements, Gen 1 technology had some serious quirks. If you’ve ever looked through a Gen 1 device, you know exactly what I’m talking about. These issues are baked right into the design of the image intensifier tube.
Here’s what you’ll notice right away with a Gen 1 unit:
- Geometric Distortion: The image looks warped around the edges, kind of like a fisheye lens. This makes it tough to judge distances or make out shapes on the periphery.
- Audible Whining: Most Gen 1 tubes let off a high-pitched whine when they’re on. That’s the sound of the power supply working hard to energize the tube.
- Blooming and Halos: Point it at a streetlight or a car’s headlights, and the bright light creates a big, washed-out halo that can temporarily blind you to everything else in the image.
- Low Light Performance: Gen 1 units are thirsty for light. On a really dark, overcast night with no moon, they struggle. You often have to switch on an IR illuminator to get a clear picture, which brings you right back to the active-system problem of Gen 0.
Even with its flaws, Gen 1 proved the concept. It showed that seeing in the dark without a giant “shoot here” light was possible. It set the baseline, and a much-needed one, for the next big leap in performance that would tackle these exact problems head-on.
The Game Changer: Understanding Gen 2 Technology
If Gen 1 was the proof of concept, then Generation 2 was the leap forward that turned night vision into a serious, professional tool. Let’s be honest, the first generation had its issues—distorted images, a noticeable whine, and it struggled badly when it got really dark. Gen 2 came along and fixed all that, thanks to one game-changing innovation: the Micro-Channel Plate (MCP).

This single component changed everything.
Think of the MCP as an incredibly thin wafer, about the size of a quarter, absolutely packed with millions of microscopic glass tubes. When the few electrons generated from ambient light hit this plate, they bounce off the walls inside these tiny tubes, setting off a chain reaction. Each impact knocks loose even more electrons, creating a massive cascade effect.
This process multiplies the initial electrons by the thousands, dramatically amplifying the light signal before it ever hits the phosphor screen. What does that mean for the user? A much brighter, sharper, and cleaner image than anything Gen 1 could ever dream of producing. That annoying “fisheye” distortion was gone, and the resolution was crisp across the entire field of view.
The Power of the Micro-Channel Plate
Popping up in the 1970s, the MCP is what truly separates hobby-grade from professional-grade night vision. Its ability to amplify light was simply astounding. A Gen 2 device could boost available light by around 20,000 times—a staggering jump from the 1,000x gain of its predecessors. This meant operators could finally see clearly on moonless nights, giving the technology a whole new level of reliability and clarity. You can dive deeper into the technical details of this pivotal night vision advancement to see just how big of an impact it had.
The MCP’s design delivered a few immediate, defining benefits for Gen 2 performance:
- Enhanced Clarity: The electron multiplication process created a much cleaner image with far less of the “snow” or static that plagued earlier devices.
- Reduced Distortion: The MCP helped produce a flatter, more accurate image, finally getting rid of the warped edges common in Gen 1.
- Improved Low-Light Capability: With so much more light gain, Gen 2 units could function effectively in conditions that would have left Gen 1 completely blind.
By integrating the Micro-Channel Plate, Generation 2 technology didn’t just improve upon Gen 1—it created an entirely new standard of performance that would dominate the professional market for decades.
A New Standard for Professionals
This massive leap in performance cemented Gen 2 as the go-to choice for military and law enforcement agencies across the globe. Suddenly, night vision wasn’t just a quirky gadget with major limitations; it was a reliable and effective tool for serious operations. Better image quality meant better target identification, safer navigation, and a huge tactical advantage after dark.
While more advanced night vision generations have come along since, Gen 2 technology truly laid the foundation for modern image intensification. In fact, the performance gap between Gen 1 and Gen 2 is often considered the most important jump in the entire history of night vision.
Here’s a quick breakdown of what made Gen 2 so much better:
- Operational Range: Users could see farther and with much greater detail.
- Image Fidelity: What you saw through the device was a far more accurate representation of the real world.
- Reliability: The tubes themselves were more robust and had a much longer operational lifespan.
Gen 2 devices became the workhorses for everyone from patrol officers and security teams to serious hunters who needed dependable performance without the eye-watering cost of the next generation. It carved out a critical sweet spot in the market, offering professional-grade capability that was a world away from the entry-level gear.
Exploring the Modern Standard of Gen 3
If Gen 2 set the professional standard, Generation 3 is what perfected it. This is the top-tier, current-issue technology for a reason, and it all boils down to one key innovation: the gallium arsenide (GaAs) photocathode.
This material is simply a rockstar at converting photons (light) into electrons (an electrical signal). It’s the very first, and most critical, step in the whole night vision process.
Think of it this way: a Gen 2 photocathode is like a good-quality solar panel—it gets the job done. But the gallium arsenide photocathode in a Gen 3 unit is like a next-level, hyper-efficient solar array that soaks up virtually every single photon that hits it. This massive leap in efficiency is what creates the incredibly bright, clean, and sharp images Gen 3 is famous for, especially when the lights really go out.
This level of performance is why Gen 3 became the go-to for the U.S. military and elite special operations forces across the globe.
Key Innovations Within Gen 3
It wasn’t just the photocathode that got an upgrade. Gen 3 also introduced some game-changing features that pushed performance and tube longevity to a whole new level. The most important of these is autogating.
Picture yourself moving through a dark alley when a car suddenly turns the corner, blasting you with its high beams. With older, non-gated tubes, that sudden flash of light would cause the image to “bloom” into a blinding white mess, potentially even damaging the intensifier tube.
Autogating is essentially a lightning-fast protective reflex for the tube. It rapidly cycles the power thousands of times per second, acting like an automatic dimmer switch. This not only saves the tube from damage but also allows you to maintain a usable image, even in environments with unpredictable light changes, like urban settings.
Autogating is a non-negotiable feature for anyone operating in dynamic lighting. It lets you transition from pitch-black conditions to brightly lit areas without missing a beat or worrying about burning out your expensive equipment.
The Rise of White Phosphor
For decades, night vision meant one thing: a glowing green image. There was a good reason for this—the human eye is fantastic at picking out different shades of green, which helped with detail recognition. But another major shift within the Gen 3 era has been the move to white phosphor tubes.
Many operators find that staring through a green screen for hours can cause significant eye strain. White phosphor tubes, on the other hand, produce a crisp black-and-white image that feels much more natural and less fatiguing over long missions.
But it’s not just about comfort. White phosphor offers real performance benefits:
- Better Contrast: The grayscale image often creates a greater sense of depth and makes it easier to separate a target from its background.
- Less Eye Fatigue: The black-and-white view is just more intuitive for our brains, which can make a huge difference during all-night operations.
- Superior Detail: For many, the sharper contrast of white phosphor helps in spotting subtle details that might get lost in the sea of green.
While the “green vs. white” debate often comes down to personal preference, there’s no denying that white phosphor has become the new premium standard. If you want to dive deeper, you can explore the advantages of white phosphor night vision to see which is best for you.
At the end of the day, Gen 3 technology takes the core principles of Gen 2 and elevates them with a far more sensitive photocathode and essential features like autogating. With tube lifespans easily exceeding 10,000 hours, a good Gen 3 unit is a long-term investment in top-tier performance. This blend of clarity, durability, and advanced capability is why Gen 3 remains the benchmark for serious night vision work.
How to Compare Night Vision Performance Metrics
While the “generation” label is a good starting point, the real story of a night vision device’s performance is written in its spec sheet. To truly know what you’re buying, you have to look past the broad categories and get into the numbers that define what you’ll actually see in the dark. These metrics are the true language of night vision.
Think of it like buying a car. You know a “sports car” is supposed to be fast, but is it the horsepower, the torque, or the 0-60 time that really matters for how you plan to drive? It’s the same with night vision. Getting a handle on specs like Resolution, Signal-to-Noise Ratio, and Figure of Merit is what lets you compare two different Gen 3 devices and know exactly which one is going to perform better when it counts.
Demystifying Resolution and lp/mm
The easiest metric to grasp is Resolution, which is measured in line pairs per millimeter (lp/mm). This number tells you, quite simply, how sharp and detailed the image is going to be.
The best analogy is the resolution on your TV. A 4K screen packs in way more pixels than an old standard-def tube TV, which is why you can see fine details like individual leaves on a tree. In night vision, a higher lp/mm value means the image tube can resolve more detail, helping you tell the difference between a coyote and a German Shepherd at 200 yards.
Understanding Signal to Noise Ratio
Next up is the Signal-to-Noise Ratio (SNR), and frankly, this is often more important for real-world use. SNR is all about the cleanliness of the image. The “signal” is the light you want to see, and the “noise” is that distracting, sparkling static you see in very dark conditions.
Imagine trying to tune into a distant radio station. High SNR is like a perfectly clear broadcast—no static, just clean sound. Low SNR is like a station that’s mostly static, forcing you to strain to hear the music. A higher SNR in your night vision device means a cleaner, less “snowy” image, which is absolutely critical for spotting movement in deep shadows or on moonless nights. It’s why so many seasoned users will look at SNR before any other spec.
While high resolution makes an image sharp, a high Signal-to-Noise Ratio makes it usable. It’s the difference between seeing a crisp image filled with static and a slightly softer but perfectly clear one. In near-total darkness, clarity almost always wins over raw sharpness.
The All-Important Figure of Merit
So how do you balance the importance of Resolution against SNR? That’s where Figure of Merit (FOM) comes into play. FOM is a dead-simple calculation that gives you a single score to judge the overall performance of an image intensifier tube.
FOM = Resolution (lp/mm) x Signal-to-Noise Ratio (SNR)
For instance, a tube with 64 lp/mm Resolution and an SNR of 30 gives you a FOM of 1920 (64 x 30). Simple.
This one number has become the industry standard for quickly sizing up a tube’s quality. While the individual specs tell their own story, FOM gives you an immediate benchmark. Top-tier Gen 3 tubes often boast FOM values well over 2000, while a good Gen 2 unit might be closer to 1200.
This table breaks down how these key performance specs look across the generations, showing the real-world impact of the numbers on what you actually see through the device.
Comparing Performance Metrics Across Generations
| Metric | Generation 1 | Generation 2 | Generation 3 | What This Means for You |
|---|---|---|---|---|
| Resolution (lp/mm) | 25-40 lp/mm | 45-72 lp/mm | 64-81+ lp/mm | Higher numbers mean a sharper, more detailed image. You can identify targets from farther away. |
| SNR | 8-12 | 16-28 | 25-40+ | Higher SNR gives you a cleaner, less “snowy” image, especially in extremely low light. It’s key for clarity. |
| FOM | 200-480 | 720-2000 | 1600-3200+ | This is your at-a-glance performance score. A higher FOM generally means a better, more capable tube. |
Ultimately, these numbers are the tools you need to cut through marketing fluff and compare the core engine of different night vision units. Getting comfortable with these metrics is just as important as understanding the fundamental differences between thermal imaging vs. analog night vision. It empowers you to read a spec sheet and make a decision based on hard data, not just a generation label.
Choosing the Right Night Vision Generation for You
https://www.youtube.com/embed/wfbraaFSuGU
Now that we’ve broken down the tech, we get to the real question: which night vision generation is actually right for you? The answer isn’t about chasing the “best” specs on paper. It’s about finding the perfect match for what you’ll be doing and what you’re willing to spend.
Honestly, buying a device that’s way more powerful than you need is just as much a mistake as buying one that can’t get the job done. The key is to be realistic about your specific use case.
Sure, a top-tier Gen 3 unit with a FOM over 2400 delivers a breathtakingly clear image. But let’s be real, that’s complete overkill if you’re just trying to spot what’s rustling in your suburban backyard. A quality Gen 1 or a good digital unit will handle that perfectly for a tiny fraction of the cost.
On the flip side, trying to use a basic Gen 1 device for a serious hog hunt deep in the woods is a recipe for pure frustration. When the light is low and you absolutely have to tell the difference between a boar and a shadow, the performance of Gen 2 or Gen 3 isn’t a luxury—it’s essential.
Matching Your Mission to the Machine
Let’s cut through the noise and connect common activities with the right generation. Thinking about it this way helps you focus on what really matters.
- Casual Observation & Backyard Security: If you’re just trying to see what’s making noise at night, watch for wildlife, or handle pests at closer ranges (under 75 yards), a high-quality Gen 1 or a modern digital night vision device is a fantastic value.
- Serious Hunting & Rural Security: When you’re tracking game in dark timber or keeping an eye on a large property with very little light, you need to step up. The performance jump to Gen 2 is significant and well worth it for the improved clarity and low-light reach.
- Professional & Tactical Use: For law enforcement, military operators, or anyone in a situation where gear failure isn’t an option, Gen 3 is the only real choice. Its ability to perform in near-total darkness and advanced features like autogating are non-negotiable.
The best way to make a smart choice is to define your environment first. Think about the typical light conditions, the distances you’ll be looking at, and how much detail you truly need to see.
A Simple Decision Checklist
Still on the fence? Run through these simple questions. Your answers will point you directly to the right tier of night vision.
- What’s my absolute maximum budget? This is the fastest way to narrow the field and set realistic expectations.
- Where will I use it most? A city with tons of light pollution presents a totally different challenge than a remote forest.
- How dark does it actually get? Be honest. Gen 1 needs some moonlight or starlight to work well. Gen 3 can practically see in a cave.
- What’s my typical viewing distance? Making a positive ID on something at 50 yards is one thing. Doing it at 200 yards requires a much clearer, higher-resolution image.
- Is this for a critical application? If your safety or the success of a mission depends on it, don’t skimp. Investing in high-end Gen 2 or Gen 3 is always the right call.
Your Night Vision Questions, Answered
Even after getting the basics down, you’re bound to have some practical questions when you start comparing different night vision generations. Let’s tackle a few of the most common ones we hear from people trying to make the right choice.
Is Gen 4 Night Vision a Real Thing?
You’ll see the term “Gen 4” thrown around in marketing, but it’s important to know that this isn’t an official U.S. military designation. It’s a label that typically describes very high-performance, filmless Gen 3 tubes.
These tubes are the best of the best, offering incredible low-light performance and a significant reduction in the halo effect around bright lights. So while the technology is absolutely real and represents the peak of what’s available, think of it as a top-tier evolution of Gen 3 rather than a brand-new generation.
Why Is There Such a Big Price Jump Between Generations?
The huge leap in price from one generation to the next boils down to the sheer complexity of the manufacturing process and the exotic materials involved. A Gen 3 image intensifier tube is a marvel of engineering.
The heart of the device, with its Gallium Arsenide photocathode and precision-made micro-channel plate, is incredibly difficult and expensive to produce. It’s a world away from the simpler tech inside a Gen 1 tube. On top of that, achieving higher performance specs like a top-tier FOM requires extremely tight quality control, which adds to the final cost.
Can You Actually See in Complete Darkness?
This is a great question. Image intensification devices—which covers Gen 1, 2, and 3—need a little bit of ambient light to function. They work by gathering and amplifying faint light from the moon, stars, or even distant city glow.
If you were in a sealed room with absolutely zero light, your night vision device wouldn’t be able to produce an image. For those true “total darkness” scenarios, you’ll need an infrared (IR) illuminator. Think of it as a flashlight that’s completely invisible to the naked eye but lights up the world for your night vision unit.
Ready to find the right gear for your needs? The team at Superior Tactical LLC has over a decade of experience outfitting everyone from hunters to law enforcement with top-tier night vision and thermal optics. Find the right night vision for your needs.