A Complete Guide to Lightweight Night Vision Technology
Picture this: moving through total darkness with the same ease and quickness you have in broad daylight. That's the core promise of lightweight night vision. We're not just talking about comfort here; cutting the weight of your night vision gear is a game-changer that opens up a whole new world of possibilities for professionals and serious enthusiasts.
Why Lightweight Night Vision Changes Everything

When you hear "night vision," you probably imagine the clunky, heavy goggles from old action movies. For a long time, that wasn't far from the truth. The first systems were so heavy they were often bolted to vehicles instead of being carried by a person. Looking back at that history really drives home how far the technology has advanced.
The journey from the giant infrared searchlight systems of WWII to the sleek monoculars of today is a story of incredible miniaturization. Those early German and Allied systems could weigh a staggering 25–35 kg (55–77 lb). Compare that to a modern set of helmet-mounted goggles, which often weigh between 300 and 700 grams. That's a massive 98–99% reduction in the weight you have to carry. If you're curious, you can explore the history of night vision devices and see the evolution for yourself.
This isn't just a minor improvement for convenience's sake. It's a fundamental shift in how we operate after dark. It's like the difference between an old-school canvas hiking pack and a modern ultralight one—the principle is the same, and the benefits are very real.
The Real-World Impact of Reduced Weight
Every single ounce you can shave off gear mounted to your head or your weapon makes a tangible difference in the field. Less weight means less strain on your neck, back, and shoulders, which is absolutely crucial during long missions or all-night hunts.
This reduction in physical load translates directly to tactical advantages:
-
Increased Mobility: You can move faster, quieter, and with more agility when you're not fighting against heavy equipment.
-
Reduced Fatigue: Carrying less weight helps you conserve energy, keeping you alert and at peak performance for much longer.
-
Enhanced Situational Awareness: When you're not distracted by neck pain or a headache, you can focus completely on your surroundings and react faster.
Lightweight night vision is not simply an incremental improvement. It is a redefinition of what is possible after dark, transforming night operations from a cumbersome challenge into a strategic advantage.
Ultimately, "lightweight" is more than just a number on a spec sheet. It's a design philosophy centered on maximizing your endurance and effectiveness. By making night vision systems more ergonomic and less of a physical burden, manufacturers empower everyone—from law enforcement and hunters to search and rescue teams—to do their jobs more safely and successfully. In this guide, we'll dive into the specific technologies and designs that make it all happen.
How Different Night Vision Technologies Work
Before you can pick the right lightweight night vision gear, you have to get a handle on what’s actually going on inside the box. There are three main technologies out there, and each one takes a completely different path to turn pitch-black darkness into a visible world. Think of them as different tools for different jobs—each with its own killer app.
Image Intensification (I²): The Classic Green Glow
At the heart of what most people think of as "night vision" is image intensification, or I² for short. This tech doesn't create its own light; it just gets really, really good at amplifying whatever little light is already there.
Here’s a good way to think about it: imagine you're in a huge, quiet auditorium and someone whispers from the back row. An I² device is like a super-powered microphone that catches that faint whisper, cranks the volume up thousands of times, and plays it back loud and clear. It grabs tiny, invisible bits of ambient light—from the moon, the stars, or even the glow from a distant city—and multiplies them into that classic green-hued image everyone recognizes.
This technology didn't just appear overnight. It evolved through several key stages, which we call "Generations." These aren't just marketing fluff; they represent huge leaps in performance, kind of like the jump from a clunky old tube TV to an HD flatscreen, and then to a 4K display.
-
Gen 1 systems kicked things off in the 1950s and 60s, giving us about 1,000x light amplification.
-
Then came Gen 2 in the 1970s, which introduced microchannel plates that boosted amplification to around 20,000x and made the picture much cleaner.
-
Finally, Gen 3 arrived in the late 70s and 80s. To this day, it remains the gold standard for high-end military and law enforcement units because of its incredible sensitivity and crisp image.
Digital Night Vision: The Modern Camera Approach
Next up is digital night vision. If an I² tube is an old-school analog amplifier, a digital system is a lot more like the camera sensor in your smartphone. It uses a specialized electronic sensor (usually a CMOS or CCD) that’s built to be extremely sensitive in low light.
This sensor gathers photons, converts them into a digital signal, and then displays that image on a tiny screen you look at through the eyepiece. This all-digital process is what lets these devices do cool things like record video, switch between color palettes, and even be used during the day without getting damaged. The only catch is that this digital conversion can sometimes create a tiny bit of lag, which might matter if you’re trying to track something moving very fast.
Thermal Imaging: Seeing Heat, Not Light
Last but not least, we have thermal imaging. This one is in a league of its own. While both I² and digital night vision need some reflected light to work with, thermal sees the world purely in terms of heat.
Remember the movie Predator, where the alien sees the glowing heat signatures of its targets? That's a perfect picture of thermal vision.
Every single object, whether it's alive or not, gives off infrared energy in the form of heat. A thermal imager picks up on these tiny temperature differences and paints a picture from them, usually showing warmer things in white, yellow, or red and cooler areas in black or purple.
This gives thermal a massive edge when it comes to pure detection.
-
It Works in Total Darkness: A thermal scope needs zero light. It can spot a person or a recently driven car in what would be absolute, complete blackness to an I² device.
-
It Defeats Camouflage: It doesn't care if a target is hiding in a bush or wearing the best camo on the market. If it’s giving off heat, a thermal unit will see it plain as day.
The trade-off? Thermal doesn't "see" like our eyes do. You can’t use it to read a sign or identify a person's face, because all it's showing you is a map of heat, not reflected light. For a deeper dive into how these technologies stack up, you might be interested in our guide that offers a detailed comparison between thermal, digital, and analog night vision.
Each of these technologies gives you a unique way to own the night. Understanding what makes them tick is the first real step toward choosing the perfect lightweight unit for what you need to do.
Choosing The Right Device: Monocular, Goggle, or Clip-On
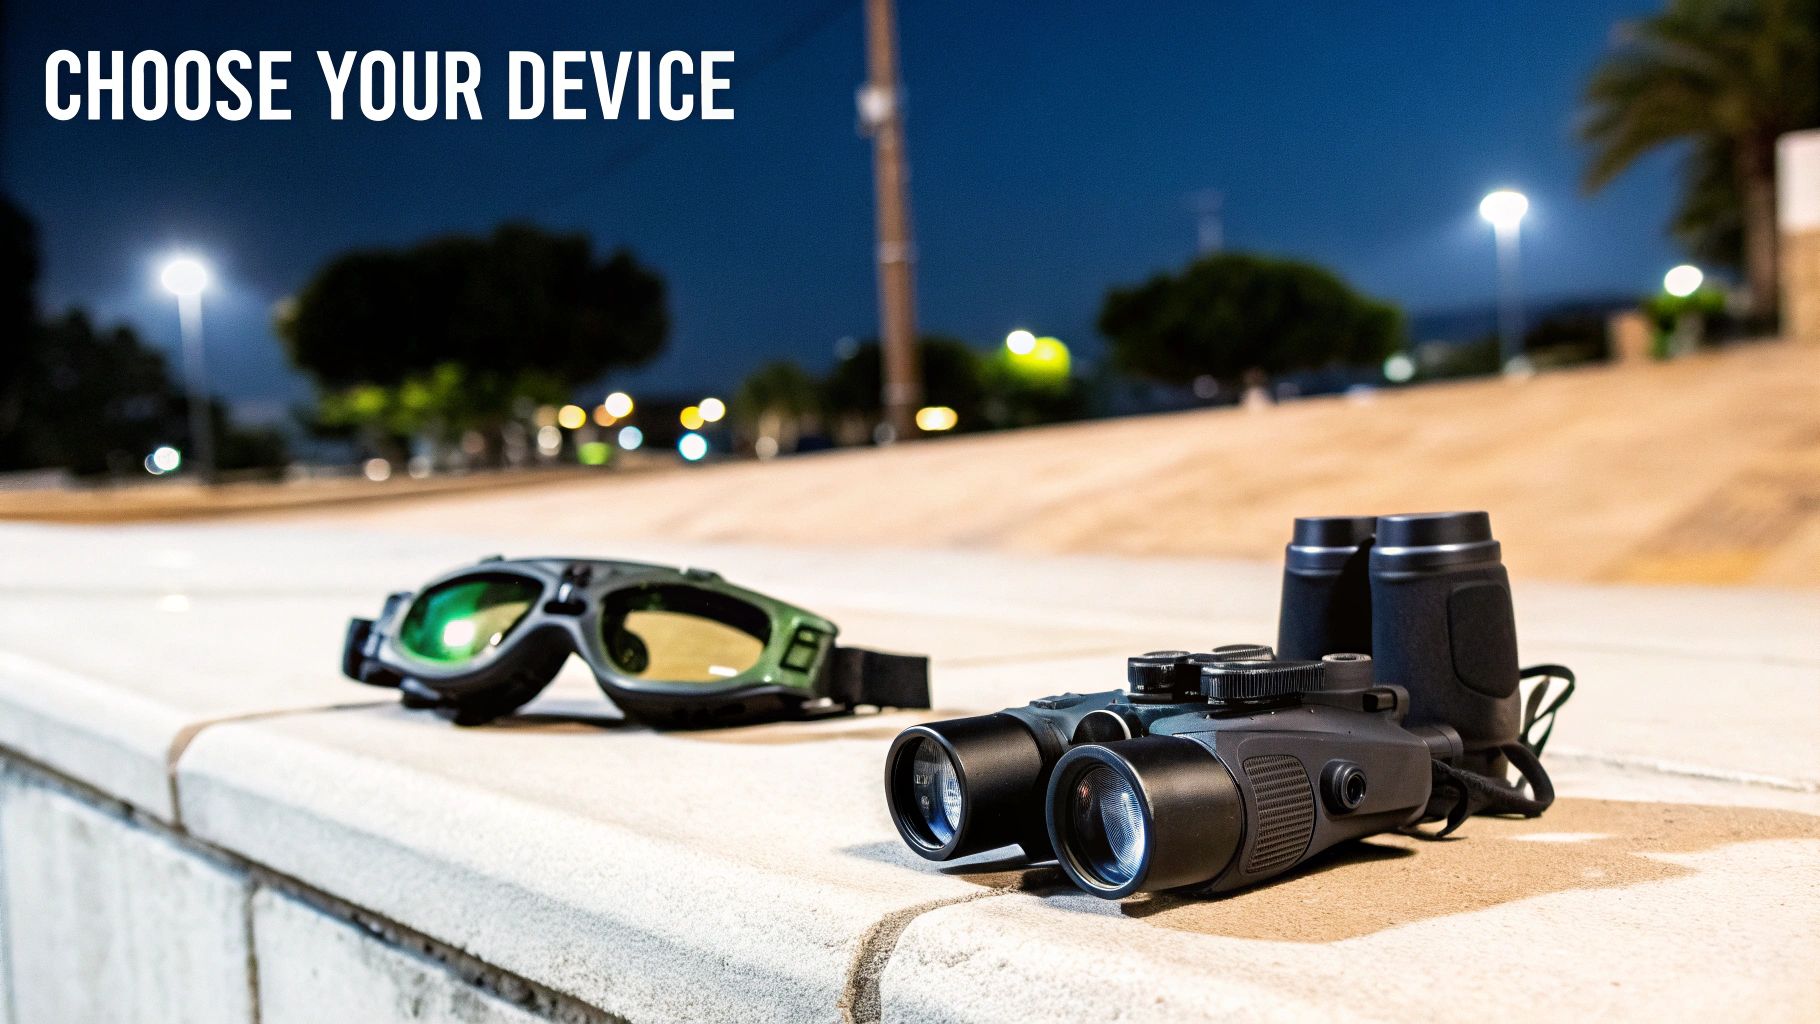
Once you've got a handle on the tech, the next big question is what form it should take. This isn't just about what looks cool; it's about matching the tool to the job. The three main players in the lightweight night vision game—monoculars, goggles, and clip-ons—each have their own distinct personality and purpose.
The right choice comes down to how you'll actually be using it. Will you be on your feet for hours? Taking long-range shots? Or do you just need to see what's happening in the immediate area around you?
The Monocular: The Scout's Spyglass
A night vision monocular is the ultimate jack-of-all-trades. Think of it as a modern-day spyglass—it’s compact, incredibly versatile, and relatively light on the wallet. Because it only uses a single image intensifier tube, it's often the lightest and most affordable way to get into serious night vision.
Its biggest strength is flexibility. When mounted on a helmet, a monocular leaves your other eye free and adapted to the dark. This is huge. You can instantly flip the NVD up to read a map, use a red dot sight, or just get your bearings in a weirdly lit area without that "I'm in a fishbowl" feeling.
-
Best For: Hunters scanning a field, hikers picking their way down a trail, or anyone who needs to switch between night vision and natural sight on the fly.
-
Key Advantage: It's a fantastic blend of low weight, manageable cost, and do-it-all capability. You can hold it, stick it on your head, or even mount it behind an optic.
-
Primary Trade-off: You lose your depth perception. It definitely takes some practice to get used to navigating tricky ground or judging distances with one eye.
The Goggle: The Immersion Specialist
When you need the full picture—a complete, immersive view of the night—nothing comes close to a set of night vision goggles. Often called binos or binoculars, these devices use two separate tubes, one for each eye, to give you true stereoscopic vision. That means you get real, honest-to-goodness depth perception, and that’s a game-changer.
Think about walking through a dark forest and trying to judge how far away that low-hanging branch is. With goggles, your brain just knows, the same way it does during the day. Movement feels natural and intuitive. This performance boost comes with a higher price tag and more weight, but for many pros, it's an easy trade.
The superior depth perception you get from dual-tube goggles drastically cuts down on eye strain and mental fatigue. This lets you stay sharp and effective for much, much longer.
This is a massive deal for law enforcement, military operators, and search and rescue teams who might wear their gear for hours on end. That intuitive sense of space isn't just a convenience; it can be a lifesaver.
The Clip-On: The Force Multiplier
Last but not least is the clip-on night vision device (CNVD). This is a highly specialized piece of kit that turns your daytime rifle scope into a nighttime powerhouse. Instead of being a standalone optic, a clip-on mounts directly in front of your existing scope.
The genius of this setup is that you can switch from day to night shooting without ever taking your primary optic off the rifle. Your zero doesn't change, your cheek weld stays the same, and you don't have to re-learn your holds. It saves a ton of time, hassle, and ammo.
While you wouldn't typically wear one on a helmet to walk around, a lightweight night vision clip-on is the go-to for anyone serious about precision shooting after the sun goes down. It lets you use the familiar reticle and magnification of your favorite scope, just with the lights turned out.
Lightweight Night Vision Form Factor Comparison
To make sense of these options, it helps to see them side-by-side. Each device is built for a specific role, and this table breaks down where each one shines.
| Form Factor | Primary Advantage | Main Disadvantage | Best Use Cases | Typical Weight Range |
|---|---|---|---|---|
| Monocular | Versatility & low weight | No depth perception | Hiking, hunting, general surveillance | ~250g to 400g |
| Goggle | True depth perception | Higher cost & weight | Driving, close-quarters navigation, extended use | ~450g to 700g |
| Clip-On | Uses existing dayscope & zero | Specialized for shooting | Precision long-range shooting, designated marksman | ~400g to 900g+ |
Ultimately, the best device is the one that disappears into your workflow.
Choosing the right unit can feel overwhelming. If you're looking for a deeper dive, our guide on how to choose the right night vision device for your needs explores these form factors and their applications in much more detail. Each design serves a very specific purpose, and we're here to help you find the perfect fit.
The Classic Trade-Off: Weight vs. Performance
When we talk about lightweight night vision, we’re talking about a world where every single gram is scrutinized. But getting that featherlight feel isn't magic; it comes from a series of very intentional engineering choices. Think about building a race car. To get it to fly around the track, you start by stripping out everything that isn't absolutely essential. You gain incredible speed, but you might lose durability, comfort, or even a bit of safety along the way.
That same exact principle is at play with night vision. The biggest headache for manufacturers is finding that sweet spot between shedding weight and maintaining top-tier optical performance. It's a delicate dance. So, when you pick up a device that feels impossibly light, the first question you should ask yourself is a critical one.
What Got Cut to Make it Lighter?
To shave mass off a night vision unit, designers have a few tricks up their sleeves. Each one cuts precious grams, but they all come with a potential compromise that you, as the user, need to be aware of. Knowing these trade-offs is the key to not getting burned.
Here are the most common things that get tweaked to save weight:
-
Housing Materials: A big win for weight reduction is swapping a rugged, machined aluminum housing for a lighter polymer one. The downside? You’re likely giving up some durability and the ability to shrug off hard knocks or extreme weather.
-
Objective Lens Size: A smaller objective lens means less glass, which means less weight. But it also gathers less light. This can result in an image that’s a bit dimmer or less sharp, especially when you’re in near-total darkness and every photon is a prisoner.
-
Battery Size: Popping in a smaller battery is a quick and easy way to drop a few grams. The catch, almost always, is shorter runtime. This might force you to carry spares, which ironically adds weight back to your overall loadout.
The real question isn't just, "How light is this thing?" It's, "Am I okay with the performance trade-offs made to get this weight for what I need to do?"
Someone out hunting for a few hours might happily take a shorter battery life to have a lighter monocular around their neck. But a search and rescue professional on a 12-hour mission? They can't afford to compromise on runtime or the toughness of their gear.
Pushing the Limits with Better Materials
Of course, the goal is always to minimize these compromises, and that’s where materials science really shines. Instead of just using less material, the best manufacturers use better material—stuff that's stronger and lighter to begin with.
This is why you’ll see premium lightweight devices built with specialized magnesium alloys. These materials boast a strength-to-weight ratio that blows most standard aluminum and polymers out of the water. They allow engineers to build a housing that is both unbelievably light and incredibly tough.
Naturally, these advanced materials and the specialized processes needed to shape them don't come cheap. It’s a major reason why a top-tier, ultralight monocular can cost significantly more than a slightly heavier unit with the same image tube inside. You’re not just paying for the night vision; you're investing in the engineering and exotic materials that make the whole package easier to carry without turning into a fragile piece of junk. It all comes down to your budget and just how much you’re willing to pay to drop those extra ounces.
How to Select the Best Gear for Your Mission
Choosing the right lightweight night vision isn’t about chasing the lowest number on a spec sheet. It's a matching game—you need to align a device’s capabilities with what you’ll actually be doing out there in the dark.
The perfect unit for a hunter glassing a field from 300 yards is going to be completely wrong for a search and rescue volunteer navigating a treacherous trail. Let's break down the must-haves for different missions to help you build a checklist for your own investment.
For Law Enforcement and Military Professionals
When your life is on the line, gear failure is not an option. For tactical operators, the hierarchy is clear: absolute reliability, ruggedness, and positive threat identification. Performance is everything.
You need equipment that can take a beating in any environment. Hands-free operation is a given, which is why dual-tube goggles are so prevalent. That true depth perception they offer is critical when you’re navigating tight spaces or clearing a room.
Your Checklist:
-
Technology: Gen 3 Image Intensification is the professional standard, especially white phosphor for its superior contrast and detail.
-
Durability: Look for housings made from robust aluminum or magnesium alloy. It has to be completely waterproof and shock-resistant, period.
-
Mounting: A rock-solid helmet mount, like a dovetail interface, is non-negotiable. You can't have your optics wobbling when you need a stable sight picture.
For the Dedicated Hunter
A hunter’s world is different. The mission shifts from close-quarters ID to long-range detection and precise targeting. Seeing the heat signature of an animal through thick brush or spotting it hundreds of yards out is a game-changer.
Sure, weight still matters if you're hiking into your spot, but it takes a backseat to optical clarity and a stable weapon mount. A monocular is fantastic for scanning, but when it’s time to take the shot, a dedicated thermal or clip-on scope is what you want.
Your Checklist:
-
Technology: Thermal imaging is king for spotting game. An I² tube can be fooled, but a heat signature can't hide. When it's time to shoot, a high-quality I² or thermal clip-on system is the way to go.
-
Key Specs: Focus on detection range and sensor resolution for thermal, or a high FOM for I². A quality lens is just as important—it’s what brings that distant image into sharp focus.
-
Mounting: If it’s going on your rifle, make absolutely sure it’s recoil-rated for your caliber.
This decision tree helps visualize the balancing act. You're always trading something—usually performance for weight.

As you can see, chasing maximum performance almost always adds ounces, while prioritizing a lighter load means you have to be realistic about what you give up in optical power or durability.
For Search and Rescue Teams
SAR operations are a race against the clock. Operators need to scan huge, often difficult areas as quickly as possible. In this scenario, a wide field of view (FOV) is far more valuable than high magnification. It’s all about covering ground.
This is where thermal truly shines. Nothing finds a human heat signature against a cold landscape faster. To combat fatigue and improve safety over long searches on rough terrain, dual-tube goggles can also be a massive asset.
Your Checklist:
-
Technology: Thermal is the priority because of its incredible detection power. A handheld thermal monocular is an essential piece of kit.
-
Field of View (FOV): A wider FOV (40° or more) is your best friend. It gives you better situational awareness and lets you scan areas much more efficiently.
-
Power: Look for long battery life or the ability to hook up an external battery pack. You can’t afford to have your gear die when a mission runs all night.
For Hobbyists and DIY Builders
If you’re an outdoor enthusiast, a camper, or someone who loves to tinker, the focus shifts to getting the most bang for your buck. Digital night vision is a great starting point, offering an affordable way in with cool features like video recording.
The DIY community has also exploded, making it possible to assemble your own high-quality PVS-14 from a kit. This is an awesome way to get into Gen 2 or even Gen 3 performance without the massive price tag of a factory-built unit.
The global night vision market was recently estimated between USD 4.5 billion and USD 6.0 billion annually, and it's projected to grow by 6–8% a year. That boom isn't just from military contracts; it's being driven by a huge civilian demand for security and recreational use. Discover more about infrared technology trends.
Your Checklist:
-
Technology: High-quality digital systems or Gen 2 image intensifiers offer an incredible performance-to-cost ratio.
-
Value: Complete kits or budget-friendly monoculars are a great way to cover the basics for navigation and general observation.
-
Features: Things like onboard recording and smartphone connectivity are common in digital units and add a lot to the fun.
Getting Your Gear Set Up: Mounts, Maintenance, and Power
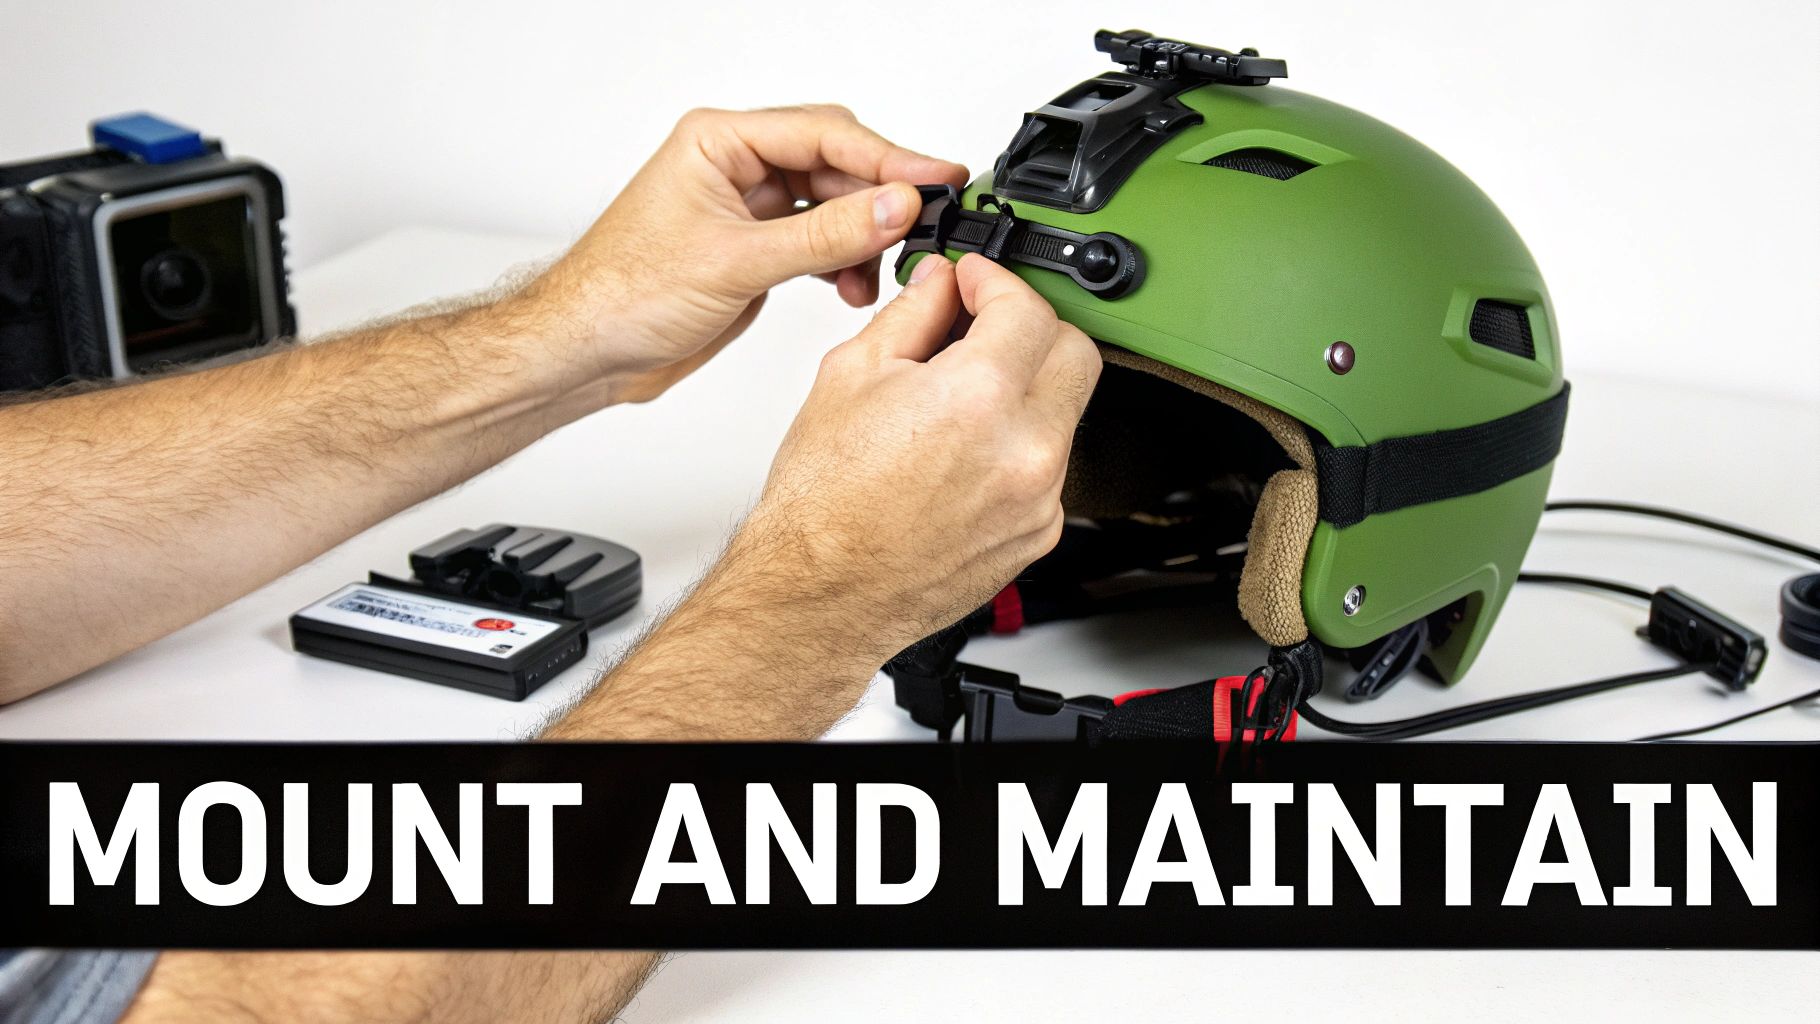
So, you've got your hands on a great piece of night vision gear. That's a fantastic start, but it's only half the battle. How you care for, mount, and power your device is what will make or break its performance in the field and determine how long it lasts. These details are every bit as important as the tube inside.
For any helmet-mounted setup, a rock-solid mount is absolutely essential. Any slop or wobble between your helmet and your optic will turn into a shaky, nausea-inducing image. It's distracting, causes serious eye strain, and kills your situational awareness. The two main systems you'll see are the classic bayonet-style J-Arm and the more modern dovetail interface.
The dovetail mount has become the gold standard for a reason. It provides a much more secure and stable lockup, virtually eliminating that dreaded wobble. When you're moving, that solid connection is what keeps your view clear and steady.
If you want to dive deeper into getting the right mount, our guide on dovetail mounts for night vision goggles and their compatibility is the perfect place to start.
Keeping the Lights On: Power Solutions
A dead battery turns your high-tech optic into a very expensive paperweight. You’ll generally find devices that run on either CR123A or AA batteries. The CR123A is the professional's choice—it has a great shelf life and holds up much better in the cold. AAs are easier to find in a pinch, but their performance can really tank when the temperature drops.
Planning on being out for a while? An external battery pack is a game-changer. It dramatically extends your runtime and has a secondary benefit: mounted on the back of your helmet, it acts as a perfect counterweight. This makes the whole setup feel more balanced and takes a lot of strain off your neck.
Keeping Your Glass Clean: Care and Maintenance
Your lenses are finely coated optical instruments. Treat them like it. A scratched or smudged lens can permanently degrade your image quality, so proper cleaning is non-negotiable.
Here’s the right way to do it:
-
Get the Grit Off First: Before you even think about wiping, use a lens pen brush or a blower to gently remove any loose dust or sand. Wiping a gritty lens is the fastest way to scratch it.
-
Use the Right Stuff: Put a couple of drops of a quality lens cleaning solution on a clean microfiber cloth. Never spray or drip it directly onto the lens.
-
Wipe, Don't Scrub: Use a gentle, circular motion, starting from the center of the lens and working your way out.
-
Store It Smart: When you're done, put the lens caps back on and store the unit in its padded hard case. Keep it somewhere cool and dry, and out of direct sunlight, to protect the sensitive electronics.
Answering Your Lingering Questions
Alright, we've covered the big stuff, but I know there are always a few specific questions that pop up when you're getting close to a decision. Let's tackle some of the most common ones I hear to clear up any final confusion.
Digital vs. Image Intensifier Tubes
So, what's the real difference between a digital setup and a traditional image intensifier (I²) tube? The easiest way to think about it is analog versus digital, or maybe even an amplifier versus a camera.
An I² tube is a marvel of analog tech. It physically takes the few photons of available light and multiplies them thousands of times, presenting a bright, crisp, green-hued image directly to your eye. The key takeaway here is that it's instantaneous—there is absolutely zero lag. What you see is happening in true real-time.
Digital night vision, on the other hand, works like a specialized low-light camera. It uses a sensor to capture an electronic image, processes it, and then displays that image on a tiny screen inside the eyepiece. This opens the door to cool features like recording video, but for pure, natural-feeling observation, nothing beats the clean view of an I² tube.
Can I Use Night Vision During The Day?
This is a critical point, and getting it wrong can be an expensive lesson. You cannot use an image intensifier device (Gen 1, 2, or 3) in daylight without the protective day cap on. Period.
Exposing the tube to a bright light source will overload it and cause permanent, irreversible burn damage. Think of it like staring at the sun with a high-powered telescope—you're going to burn something out. Most day caps have a tiny pinhole that lets in just enough light for a quick function check, but taking that cap off in the sun will destroy your tube in an instant.
Digital and thermal systems, however, are a different story. Since they use electronic sensors, they are perfectly safe to use during the day.
If you remember one thing, make it this: the fundamental difference between image intensifier tech and digital systems is the most important factor in preventing accidental damage to your gear.
What's The Real Cost of Good Lightweight Gear?
The price tag on lightweight night vision is all over the map, and it's almost entirely dictated by the technology running the show.
-
Entry-Level Digital: You can get your feet wet with a basic digital monocular for a few hundred dollars.
-
High-Quality Gen 2: A good, reliable Gen 2 unit will typically land you in the $1,500 to $3,000 bracket.
-
Military-Grade Gen 3: This is where the pros play. Top-tier Gen 3 monoculars usually start around $3,000 and can climb well past $10,000 for high-spec white phosphor binocular setups.
Trying to sort through all of this on your own can be daunting. At Superior Tactical LLC, our team has spent over a decade helping everyone from law enforcement officers to dedicated hunters get into the right setup. We're here to give you straight answers and back it up with a solid 10-year warranty on our Gen 3 systems.
When you're ready, feel free to explore our curated selection of night vision optics and see what's possible.