How Night Vision Works Your Guide to Seeing in the Dark
Ever tried to find your way through a room in total darkness? It’s a struggle. But where our eyes fail, technology gives us two very different ways to see what’s hidden in the shadows.
One method, called image intensification, is like turning the volume knob on light all the way up. The other, thermal imaging, bypasses light completely and instead creates a picture based on heat.
How We See in the Dark
To really get a handle on night vision, you have to realize it’s not just one thing. It’s two distinct technologies tackling the same problem from opposite ends. Each one taps into a different part of the electromagnetic spectrum to paint a picture our eyes can understand, and that makes them useful for very different jobs.
We’re going to break down the science that lets us pierce the darkness, starting with these two core approaches. While the end goal is the same—seeing at night—how they get there couldn’t be more different. One works by gathering the faintest traces of light and multiplying them, while the other sees the invisible heat energy that everything around us gives off.
The Two Pillars of Night Vision Technology
Almost all modern night vision devices you’ll encounter fall into one of two buckets:
- Image Intensification: This is that classic, grainy green view you’ve seen in countless movies. It works by collecting whatever tiny bit of ambient light is available—from stars, the moon, even the faint glow from a distant city—and amplifying it thousands upon thousands of times. It’s a powerful light multiplier, but it does need some light to get started.
- Thermal Imaging: This technology couldn’t care less about light. It works by detecting infrared radiation, which is just a fancy way of saying heat. It builds a picture based on tiny differences in temperature, which is why a warm person or animal glows brightly against a cool background.
Modern gear is incredible, but the basic ideas have been around for a while. The first real night vision systems, called Generation 0, showed up in the late 1930s and used what’s known as active infrared. Think of it like a special flashlight that projected a beam of invisible light, which a paired viewer could then see. To see just how far we’ve come, you can explore the history of when night vision was invented. That old-school tech set the stage for the sophisticated image intensifier tubes we’re about to dive into.
How Image Intensification Turns Photons into Pictures
That iconic green-hued world you see through night vision isn’t magic—it’s the result of a brilliant process that amplifies incredibly faint light. This technology, called image intensification, is the engine behind most night vision devices. It essentially acts like a supercharger for light, grabbing the few available particles of light and multiplying them thousands of times over to create a clear picture.
Think about a single particle of light, a photon, that has traveled through the darkness from a distant star or the moon. When that lone photon enters the lens of your night vision device, it kicks off a lightning-fast, four-step journey to become part of the bright image you see.
It’s important to know this is completely different from thermal imaging, which sees heat instead of light. The infographic below lays out the two main ways we see in the dark, showing how image intensification amplifies light while thermal imaging detects heat signatures.
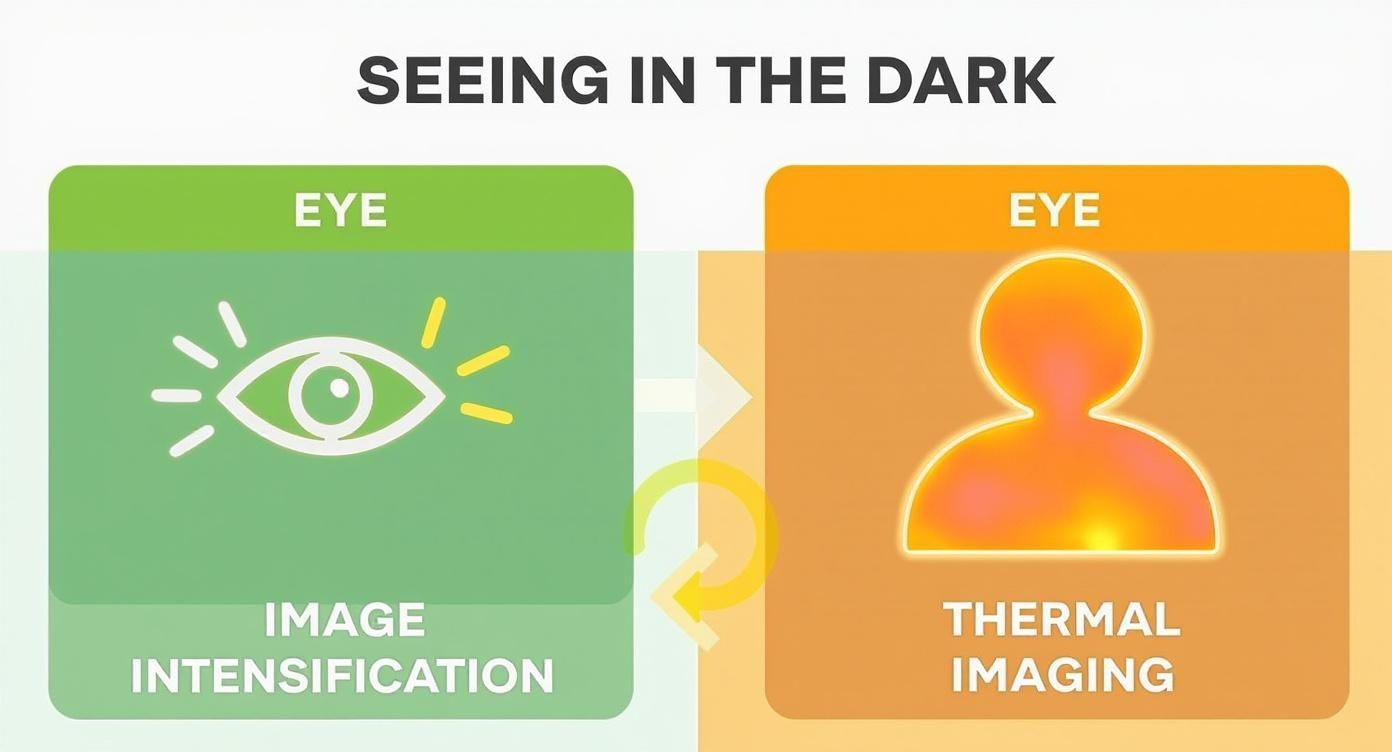
As you can see, one method works by boosting the ambient light that’s already there, while the other builds a picture from the heat energy objects give off. Each has its place, but today we’re focused on the light-amplifying champs.
Step 1: The Photocathode Converts Light into Electrons
The process begins the moment that incoming photon hits a special light-sensitive surface called a photocathode. You can think of this component as a translator. Its one and only job is to convert the light energy from that photon into electrical energy by releasing an electron.
For every photon that makes contact, the photocathode kicks out a corresponding electron. This is the first critical step in turning an invisible scene into something your eyes can register. But at this point, the signal is still far too weak to be of any use. The real power-up is about to happen.
Step 2: The Microchannel Plate Supercharges the Signal
That single electron is then pulled towards the heart of the system: the Microchannel Plate (MCP). This little component is the secret sauce that gives modern night vision its jaw-dropping performance. The MCP is just a tiny glass disc, often no bigger than a quarter, but it’s packed with millions of microscopic, angled channels.
When our electron zips into one of these tiny tubes, it smacks into the specially coated walls. That impact is enough to knock several more electrons loose in a cascade effect. These new electrons then bounce down the channel themselves, dislodging even more electrons with every single collision.
This chain reaction inside the Microchannel Plate is exponential. A single electron entering an MCP can result in the release of more than 1,000 electrons from the other end, creating a massive gain in the signal.
This process is happening millions of times at once across the entire plate, with each channel corresponding to a different point of light from the original scene. It’s an incredibly effective way to multiply the electrical signal by tens of thousands of times.
Step 3: The Phosphor Screen Creates a Visible Image
After blasting out of the MCP, the now-massive cloud of electrons rockets toward the final piece of the puzzle: a phosphor screen. This screen is coated with materials that glow whenever they’re struck by electrons. So, when the amplified cloud of electrons slams into the screen, it causes the phosphors to light up brightly.
The glowing pattern on the screen is a perfect, but now thousands of times brighter, replica of the original light that entered the device. This is what creates that classic green image we associate with night vision. Of course, the specifics of the image intensifier tube—like whether it’s thin-filmed or unfilmed—can affect the final clarity and performance. You can learn more in this detailed comparison of thin-filmed and unfilmed image intensifier tubes.
All that’s left is for you to look through an eyepiece lens, which magnifies this glowing screen and focuses it for your eye. In a tiny fraction of a second, the device has captured, amplified, and displayed a scene that was completely hidden in the dark just moments before.
Tracing the Evolution of Night Vision Generations
Night vision technology didn’t just appear out of thin air. It evolved through distinct stages, with each “generation” bringing a massive leap in performance. Think of it like the jump from those old, brick-like cell phones to the sleek smartphones we use today. Understanding this evolution is key to seeing why there’s such a huge range in clarity, brightness, and price in the night vision market.
It all started with bulky, almost experimental systems that laid the groundwork. But the real story begins with the numbered generations, each defined by a game-changing technological breakthrough.
Generation 1: The Foundation
The first widely available night vision systems, Generation 1 (Gen 1), hit the scene back in the 1960s. These were the first devices that could passively amplify existing ambient light, meaning they didn’t always need a giant, obvious infrared spotlight to work. This made them far more practical.
That said, Gen 1 tech has some serious quirks. The image is often blurry or warped around the edges—a classic fish-eye effect known as geometric distortion. They also need a decent amount of moonlight to be useful and can get easily washed out by sudden bright lights.
Generation 2: The Microchannel Plate Revolution
The 1970s brought us Generation 2 (Gen 2), and it was a total game-changer. The secret sauce was the addition of a Microchannel Plate (MCP), that electron supercharger we talked about earlier.
This one component made a world of difference. It dramatically boosted the light gain, giving users a much clearer, sharper picture with way less of the distortion that plagued Gen 1. Gen 2 gear could perform reliably in much darker conditions, setting the new standard for military and professional applications for decades to come.
Generation 3: The Current Standard
Then came Generation 3 (Gen 3) in the 1980s, which pushed performance even further. The defining innovation here is a photocathode made from gallium arsenide. This material is incredibly efficient at converting photons into electrons, which translates directly into a brighter, cleaner image and amazing performance in near-total darkness.
This superior photocathode is also what gives Gen 3 its incredible tube life, often lasting well over 10,000 hours of operation. The difference in raw power between the generations is just staggering.
- Gen 1: Amplified light by about 1,000x.
- Gen 2: Jumped this up to around 20,000x.
- Gen 3: Reached an incredible 30,000x to 50,000x amplification, or even more.
These numbers really paint a picture of how far the core technology has advanced. For a deeper dive into this journey, check out our guide on the evolution of night vision from World War II to cutting-edge technology.
Night Vision Generations at a Glance
To make it easier to see how these generations stack up, here’s a quick comparison table. It breaks down the core technology and what that means for real-world performance.
| Generation | Key Technology | Light Amplification | Image Quality |
|---|---|---|---|
| Gen 1 | Simple photocathode and phosphor screen | ~1,000x | Low resolution, significant edge distortion |
| Gen 2 | Addition of a Microchannel Plate (MCP) | ~20,000x | Clearer, less distorted, good low-light performance |
| Gen 3 | Gallium Arsenide (GaAs) photocathode | 30,000x – 50,000x+ | Bright, crisp, excellent in very dark conditions |
As you can see, each step forward brought significant gains in both light amplification and image fidelity, leading to the high-performance devices we have today.
By using a gallium arsenide photocathode, Gen 3 devices are not only more sensitive to light but also more reliable and long-lasting, solidifying their status as the gold standard for military and serious civilian users.
This clear path of innovation, where each generation solved the problems of the one before it, explains how modern night vision works with such incredible efficiency. Each leap pushed the boundaries of what we can see after the sun goes down.
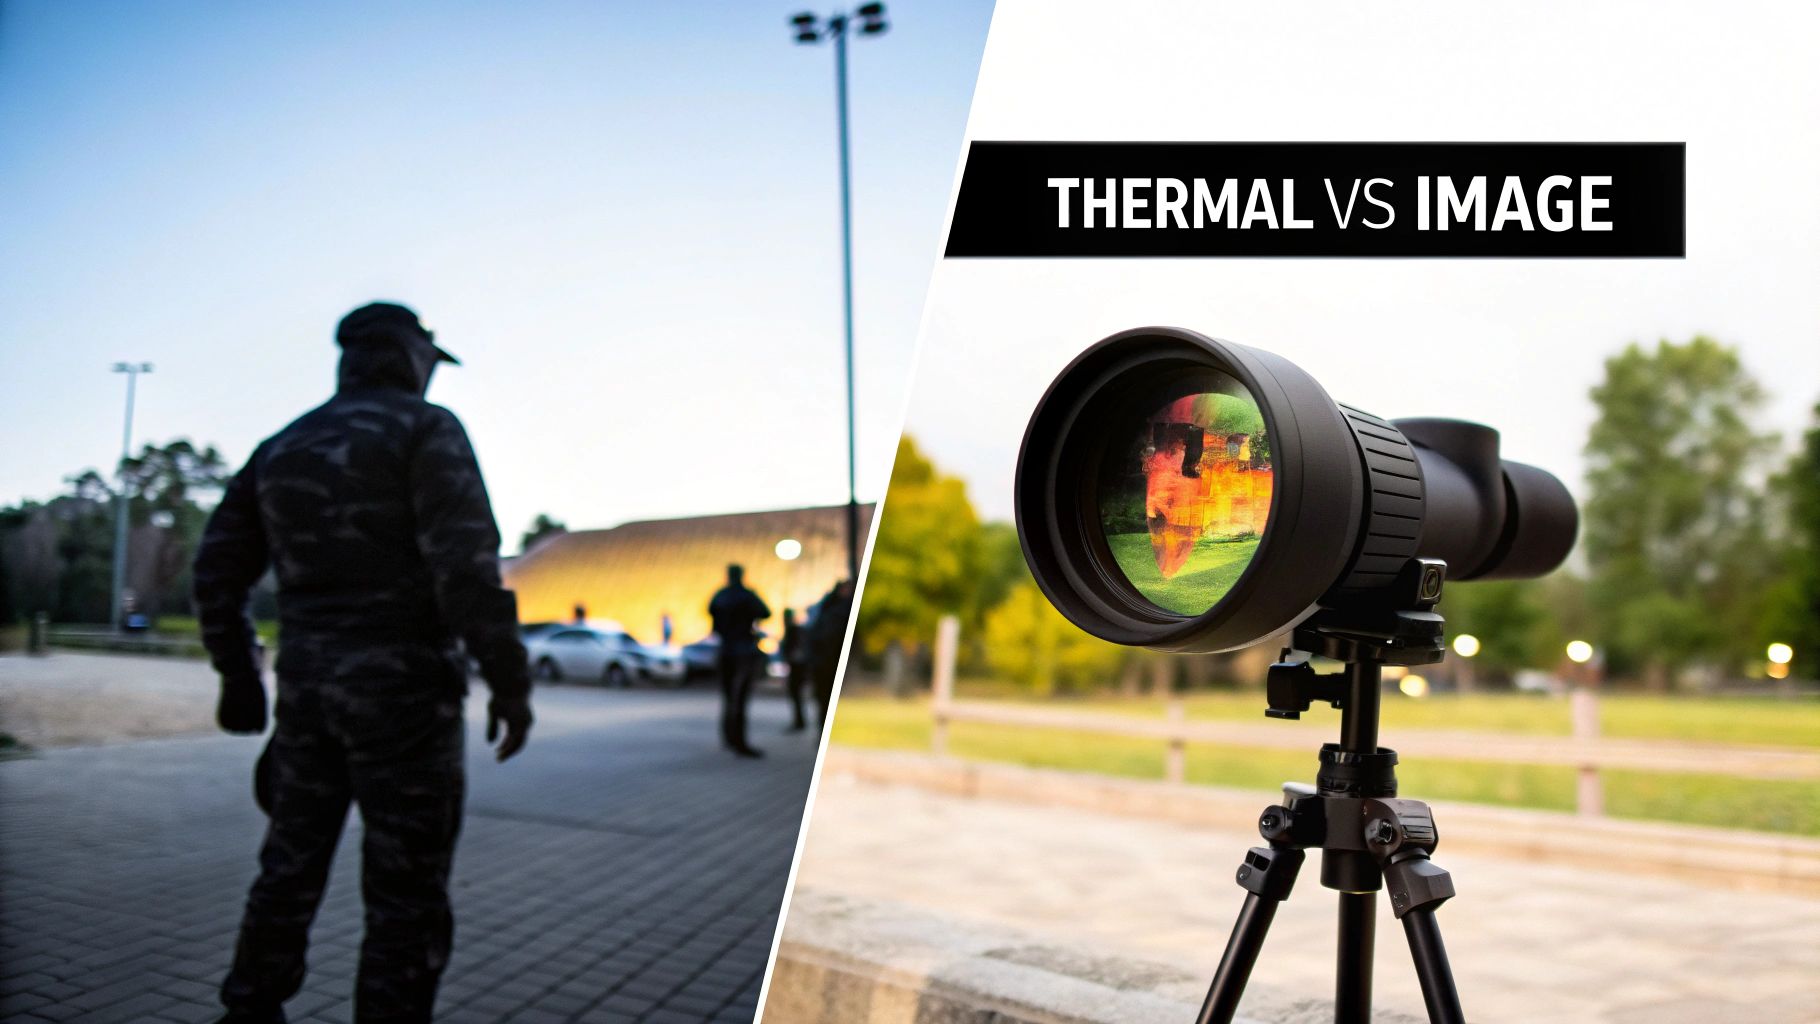
Thermal Imaging vs. Image Intensification
At first glance, thermal imaging and image intensification seem to do the same thing: let us see in the dark. But that’s where the similarity ends. They work on completely different principles, and knowing that difference is crucial for picking the right tool for the job.
Think of it this way: image intensification is like having bionic ears. It needs some sound to work with, even if it’s just a whisper. It takes tiny amounts of ambient light—from the moon, stars, or distant city glow—and amplifies them thousands of times to paint a clear picture.
Thermal imaging, on the other hand, is like seeing the world’s heat signature. It doesn’t care about visible light at all. Instead, it detects the infrared energy that everything around us gives off. A warm engine, a human body, even a recently fired weapon—they all radiate heat, and a thermal device turns that heat map into an image.
Different Tools for Different Jobs
This fundamental difference is what makes each technology a specialist.
Because it keys in on heat, thermal imaging is the undisputed champion of detection. A person’s warm body stands out like a beacon against a cool nighttime landscape, making it almost impossible to hide. This is why it’s a go-to for finding people in dense foliage or seeing through smoke and fog.
Image intensification, however, is all about identification. By amplifying light, it preserves details, textures, and shadows. You can see the branches on a tree, read a sign, or recognize a person’s face. It gives you a much more natural, recognizable view of your surroundings.
- Thermal Is for Detection: It’s perfect for spotting heat signatures. Think search and rescue, surveillance, and hunting. It works in absolute darkness because it doesn’t need a single photon of light.
- Image Intensification Is for Identification: It’s built for navigating, driving, and identifying threats or targets. If you need to know what you’re looking at, not just that something is there, this is your tool.
So, a SWAT team might use a thermal scope to see if suspects are hiding in a dark building, but they’ll use image intensification goggles to move through the rooms and identify who is who.
Thermal imaging creates a picture from heat, not light, allowing it to function in zero-light conditions and see through obscurants like dust or smoke. Image intensification, however, requires at least minimal ambient light to function but provides a more detailed, recognizable image.
Key Operational Differences
There are practical limitations to both. A sudden bright light, like a flashlight beam or a car’s headlights, can temporarily “white out” or even permanently damage an image intensifier tube.
Thermal imagers don’t have this problem, but they can be tricked by temperature uniformity. On a cool night, a rock and a log that have both been sitting out for hours might be the exact same temperature, making them indistinguishable on a thermal screen.
The image you see is also starkly different. Image intensification gives you that classic, grainy green-and-black view (or white phosphor in newer units) that looks like a brighter version of reality. Thermal devices create a heat map, often in grayscale (white-hot or black-hot) or with color palettes where hotter objects glow bright red or yellow.
To dive deeper into how these stack up against other options, check out our night vision technology explained: thermal vs digital vs analog guide.
In the end, it’s not a question of which is better. It’s about understanding the mission and choosing the technology designed to accomplish it.
Night Vision in the Real World
Night vision technology might have started on the battlefield, but it didn’t stay there. Its ability to pierce the darkness has found its way into countless civilian roles, becoming an essential tool for science, safety, and even recreation. Once you understand how it works, you start to see why it’s so useful to so many different people.
This tech simply lets us see and operate where our own eyes fail us, effectively opening up the world for use 24/7. Whether it’s protecting a property or exploring the backcountry after sunset, the applications are incredibly diverse.
Safety and Security Applications
Security is easily one of the most common places you’ll find night vision today. Image intensification and thermal imaging are both mainstays in modern surveillance, giving security teams clear visuals long after the sun goes down. This isn’t just for monitoring a perimeter; it’s about gathering solid evidence when it’s needed most.
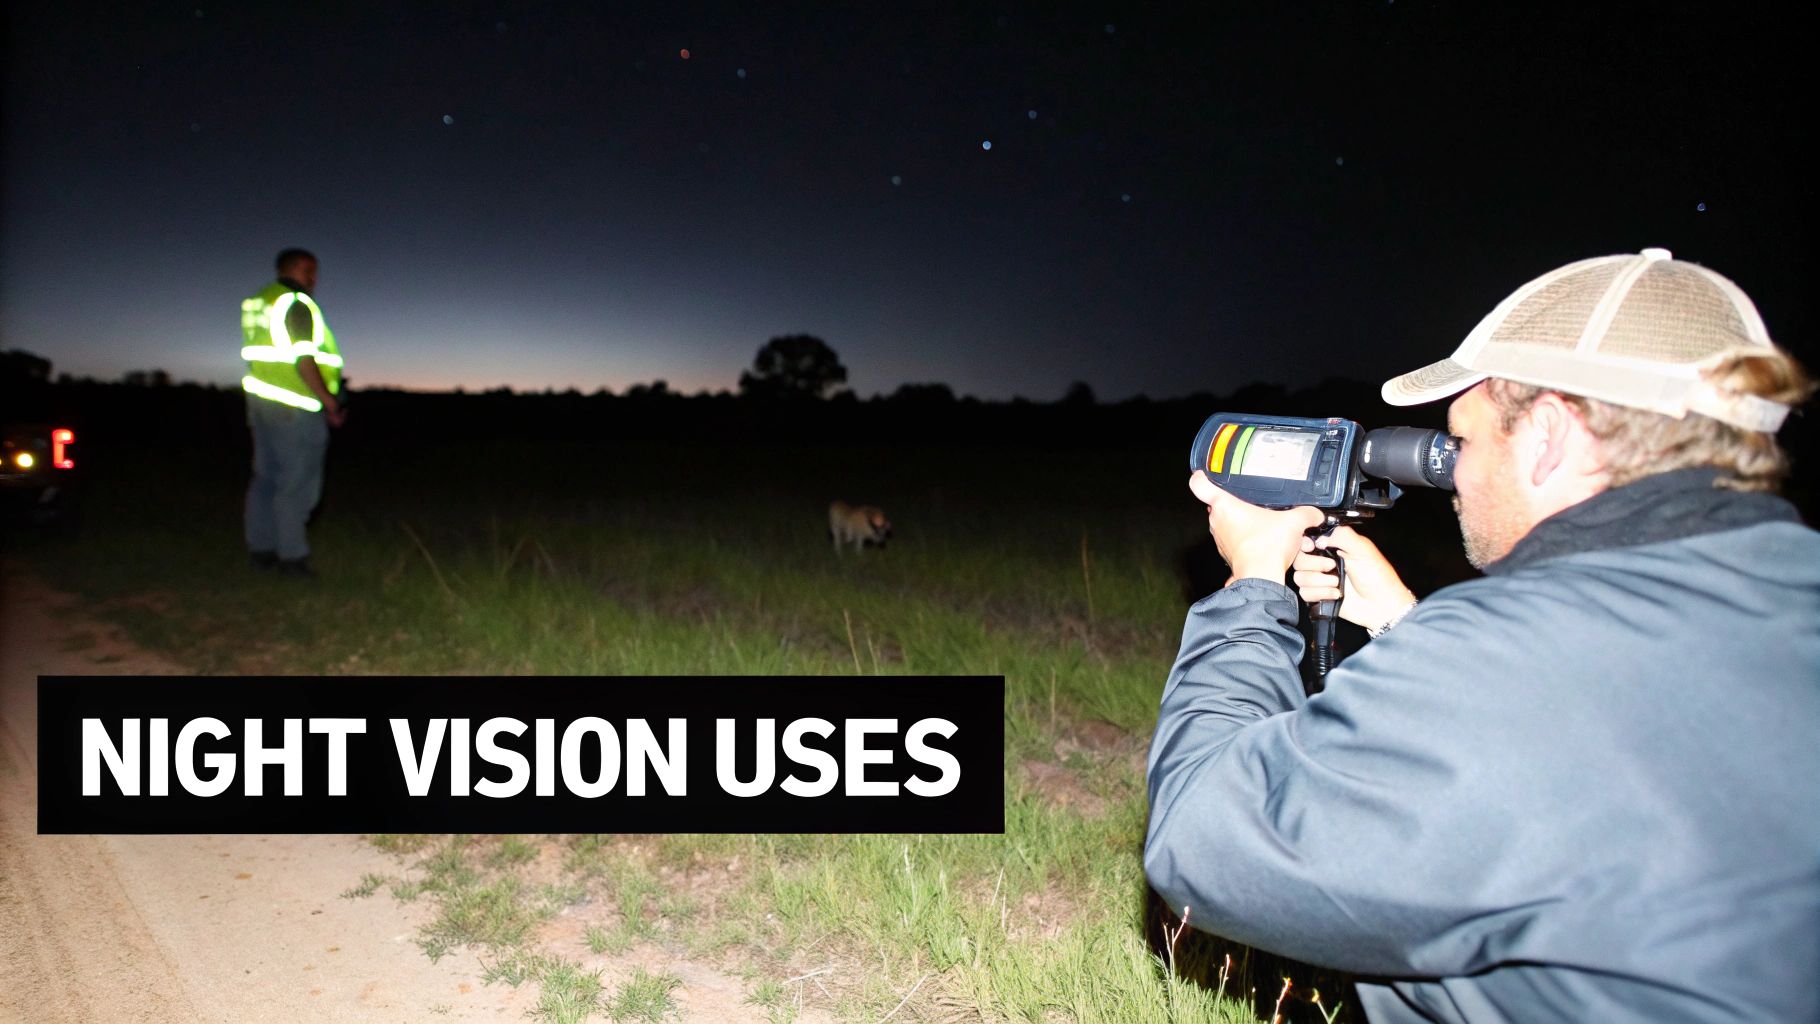
Search and rescue (SAR) teams also rely heavily on this gear. When someone is lost, time is everything.
- Thermal Imaging for SAR: A helicopter crew can use a thermal camera to scan a huge, dark forest and spot the faint heat signature of a missing person. It’s an incredible advantage for finding someone fast.
- Image Intensification for Navigation: Once they have a location, ground teams can use standard night vision goggles (NVGs) to move through rough terrain, spotting roots, rocks, and drops that would be completely hidden otherwise.
In a disaster scenario, helicopters equipped with night vision can fly missions around the clock—assessing damage, dropping off supplies, and moving personnel without being limited by daylight. It completely changes the speed and scope of the response.
Research and Recreation Uses
It’s not all about emergencies, though. Night vision has become a go-to tool for scientists and hobbyists. Wildlife biologists, for instance, use thermal scopes to watch animals at night without shining bright, disruptive lights on them. This gives them a far more natural look at how creatures actually behave in their own environment.
For anyone who loves the outdoors, night vision opens up a whole new dimension. Activities that used to end at sundown are now fair game. Campers, boaters, and hikers use monoculars to safely navigate trails and waterways, spotting hazards before they become a problem. Hunters also gain a serious edge, using thermal or night vision optics to spot game during legal hunting hours after dark, making for a more successful and ethical hunt.
It’s amazing to see how far the technology has come from its highly specialized military roots to become a tool anyone can use.
Common Questions About Night Vision
Now that we’ve pulled back the curtain on how night vision works, let’s tackle some of the questions that almost always come up. It’s one thing to understand the science, but it’s the practical, real-world stuff that really matters when you’re thinking about using this gear.
We’ll clear up a few common myths and give you straight answers on everything from that signature green glow to whether you can actually own military-grade equipment.
Why Is Everything Always Green?
That iconic green glow isn’t just for cinematic effect—it’s a smart decision based on human biology. Our eyes are incredibly sensitive to green light, far more so than any other color. This means we can distinguish between more shades and pick up on subtle details much easier in a green-tinted image.
The phosphor screens inside the image intensifier tubes are specifically designed to glow green when electrons hit them. This choice not only makes the image appear sharper but also dramatically cuts down on eye strain. When you’re looking through a device for hours, that comfort makes a world of difference.
Can You See Through Walls or Fog with Night Vision?
This is probably the biggest misconception out there, thanks to countless movies and video games. The short answer is no. Standard night vision cannot see through solid objects like walls, and it can’t pierce heavy fog or thick smoke.
Image intensification technology needs some light to amplify. If light can’t get through a barrier, your night vision device has nothing to work with. It’s as simple as that.
What about thermal? This is where thermal imaging has an edge. While it still can’t see through a solid wall, it detects heat, not light. Heat radiation can often penetrate obscurants like smoke, dust, and light fog much better than visible light can, allowing you to see a heat signature when a night vision device would just see a gray soup.
This is a perfect example of why it’s so important to match the right tool to the job.
Is It Legal for Me to Own Night Vision?
Absolutely. In most places, including the United States, it is completely legal for civilians to own and use night vision devices. You can even buy the same high-end Generation 3 models used by military and law enforcement professionals.
The big catch, however, involves international travel. High-performance night vision equipment is regulated under the International Traffic in Arms Regulations (ITAR). These rules are extremely strict and mean you cannot legally ship, carry, or otherwise export these devices without getting the right license, which is notoriously difficult to obtain. Always check your local laws before you buy or plan a trip with your gear.
Ready to pierce the darkness with reliable, high-performance gear? At Superior Tactical LLC, we offer a curated selection of night vision and thermal optics for every mission, backed by expert guidance and a 10-year warranty on Gen 3 systems. Equip yourself with the best at https://superiortac.com.