Helmet Mounted Light: The Essential Guide to Choosing Your Tactical Light
A helmet mounted light is exactly what it sounds like: a compact, powerful light source that attaches directly to your helmet. Whether it's for tactical, rescue, or recreational use, it's a critical piece of gear that gives you hands-free illumination precisely where you're looking. It’s not just a convenience; it's a fundamental upgrade for anyone working in the dark.
Why a Helmet Mounted Light Is a Critical Force Multiplier
Try to picture this: you're clearing a dark, unfamiliar building. One hand is on your weapon or primary tool, the other is on a doorknob or keying your radio. Where's your flashlight? If it's in your hand, you're already at a disadvantage, forced to choose between seeing and doing. This is the exact moment a helmet mounted light proves its worth. It’s not just an accessory; it’s an indispensable asset that changes the entire dynamic of how you operate in darkness.
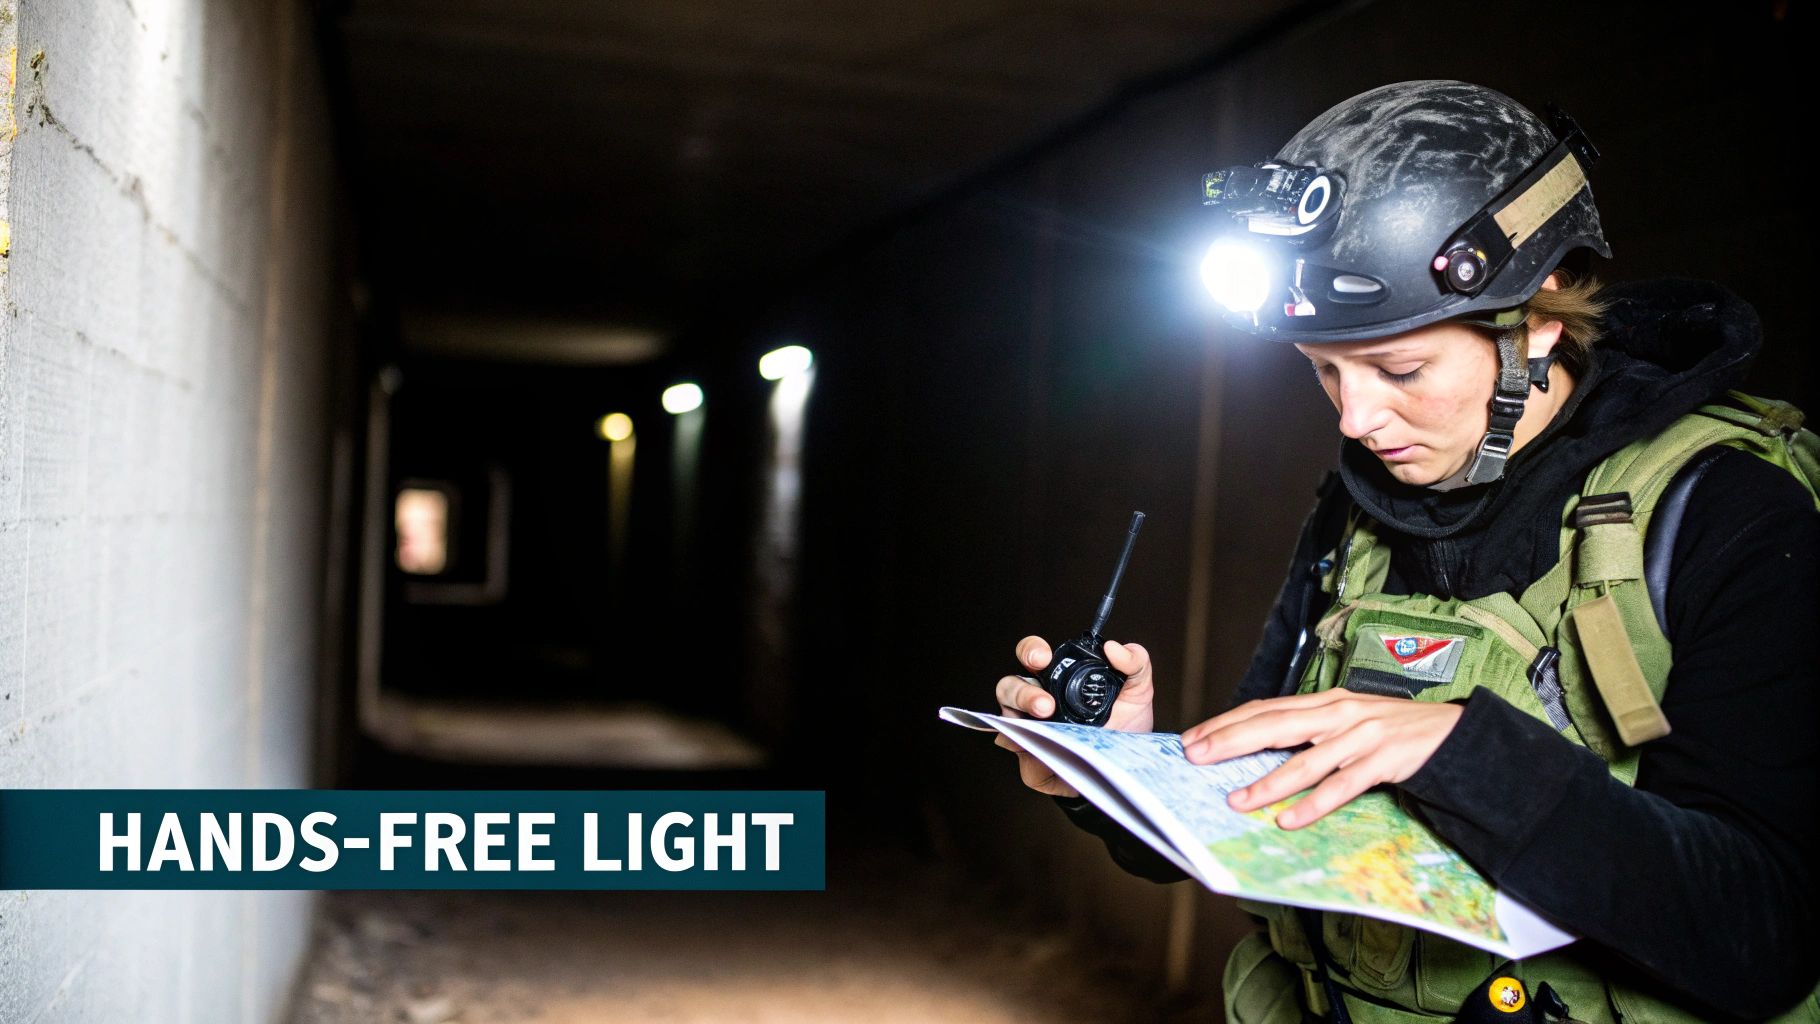
Simply put, it multiplies your effectiveness by freeing up your hands for the mission. You're no longer juggling gear. You can navigate, identify a threat, or give first aid without ever losing light on your objective. The light literally becomes an extension of your vision, moving seamlessly with your natural head movements as you scan an area.
Enhancing Situational Awareness
The most immediate benefit you'll notice is a massive jump in situational awareness. Because the light is always aligned with your gaze, your brain can process what it's seeing instantly and intuitively. There’s zero lag between looking at something and illuminating it, and in a high-stakes situation, that fraction of a second can be the difference-maker.
The advantages really stack up:
- Hands-Free Operation: Keep both hands on your weapon, tools, or comms without fumbling with a separate light.
- Intuitive Direction: The beam of light follows your line of sight automatically. Look left, light goes left. It’s that simple.
- Improved Navigation: Moving through tight spaces or over rough ground becomes far easier and safer when you don't have to aim a light.
- Threat Identification: Your reaction time gets a serious boost when potential threats are lit up the instant you spot them.
A Tactical and Practical Advantage
But its utility goes well beyond just pointing a beam forward. Many of the best modern helmet lights can be articulated, allowing you to angle the beam exactly where you need it.
One of the most effective techniques for room clearing is what we call "umbrella lighting." By tilting your helmet light up towards the ceiling, a team can create a soft, ambient light that illuminates the entire room without blinding each other. This is a game-changer for post-assault tasks like casualty care or handling detainees.
This simple feature transforms your personal light into a shared team asset, improving coordination and overall safety. Whether you're a SAR tech needing a focused spotlight or a police officer needing a low-profile task light for writing a note, a single piece of gear adapts to whatever the mission demands. It’s far more than just a light on your head.
Decoding the Language of Tactical Illumination
To pick the right helmet-mounted light, you first have to speak the language. Staring at a spec sheet can feel like trying to read a foreign language, but once you understand what the terms mean out in the field, they become powerful decision-making tools. It’s a lot like understanding the difference between horsepower and torque in a truck—both matter, but they tell you very different things about what it can do.
Let’s break down the core concepts behind tactical lighting. We'll turn the technical jargon into practical knowledge so you can confidently judge a light's real-world capabilities for your specific mission.
White Light vs. Infrared Light
The most fundamental choice you'll make is between visible white light and covert Infrared (IR) light. Each serves a completely different purpose, and many of the best units give you both.
- Visible White Light: This is your standard flashlight beam. It’s what you use for general navigation, identifying potential threats, or handling administrative tasks when staying hidden isn't the top priority.
- Infrared (IR) Light: This is the game-changer. IR is invisible to the naked eye but shines like a floodlight when you’re looking through night vision goggles (NVGs). It lets you own the dark, navigating and identifying targets without giving away your position to anyone not on your level.
Think of white light as your truck’s high beams—great for seeing what's ahead, but everyone on the road knows you're there. IR light, on the other hand, is a secret handshake that only you and your team can see. This capability is the cornerstone of modern night operations.
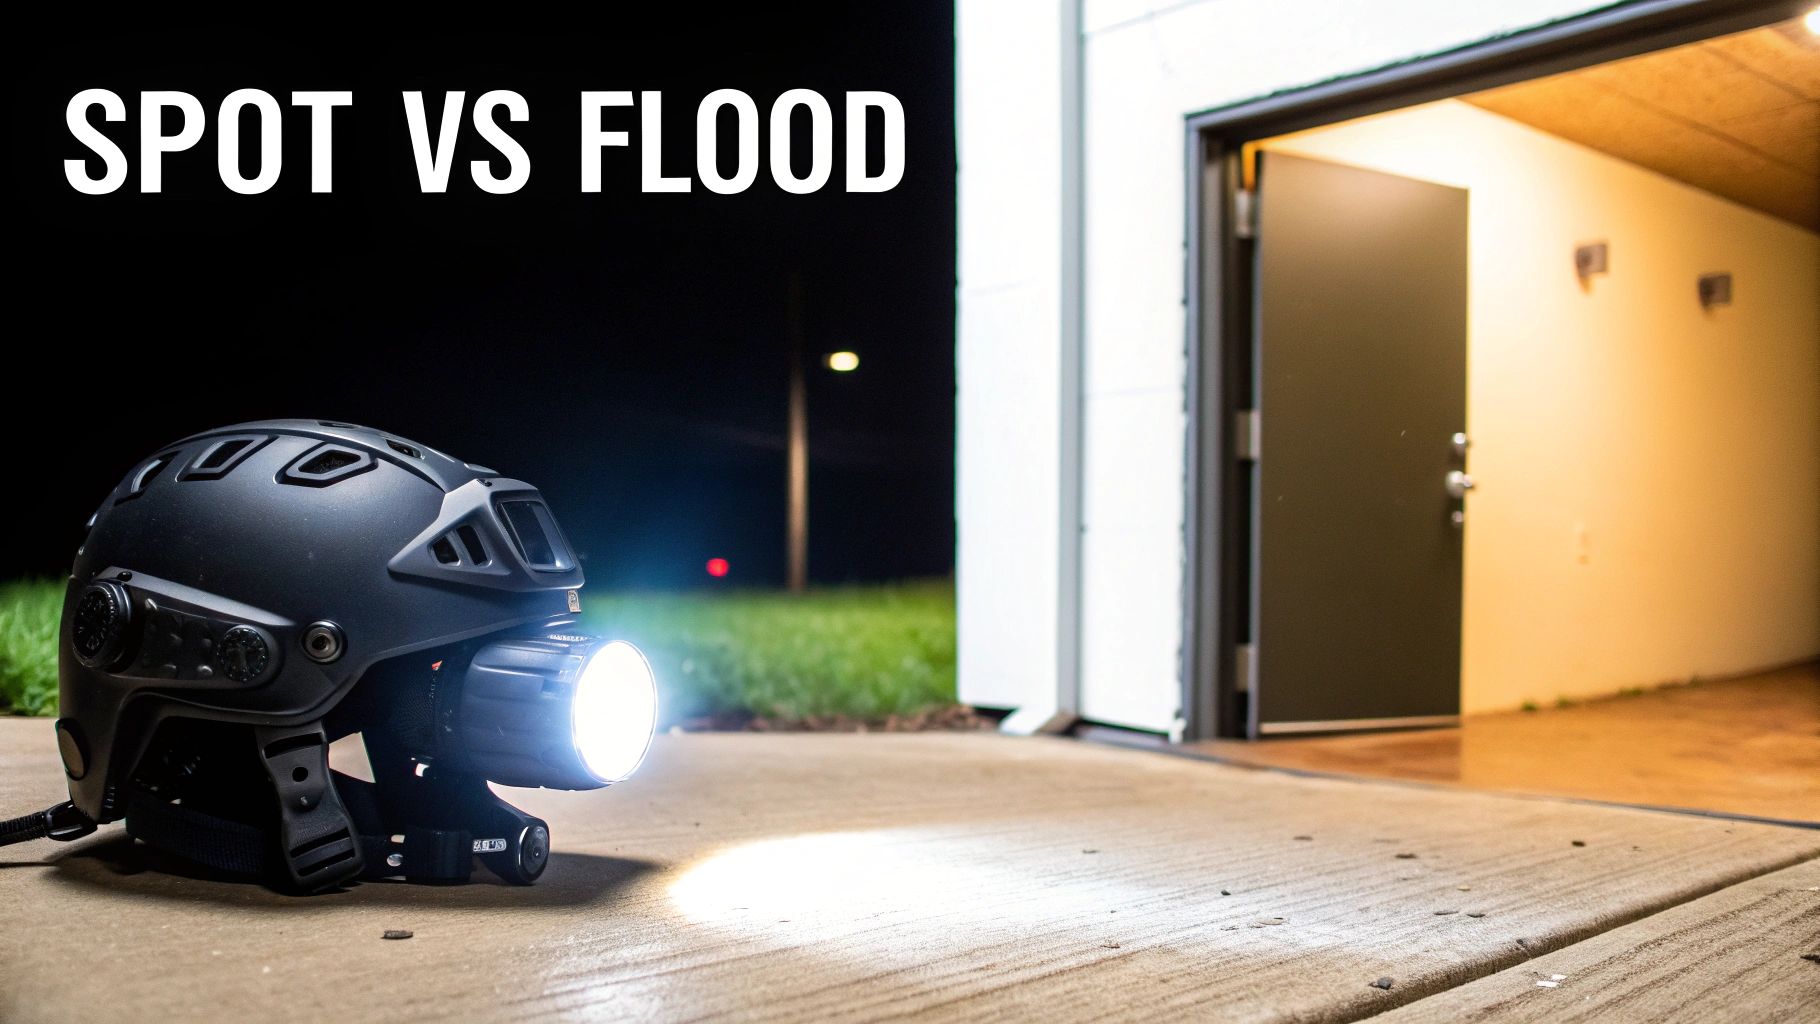
Understanding Beam Shape: Spot vs. Flood
Next up is how the light is actually thrown downrange. The shape of the beam has a massive impact on its practical use. Most helmet lights produce a beam that’s primarily a "spot," a "flood," or a functional combination of both.
A spot beam acts like a searchlight. It concentrates all its power into a tight, intense beam that excels at long-range tasks. This is what you need for positively identifying something way out in a field or at the end of a long, dark corridor.
A flood beam is the total opposite—it’s more like a lantern. It casts a wide, even wash of light that illuminates everything in your immediate area. It's perfect for working on tasks right in front of you, moving through tight spaces, or just maintaining your peripheral awareness without a blinding central hot spot.
The sweet spot for many users is a light that offers a compromise: a bright, focused center spot for distance, surrounded by a less-intense "spill" of flood light. This hybrid approach gives you the best of both worlds—long-range punch and close-quarters situational awareness.
Lumens and Candela: The Brightness Equation
This is where a lot of people get tripped up, but the difference is simple and absolutely critical. Lumens and candela are the two numbers that define a light's output, but they measure very different aspects of its performance.
Lumens measure the total raw output of light coming from the emitter. Think of this as the total volume of light being produced.
Candela, on the other hand, measures the intensity or focus of that light. This is what translates directly to how far the beam will throw.
A light with super high lumens but low candela will create a massive, bright flood that lights up a room but dies out quickly at a distance. Conversely, a high-candela light can slice through the darkness and illuminate a target hundreds of meters away, even if its total lumen count isn't record-breaking. Knowing what you need from this balance is everything.
To put it all together, here’s a quick-reference table.
Light Beam Characteristics at a Glance
| Characteristic | Flood Beam | Spot Beam | Primary Use |
|---|---|---|---|
| Lumens | High lumens create a wide, bright area | Lumens contribute to overall brightness | Situational awareness, indoor clearing, admin tasks |
| Candela | Low candela, resulting in short throw | High candela for a focused, long-range beam | PID at distance, barrier penetration, signaling |
| Beam Angle | Wide and diffuse | Narrow and focused | Wide for CQB, narrow for open terrain |
| Best For | Up-close tasks, navigation in tight spaces | Positive Identification (PID) at range | A combination is often ideal for all-around use |
Getting a handle on these key specs moves you from being a consumer to an informed operator who can select gear based on mission-critical performance, not just marketing hype.
The market for helmet-mounted lights is a specialized corner of the tactical industry, but it's growing fast. Projections show the global market hitting around $350 million in 2025, with a steady 7% annual growth rate. This boom is driven by huge leaps in LED tech that give us more brightness, better battery life, and tougher construction—all must-haves for the pros. For retailers like Superior Tactical LLC who cater to law enforcement and security specialists, these lights are the natural partner to any night vision setup. You can discover more insights about the growing HML market from industry analysts tracking these trends.
Finding the Right Mount for Your Helmet Setup
A top-of-the-line helmet light is pretty much worthless if it's not securely fastened to your helmet. The mount is the single most critical link in the entire system, dictating how stable, adjustable, and reliable your light will be when you’re on the move. Finding the right one isn't about some universal "best" option; it’s about matching the hardware to your specific helmet and how you plan to use it.
Think of it like picking scope rings for a precision rifle. Just as those rings need to lock your optic to the rifle's rail without any play to hold zero, your light mount needs to create a rock-solid connection. A wobbly or loose mount turns an expensive piece of kit into a liability right when you need it most.
The Most Common Helmet Rail Systems
Most modern tactical helmets come with accessory rails already installed, giving you a universal docking station for lights, comms, and cameras. The very first step is figuring out which system you're working with.
-
ARC Rails (Accessory Rail Connector): Originally an Ops-Core design, the ARC rail is basically the industry standard now. You'll find it on helmets from Crye Precision, Ops-Core, Galvion, and countless others. Its dovetail shape makes sliding accessories on and off quick and easy, and it's known for being tough and having a massive ecosystem of compatible gear.
-
M-LOK Rails: If you're familiar with the firearms world, you've seen M-LOK. Brands like MTEK and Team Wendy have brought this system over to helmets. It uses rectangular slots for direct-attach accessories, which can result in a lighter, lower-profile setup compared to ARC rails.
Of course, some older or non-tactical helmets might not have rails at all. In those cases, you're looking at direct screw-on or clamp-style mounts. They can get the job done, but you lose out on the quick modularity that makes modern rail systems so practical.
Choosing Your Mounting Hardware
Once you know your rail type, you can pick the right mount. The name of the game is finding something that locks down tight but still gives you the adjustment you need for your mission.
Many of the best light systems, especially those using something like the S&S Precision M-AX Mount, come with adapters for both ARC and M-LOK rails. That kind of versatility is huge, because it means your light can move with you if you ever switch helmet platforms. These articulating mounts are game-changers, letting you swing the light exactly where it needs to be—straight ahead for illumination, angled down for map reading, or even pointed up to bounce light off a ceiling and "umbrella light" an entire room.
One of the most overlooked perks of an articulating mount is being able to tuck the light snugly against the helmet when you're not using it. This cuts way down on the snag hazard, which is a massive deal when you're moving through thick woods, getting in and out of vehicles, or clearing tight spaces.
Strategic Placement and System Integration
Where you put the light is just as important as how you stick it on. You want to place it so it doesn't interfere with your other gear or cast annoying shadows. For a right-handed shooter, putting the light on the left side of the helmet can keep your rifle from blocking the beam when you bring it up.
You also have to think about how the light plays with everything else on your head—your comms headset, your night vision, and all the cables and battery packs that go with them. A good setup ensures your helmet mounted light becomes a seamless part of your headborne system, not a clumsy add-on that gets in the way. This is particularly true when running lights alongside NVGs, where the whole mounting ecosystem is critical. For a deeper dive into this, you can learn more about dovetail mounts for night vision goggles in our comprehensive guide.
Ultimately, a well-planned system feels balanced, stays snag-free, and works without you having to think about it.
Evaluating the Key Features of a Helmet Light
Alright, let's get down to the brass tacks. You know what a helmet light is and why you need one, but now it's time to sift through the specs and figure out which one is right for you. This is where the real decision-making happens.
Choosing the right helmet mounted light is all about matching the hardware to your mission. Forget just looking for the brightest light on the shelf; you need a balanced tool where every feature—from lumens to the type of switch—serves a purpose. Let's break down the numbers and terms that actually matter.
Brightness and Beam Performance
When you look at a light's performance, it all comes down to two key specs: lumens and candela. They work together, and you need to know which one to prioritize.
For close-quarters work, like a law enforcement officer clearing a building, you're looking for a good amount of spill, or floodlight. A beam with 300-500 lumens is often the sweet spot. It’s enough to light up an entire room without being so intense that the reflection off a white wall—what we call "splashback"—blinds you.
But if you're a hunter or on a search and rescue team, your needs are totally different. You need to see things far away. That's where candela comes in. A light pushing over 15,000 candela can throw a tight, focused beam out past 200 meters, giving you the reach needed for positive identification in open country. The best lights strike a good balance, giving you both usable spill up close and a respectable amount of throw.
Power Source and Runtimes
The battery is the engine of your light. The choice you make here is a classic trade-off between performance, convenience, and long-term cost.
- CR123A Batteries: These are the old faithfuls of the tactical world. They can sit in a drawer for up to 10 years and still work, and they don't flinch in extreme cold or heat. The downside? They're single-use, and the cost can add up if you're a heavy user.
- Rechargeable Batteries (18650, 18350): Rechargeables like the 18650 are powerhouses that save you money in the long run. The trade-off is that their performance can dip in the cold, and you have to be disciplined about keeping them charged.
Pay close attention to the manufacturer's runtimes. A light that claims a blistering 1,000 lumens but can only hold that for two minutes before automatically "stepping down" to a much lower output isn't very practical. A light that can sustain a solid 500 lumens for an hour or more is a much more dependable tool in the field.
Durability and Construction
Let’s be real—your helmet is going to get knocked around. Your light needs to be tough enough to handle the same abuse. Machined aluminum is a fantastic choice, offering a great balance of strength and low weight. High-impact polymer is another solid option that shaves off even more weight, though it may not be quite as bombproof as its metal counterparts.
Weather resistance is non-negotiable. Look for at least an IPX7 rating, which means the light can handle being submerged in a meter of water for 30 minutes. It'll survive a serious downpour, no problem. An IP68 rating is even better, meaning it's completely sealed against dust and can handle being underwater for extended periods. If you want to learn more about separating the tough gear from the toys, check out our guide on how to identify authentic tactical flashlights online.
The All-Important User Interface
How you turn the light on and off is just as critical as how bright it is. Under stress, a clunky, confusing switch can be a major liability. The user interface (UI) needs to be dead simple, giving you instant access to white light, IR, or momentary-on without having to think about it.
A "lockout" mode is one of the most underrated features you can find. It’s a simple function—usually a twist of the bezel or a button press sequence—that prevents the light from turning on by accident in your bag. It saves your batteries and, more importantly, protects your light discipline.
Some lights also offer programmable outputs, which let you set the brightness levels you use most often. A good UI should feel like an extension of your hand, working with you when seconds count.
Helmet Light Feature Comparison for Different Missions
To put this all together, here’s a quick look at how these key specs stack up for different users and their typical environments.
| Specification | Law Enforcement (CQB) | Hunting / Outdoors | General Purpose |
|---|---|---|---|
| Lumens | 300-500 (balanced for indoor use) | 500+ (for broad area illumination) | 300+ (versatile for various tasks) |
| Candela | 5,000-15,000 (wide spill over long throw) | 15,000+ (prioritizes distance) | 10,000+ (a good balance of throw and spill) |
| Primary Power Source | CR123A (reliability in any temp) or 18650 (rechargeable) | 18650/18350 (cost-effective for long runtimes) | Rechargeable (convenience and lower long-term cost) |
| Key UI Feature | Instant momentary-on, easy mode switching | Simple on/off, accessible high-output mode | Lockout mode, multiple brightness levels |
| Durability Rating | IPX7 or higher, aluminum body | IPX7 or higher, weather-sealed | IPX4 or higher, polymer or aluminum |
This table helps illustrate that there’s no single "best" light—only the best light for the job you need it to do.
This decision tree gives you a visual roadmap for figuring out the right mount for your specific helmet.
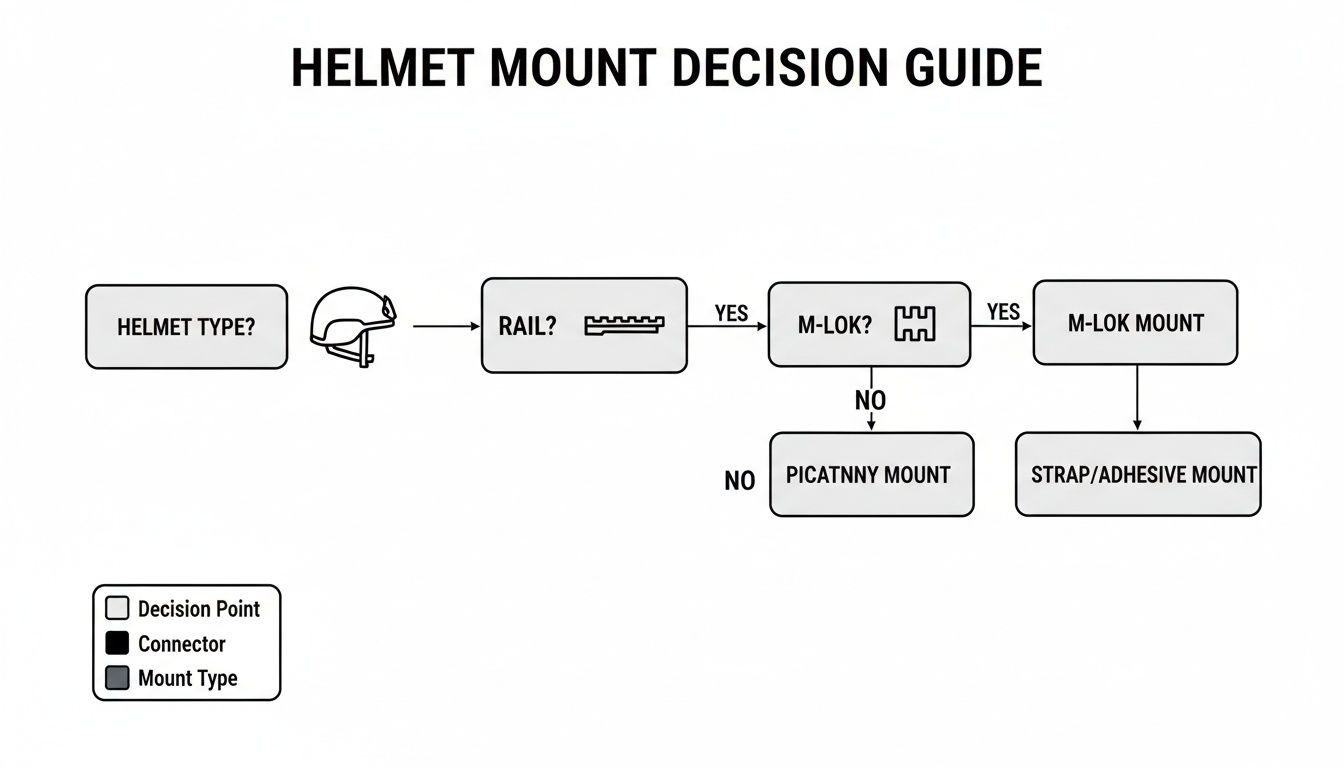
As you can see, the process starts with one simple question: what helmet are you running? Once you know that, the rest of the pieces fall into place.
How to Integrate Lights with Night Vision Devices
For anyone running serious kit, a helmet-mounted light isn’t just a standalone accessory—it’s a core piece of a much larger headborne system. This is never more true than when you’re integrating it with night vision devices (NVDs). The way your light, particularly its Infrared (IR) illuminator, works with your NVD is what truly lets you own the night.
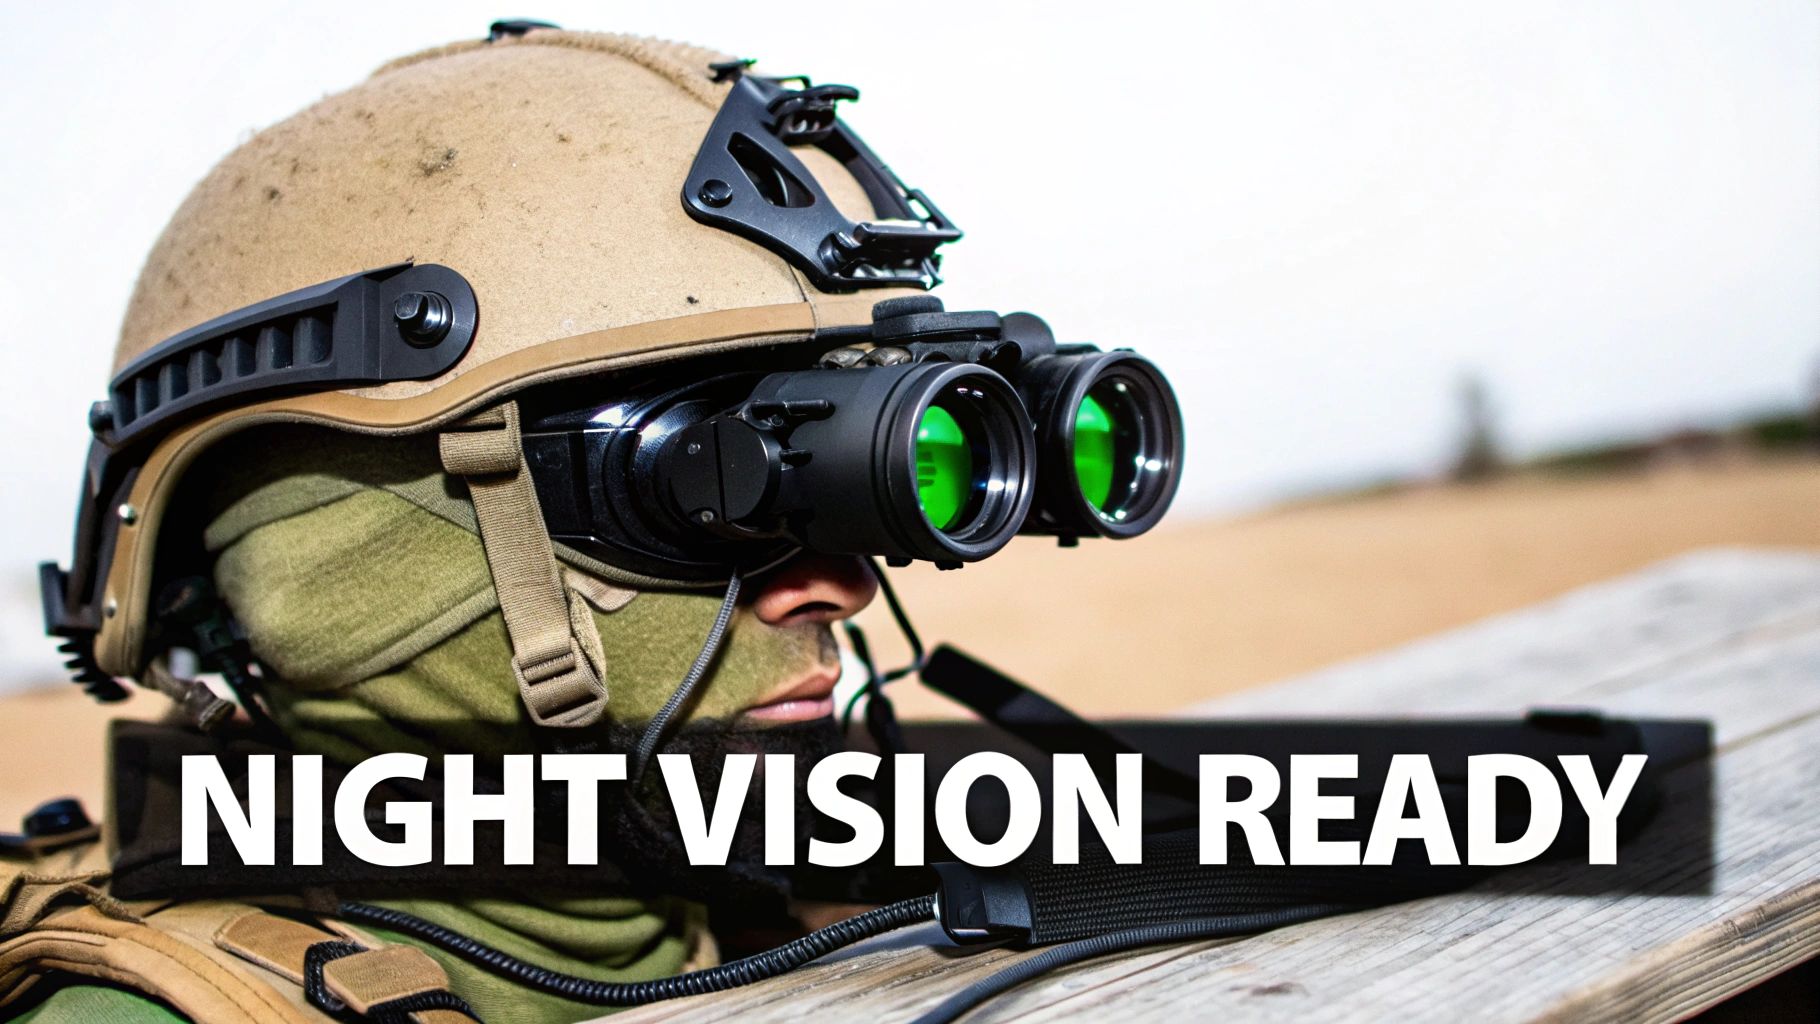
As incredible as NVDs are, they're image intensifiers, not magic. They need some ambient light to work, gathering faint traces from the moon or stars and amplifying them. But what happens when you step into a windowless building or a deep cave with zero light? Your expensive nods go blind. That’s where your helmet light’s IR illuminator becomes absolutely mission-critical.
The Power of Active IR Illumination
Think of your NVD like a powerful radio amplifier. If there's a faint signal out there (a bit of starlight), the amp can boost it into something you can hear clearly. But if there’s no signal at all—just dead air—the amplifier has nothing to work with.
An IR illuminator is like broadcasting your own private signal that only your NVD can see. It floods the area with infrared light, which is totally invisible to the naked eye but acts like a high-powered spotlight for your night vision. This is what we call "active" illumination, and it lets you see with total clarity even in pitch-black environments where passive observation fails.
A word of caution: light discipline is everything when using IR. While you might be invisible to the naked eye, your IR illuminator lights you up like a Christmas tree to anyone else wearing night vision. The key is to use it strategically—only when you absolutely have to, and in short, controlled bursts. See, don't be seen.
Managing Light Splash and System Interference
One of the biggest real-world headaches of running a light and NVD together is dealing with "light splash." This is when the beam from your helmet light bounces off nearby objects—like your rifle optic, suppressor, or even your own hands—creating a blinding glare in your NVD.
Getting this right comes down to careful placement. Pushing your light as far forward on the helmet rail as possible helps get the beam out past your gear. Another problem is "gating," where a bright splash of light causes your NVD’s auto-gating feature to dim the entire image, killing your situational awareness. It's a delicate balancing act. Understanding your gear is the first step, and our guide on what defines PVS-14 housing provides a great starting point for dialing in your setup.
To beat these issues, seasoned operators use a few key tricks:
- Strategic Articulation: This is where articulating mounts earn their keep. They let you angle the light to hit your target precisely without washing out your optics or gear.
- Beam Shaping Devices: Simple accessories like screw-on caps with pinholes can tame a powerful IR flood, turning it into a soft, low-output task light. It’s perfect for map reading or admin tasks without blowing out your night vision.
- Mindful Cable Management: A clean helmet is a functional helmet. Snagged cables aren’t just annoying; they can block your view, get ripped out, or prevent your light from moving freely. Use ranger bands or dedicated clips to lock everything down.
By tackling these integration challenges head-on, you turn a bunch of individual parts into a single, cohesive system. Every component works together, sharpening your edge in any low-light situation.
Getting Your Gear Set Up and Running it Right
Having the best light on the market doesn't mean much if it's not installed correctly or if you don't know how to run it. Getting your helmet-mounted light properly set up and knowing the right way to use it is what turns a cool piece of gear into a genuine tactical advantage. Let's get hands-on and cover what you need to know.
A solid setup starts with the mount. It doesn't matter if you're using an ARC or M-LOK rail; that mount has to be rock-solid with zero play. Torque it down to the manufacturer's spec. Overtighten it and you risk cracking the mount or rail. Too loose, and your light will shift right when you need it most.
Next up, get your cables under control. A loose wire is an accident waiting to happen—it's a massive snag hazard that can rip gear right off your helmet. Tame those wires with zip ties, ranger bands, or purpose-built clips. Run them tight along the helmet's shell so they stay put and out of your way.
Keeping Your Light in Fighting Shape
Your helmet light is a critical piece of kit, just like your rifle or your optic. It needs regular, simple maintenance to make sure it fires up every single time. These small habits are what prevent catastrophic failures when it counts.
Here's a quick, no-nonsense checklist:
- Clean the Lens: A dirty lens kills your light output. Keep a microfiber cloth handy and wipe off any mud, dust, or fingerprints for a clean, powerful beam.
- Check the Contacts: Every so often, pop the tailcap and take a look at the battery contacts. If you see any gunk or corrosion, a quick wipe with a cotton swab and a little isopropyl alcohol will clean them right up.
- Inspect O-Rings: The little rubber O-rings are what keep water out. Make sure they aren't cracked or dry. A tiny dab of silicone grease keeps them pliable and maintains that waterproof seal.
Taking a few minutes to do this ensures your gear is always ready to go.
Running the Light Like a Pro
How you use the light is just as important as the hardware itself. Smart tactics let you see what you need to see without turning yourself into a giant target. The first and most critical skill is mastering the difference between momentary-on and constant-on.
Your momentary switch is your go-to. It lets you "splash" an area with a quick burst of light to get information, then go dark before anyone can lock onto your position. Constant-on has its place, but momentary is key for light discipline.
For team situations, a great technique is "umbrella lighting." Angle your helmet light up at the ceiling. This bounces a soft, diffused light around the room, illuminating everything without blinding your teammates. It’s perfect for searching, bagging evidence, or tending to a casualty after a room is secure.
Finally, learn to use your helmet light and weapon light as a team. The helmet light, with its wider, less intense beam, is for moving around and seeing what’s right in front of you. Save that high-candela, tightly focused weapon light for one thing: positively identifying a threat downrange. This approach saves battery and prevents you from backsplashing light off nearby walls and giving away your position.
The idea of putting tools on a helmet isn't new—the first patents for helmet-mounted aiming devices showed up way back in World War I. That century-long journey from simple steel pots to the integrated platforms we use today is what got us here. You can learn more about the evolution of tactical helmets to appreciate just how far the technology has come.
Your Helmet Light Questions, Answered
Alright, you've got the basics down, but now come the practical questions—the ones that pop up right before you're ready to pull the trigger on a purchase. Let's tackle the most common ones we hear from guys in the field.
Think of this as the final briefing. We'll get into the nitty-gritty details that really determine how a light will perform for you when it counts.
What’s the Right Lumen Count?
This is easily the question I get asked most often. The truth is, there's no magic number. It all comes down to where and how you’ll be using the light.
For most situations—think law enforcement clearing a building or general-purpose use—a light in the 300 to 500 lumen range is the sweet spot. That's plenty of power to light up a room or a trail without blinding yourself with splashback from a nearby wall.
Now, if you're doing search and rescue or need to spot something way out in an open field, you'll want to look at something pushing 500 lumens or more. Just remember the golden rule: high lumens are useless without high candela to throw that light downrange.
The biggest mistake people make is getting fixated on the highest lumen number they can find. A well-engineered 400-lumen beam will almost always be more useful for tactical work than a poorly focused 1000-lumen floodlight. It’s all about balance, not just raw power.
Polymer vs. Aluminum: Which Body Is Better?
Both materials have their place, and the "best" choice really boils down to what you value more: sheer toughness or minimal weight.
- Aluminum: If you need something that can take an absolute beating, aluminum is your answer. A machined aluminum body is built for hard-use environments where gear failure simply isn't an option. It's the standard for a reason.
- Polymer: Don't mistake polymer for cheap plastic. Modern high-impact polymers are incredibly tough and have the huge advantage of being significantly lighter. If your goal is to build out the lightest helmet rig possible, a quality polymer light is the way to go.
So, you're choosing between bombproof durability with aluminum versus a tough, lightweight alternative with polymer.
How Do I Get the Most Out of My Batteries?
Battery management is a skill, and it's a critical one. You don't want your light dying in the middle of something important.
The single best thing you can do is use your momentary-on switch. Train yourself to use quick flashes of light only when needed, instead of leaving the light on constantly. This one habit will stretch your battery life further than you can imagine.
Beyond that, the rules are simple. Always carry spares. If you use rechargeables, make a habit of charging them after every mission. And finally, get familiar with your light's lockout mode. Use it anytime you toss your helmet in a bag to prevent it from accidentally turning on, draining your battery, and maybe even giving away your position.
Ready to build a truly professional headborne system? The experts at Superior Tactical LLC can help you select the perfect helmet mounted light and integrate it seamlessly with your existing night vision and tactical gear. Explore our curated selection of industry-leading illumination tools and accessories today at https://superiortac.com.