How Night Vision Goggles Work A Complete Guide
At its core, night vision technology isn't a single thing. It's really two completely different ways of solving the same problem: how to see when our eyes can't. The first method, image intensification, takes the tiny, invisible traces of light in a dark environment and cranks up the volume, so to speak. The second, thermal imaging, ignores light altogether and instead sees the world in terms of heat.
The Two Paths to Seeing in the Dark
When most people think of night vision, they picture the classic green-glowing view from movies and video games. That’s the work of image intensification, often called I². Think of it as a light amplifier on steroids. It scoops up faint ambient light from the moon, stars, or even distant city glow—light our naked eyes can't even register—and boosts it thousands of times to paint a visible picture.
The other path is thermal imaging. This technology doesn't care about light at all. You could be in the darkest cave on earth, and a thermal device would work just fine.
Instead of light, thermal imagers see heat. Every person, animal, and running engine gives off infrared energy. A thermal device captures this heat signature and converts it into an image, letting you see straight through total darkness, fog, or smoke.
Understanding this split is the first and most critical step for anyone serious about operating in the dark. One technology works with light, the other with heat. They are not interchangeable.
Night Vision Technology at a Glance
Before we get into the nitty-gritty of photocathodes and microchannel plates, let's put these two technologies side-by-side. This quick comparison really highlights why you’d choose one over the other for a specific job.
As a rule of thumb, I² is for identifying what you're looking at, while thermal is for detecting that something is there in the first place.
| Feature | Image Intensification (I²) | Thermal Imaging |
|---|---|---|
| Primary Function | Amplifies existing ambient light | Detects infrared (heat) energy |
| Light Requirement | Needs some light (starlight, moonlight) | Works in absolute, total darkness |
| Best Use Case | Navigation and target identification | Detection and surveillance |
| View Through Glass | Can see through standard windows | Cannot see through glass |
| Typical Image | Green or white/black monochrome | Grayscale or color palettes (heat map) |
This table makes the core differences clear, but the real magic is in the details of how each system achieves its goal, which we'll dive into next.
The Science Behind Image Intensification
At the core of nearly every pair of night vision goggles is a process called image intensification. This isn't about seeing heat; it's about taking the tiniest, faintest traces of ambient light—from the moon, stars, or even a porch light miles away—and amplifying them thousands of times over. It's a fascinating dance between physics and engineering.
This whole light-multiplying miracle happens inside a vacuum-sealed component called the image intensifier tube. You can think of this tube as the heart of your night vision device. It takes an almost invisible scene and, through a few critical steps, turns it into a bright, clear picture you can actually see.
The diagram below really nails the fundamental difference between this technology and thermal imaging. One works with light, the other with heat.
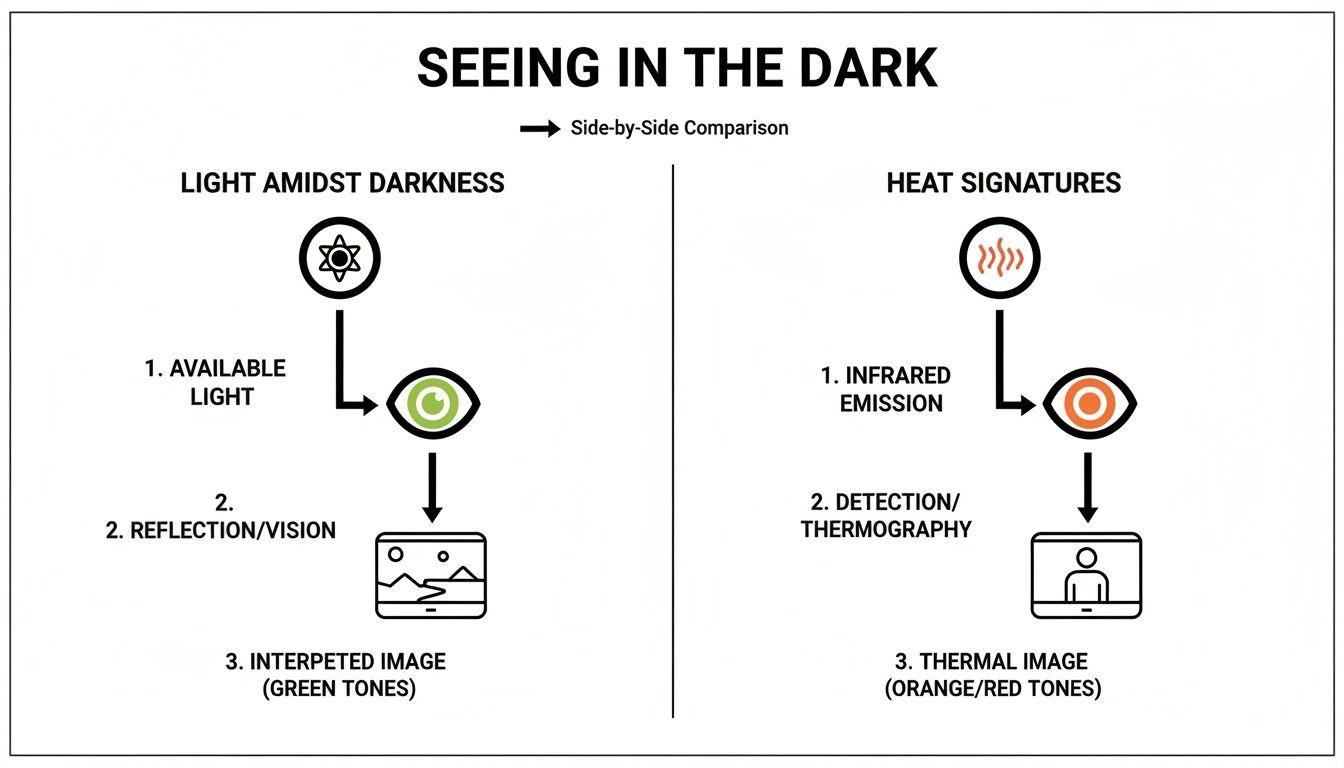
As you can see, even though both let you operate in the dark, they are interpreting completely different parts of the electromagnetic spectrum to get the job done.
Step 1: Gathering the Light
It all starts at the objective lens, the big piece of glass at the front of the unit. Its job is simple but absolutely crucial: gather every last bit of available light and focus it. This light is made up of tiny energy particles called photons.
When you're out in the pitch black, there are very few photons to work with. That’s why the quality of this front lens is so important—a better lens is more efficient at collecting these scarce photons, which is the first step toward getting a clean, sharp image.
Step 2: From Light to Electricity
Once the objective lens has done its work, the focused photons slam into a highly sensitive surface called the photocathode. This isn't just a piece of coated glass; it's a marvel of material science designed to do one thing perfectly: when a photon hits it, it kicks out an electron.
This is where the magic really begins. The device has just converted the light energy from the outside world into electrical energy inside the tube. The pattern of electrons that gets released is a perfect electrical duplicate of the dark scene in front of you.
The Big Idea: The photocathode is a translator. It converts the "language" of light (photons) into the "language" of electricity (electrons). How well it does this job is a huge factor in the overall performance of the night vision device.
The specific materials used to build the photocathode are what really separate the different generations of night vision, a topic we'll get into a bit later.
Step 3: Multiplying the Signal
So now we have a faint stream of electrons, basically an invisible electrical ghost of the original scene. It's not enough to see, so it needs to be amplified. That's the job of the microchannel plate (MCP).
The MCP is an incredibly thin glass disc, maybe a millimeter thick, that's riddled with millions of microscopic, hollow channels. Think of it like a honeycomb made of glass.
When an electron from the photocathode enters one of these channels, a high voltage running across the MCP sends it careening down the tube. Every time it smacks against the channel wall, it knocks several more electrons loose in a chain reaction.
- A single electron enters a channel.
- It hits the wall, releasing three or four new electrons.
- Those new electrons accelerate and hit the wall, each releasing even more.
- This cascade continues down the entire length of the tiny channel.
By the time this electron avalanche reaches the other side, that one single electron has been multiplied into thousands. This is the "intensification" part of image intensification. It's also where you can find major performance differences, which you can read about in our guide on thin-filmed and unfilmed image intensifier tubes.
Step 4: Back to a Visible Image
This supercharged cloud of electrons now exits the MCP, flies across a tiny gap, and slams into the final component: the phosphor screen. This screen is coated with a special material that glows brightly whenever it's hit by an electron.
This step effectively converts that amplified electrical energy back into visible light. But because there are now thousands of times more particles hitting the screen than there were photons entering the device, the image it creates is bright enough for your eye to easily see.
Finally, you look through the eyepiece lens, which focuses this bright green or white image so your eye can perceive it clearly. This whole journey—from photon to visible image—happens so fast it feels instantaneous, giving you a real-time window into the dark.
Understanding Night Vision Generations
Let's get one thing straight: not all night vision is created equal. The term gets thrown around a lot, but it covers a huge range of gear with massive differences in performance. The key is understanding the "generations."
Each generation marks a major breakthrough in the guts of the device—the image intensifier tube. This directly translates to how well you can see, how clear the image is, and how long the unit will last. It's the reason a pro-grade monocular costs thousands more than a budget scope, and it’s the most important factor to understand before you invest.
This isn't just about making a dark night brighter. It’s about getting a sharp, clean image you can actually rely on when the lights go out.
Gen 0 and Gen 1: The Starting Point
The earliest systems, what we call Generation 0, were brute-force technology. Developed back in the mid-20th century, these things were massive, clunky, and absolutely required a powerful infrared (IR) illuminator to see anything. Think of it as a mandatory, invisible flashlight. Because they were "active" systems blasting out IR, they were also screamingly obvious to anyone else with night vision.
Generation 1 (Gen 1), which showed up in the 1960s, was a huge step forward because it was the first truly passive system. It could amplify existing ambient light from the moon and stars without needing that constant IR illuminator. Tactically, that was a game-changer.
Still, Gen 1 gear has some serious drawbacks you’ll notice right away:
- Image Distortion: You'll often see a "fisheye" effect, where everything around the edges of the image is warped and blurry.
- Blooming: Point it at a bright light, like a streetlight or a flashlight beam, and you get a huge, washed-out halo that can blind the whole tube.
- Short Lifespan: These tubes don't last long. You're looking at a realistic operational life of about 1,500 hours.
For the price, Gen 1 is fine for casual backyard observation, but it’s not something you'd want to depend on for anything serious.
Gen 2: A Major Leap in Performance
When Generation 2 (Gen 2) hit the scene in the 1970s, it completely changed the game. The secret sauce was the addition of a brand-new component inside the tube: the microchannel plate (MCP). This little wafer acts as an electron multiplier, dramatically cranking up the light amplification.
The result was an image that was miles ahead of Gen 1—brighter, significantly clearer, and with way less of that classic edge distortion. Gen 2 devices are a fantastic middle ground, offering solid performance that makes them a go-to for serious enthusiasts and even some professional roles where budget is a major factor. They also last a lot longer, typically around 5,000 hours.
Key Takeaway: The microchannel plate is what defines Gen 2 technology. It’s the single component that allowed night vision to become truly effective in very low-light conditions, creating a much more usable image than anything that came before it.
Gen 3: The Professional Standard
Today, Generation 3 (Gen 3) is the gold standard. This is the tech used by military forces, law enforcement, and anyone who needs uncompromising performance when it matters most. The jump from Gen 2 to Gen 3 wasn't just an improvement; it was a fundamental shift in material science.
The breakthrough was a new photocathode made of gallium arsenide (GaAs). This material is incredibly sensitive to light, especially in the near-infrared part of the spectrum that we can't see. It's far more efficient at turning those faint photons into electrons, which is the first and most critical step in the whole process.
What this means for the user is an exceptionally bright, crisp, and high-resolution image, even on a cloudy, moonless night where older generations would just show you static. This is the technology that truly lets you own the dark. If you're interested in the details, you can learn more about the historical development of these systems and how they've evolved.
Modern Gen 3 tubes are also packed with advanced features like autogating. This tech acts like a super-fast dimmer switch, protecting the tube from sudden bright flashes (like muzzle flash or headlights) and dramatically reducing blooming. Built for the long haul, a quality Gen 3 tube has a lifespan that can easily exceed 10,000 hours.
Beyond Gen 3: White Phosphor and Modern Advances
While the U.S. military has never officially recognized a "Gen 4," the technology hasn't stood still. The most significant evolution in recent years has been the move from traditional green phosphor to white phosphor (WP).
Instead of the classic green-and-black view, WP tubes produce a black-and-white image. Many operators find this far more natural to look at and less fatiguing on the eyes, especially during long nights of observation. Though the core tube is still Gen 3, these high-spec WP units are what you'll find at the absolute cutting edge of night vision today.
How Thermal Imaging Sees Heat Instead of Light
While image intensification is all about making the most of a little bit of light, thermal imaging works on a completely different principle. It doesn't need a single photon of light to see. Instead, it visualizes the invisible world of heat.
Everything around you with a temperature above absolute zero—and that's literally everything you'll ever encounter—is constantly giving off thermal energy. We know this as infrared radiation. Your own body, the engine of a running truck, or even the ground soaking up heat on a sunny day all have a distinct heat signature. Thermal devices are built to capture that energy and paint a picture we can actually see.
This is a massive advantage. Since thermal optics don't rely on reflected light, they can cut right through things that blind the naked eye and even traditional night vision. We're talking about smoke, fog, dust, and even light brush. This makes thermal the undisputed king of detection.
The Thermal "Temperature Map"
The easiest way to think about a thermal imager is as a camera that creates a detailed "temperature map." It’s not capturing light; it’s building a visual based entirely on differences in heat.
Here’s a quick rundown of how it pulls this off:
-
Specialized Lens: It all starts with a special lens, usually made from a material like germanium. This lens is transparent to infrared energy but blocks visible light, focusing all that heat onto the sensor.
-
Infrared Detector: The heart of the unit is a sensor array called a microbolometer. Think of it as a grid made up of thousands of microscopic heat detectors.
-
Creating the Thermogram: As infrared energy hits this grid, each tiny detector measures the change in temperature. This creates an incredibly detailed heat pattern, which is called a thermogram.
-
Displaying the Image: From there, the device's internal processor takes that thermogram data and assigns different colors or shades of gray to the different temperature readings. This digital signal is then fed to the display in the eyepiece, giving you the final image.
The core idea is simple: turn temperature differences into a visible picture. Hotter objects, like a person or a coyote, will pop as bright white or a vibrant color, while the cooler ground and trees appear dark.
This is what allows a user to instantly spot a warm-blooded target against a cool landscape, even in pitch-black conditions where image intensifiers would struggle.
The Unrivaled Advantage of Detection
The real magic of thermal imaging is its raw detection capability. Living things are almost always warmer than their surroundings, so they stand out like a neon sign on a thermal display. This makes it an absolute game-changer when just finding something is the top priority.
Just think about where this technology shines:
- Search and Rescue: Finding a lost person in a dense, dark forest.
- Law Enforcement: Spotting a suspect trying to hide in thick bushes.
- Hunting: Picking out game animals through the morning fog or from way downrange.
- Surveillance: Monitoring a property line for trespassers in total darkness without giving away your own position.
But this incredible ability to detect heat comes with a trade-off. Thermal imaging doesn't give you the same level of detail as a good image intensifier. You can easily spot a human-sized heat signature from hundreds of yards away, but you probably won't be able to tell who it is. It's a critical distinction you can learn more about in our guide comparing thermal imaging vs. digital and analog night vision.
Thermal is built for detection, not identification. It's why many pros run both systems—to get the best of both worlds.
Choosing the Right Technology for Your Mission
Knowing the science is one thing, but deciding what to actually mount on your helmet is a whole different ball game. The real question isn't about which technology is "better" overall. It's about which one is the right tool for your specific mission.
Each one excels where the other falls short.
Image intensification, or I², is the undisputed king of navigation and identification. Because it works by amplifying existing light, it gives you a detailed, textured picture of the world. You can see the ruts in a trail, read a street sign, and most critically, positively identify who you're looking at.
Thermal imaging, on the other hand, is a master of pure detection. It doesn't see light; it sees heat. This is its superpower, letting it instantly pick out a warm body hiding in thick brush or punch through smoke and fog that would completely blind a traditional I² device.
Image Intensification: When You Need to See What It Is
Think of I² as turning up the brightness on the world. You’re still seeing in the traditional sense, just with the light cranked way up. The visual information you get is rich and full of detail, which is absolutely vital for certain tasks.
You’ll want to go with image intensification when your primary goals are:
- Navigation: Moving safely through tricky terrain, whether on foot or in a vehicle, means you have to see potholes, low-hanging branches, and sudden drop-offs. I² lets you do that.
- Positive Identification (PID): This is a big one. Telling the difference between a threat, a friendly, or an innocent bystander is impossible with thermal alone. I² gives you the facial details and gear cues you need to make that critical call.
- Situational Awareness: Getting a complete lay of the land—buildings, potential cover, obstacles—is a massive strength of the detailed picture I² technology provides.
Simply put, I² allows you to interpret your environment. You can identify what something is, not just that something is there. For anyone in law enforcement, military roles, or any situation requiring high-stakes identification, this is non-negotiable.
Thermal Imaging: When You Just Need to Find It
Thermal optics give you a totally different kind of advantage: the ability to see heat. This makes it an absolutely peerless tool for locating targets, especially when they're actively trying to hide.
Thermal is the right call when your mission is all about:
- Detection: Spotting a person or animal in pitch-black conditions, through camouflage, or hidden in deep foliage is where thermal really shines. A warm body practically glows against a cooler background.
- Tracking: A sensitive thermal imager can follow the faint heat trail left by footprints or spot a vehicle that was running just minutes ago.
- Seeing Through Obscurants: This is thermal's unique party trick. Smoke, dust, heavy fog, and even pouring rain can stop visible light, but they can't stop a heat signature from getting through.
The trade-off? You sacrifice all that fine detail. You'll see a bright, human-shaped blob, but you won't have a clue who it is.
Image Intensification vs. Thermal Imaging Practical Use Cases
To help you decide which tech is right for you, this table breaks down how each performs in common scenarios. It's a direct comparison to help you match the tool to the job.
| Scenario/Factor | Best Choice Image Intensification (I²) | Best Choice Thermal Imaging |
|---|---|---|
| Primary Use | Navigation & Identification | Detection & Tracking |
| Environment | Open fields, urban areas, woods with some ambient light | Total darkness, heavy fog, smoke, thick foliage |
| Target Type | Needing to ID a person or read text/signs | Locating any heat-emitting object (people, animals) |
| Key Limitation | Requires some ambient light; blinded by obscurants | Cannot see through glass; provides no identifying details |
The best setup? For many professionals, it's not an either/or choice. The ultimate advantage comes from using both.
A common and highly effective loadout is a helmet-mounted I² device like a PVS-14 for navigation, paired with a weapon-mounted or handheld thermal for scanning. This "fusion" approach gives you the most complete operational picture, letting you move with clarity and detect with absolute certainty.
Protecting Your Night Vision Investment
Owning a quality night vision device is a serious commitment. Whether it's for duty, the hunt, or just being prepared, you've invested in a powerful tool. And like any piece of precision equipment, it needs the right care to keep it running reliably for years. Once you understand how these things work on the inside, you realize just how delicate those internal components—especially the image intensifier tube—really are.
The absolute number one rule of night vision ownership is to protect the tube from bright light. Firing up your device and pointing it at the sun, car headlights, or even a bright room lamp can cause permanent damage. You'll end up with dark spots or "burns" in your image that won't go away. This is why you always keep the daylight cap on the objective lens when you're not actively using the unit.
A dangerous myth is that the device has to be powered on for bright light to hurt it. Not true. Even when it's off, concentrated sunlight beaming through the objective lens can cook the photocathode. That's the very first part of the system that starts the light amplification process, and damaging it is catastrophic.
Essential Care and Maintenance Practices
Good maintenance is about more than just dodging bright lights. It's the simple, consistent habits that will get the most life and performance out of your gear, making sure it's ready to go when you are.

- Lens Cleaning: Treat your lenses like you would a high-end camera lens. Start with a puffer bulb or a soft lens brush to get rid of any loose grit. For fingerprints or smudges, use a dedicated lens cleaning solution on a microfiber cloth and wipe gently. Never, ever use Windex or the corner of your t-shirt.
- Battery Management: Stick with high-quality batteries from brands you trust. If you’re putting your device away for more than a few days, always take the batteries out. This is a cheap insurance policy against leaking batteries, which can corrode the contacts and wreck the electronics.
- Proper Storage: When your NODs are off-duty, they should live in a padded, hard-sided case. This protects them from drops, dust, and moisture. Tossing a desiccant pack in the case is a great pro-tip to suck up any ambient humidity and keep the internals safe.
Handling and Operational Discipline
How you treat your gear in the field matters just as much as how you store it. Dropping a unit can easily knock the optics out of alignment or, in a worst-case scenario, shatter the intensifier tube itself.
If you start noticing problems or things just don't seem right, it's usually best to get a professional opinion. You can learn more about spotting common night vision gear issues to figure out when it’s time to send it in for service. Treat your equipment with respect, and it’ll be there for you when the lights go out.
Got Questions? We've Got Answers.
Alright, we've covered a lot of ground on how night vision works. Now, let's tackle some of the most common questions that pop up. Getting these straight will help you really understand your gear and use it like a pro.
Can You Actually See in Complete Darkness?
This is the big one, and the honest answer is: it depends entirely on the type of night vision you're using.
Think of traditional image intensification (I²) goggles as light multipliers. They need some light to work with, even if it's just faint starlight from a thousand miles away. Put them in a sealed closet with zero light, and you'll see nothing. That's why they have built-in IR illuminators—to provide that necessary light source when the environment offers none.
Thermal imagers, on the other hand, couldn't care less about light. They see heat, not light. So yes, in a pitch-black, zero-light scenario, a thermal device will work perfectly, painting a clear picture based on the heat signatures of objects, people, and animals.
So, Why is Everything Green?
That iconic green glow isn't just for Hollywood. It's a very intentional design choice rooted in human biology. Our eyes are incredibly sensitive to the green part of the light spectrum. This means we can distinguish between more shades of green than any other color, picking out subtle details and textures with less eye strain over long periods.
The image is generated by a phosphor screen, and for decades, green phosphor (P43) was the most effective and efficient option. While modern white phosphor tubes—which produce a grayscale image—are gaining serious popularity for their crisp, natural look, that classic green is still a proven and highly effective standard.
The Bottom Line: That green hue is chosen specifically to play to the strengths of your own eyes. It helps you see more detail and reduces fatigue when you're scanning an area for hours.
What's the Real-World Difference Between Gen 2 and Gen 3?
The jump from Gen 2 to Gen 3 was a game-changer, and it all boils down to one critical component: the photocathode. Gen 3 tubes use a gallium arsenide (GaAs) photocathode, which is vastly more sensitive and efficient at converting light particles (photons) into electrons than the older Gen 2 tech.
What does that mean for you? A much brighter, cleaner, and sharper image, especially when light is incredibly scarce. A Gen 2 unit might start to show a lot of noise or "scintillation" where a Gen 3 unit can still provide a usable picture. Gen 3s also boast a much longer tube life, often rated for over 10,000 hours of operation. For any serious user, the massive performance boost in low-light environments makes Gen 3 the clear winner.
Now you're equipped with the core knowledge to navigate the night. When you're ready to get gear that's as serious as your mission, from top-tier Gen 3 monoculars to advanced thermal optics, trust the team at Superior Tactical LLC. Check out our hand-picked selection of professional-grade equipment and accessories at https://superiortac.com.