A Hunter’s Guide to Hunting With Night Vision
Imagine the woods after dark—a world that was once completely off-limits to hunters, now wide open. This guide is here to pull back the curtain on hunting with night vision. We'll cut through the jargon and show you how what was once complex military tech is now a practical, accessible tool for anyone.
We'll cover everything from Gen 3 monoculars to cutting-edge thermal scopes, making it simple to find and use the right gear for your hunt.
Seeing in the Dark: The Hunter’s Modern Advantage
Stepping into the field after sunset isn't just about extending your hunting hours; it's about gaining a massive advantage in safety, ethics, and overall effectiveness. For landowners battling destructive, nocturnal animals, night hunting has become an absolutely essential tool for conservation and property management.
The biggest reason for this shift? The urgent need to control invasive species that cause billions in agricultural damage. Feral hogs, for example, are a perfect case study. They're notoriously active at night, which makes traditional daytime hunts feel like a shot in the dark. Hunting with night vision and thermal optics allows for the kind of precise, ethical culling needed to actually make a dent in the problem.
This surge in civilian use has fueled an entire industry. The global night vision device market jumped from USD 8.28 billion in 2022 and is projected to hit a staggering USD 16.35 billion by 2031, with hunting being a major driver of that growth. You can dive deeper into this market trend on marketsandmarkets.com.
Why Modern Hunters Embrace the Night
The payoff for adopting this technology goes way beyond just managing pests. It completely changes your relationship with the environment after dark.
Here’s what you gain:
- Serious Safety Boost: Let's be honest, stumbling around in the dark is a great way to get hurt. A good night vision monocular lets you spot holes, low-hanging branches, and treacherous ground, turning a risky walk into a safe one.
- Positive Target ID: This is non-negotiable. Night vision and thermal optics give you the power to be 100% sure of your target and what’s behind it. It's the key to avoiding tragic mistakes and ensuring every shot is an ethical one.
- Sky-High Success Rates: Most predators and invasive species do their work under the cover of darkness. When you can operate effectively in their world, on their time, your odds of a successful hunt go through the roof.
The heart of night vision is simple: light amplification. It grabs the tiniest bits of ambient light—from the moon, the stars, even distant city glow—and multiplies them thousands of times to paint a clear picture of the world in front of you.
Getting a handle on the tech is your first step. That classic green image is iconic, but the science behind it is what really matters for a serious hunter. To get a solid foundation, take a look at our detailed guide on how night vision works and what separates good gear from great gear. This knowledge will pay off big time when you're choosing and using your equipment.
How to Choose Your Night Vision Optic
Picking the right optic for night hunting can feel like learning a new language. You're hit with terms like "image intensification," "thermal," and "generations," but what does any of that actually mean when you're out in the field? Getting this choice right is the single most important step you'll take in building a setup that actually works.
The first big decision splits the path right down the middle. You have to choose between traditional night vision, which amplifies ambient light, and thermal imaging, which sees heat. They are completely different technologies, and each one has its place.
This flowchart gives you a good visual for the core choice: are you trying to see heat, or are you trying to amplify light?
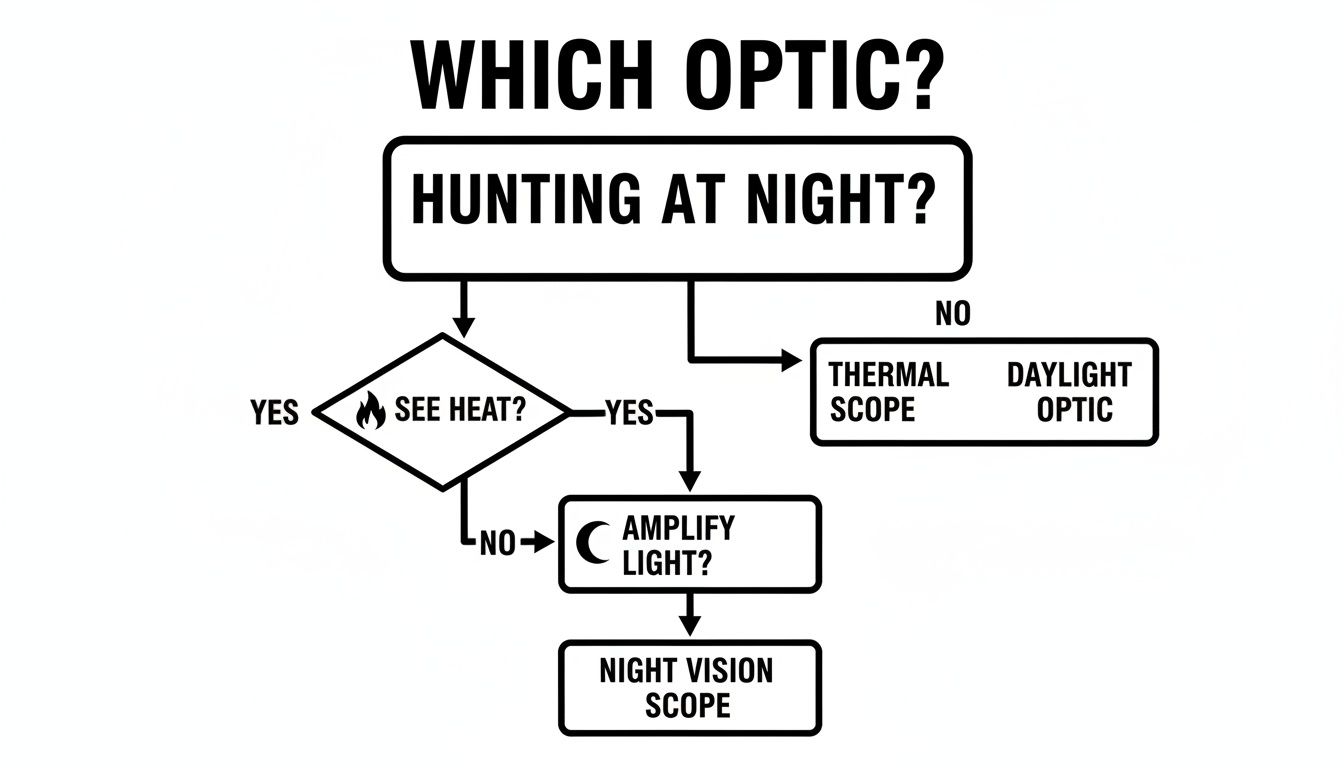
As you can see, what you want to accomplish—spotting heat signatures or getting a detailed, illuminated picture of your surroundings—is the starting point for your entire rig.
Image Intensification: The Classic Green Glow
Image intensification, or I², is what most folks think of when they hear "night vision." Devices like the classic PVS-14 monocular work by gathering tiny amounts of existing light from the moon and stars and multiplying it thousands of times. The result is that iconic green-hued image.
The huge advantage here is clarity and detail. With a quality I² unit, you can see textures on the ground, identify specific features on an animal, and navigate tough terrain with confidence. That level of detail is absolutely critical for positive target identification, making sure you can tell a coyote from a neighbor's German Shepherd.
These devices are broken down into "generations," which is just a way of classifying the level of tech inside the tube.
- Gen 2: This is an older, more budget-friendly option. It's a massive step up from the naked eye but really needs a decent amount of ambient light or a good IR illuminator to shine. The image can look a bit grainy compared to newer stuff.
- Gen 3: This is the modern standard for any serious hunter or professional. Gen 3 tubes give you a much brighter, clearer, and crisper image, and they perform incredibly well even on moonless nights. They cost more, but the performance jump is significant.
Thermal Imaging: Seeing the Unseen
Thermal optics don't see light at all; they see heat. Every object gives off some amount of thermal energy, and these devices translate those temperature differences into a picture you can see. Warm-blooded animals glow like a lightbulb against a cooler background, making them almost impossible to miss.
Thermal is the undisputed king of detection. A hog can be perfectly camouflaged in tall grass or hiding in thick brush, but its heat signature will pop right out on a thermal screen. This makes it an unbelievable tool for scanning big fields or dense woods to find game fast. The trade-off is that thermal gives you much less environmental detail, so judging terrain or spotting non-living obstacles like a stump or a hole can be tricky.
For a much deeper dive into how these two technologies stack up, check out our guide comparing thermal scope vs. night vision performance in the field.
Understanding the Key Specs
When you start shopping, you're going to get bombarded with technical terms. Don't let them intimidate you. Here are the two most important ones and what they actually mean for a hunter.
- Resolution (lp/mm): This stands for line pairs per millimeter, and it's a direct measurement of how sharp the image is. A higher number, like 64 lp/mm or 72 lp/mm, means a cleaner, more detailed picture where you can better separate your target from the background.
- Figure of Merit (FOM): This is a simple calculation (resolution multiplied by the signal-to-noise ratio) that gives you one number to judge a tube's overall performance. A higher FOM, like 1800 or 2200+, means you've got a high-performing tube that will give you a better image when it gets really dark.
The civilian market for this gear has exploded. While the military still drives the technology, demand from hunters is surging, with North America holding 36% market dominance. Tech that was developed for the Gulf Wars has trickled down, making incredible optics much more accessible for predator control and other types of hunting.
So, which one is right for you? It really comes down to your primary need. If you're scanning and spotting, thermal is unbeatable. If you need positive identification and the ability to navigate, a Gen 3 I² device is the way to go.
Frankly, a lot of experienced hunters end up using both. We'll run a thermal monocular to find game, then switch to a night vision scope or a helmet-mounted unit to ID and take the shot. This combo gives you the best of both worlds and truly turns the darkness into your biggest advantage.
Setting Up Your Rifle for a Night Hunt
Picking out the right optic is half the battle, but even the best gear is useless if it’s not properly integrated with your rifle. A high-tech scope is only as good as the system it’s part of, and a well-configured rifle is what turns that advanced vision into a lethal, ethical hunting tool. This is where we get our hands dirty and build a rig that’s reliable, intuitive, and ready for whatever the night throws at us.
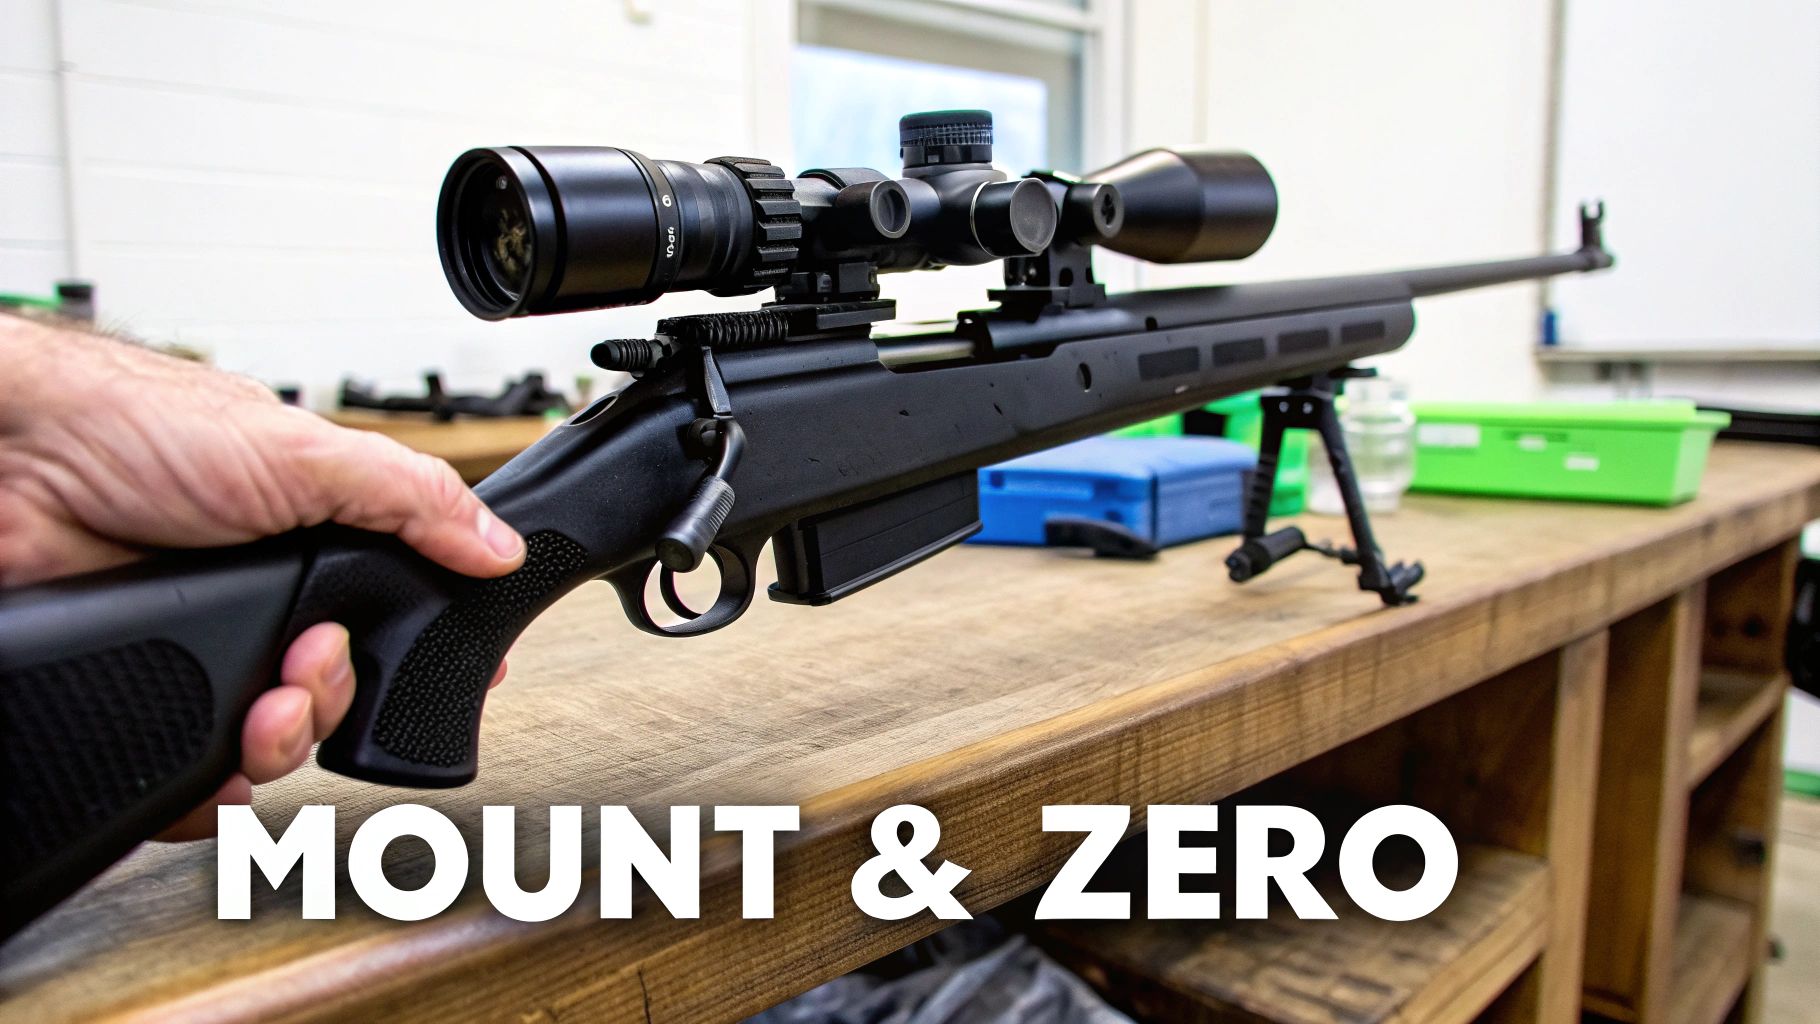
The real goal here is to create a clean, snag-free setup where everything just works. You don’t want to be fumbling with controls or fighting a top-heavy rifle the moment a coyote finally steps into the clearing. A thoughtfully assembled rifle lets you keep your eyes and your mind on the hunt.
Correctly Mounting Your Optic
Think of your mount as the foundation of your entire aiming system. A mount that shifts even a tiny fraction of a millimeter will send your shot wide by feet at a distance—a complete failure when precision is everything. Whether you're running a dedicated thermal scope or a laser aiming module, the principle is the same: it has to be rock-solid.
Don't cheap out here. Always use a quality, reputable mount built for your specific optic and rifle. More importantly, follow the manufacturer's torque specs to the letter with a proper torque wrench. Guesswork is your enemy. I’ve seen guys over-tighten and crush scope tubes, but the more common mistake is under-tightening, which is a guaranteed recipe for losing zero.
Here's a rule of thumb I live by: mount your optic as low as you can get it to the bore axis while still achieving a comfortable, consistent cheek weld. That solid cheek weld is the secret sauce for repeatable accuracy, shot after shot.
Zeroing Your Night Vision or Thermal Scope
Getting a night vision or thermal optic zeroed isn't all that different from a regular daytime scope, but there are a few quirks to know about. Most modern digital and thermal units come with a "one-shot zero" feature, which sounds simple, but you still need to be methodical to get it dialed in perfectly.
Here’s a practical way to nail your zero every time:
- Start Close. Don’t try to be a hero at 100 yards right out of the box. Start at 25 or 50 yards. It’s much easier to get on paper and make those first big adjustments.
- Get Stable. Use sandbags, a bipod, a shooting rest—whatever it takes to get completely stable. Fire one careful shot at the center of your target.
- Move the Reticle. This is the key difference with digital scopes. Instead of clicking turrets to move your point of impact, you keep the rifle locked in place and digitally move the reticle to cover your first bullet hole.
- Confirm and Refine. Fire another shot to confirm. If it’s dead on, you can move back to your final zeroing distance—say, 100 yards—and repeat the process for any fine-tuning.
For thermal scopes, you’ll need a target that gives off a clear heat signature. A simple hand warmer or a small square of aluminum foil taped to a cardboard backer works wonders. That sharp contrast gives your scope a perfect aiming point.
The Role of an Infrared Illuminator
A high-quality Gen 3 tube can see amazingly well in low ambient light, but a good infrared (IR) illuminator is a true game-changer. It's basically a stealth flashlight. It’s completely invisible to animal and human eyes but floods the area with light that your NV device can see, turning a dim scene into daylight.
In places with absolutely zero light—like under a thick forest canopy or on a cloudy, moonless night—an IR illuminator isn't just nice to have, it's essential. The extra light is critical for positive target identification at longer ranges, helping you tell a coyote from a neighbor's dog and ensuring you take a clean, ethical shot.
When you mount your IR illuminator, play with the position to minimize the barrel shadow in your scope’s view. Most hunters I know mount them on the side or top of the handguard. Test it out and see what gives you the cleanest sight picture without making the rifle clumsy. A well-placed illuminator can make your setup absolutely dominant in the dark.
Field Tactics for Hunting at Night
Alright, your rifle is dialed in, and the gear is ready to go. Now it’s time to leave the controlled environment of the range and step into the real world. This is where your investment in technology meets the raw, unpredictable nature of the hunt. Success out here isn’t just about seeing in the dark; it’s about moving, thinking, and acting like a creature of the night.
The nocturnal world is dominated by sound and movement. Forget what you know about daytime hunting. Your best tools now are patience and an intimate knowledge of the terrain. Before you even take a step, you have to shift your mindset from a visual hunter to a predator who uses every whisper of wind and shadow to their advantage.
Movement and Noise Discipline
Every snapped twig sounds like a gunshot in the dead of night. Same with the rustle of a jacket. Your number one tactical priority is mastering slow, deliberate, and silent movement. The darkness gives you cover, but it also magnifies every single mistake.
If you can, walk your route in daylight. Make mental notes of clear paths and potential trouble spots like gravelly creek beds or patches of dry, crunchy leaves. This prep work pays off in a huge way when you're trying to be invisible later. When you're actually moving, get into a rhythm of "scan, then step." Sweep your path with your night vision, pick a safe landing spot for your foot, and only then take a slow, controlled step.
- Footwear is Key: Wear soft-soled boots to deaden your footfalls. I know some old-school hog hunters who swear by moccasin-style footwear to get as quiet as humanly possible.
- Silence Your Gear: Lock down every piece of kit on your body. A rattling magazine or a clanking sling will broadcast your position to every animal within a hundred yards. Use electrical tape or ranger bands to silence anything that moves.
- The Wind is Everything: Always, always hunt into the wind. Your scent is your biggest enemy, and darkness does nothing to hide it. Use the wind to carry your scent away from your quarry and to help mask the sound of your approach.
The most successful night hunters I know move at a glacial pace. Their motto is simple: "If you think you're moving too slowly, slow down." Patience is the deadliest weapon in your nocturnal arsenal.
The Scan and Spot Method
The best way to find game at night is through a systematic scanning process. This is where combining different technologies, like thermal and traditional image intensification (I²), really shows its power.
Your best friend for spotting is a thermal monocular. Nothing beats its ability to pick up heat signatures at incredible distances. The proper technique isn't to just wander around looking. You should move quietly from one concealed position to another, stop, and then perform a slow, methodical 360-degree scan of your surroundings.
Once you spot that tell-tale heat signature, the real work begins. And this brings us to the single most important rule of hunting at night.
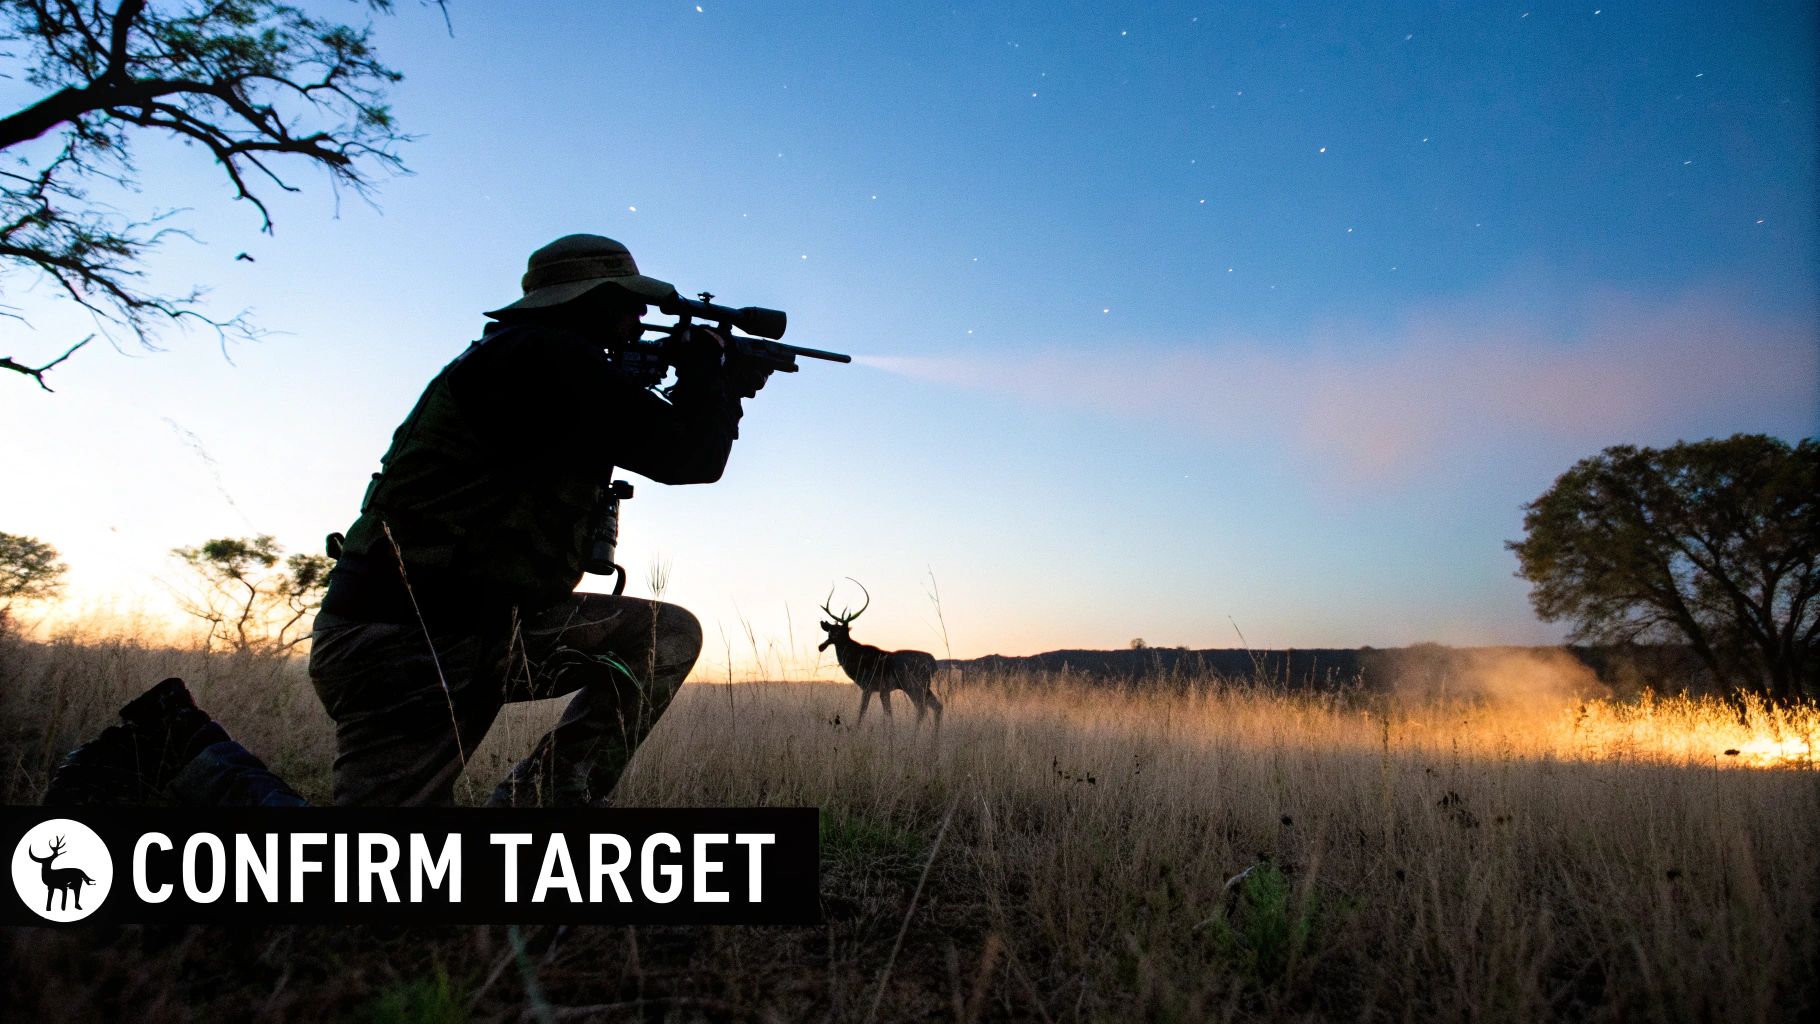
Non-Negotiable Target Identification
Let me be crystal clear: You never, ever take a shot based solely on a thermal signature. That glowing blob on your screen could be the coyote you’re after, but it could just as easily be a farmer's calf, a stray dog, or—worst of all—another person. Positive identification isn't a suggestion. It's an absolute, non-negotiable ethical and legal mandate.
This is why you need your I² device or a good IR illuminator. After you detect a heat signature with thermal, you must use a device that shows you detail to confirm exactly what you're aiming at.
- Detect with Thermal: Use your thermal scanner to sweep fields, tree lines, and brush for any heat source that doesn't belong. Its ability to cut through darkness and even light fog is incredible.
- Confirm with I² or IR: Once you have a potential target, switch to your rifle-mounted I² scope or light it up with your IR illuminator. This gives you the critical details—body shape, the way it moves, key features—that allow you to make a 100% positive identification before your finger even thinks about touching the trigger.
This two-step process is the bedrock of safe and ethical night hunting. To get a better handle on making these technologies work for you, check out our guide on thermal vision for hunting which dives deeper into maximizing your detection and ID capabilities.
Estimating Range and Taking the Shot
Judging distance in the dark is tough, even with a great optic. The flattened, two-dimensional view through a scope can be incredibly deceptive, making a 100-yard target look like it's at 50, or vice versa. This is exactly why a laser rangefinder is a non-negotiable piece of kit.
Many modern thermal scopes have a built-in laser rangefinder (LRF) that gives you an instant, accurate reading. If your scope doesn't have one, a quality handheld LRF is your next best option. Ranging your target is a critical step you cannot skip before taking a shot.
When you’re set, remember that a stable shooting position is more vital than ever. Use a bipod, a tripod, or even a solid tree branch—whatever it takes to get steady. The darkness already adds enough challenge; don't compound it with an unstable shooting platform. Take a deep breath, trust your zero, and focus on a smooth, clean trigger press.
Taking Care of Your Night Vision Investment
Your night vision or thermal optic is a serious piece of kit, and it likely cost you a good chunk of change. Just like a finely-tuned rifle, it needs proper care to work when it matters most. Skipping routine maintenance is a surefire way to shorten its life and, worse, have it fail you on a hunt.
This isn't just about keeping the lenses clean. It’s about reliability. The market for gear like this is exploding—from USD 7.5 billion in 2023 to an expected USD 11.2 billion by 2028. That’s a lot of hunters realizing how much of a game-changer this technology is. It’s a major shift in how we hunt, and you can get a deeper dive into these trends over on police1.com.
Smart Cleaning for Sensitive Lenses
The heart of your optic is its glass, and those lenses are surprisingly delicate. They’re covered in special coatings that are critical for performance, and you can damage them for good with the wrong cleaning method. Put that shirt tail or paper towel away—they're your enemy here.
First things first, get the big stuff off without scratching anything. A quick blast from a can of compressed air or a gentle sweep with a soft lens brush will dislodge any dust or grit. If you wipe a gritty lens, you're essentially grinding that dirt into the coating, causing micro-scratches that will permanently mess with your image.
Once the debris is gone, you can go in for the detail work. Use a dedicated lens pen or a clean microfiber cloth with a drop or two of an approved lens cleaning solution. A gentle, circular motion from the center out is all you need.
How You Store It Matters
What you do with your gear between hunts is just as critical as how you handle it in the field. Night vision and thermal devices hate moisture and big temperature swings. Leaving your scope baking in a truck cab or sitting in a damp basement is asking for trouble.
Always find a cool, dry spot for storage. A hard-sided case with custom-fit foam is your best bet; it protects against drops, bumps, and moisture. I always toss a few desiccant packs in my cases to soak up any humidity that might sneak in. It’s a cheap insurance policy against fogged internals or fried electronics.
Here's a pro tip I learned the hard way: never bring a cold optic straight into a warm, humid house or cabin. Condensation will form instantly, inside and out. Let it acclimate to room temperature while it's still inside its case before you open it up.
And for goodness' sake, take the batteries out before you store it for any length of time. Leaky batteries are the silent killer of expensive electronics. The corrosion they cause can ruin your device beyond repair. It’s a five-second step that can save you a five-thousand-dollar headache.
The Pre-Hunt Ritual
A few minutes of prep before you head out can save you hours of frustration in the field. A methodical gear check builds confidence and catches small problems before they become big ones.
Run through this quick checklist every time:
- Mounting Hardware: Grab your torque wrench and double-check every screw on your mount and rings. A loose mount is the number one reason a rifle suddenly won't hold zero.
- Battery Check: Pop in a fresh set of high-quality lithium batteries. Don't trust the ones that have been sitting in there for a month. It’s not worth the risk of your optic dying just as a coyote steps into the clearing.
- Lens Inspection: Give the lenses one last, quick wipe. A single fingerprint or smudge can create a surprising amount of glare and distortion under IR light.
- Function Test: Power it on. Cycle through the settings. Make sure the reticle is sharp and the display is bright. If you have an onboard IR illuminator or rangefinder, test those too. This quick systems check confirms you're ready to go.
Answering Your Top Questions About Night Vision Hunting
Once you start diving into the world of hunting after dark, you’ll find that a lot of questions come up. It's a whole different game with its own gear, rules, and tactics. Getting solid answers from the get-go is the fastest way to build real confidence in the field.
I've been asked these same questions countless times by hunters just getting started. Let's break down the most common ones you'll likely have.
Is It Legal to Hunt With Night Vision?
This is the big one, and the answer is a classic: it depends entirely on where you are and what you're hunting. There’s no blanket federal law that gives a simple yes or no; everything is handled at the state level.
The rules almost always hinge on two key things:
- What you're hunting: For non-game or invasive species like feral hogs and coyotes, it's usually good to go. But for traditional game animals like deer, turkey, or elk, it's almost always prohibited.
- Where you're hunting: Sometimes the regulations change between public and private land. Always double-check the rules for the specific piece of property you'll be on.
Look, I can't stress this enough: you have to check your local and state wildlife regulations every single season. Laws change. The only place to get the right answer is your state's Department of Fish and Wildlife website or their official annual hunting handbook. Don't rely on word of mouth.
What Is the Real Difference Between Digital and Gen 3?
Both technologies let you see in the dark, but how they get there is night and day. Digital night vision is basically a specialized camera with a sensor that's extremely sensitive to light, displaying the image on a tiny screen. It often relies heavily on a good IR illuminator to work well and can sometimes have a bit of a delay or "lag" in the image.
Gen 3 image intensification (I²), on the other hand, is the real deal. It's an analog technology that uses a vacuum tube to physically amplify tiny amounts of ambient light by tens of thousands of times. The result is an incredibly crisp, detailed, and lag-free image you see directly through the eyepiece. When it comes to hunting with night vision, that clarity is everything for positive target ID, and Gen 3 is simply in a league of its own.
Do I Really Need an Infrared Illuminator?
Even if you have a top-tier Gen 3 unit that can practically see in total darkness, an IR illuminator is still one of the most important accessories you can own. Think of it as a powerful flashlight that’s completely invisible to animal and human eyes but lights up the world for your night vision device.
On those pitch-black nights with heavy cloud cover or deep in the woods under a thick canopy, an IR illuminator is your best friend. It punches through the darkness, extends your detection range, and gives you the sharp detail you need for 100% positive target identification. It’s what takes a capable setup and makes it truly dominant.
Can I Use a PVS-14 Monocular for Shooting?
Absolutely, but it's critical to understand how. You can't just mount a PVS-14 in front of your regular deer scope—it's not built to handle the recoil of a centerfire rifle and it won't work with the magnification. But that doesn't mean it's not an awesome tool for shooting. It's just used differently.
Here are the two ways it works brilliantly:
- Helmet-Mounted Aiming: You wear the PVS-14 on a helmet and aim your rifle using a compatible red dot or holographic sight. This gives you incredible freedom of movement and situational awareness, which is why so many hog hunters run this setup.
- Weapon-Mounted Behind a Red Dot: You can also mount the PVS-14 directly to your rifle's top rail, but behind a night vision-compatible red dot sight.
This flexibility for both walking around and shooting is exactly why the PVS-14 has been a go-to for hunters for years.
Ready to gear up for your next night hunt? At Superior Tactical LLC, we offer a curated selection of Gen 3 night vision, thermal optics, and all the essential accessories to build your perfect rig. Explore our full range of mission-ready equipment at https://superiortac.com.