Ultimate Helmet Light Mount Guide
A helmet light mount turns any standard helmet into a hands-free lighting solution for those moments when visibility matters most. You can pan and tilt your beam on the fly, keeping both hands locked on your task.
What A Helmet Light Mount Does
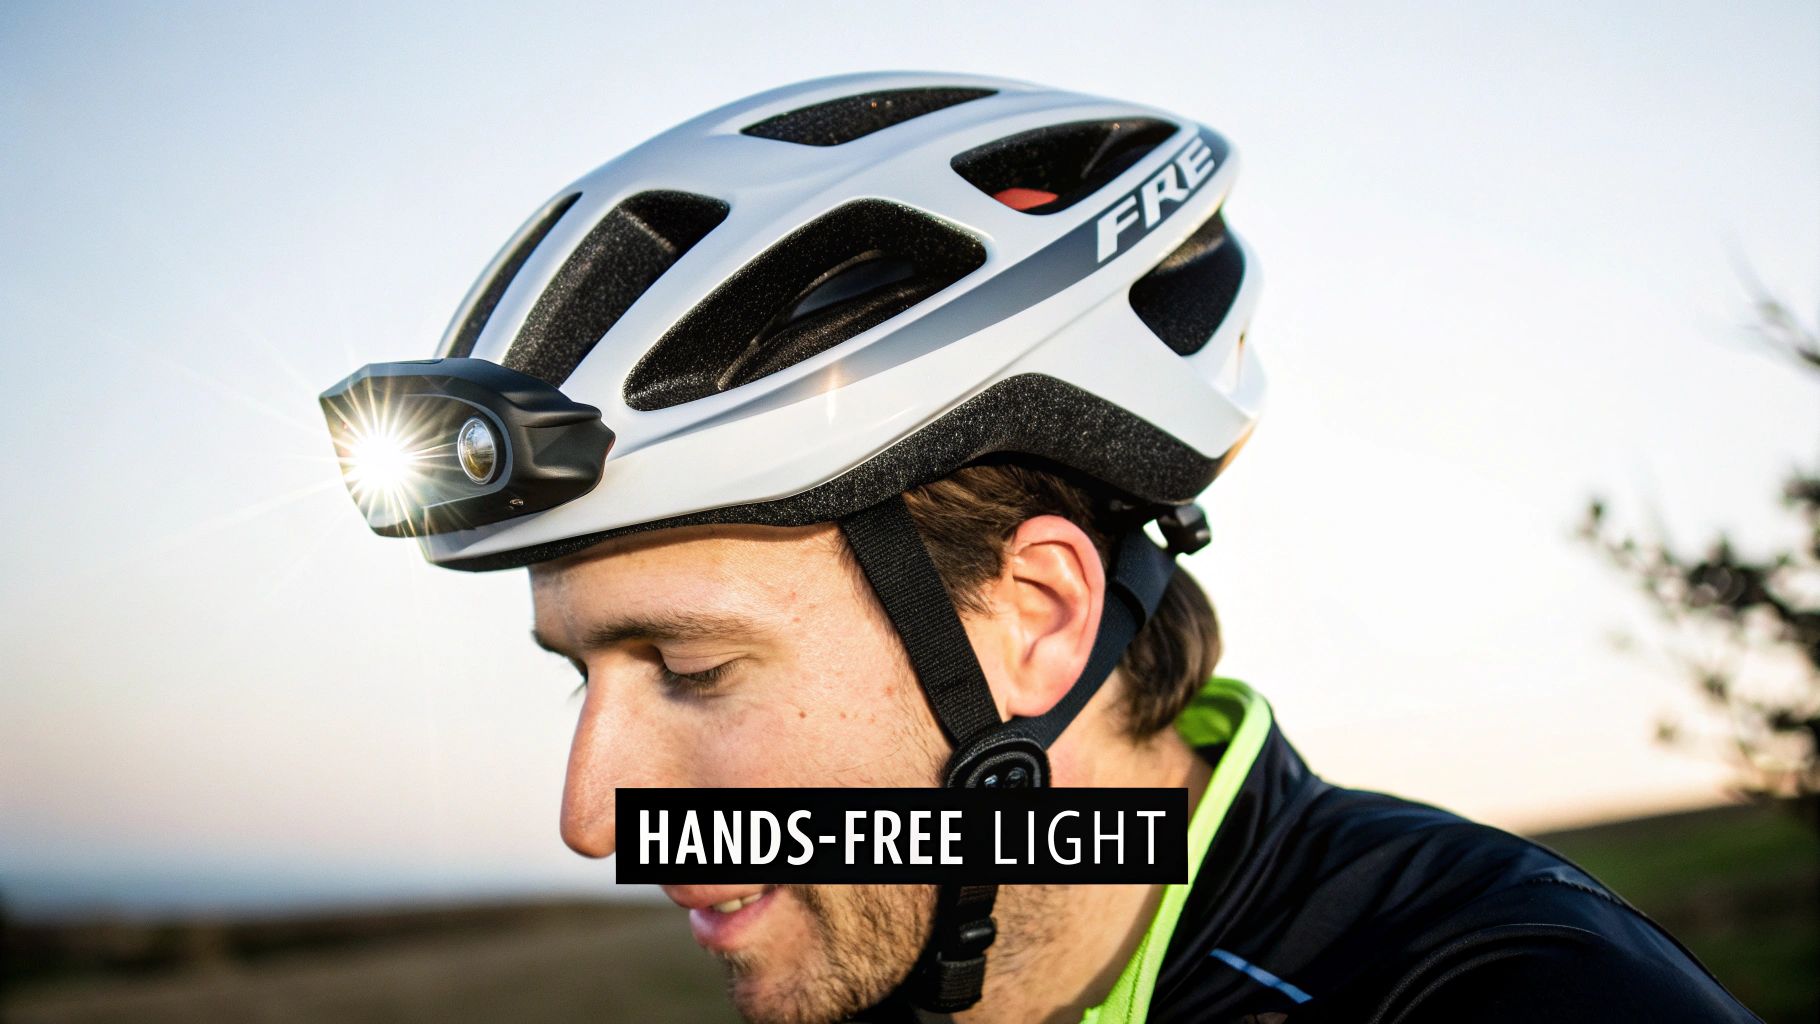
These mounts cater to cyclists, tactical operators, hunters and industrial crews. They secure flashlights using shrouds, rail clips, straps or even sticky pads.
Key Mount Benefits
- Hands-free Operation Keeps your hands available for tools or weapons.
- Beam Adjustability Tilt and aim the light exactly where you need it.
- Compatibility Fits ARC rails, NVG shrouds and strap systems.
Cyclists often grab a slim adhesive mount to cut wind resistance. Tactical teams lean on rail adapters for split-second swaps under pressure. Hunters favor strap mounts because they don’t alter the helmet shell.
Common Mount Styles
Choosing the right style hinges on your helmet’s design, activity level and how bright you need the beam.
Hands-free lighting reduces task time by 25% in field tests.
Before we dive into detailed mechanics and installation, let’s review each mount type at a glance.
Summary of Helmet Light Mount Types
| Mount Type | Key Features | Ideal Use Case |
|---|---|---|
| NVG Shroud Mount | Seamless NVG integration | Tactical and military |
| ARC Rail Adapter | Quick-attach to ARC rails | Law enforcement and military |
| Strap Mount | Universal fit with straps | Cycling and hunting |
| Adhesive Mount | Low-profile, easy stick-on | Industrial and maintenance |
Use this snapshot to steer your decision before exploring hands-on setup.
What Comes Next
- Weight Find the right balance between stability and comfort.
- Retention Make sure the mount holds firm under recoil.
- Low-Profile Keep snag points to a minimum in tight environments.
Refer to these pointers as we unpack mount anatomy and step-by-step installation. Stay tuned for model comparisons and hands-on tips in upcoming sections. Enjoy the read!
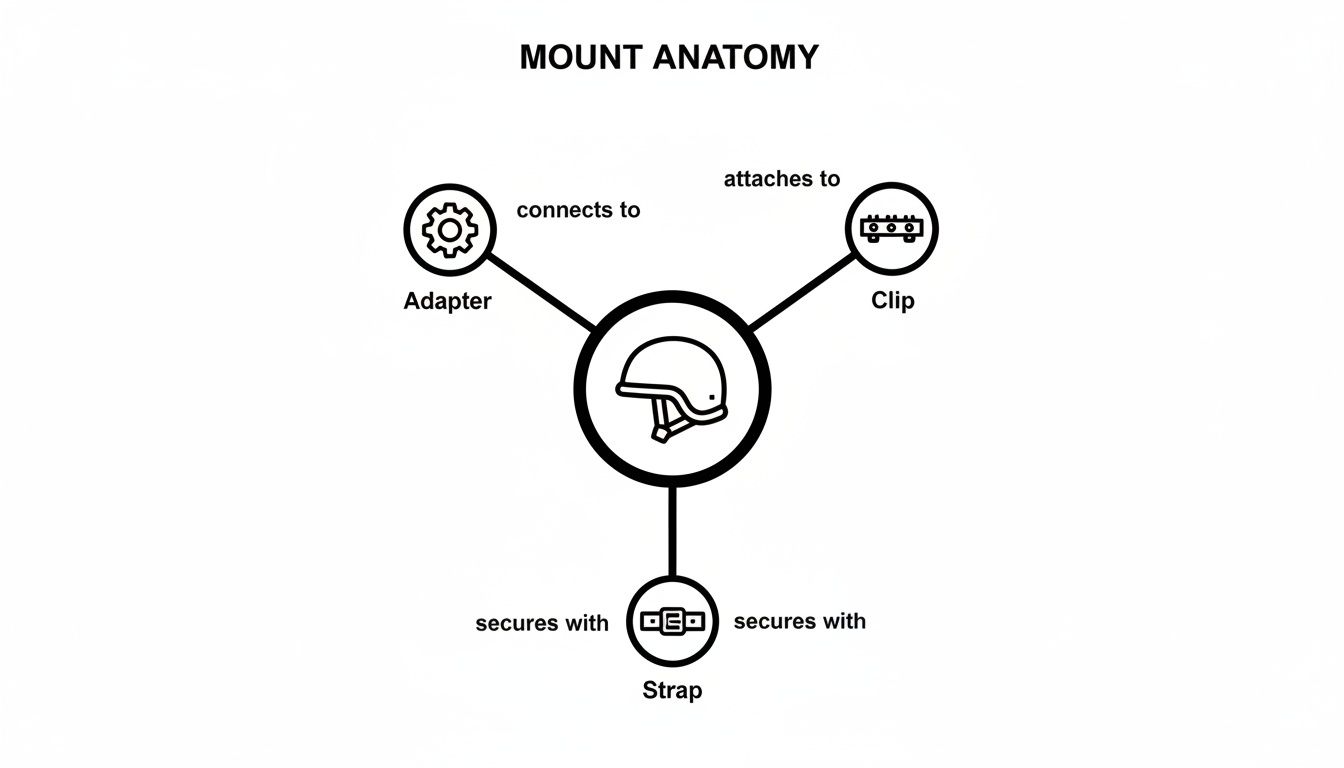
Understanding Helmet Light Mount Mechanics
Every helmet light mount is really a small assembly of parts working together. You’ll find shroud adapters, rail clips, adhesive pads, straps, and quick-release levers all fitted in one system.
Each piece contributes to how tightly the light grips your helmet and how it handles constant vibration. Think of it like adjusting a camera tripod: you lock each leg at the right length, so the setup doesn’t wobble. In the same way, mounts need both precise adjustability and solid retention.
Key Mechanical Goals
- Retention Force that holds lights steady during recoil or bumps
- Ease of Adjustability for smooth, on-the-fly beam alignment
- Quick-Release Mechanisms to swap or remove lights in seconds
Besides the geometry, the choice of material makes a real difference. Aluminum alloys keep weight down while staying rigid, and polymer composites add a bit of shock absorption without bulk.
Mount Design Insights
Even the smallest flex under recoil can send your beam off target. To prevent this, designers use crimped rails or spring-loaded clamps that lock under tension. It’s similar to how some bike rack locks snap tight around your wheel under stress.
“A mount’s clamp must hold firm through constant vibration,” notes a field engineer.
That image shows how a shroud on a helmet-mounted display adapts to attachments—exactly the interface your light mount rides on.
Over the years, military-grade mounts followed the same path as helmet lights: they grew tougher as tech demands rose. You can even track this in market research, where a projected CAGR of several percentage points from 2025 to 2031, starting at a 2024 base in US$ millions globally, tells the story. Check out these helmet-mounted lighting market findings for the numbers.
Usage spans every branch—land, naval, and air forces in North America lead the way, while Asia-Pacific picks up pace with new programs. In Europe, civilian cyclists and industrial workers drive the civilian side.
Evaluating Mount Features
When you shop for a mount, run through these quick checks:
- Material Strength vs. Weight: Is the trade-off worth it?
- Retention Test: Shake your helmet gently—no wobble allowed.
- Profile Height: Low is better to avoid snags on doorways or brush.
- Compatibility: Confirm your helmet’s shroud or rail standard matches.
For heavier headgear, a reinforced aluminum design often strikes the best balance between sturdiness and manageable weight.
Key Takeaways
- Strong retention and easy adjustability keep your beam on target under stress.
- Swapping materials or tweaking design can cut weight by up to 20 percent.
- A reliable quick-release lets you adapt fast in the field.
Armed with these tips, you’ll zero in on the perfect mount for your needs—no surprises when it matters most.
Exploring Helmet Light Mount Types
Helmet light mounts come in as many shapes and mechanisms as the helmets they attach to. From tactical operations to weekend trail rides, the right mount can mean the difference between a wobbling beam and rock-steady illumination.
For example, special-ops teams often rely on NVG shrouds to snap their lights into place, while cyclists prefer low-drag adhesive pads that won’t catch a headwind.
- Shroud Compatible NVG Mount attaches to a night-vision shroud for a rock-solid fit.
- ARC Rail Adapter clips into ARC rails on Ops-Core or Galvion helmets for lightning-fast swaps.
- Adhesive and Strap Mounts stick or wrap around shell contours for universal compatibility.
- Height Risers lift lights over peaks or cables to keep your beam unobstructed.
- Offset Arms shift the light off-center to clear visors, cameras, or HUD gear.
Shroud Compatible NVG Mounts
Think of a shroud mount as a dedicated parking spot built right into your helmet. The standard-issue interface ensures your light clicks in and stays in place, even when you’re running drills or firing rounds.
Use cases:
- Special-operations missions
- Night-vision system integration
- Scenarios demanding maximum stability
Arc Rail Adapter Mounts
A rail adapter is like a quick-release holster—snap your light in and out in seconds. These mounts engage scalloped grooves on helmet rails, giving you tool-free operation under pressure.
Key benefits:
- Rapid deployment and removal
- Consistent alignment on rail slots
- Ideal for multi-light setups
Adhesive And Strap Mounts
When simplicity wins, adhesive pads and straps come through. A dab of 3M tape or a wraparound strap can secure a compact light to nearly any curved surface. While they won’t handle heavy recoil, they’re perfect for low-impact jobs.
Best for:
- Industrial inspections
- Recreational biking
- Hunters adding a quick-on headlamp
Height Risers And Offset Arms
Height risers act like stilts, raising your light above helmet ridges or NVG gear. Offset arms, on the other hand, let you swing the beam to the side—great when a GoPro or HUD clock sits front and center.
Benefits at a glance:
- Prevent tangled cables
- Maintain a clear forward view
- Customize beam angle without twisting your neck
In the burgeoning smart helmet ecosystem, helmet light mounts drive the USD 779.1 million market in 2024, with projections to hit USD 2,641.9 million by 2032 at a 16.5% CAGR. Learn more about market insights from Fortune Business Insights.
Good mount selection cuts wobble and snag risk significantly.
For a reliable ARC rail solution, check out our guide on the Wilcox G24 mount for durability and quick-release performance.
Comparison of Mount Attachment Mechanisms
Before you lock in your choice, it helps to weigh how each system impacts helmet balance, weight, and flexibility. Use the table below to match your requirements to the ideal attachment style.
| Mount Type | Attachment Method | Weight Impact | Adjustability |
|---|---|---|---|
| Shroud Compatible NVG Mount | Standardized NVG helmet interface | Low to Moderate | Single pivot point |
| ARC Rail Adapter | Clipping onto Ops-Core/Galvion rails | Moderate | Quick-release lever |
| Adhesive and Strap Mounts | 3M adhesive pads or adjustable straps | Minimal | Limited angle options |
| Height Riser | Elevated bracket attachment | Moderate | Vertical tilt only |
| Offset Arms | Side-mounting bracket | Moderate | Lateral beam shifting |
This comparison highlights the trade-offs between weight, stability, and adaptability. Use it to narrow down which mount will stay rock-steady on your next operation—or weekend ride.
Selecting the right mount boils down to a few simple tests:
- Weight Impact: Aim for no more than 100 g per mount for all-day comfort.
- Retention: Jostle your helmet or simulate recoil to confirm the light stays put.
- Adjustability: Check that tilt and pan axes move smoothly under load.
- Profile Choice: Decide between a low-drag profile or an offset design to clear obstructions.
Maintenance is straightforward—wipe mounting surfaces with isopropyl alcohol and inspect fasteners every month. By matching form to function, you’ll keep your light exactly where you need it when the shadows close in.
Stay mission-ready. Always secure.
Matching Mounts To Helmets And Night Vision
Not every helmet light mount pairs seamlessly with every shell or NVG setup. Making the right choice early saves you from cracked ABS shells and beams that miss their mark.
For instance, cycling helmets rely on low-profile, thin adhesive pad mounts, while tactical models often sport ARC rails or NVG shrouds ready for quick-release hardware. Even industrial hard hats can feature M-LOK slots or Velcro areas designed for strap-on lights.
• Cycling helmets with curved shells use thin adhesive pad mounts for a snug, low-profile link.
• Tactical helmets with ARC rails accept quick-release rail-mounted brackets built for high-stress scenarios.
• NVG-ready helmets boast dovetail interfaces—perfect for shroud-compatible mounts.
Before you buy, take a close look at your helmet’s mounting zone. Scan for recessed pockets, raised rails or flat adhesive areas that match your planned mount. A mismatch here can crack polycarbonate shells under torque.
Always cross-check the compatibility specs from both helmet and mount makers to ensure a flawless fit.
Identifying Helmet Interfaces
ARC rails show off scalloped grooves that “click” when the mount seats properly. You’ll hear—or feel—a satisfying snap as it locks in place.
NVG shrouds, by contrast, use a standard dovetail slot. A gentle lateral wiggle helps confirm the mount won’t slide out under recoil or rough movement.
Ensure a snug fit every time to avoid equipment failure in the field.
• Check ARC rail width and count the grooves for rail-mounted fixtures.
• Match dovetail angles and flange dimensions so shroud-compatible brackets lock firmly.
• Confirm adhesive pad zones are clean, dry and smooth before pressing mounts on.
Some industrial helmets even accept M-LOK attachments—giving you modular light options. Velcro-backed mounts slide onto hook loops in seconds, no tools required.
Integrating Electrical And Optical Systems
When you add head-mounted displays or night vision, you’ll need a mount that routes power and data lines neatly. Look for models with integrated cable clips or channels to prevent pinching and clutter.
Certain mounts include pogo pins for direct power transfer to NVGs. The result? Fewer dangling cables and a faster nighttime setup.
- Ensure the cable path avoids visor and strap areas to keep your line of sight clear.
- Test power-pin alignment before you head into action—avoiding shorts in the dark.
- Use strain-relief ties on connectors to reduce stress and boost long-term durability.
Proper positioning aligns your beam with your eye axis. A slight upward tilt keeps hands and tools illuminated without blinding your forward view.
You might be interested in our guide on Dovetail Mounts for Night Vision Goggles for detailed compatibility charts.
With the right interface and a few quick checks, any helmet can become a dependable platform for tactical illumination.
• Clean mounting surfaces with isopropyl alcohol before attaching.
• Verify both mechanical and electrical interfaces fit snugly.
• Inspect mounts weekly after heavy use to catch wear before it becomes a problem.
Choosing The Right Helmet Light Mount
Finding the right helmet light mount boils down to balancing weight, retention strength, adjustability, durability, and profile height. Give your mounted light a gentle shake to see how it holds up. If the beam doesn’t wander under recoil or rough terrain, you’re on the right path.
Performance Testing
Begin by shaking your helmet along each axis for at least 10 seconds. This simple move reveals how securely the mount grips.
Then, tilt your head forward, backward, and side to side to mimic running or climbing. It’s a quick way to test real-world balance under dynamic conditions.
- Weight Impact: Mounts under 100 g reduce neck strain.
- Adjustability Range: Smooth pan and tilt axes allow precise beam placement.
- Profile Clearance: Low-profile designs cut snag points in tight spaces.
Material Comparison
Reinforced polymers act like built-in shock absorbers and shrug off corrosion in humid settings. Aluminum alloys, meanwhile, shed ounces without sacrificing rigidity—though they can feel cold to the touch.
- Polymers absorb shocks and add minimal bulk.
- Aluminum Alloys resist flex but may require protective coatings.
Adjustability feels a lot like tweaking a camera gimbal: you trade a bit of bulk for silky-smooth motion. Offset arms, for instance, behave like camera extension rods, swinging your beam around visors or NVG sensors with ease.
Adjustability Trade Offs
More tilt and pan range means better targeting, but each pivot point adds weight. Tight joints lock your settings against recoil, yet they sometimes demand a tool or a dab of lubricant. It’s the classic choice between gimbal dampening for stability and free-spin for speed.
Profile Choices
Low-profile mounts hug the helmet shell, slashing snag risks on brush or gear. Offset arms push the light beyond visors, action cams, or night-vision attachments.
| Feature | Low-Profile Mount | Offset Arm Mount |
|---|---|---|
| Snag Risk | Minimal | Moderate |
| Beam Angle | Straight Ahead | Adjustable Laterally |
| Weight Impact | Slightly Lower | Slightly Higher |
20-30% adoption increases in North America and Europe underscore how critical mount selection is for safety and performance.
Global demand for helmet light mounts reached millions in 2024. Industry leaders like BAE Systems, Thales Group, and Streamlight Inc. grabbed the largest revenue shares, while Asia-Pacific is poised for robust growth through 2031, driving demand in military, cycling, and industrial sectors. Learn more about this market projection.
Check out our comparison of night vision mounts in the Wilcox G24 vs Argus A4 guide for expert tips on optical interfaces.
1 Identify your helmet interface and weight capacity.
2 Perform shake and tilt tests to verify retention.
3 Compare material profiles for your operating environment.
4 Select a profile height that matches your activity’s risks.
By running these tests and weighing your options, you’ll pinpoint a helmet light mount that feels custom-built for your missions. Stay prepared and keep your beam rock-steady.
Installing And Maintaining Your Helmet Light Mount

A secure helmet light mount keeps your beam exactly where it belongs, even when you’re moving fast or taking a hit. Getting the angle, torque, and alignment right from the start pays off under pressure. A few quick checks before action can save you from dreaded mid-mission adjustments.
Step By Step Positioning
Begin by sliding the mount into your helmet’s shroud or rail until it clicks firmly in place. Next, tilt and pan the light so it centers in your line of sight—picture adjusting a mirror to catch daylight on your workspace. Finally, use a calibrated driver to tighten the screws to 5 N·m, ensuring you don’t strip the threads.
Numbered Setup Process
- Seat the mount interface fully
- Align tilt and pan with your eye axis
- Torque fasteners to 5 N·m
End this phase with a gentle pull test. If it holds steady, you’re ready to move on.
Troubleshooting Common Issues
Even a bulletproof setup can slip under recoil or rough terrain. A careless bump or worn washer might cause misalignment or rattling.
“A loose mount can throw your beam off target in split seconds,” says a veteran operator.
Quick Fixes
- Slippage: Retighten fasteners and inspect threads
- Misalignment: Realign tilt against a fixed reference
- Rattling: Apply a drop of thread locker or swap in fresh washers
Routine Maintenance Checklist
- Inspect mounts daily for cracks and wear
- Wipe interfaces with isopropyl alcohol every 10 minutes after heavy use
- Store in padded cases away from UV light and moisture
Safety And Legal Considerations
Helmet lights aren’t just practical—they often fall under specific regulations for tactical, hunting, or industrial use.
| Activity | Compliance Requirement | Notes |
|---|---|---|
| Tactical Ops | Follow agency SOPs | No unauthorized modifications |
| Hunting | Adhere to state game laws | Several states ban white light |
| Industry | Meet OSHA illumination rules | Keep brightness within spec limits |
Always verify local rules before heading out at night. And double-check that your mount adjustments don’t void your helmet’s safety certification.
Monthly Deep Maintenance
- Check and lubricate all moving parts to prevent wear
- Fully disassemble once a year; replace O-rings or gaskets
- Examine mounting interfaces for corrosion or fatigue cracks
Block out time in your calendar for these checks—it’s the best way to avoid surprises and extend your mount’s service life.
Treat your helmet light mount like any other precision tool. Replace stripped screws immediately, and carry a backup set of fasteners in your kit for quick field swaps.
Frequently Asked Questions
What Is a Helmet Light Mount and Why Do You Need One?
Think of a helmet light mount as a small bridge between your headgear and your flashlight. It locks a tactical light or compact torch onto your helmet, freeing both hands for other tasks—whether you’re checking a map in dim conditions or fine-tuning your gear.
Which Mount Style Fits Best With Night Vision or Cycling Helmets?
When you pair up with night-vision goggles, a shroud-compatible mount is the obvious choice. On the other hand, cyclists usually opt for a slim adhesive pad that hugs their helmet’s curves and keeps wind drag to a minimum.
- Shroud Mounts anchor onto NVG headgear for rock-solid stability.
- Rail Adapters slot into ARC rails on Ops-Core shells for rapid attachment and removal.
- Adhesive Pads stick to smooth cycling or safety helmets without adding bulk.
- Strap Mounts wrap around uneven contours for a universal fit.
How To Install a Helmet Light Mount
Start by cleaning the mounting area with isopropyl alcohol—any grease or dust will weaken the bond. Next, either slide your mount into the helmet rail or press the adhesive pad firmly against the shell.
Installation Steps:
- Push the interface in until you hear a distinct click.
- Tilt the light to line it up with your sightline.
- Hand-tighten screws to the manufacturer’s torque recommendations.
- Give the setup a gentle shake to ensure nothing shifts.
Always double-check torque settings to prevent stripped threads and keep your beam locked in place.
Maintenance Tips For Reliable Mounts
A little upkeep goes a long way toward avoiding surprises in the field. Inspect straps, clamps and adhesive pads weekly for wear and corrosion. Then, rotate your mount position monthly to distribute stress evenly.
- Check fasteners daily and re-torque as needed.
- Wipe contact surfaces with alcohol after heavy use.
- Replace O-rings and adhesive pads every 6 months.
- Store mounts in a dry case, away from UV and moisture.
Spending a few minutes on these tasks means your helmet light stays rock-steady when you need it most.
Ready to upgrade your kit? Check out Superior Tactical LLC for helmet light mounts built to last.